• Please visit and share your knowledge at our sister communities:
  • If you have not, please join our official Homebrewing Facebook Group!

    Homebrewing Facebook Group

Converting the Frigidaire 7.2 cu ft Chest Freezer

Homebrew Talk

Help Support Homebrew Talk:

This site may earn a commission from merchant affiliate links, including eBay, Amazon, and others.
Is 3/4" wood not big enough? That is what I just cut. I haven't assembled yet. I am going to glue foam insulation to the wood so hopefully that will help. The wood cost me $50 so I really hope 3/4" will work? Thoughts?

Awesome! Thanks guys.

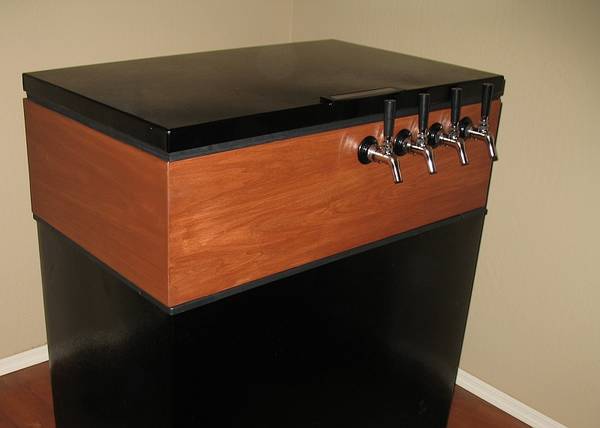
Got the collar all cut/joined/wood puttied and sanded. I just need to cut the holes for the shanks, temp contoller anb wires out the back. After that, I start staining. Nice to know that the Red Mahogany truns out looking nice. Maybe it was just the pine I was using that was giving it a purplish look. I have since moved to the Hemlock since my first attempt at a colar was a msierable disaster. I was trying to use a little better quality wood so I bought finished pine boards. The problem is that the are only 3/4" think so I was gluing two of them together around all of the sides. What a mess. Oh well...live and learn. I was a little afraid of the hemlock because I thought I wouldn't be able to find two boards that were straight. First two I picked off of the pile were near perfect. :)

I did have another question: What size hole saw for the shank holes? I think I read somewhere else the 7/8" works best. Can you guys confirm?

Also, for anyone else following this thread: My freezer (like most I would think) has a textured finish...almost rubberized. I found a nice paint that worked perfectly. I originally tried the Rustomeum Appliance Epoxy, but since it was enamel based it seemed to chip off a little easy. I could actually scrath it off with my finger nail after sitting for 2 days. This is what I ended up using (available at Lowes/HD):

http://rustoleum.com/CBGProduct.asp?pid=178

OVERVIEW:
New Rust-Oleum Universal is specifically formulated to work on diverse surfaces including wood, plastic, metal, brick, concrete and even vinyl. The Rust-Oleum Universal advanced spray system can spray from any angle — even upside down.

PRODUCT FEATURES:
For use on interior / exterior environments
One Universal coating for diverse substrates
Ultimate flexibility for extreme applications
Maximum adhesion for demanding substrates
Fast, efficient coverage
Fade and chip resistant
Rust preventative
2008 HANDY Innovation Award Winner​


This stuff is pure awesomeness! :)

Thanks again!

John
 
Is 3/4" wood not big enough? That is what I just cut. I haven't assembled yet. I am going to glue foam insulation to the wood so hopefully that will help. The wood cost me $50 so I really hope 3/4" will work? Thoughts?

I'm using 3/4" poplar...

I'm not done with the build yet, but I have attached it to the keezer just to see how it works, and it should be fine.

Some others in this thread have used 1" (actual 3/4") as well...
 
I used 1x6 maple, which is actually 3/4" thick. (Or was it 1x8...don't remember right this second and I'm not at home right now.) Worked just fine. It's been running for, what, a couple years now I think. I don't even have any foam insulation inside the collar. Very, very minimal temperature loss through the wood. Wood is a pretty good insulator in itself.
 
Cool. What are people that are connecting the collar to the top using to bind the two together?

I didn't use the top ... I put my own top on the collar ... but others who have reused the top just used some sort of adhesive (construction or silicone) and/or weatherstripping ... and at least one thread showed some angle brackets or other hardware to keep it secure.
 
Cool. What are people that are connecting the collar to the top using to bind the two together?

Do you mean attaching the collar to the freezer?

I'm using these: http://www.lowes.com/pd_315689-1277...urrentURL=/pl__0__s?Ntt=stanley+corner+braces

And these: http://www.lowes.com/pd_276821-2191...=1&currentURL=/pl__0__s?Ntt=self+drill+screws

Use the bracket screws (one the two outside holes on the bracket) for the collar, and the self-drill screws (one in the middle hole of the bracket) for attaching to the freezer.
 
For people worrying about the thickness of their wood. You can make the frame out of 3/4" thick wood but if you still have a concern you can cut some small strips and attach it along each edge, top and bottom. This will build it out and give the top and bottom more surface area. My collar is 1 1/2" thick because i wanted my collar to overhang the freezer body a 1/2" on the front face and both sides. The back of the collar sits flush with the back of the freezer.. That way i don't have to worry about the reveal being consistent and square.
 
I do that and I also have a wireless thermometer with the probe inside the keg. I just put the transmitter inside a ziplock bag, sanitize it and float it on top of the beer. The poured beer will typically be several degrees warmer in the glass than it is in the keg. I suppose the lines, shanks, taps and the glass itself warm up the beer some right away as it is poured.

how long is the probe on the transmitter? thats pretty cool. You think if you put it in a plastic back it would just float and the probe would not be in the beer providing correct temps.

I like your idea.
 
pola0502ds said:
For people worrying about the thickness of their wood. You can make the frame out of 3/4" thick wood but if you still have a concern you can cut some small strips and attach it along each edge, top and bottom. This will build it out and give the top and bottom more surface area. (snip)

Yeah, that's what I did on the bottom of mine. That also allowed me to create a lip for the gasket, since my collar is hinged.
 
Has anyone had to replace their gasket? I purchase a used freezer and on 1 corner of the lid, the gasket it raising up which doesn't create a good seal, I can almost see inside the freezer, it's that bad. I was thinking about removing the gasket and putting a shim in that location to push it down. Does anyone know if that will work?
 
how long is the probe on the transmitter? thats pretty cool. You think if you put it in a plastic back it would just float and the probe would not be in the beer providing correct temps.

I like your idea.

There is no probe on the transmitter. It's wireless as in RF. The transmitter is in a plastic zip lok bag floating on top of the beer. The only thing separating the beer from the transmitter is the wall of the thin plastic bag. I have a muffin fan running continuously in the freezer, so the entire keg should be of fairly uniform temperature, even at the surface. Close enough for me in any case. I have indoor/outdoor thermometers in all of my refrigerators and freezers. I like the min/max memory feature they have.
 
I got all my parts in from keg connection yesterday and I am going to install everything tonight, does it matter what the length of my hoses are for the co2 and beer line? I was just thinking about cutting enough hose to go from each connection plus enough slack on each connection so that if I need to move things around in any direction, I can. Is there anything else to take into consideration that would make me want to cut my lines longer or shorter?
 
The gas lines just need to be long enough so you can maneuver them and/or around them comfortably.

The beer line length does make a difference. Mine are six feet. That works well for me.
 
You know what i don't understand, I know they make a faucet that attaches directly to the liquid out disconnect that is attached a soda keg. There is no hose attached to it. How do they get it to work well?

Last night I hooked up my first keg and poured a glass. I first set it to 5 PSI and it came out nice but a little slow. Then i kicked it up to 10psi and it came out nice but a little faster. I really don't think anyone needs those charts because all you have to do is experiment. Those charts are most likely really useful for people who install draught systems that are rather large and where the kegs are stored a long distance from the faucets.
 
1. I have a brand new Love TS-13010 controller and I just checked it out. There is no delay. All of the parameters (d2 thru c3), which could affect a delay have a default value of zero. Cut power to the controller several times over a period of 10 minutes or so. Nope...no delay at all. None of my other controllers have a delay either.

2. IIRC, this is still a semi-free country. I don't think the power companies have the authority to issue such a broad regulation to manufacturers. Either it's code or it's not. If it is a code type regulation, I would think that it could be located somewhere.. Industrial groups would likely automatically reject the idea on the basis that it lacks flexibility.

3. Yes, small relays can be set up to operate larger relays. No surprise there. These controllers are nothing more than digital thermostats with a built in relay that handles line voltage. Some have more features than others, but they are still just simple digital temperature switches.

Hmm. Well, there is the possibility that I am wrong about this. I will check my controller again. My information is all hearsay, so I cannot say for sure.

I searched the web a little and I came up with a few items. This page says that the delay protects the compressor after a power outage (read 3rd paragraph).

This PDF page talks about power outage protection for the compressor also (1st paragraph).

This temperature controller information page says "Automatic Delay Restart (ADR)
Auto restart delay: Ensures on line quality after power failure, decreases power loading, and protects the compressor."

I think my information was basically correct, except for the "requirement" part.

I thought you said that you use a Love controller (or Ranco or Johnson) and that they had a built in default delay, so it should be easy for you to check.

The first link is completely irrelevant to our discussion. That link lists some high tech $16,000 freezers. Who the hell owns one of those anyway?

Can't open the second link, but also irrelevant. Most of the controllers have an adjustable parameter for anti-short cycle delay among others. We are talking about a mandated built in unavoidable start up delay.

The third link shows another obscure temperature controller similar to the Love's I guess. I did not bother to read the specs all the way through, but it looks similar. Again, nothing new here and nothing that isn't addressed by adjustable parameters on the Love's, Johnson & Ranco's.

It's not important. I was only curious about the non-existent regulation regarding start up delays built into these timers. I think I have the answer now. Thanks for your trouble anyway. That must have been a lot of work.
 
Anyone ever mount a Johnson A419 inside of the keezer? It's kinda bulky, and I'd like to get it out of the way....
 
2. IIRC, this is still a semi-free country. I don't think the power companies have the authority to issue such a broad regulation to manufacturers. Either it's code or it's not. If it is a code type regulation, I would think that it could be located somewhere.. Industrial groups would likely automatically reject the idea on the basis that it lacks flexibility.

boywithknife.jpg


I have designed a lot of things that get plugged into the walls in a lot of countries.

There are some horrible requirements if it is medical equipment. They don't want the patient getting shocked.
Military has EMP for when atomic bombs go off in the upper atmosphere, and TEMPEST requirements so the Russians can't tell what key was hit on an IMB Selectric typewriter.

There are some double insulation requirements that kick in to get a UL sticker, and sell the stuff.

But home brew electronics has one big requirement, not to put power back on the line during a power outage. They don't want line men getting electrocuted by your windmill.
 
Still working on mine - but this is pretty much what it's gonna look like...

IMG_2792.jpg


Thanks for all of the inspirations in this thread and others! :mug:
 
I realize some time has gone by jonodon, but did you paint the gasket, or did you purchase a new one? I'm just about to start a similar project to yours with a white chest freezer. I can only hope mine will look half as good as yours!
 
I'd like to know the answer as well. I need to purchase a new gasket as well as it's not sealing correctly. I would like to know where to get one or how to modify it so it does fit correctly. My freezer is white also but has a bunch of dents in it. I want to bondo it, sand it, and paint it black. Only think holding me back is the white gaskets. I'd like to know how you painted the gasket if you did. Seams to me, nothing would stick to it.
 
I attempted to turn my 7.2 into a keezer this weekend. It is functional, but I can't open the lid without rooming the tap handle. (Dogfish Head tap Handle)

Guess I'll have to rebuild, but im not sure what to do different. Anyone have the measurements of the sections of wood you used to build the collar?

If I understand your issue, the lid is bumping the handles (which are leanding backwards) when you lift it ... if that's the case, it seems like you could just put a spacer board behind the faucets to bring them farther forward ... if you have 5" shanks, you should have plenty of shank to do that ...

To explain my idea better, you would remove the faucets, drill out a 1x3 or 1x4 (or whatever you want, perhaps 2x if required) so that the holes match the existing holes in the collar, and then fasten the spacer board to the collar with the holes aligned ... then reinstall the faucets ... of course, I left out the details, such as staining the board, perhaps beveling the edges, etc., but you get the idea ...

But in any case, I'd go with a different tap handle before I'd rebuild my collar! ;)

Good luck!

That's what I was thinking. I could use a 1" shim that should correct the issue. For now, it works. I might re-build or I might Maguiver it.
 
Can't you just buy the metal attachment that goes on each faucet to angle it away from the lid? or whatever it is?
 
I thought you said that you use a Love controller (or Ranco or Johnson) and that they had a built in default delay, so it should be easy for you to check.

I did get around to it, and it turns out I goofed. The power-on delay is the same as the minimum off time in the Love controller. It always starts with this delay when you plug it in.

The first link is completely irrelevant to our discussion. That link lists some high tech $16,000 freezers. Who the hell owns one of those anyway?

Remember I said that only larger units have this delay. It should not be surprising then that this larger unit, and the other ones I linked to, has it.

I first came across this power-on delay during my career in HVAC in the early- to mid-80s. I am guilty of jumping to a foregone conclusion about the Love controller, but at least I knew about this delay and it does exist in larger units, required or not.
 
I did get around to it, and it turns out I goofed. The power-on delay is the same as the minimum off time in the Love controller. It always starts with this delay when you plug it in.


Remember I said that only larger units have this delay. It should not be surprising then that this larger unit, and the other ones I linked to, has it.

I've worked with these Mars;http://www.patriot-supply.com/products/showitem.cfm/MARS_32391
for years on supermarket remodels on the cold sections.
 
Back
Top