Closed and near-closed transfer from bucket to keg

Homebrew Talk - Beer, Wine, Mead, & Cider Brewing Discussion Forum

Help Support Homebrew Talk - Beer, Wine, Mead, & Cider Brewing Discussion Forum:

This site may earn a commission from merchant affiliate links, including eBay, Amazon, and others.

IslandLizard

Progressive Brewing
Staff member
Mod
HBT Supporter
Joined
Jan 9, 2013
Messages
22,103
Reaction score
12,728
Location
MD
After some experimenting the past 2 years, I've devised methods to be able to perform closed or near-closed transfers from buckets into kegs. This can be adapted to transfers into bottling buckets too.

Air free (oxygen free) transfers are crucial for NEIPAs, IPAs and other hoppy beers, but basically benefit any beer, preventing or at least limiting oxidation.

1. Semi-closed transfer:
  • Remove the lid from the bucket.
  • Insert the racking cane halfway between the beer level and the trub layer, using a bucket clamp to keep the cane in place along the side. Start the siphon.
  • Beer gets racked into a 100% liquid pre-purged keg through the liquid QD by gravity/siphon action.
  • CO2 escapes the closed keg through the open PRV or an open gas QD, as the keg fills.
  • Beer is still exposed to air because the bucket is open, lid is off. But it's only for 10-15 minutes.
2. A more refined method approaching a closed transfer:
  • The bucket lid remains closed.
  • It has the regular 3-piece airlock mounted.
  • Plus it has a 2nd, 1" access hole on the opposite side of the lid, normally stoppered with a solid bung, now containing a drilled stopper with the racking cane.
  • Once you start the siphon, beer goes into a 100% liquid pre-purged keg through the liquid QD by gravity/siphon action.
  • While it fills with beer, the CO2 from the keg is pushed out the gas QD, which has tubing connected to the airlock stem on the bucket lid.
  • The bucket headspace fills with CO2 from the keg as the beer level drops.
3. For a true closed transfer:
  • Same setup as 2.
  • With low CO2 pressure on the airlock stem, push the beer through the racking cane, tubing, and liquid QD into a 100% liquid pre-purged keg.
  • CO2 from the keg vents through the gas QD or PRV.
  • Once the siphon starts, you could route the keg's CO2 back into bucket headspace through the airlock stem, while disconnecting the CO2 from the tank. That would save 4-5 gallons of tank CO2.
1" access hole:
This 1" access hole is also used for adding dry hops, sugar syrups, or other additions to an active fermentation bucket under CO2. This is because while working CO2 is streaming in through the airlock stem, on the other side of the lid, into the headspace.

The access also allows me to use the back end of my long plastic brew spoon (it has a small rectangular paddle) to stir once or twice a day after dry hopping, or adding fruit etc.
 
I tried #1 with my last batch and it worked well, for a bit. Then I think some trub got into the line and clogged up either the QD or poppet.

I've got a NEIPA that will be soon ready to transfer. This bucket has a spigot, so I will be able to keep the lid on and feed the gas displaced from the keg back into the bucket through the airlock hole. Hopefully no clogs this time!
 
How would you liquid pre-purge a bottling bucket?
My brew bucket lids seal well enough to create enough pressure to push out the Starsan/water. Whatever is left can be purged upside down.

It may not be perfect, but it beats transferring into a wide open bucket and having the beer exposed to air until the last bottle has been filled, which takes at least 30-45 minutes for a 5 gallon batch.
 
I tried #1 with my last batch and it worked well, for a bit. Then I think some trub got into the line and clogged up either the QD or poppet.
Don't know if you started racking from the middle, somewhere between the beer level and the trub layer, then lowering the cane slowly as the beer level drops. Having that flow inverter tippy on the bottom of the racking cane prevents yeast and trub from being sucked up early. Tilting the bucket toward the cane keeps the beer well you're siphoning from deeper.

Using that method I've been able to rack/siphon down to the last quart of beer before it started picking up some yeast, at which time I stopped the transfer by pulling the liquid QD off the keg post.

Sticking the cane (with the diverter tippy) all the way down on the bottom in the trub is surely going to clog things early on.

For #2 and #3 the main problem is you can't see well inside the bucket, to know what's going on, where things are.
You stand to lose siphon if not lowering the cane deep enough. With a light behind the bucket you can sort of see where the cane is in relation to the beer level. I have an o-ring on the cane marking the lowest cane level, above the trub. Now when you tilt the bucket, the trub slides forward, so keep an eye on what goes into racking hose. Be prepared to stop the flow on a dime.

I've rehearsed #2 and #3 with water several times, I'm still not fluid with those, but it's coming along. Having a second set of hands available is an asset, although it can be done by one person, as long as you know what to watch for and when. Be ready to stop the siphon any time.
 
I've rehearsed #2 and #3 with water several times, I'm still not fluid with those, but it's coming along. Having a second set of hands available is an asset, although it can be done by one person, as long as you know what to watch for and when. Be ready to stop the siphon any time.

I think those who might try these methods--which I'm all in favor of, btw--need to know that it's a process to get where you want to go. It probably isn't going to go perfectly smoothly the first time or two, but it won't be worse than doing nothing, and it'll allow one to work out the kinks.

When I went from BIAB to a RIMS system w/ LODO stuff, well, that's been going on for about 16 months. Only recently have I started to have smooth brew days. Yeah, it's complicated, but again, not worse than what I was doing.

I think purging a bottling bucket is a huge leap forward for those who do bottle conditioning. It's a little fiddly, but it can be done. The biggest problem, I'd think, is having CO2 to purge. But it is readily do-able.
 
I think purging a bottling bucket is a huge leap forward for those who do bottle conditioning. It's a little fiddly, but it can be done. The biggest problem, I'd think, is having CO2 to purge. But it is readily do-able.
Of course we've been forgetting the most obvious... instead of a bottling bucket a keg can be used. Then bottle from the un-carbonated keg.

Sure, one needs to have CO2 available to use any of those methods.
 
Don't know if you started racking from the middle, somewhere between the beer level and the trub layer, then lowering the cane slowly as the beer level drops. Having that flow inverter tippy on the bottom of the racking cane prevents yeast and trub from being sucked up early. Tilting the bucket toward the cane keeps the beer well you're siphoning from deeper.
Started from the middle and got about 2/3 of the way through, but then lowered the autosiphon a bit too much. I'll pay closer attention next time!
 
I transfer to a keg and bottle from that. It's a bulky setup, but once you get started, you can bottle off a whole batch quickly. If I can get a picture to upload, I'll add it.
 
I transfer to a keg and bottle from that. It's a bulky setup, but once you get started, you can bottle off a whole batch quickly. If I can get a picture to upload, I'll add it.
The setup.
IMG_20171022_211319.jpeg
 
Started from the middle and got about 2/3 of the way through, but then lowered the autosiphon a bit too much. I'll pay closer attention next time!
Using a bucket clamp is the easiest way to keep the siphon or racking cane in place along the side. When there's 2-3 inches of beer left to go slowly tilt the bucket toward the siphon to keep the beer well deep.

You really need to watch you don't start sucking air, that's disastrous. If it does or if you need to interrupt the transfer for whatever reason, pull that QD off that keg immediately. You can always reprime, but never remove the air bubbling through the beer.
 
My brew bucket lids seal well enough to create enough pressure to push out the Starsan/water. Whatever is left can be purged upside down.

It may not be perfect, but it beats transferring into a wide open bucket and having the beer exposed to air until the last bottle has been filled, which takes at least 30-45 minutes for a 5 gallon batch.

I'll have to give it a try some day, though I have not had any serious oxidization issues with traditional bottling methods. I am sure it is there, but my IPAs don't get worse or darker with age after bottling. Then again, I drink enough that they don't last much more than a month.
 
I'll have to give it a try some day, though I have not had any serious oxidization issues with traditional bottling methods. I am sure it is there, but my IPAs don't get worse or darker with age after bottling. Then again, I drink enough that they don't last much more than a month.
I like @daveMN's idea on bottling from a (corny) keg even better. I never thought of that. It can be 100% liquid pre-purged, and it's easy to purge the headspace if necessary.

As long as you have access to CO2 there's a lot more one can do to prevent potential oxidation.
I now pretty much work under CO2 with everything beer after fermentation starts.
 
Success! Just transferred a NEIPA from my fermenting bucket to keg. I use silicone tubing to connect the bucket spigot to the liquid QD, remove the airlock from the bucket lid and run vinyl tubing from the gas QD back into the bucket.
 
Question re: purging--how about using the fermenting CO2 to purge bottling bucket?
@schematix I think did the writeup on using ferment-in-keg-to-purge-another-keg method.
 
I tried a method similar to Method 2 for my last two batches. The difference is that I ferment in a bottling bucket, so I went directly from the spigot to the liquid QD instead of using a siphon through the top.

The first time it seemed to go pretty well. The second time, I wound up giving up and taking the lid off of the keg and just siphoning to the bottom of the keg like I had in the past. That was after beer sprayed on my shirt, my floor, and across the kitchen onto the refrigerator.

The main issue is that the spigot isn't very high up on the bottling bucket, so it jammed immediately. When I was done racking the beer and I looked at the bottom of the bucket, the trub was as high as the top of the spigot.

Also, I don't recall this happening the first time, but on my second attempt the CO2 exited the keg as soon as I attached the gas QD (which was hooked up to the airlock on top of the bucket). I heard a big 'whoosh' noise, and then the keg was empty - before any liquid got in there.
 
The main issue is that the spigot isn't very high up on the bottling bucket, so it jammed immediately. When I was done racking the beer and I looked at the bottom of the bucket, the trub was as high as the top of the spigot.
That's a lot of trub!
Perhaps stick a tight-fitting elbow in the spigot, so you can siphon from an inch or so higher up? Then toward the end start tilting the bucket to transfer as much beer as possible. Do a 'dry run' with a gallon or 2 of water.
Also, I don't recall this happening the first time, but on my second attempt the CO2 exited the keg as soon as I attached the gas QD (which was hooked up to the airlock on top of the bucket). I heard a big 'whoosh' noise, and then the keg was empty - before any liquid got in there.
A liquid pre-purged keg usually contains some pressure. When pulling the PRV or sticking a QD on the gas post, that excess pressure will be released. But the keg isn't empty, it is 100% full of CO2! That's exactly what we're after.

Before starting the beer transfer, the excess keg pressure should be released first, anyway. Otherwise the excess CO2 will bubble up your racking assembly, into the fermenter, possibly rousing the trub if the cane hangs deep. At the same time you'd also lose your siphon's prime.

It takes a few times and perhaps a few simulated 'dry runs' to get all the mechanics worked out.
For example, I use a racking cane, not an auto siphon, so it needs to be primed ahead of the transfer.

To prime the racking assembly:
  • Submerge the racking hose in the Starsan bucket, it's now filled with Starsan.
  • Attach the QD.
  • Attach the now full racking hose to the top of the racking cane. It's already inserted into the 1" bung.
  • Take the solid bung out of the bucket lid's 1" access hole.
  • Stick the racking cane inside that hole, the cane is held in position by the drilled bung.
  • To prime the assembly with beer, push the QD's poppet (using the back end of a nail set) over a spill container.
  • The Starsan rushes out and starts to siphon the beer.
  • When all beer comes out the QD, release the poppet.
  • Spray the QD with Starsan, it's ready to transfer as soon as you push it onto the liquid post.
  • Just make sure the keg is deflated, has no residual CO2 pressure, or you will blow the CO2 back through the racking assembly into the fermenter.
It may look complicated, but becomes second nature after a few times, that's what 'dry runs' are for. It only takes a few minutes to prep the siphon that way.
 
That's a lot of trub!
Perhaps stick a tight-fitting elbow in the spigot, so you can siphon from an inch or so higher up? Then toward the end start tilting the bucket to transfer as much beer as possible. Do a 'dry run' with a gallon or 2 of water.

A liquid pre-purged keg usually contains some pressure. When pulling the PRV or sticking a QD on the gas post, that excess pressure will be released. But the keg isn't empty, it is 100% full of CO2! That's exactly what we're after.

Before starting the beer transfer, the excess keg pressure should be released first, anyway. Otherwise the excess CO2 will bubble up your racking assembly, into the fermenter, possibly rousing the trub if the cane hangs deep. At the same time you'd also lose your siphon's prime.

It takes a few times and perhaps a few simulated 'dry runs' to get all the mechanics worked out.
For example, I use a racking cane, not an auto siphon, so it needs to be primed ahead of the transfer.

To prime the racking assembly:
  • Submerge the racking hose in the Starsan bucket, it's now filled with Starsan.
  • Attach the QD.
  • Attach the now full racking hose to the top of the racking cane. It's already inserted into the 1" bung.
  • Take the solid bung out of the bucket lid's 1" access hole.
  • Stick the racking cane inside that hole, the cane is held in position by the drilled bung.
  • To prime the assembly with beer, push the QD's poppet (using the back end of a nail set) over a spill container.
  • The Starsan rushes out and starts to siphon the beer.
  • When all beer comes out the QD, release the poppet.
  • Spray the QD with Starsan, it's ready to transfer as soon as you push it onto the liquid post.
  • Just make sure the keg is deflated, has no residual CO2 pressure, or you will blow the CO2 back through the racking assembly into the fermenter.
It may look complicated, but becomes second nature after a few times, that's what 'dry runs' are for. It only takes a few minutes to prep the siphon that way.

Thanks for this! It should have been obvious to me, but for whatever reason, when the excess pressure was released from the keg (and pulling on the PRV didn't do anything) I didn't realize the keg was still filled with CO2. I don't know what I was thinking. Next time I'll release the pressure before doing any connections. Then I'll hook up the gas QD from the keg to the top of the bottling bucket (through the airlock), then I'll hook up from liquid QD from the spigot to the keg. Hopefully I don't have beer squirting on my shirt like last time!

As for the amount of trub - I definitely agree! It's happened twice to me, and both times were with 'bigger' beers. This past one was a Bell's Two Hearted recipe, and the first tone was over 8% if I'm recalling correctly. With the amount of dry hops and the amount of grain, there was a lot of trub. I typically just pour everything into the fermenter though. I'm going to start getting a whirlpool going, then siphoning into the fermenter, to try to leave more junk behind. That should hopefully lead to less trub.

I'm also going to make a bottling bucket with the spigot 1/2"-1" higher. I have an extra bucket, and an extra spigot, so I'll just drill the hole a little higher than my current bottling bucket. When I make beers over 6-6.5%, I'll use the bucket with the higher spigot.
 
I'm also going to make a bottling bucket with the spigot 1/2"-1" higher. I have an extra bucket, and an extra spigot, so I'll just drill the hole a little higher than my current bottling bucket. When I make beers over 6-6.5%, I'll use the bucket with the higher spigot.
An elbow should give you the exact control of height you need without extra drilling. The only thing is, you can't really adjust it after it's filled with wort/beer, like a rotating racking arm could. Unless you're brave and adventurous...

Too bad they don't make low profile 'plugs' for those bottling bucket holes.

Make sure those spigots are taken apart and cleaned thoroughly. I found a black slime between the 2 main rotating 3/4" plastic barrels.
 
That's a lot of trub!
Perhaps stick a tight-fitting elbow in the spigot, so you can siphon from an inch or so higher up? Then toward the end start tilting the bucket to transfer as much beer as possible. Do a 'dry run' with a gallon or 2 of water.

A liquid pre-purged keg usually contains some pressure. When pulling the PRV or sticking a QD on the gas post, that excess pressure will be released. But the keg isn't empty, it is 100% full of CO2! That's exactly what we're after.

Before starting the beer transfer, the excess keg pressure should be released first, anyway. Otherwise the excess CO2 will bubble up your racking assembly, into the fermenter, possibly rousing the trub if the cane hangs deep. At the same time you'd also lose your siphon's prime.

It takes a few times and perhaps a few simulated 'dry runs' to get all the mechanics worked out.
For example, I use a racking cane, not an auto siphon, so it needs to be primed ahead of the transfer.

To prime the racking assembly:
  • Submerge the racking hose in the Starsan bucket, it's now filled with Starsan.
  • Attach the QD.
  • Attach the now full racking hose to the top of the racking cane. It's already inserted into the 1" bung.
  • Take the solid bung out of the bucket lid's 1" access hole.
  • Stick the racking cane inside that hole, the cane is held in position by the drilled bung.
  • To prime the assembly with beer, push the QD's poppet (using the back end of a nail set) over a spill container.
  • The Starsan rushes out and starts to siphon the beer.
  • When all beer comes out the QD, release the poppet.
  • Spray the QD with Starsan, it's ready to transfer as soon as you push it onto the liquid post.
  • Just make sure the keg is deflated, has no residual CO2 pressure, or you will blow the CO2 back through the racking assembly into the fermenter.
It may look complicated, but becomes second nature after a few times, that's what 'dry runs' are for. It only takes a few minutes to prep the siphon that way.
What I do to purge the racking tubing going into my "bottling keg" is to attach the QD to the end of the racking tubing and attach a carbonation cap to the QD. When I start the transfer, it allows me to fill the line with beer, purge out the first bit of trub from the fermenter, and get a hydrometer sample. Then I disconnect the carbonation cap and attach to the keg (pressure released, of course). Gravity does the rest. Note also that I will depressurize by hooking up the gas QD and tubing to the keg so the gas line is purged with CO2 before connecting to the top of the FV.
 
What I do to purge the racking tubing going into my "bottling keg" is to attach the QD to the end of the racking tubing and attach a carbonation cap to the QD. When I start the transfer, it allows me to fill the line with beer, purge out the first bit of trub from the fermenter, and get a hydrometer sample. Then I disconnect the carbonation cap and attach to the keg (pressure released, of course). Gravity does the rest. Note also that I will depressurize by hooking up the gas QD and tubing to the keg so the gas line is purged with CO2 before connecting to the top of the FV.
Sure, you can do that because you drain from the bottom of your fermenter, by gravity. The instructions to prime the racking assembly are for brewers not having a bottom drain, needing to rack over the top. Although the siphon can be started by applying a little CO2 pressure to the headspace, as in method 3) in the OP.
 
For bottling bucket, how about just putting the siphon in, and putting clear wrap to cover as much of the opening as possible to limit air exposer?
 
I suppose that would be better than doing absolutely nothing, but as the beer is drawn out air will definitely find its way in, so through the duration of the transfer the surface is exposed to badness ;)

@IslandLizard's option 3 is the way to go...

Cheers!
 
@day_trippr , I've been really researching closed transfer lately and had a question.. .
how do you keep your beer line from clogging as you're transferring?
I experimented with this years ago and had horrible clogs and ended up oxidizing my beer much worse trying to resolve them than if I had just siphoned into an open keg...
Do you have a 5/16" beer line that you use? A modified QD that won't clog with hop particles?
Thanks in advance!
 
A few things I do:

- my ss racking cane is 3/8" OD, so I use 3/8" ID vinyl tubing (big box store stuff - the horror! ;)) clamped to the cane - and to the threads of a standard 1/4" MFL style QD (you can literally screw the QD into the tubing then clamp it tight). This provides much less resistance than standard 3/16" ID beer line - and actually fits without any adapters.

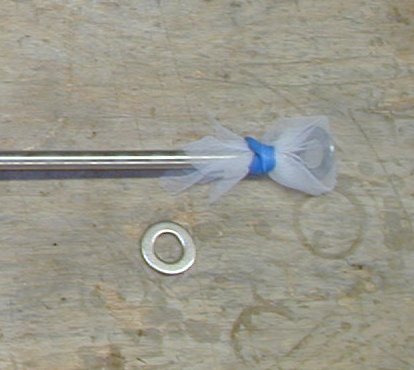
- at the business end of my cane I rubber-band some nylon paint strainer bag material with an SS washer within. The washer keeps the mesh "bag" from collapsing or being sucked into the cane.

CO2_push_rig_05.jpg


- and I cold-crash first, for two days typically, which really slams hops/trub/yeast right to bottom pretty firmly.

- Finally, when I start the flow, I position the end of the cane a good couple of inches above the debris, then when the beer level drops close to the end of the cane I'll gradually lower the cane to get the last bit of goodness into the keg. Note: though all of this I have a wedge under the carboy to tilt it back a bit which concentrates the last of the beer at the low side, where the cane tip ends up.

I don't leave hardly anything behind yet have never plugged a keg poppet, never mind a racking line...

Cheers!
 
How about bottling in a bucket that has a spout and sealing the lid as soon as you rack?
 
How about bottling in a bucket that has a spout and sealing the lid as soon as you rack?

If you get a good seal on the lid, nothing will come out when you open the spigot. Or air will have to go in through the spigot which would oxidize the beer far worse than having the lid off.

Hold a water bottle upside down to get the picture.

There needs to be air or you could introduce co2 to replace the beer as it flows out.
 
A few things I do:

- my ss racking cane is 3/8" OD, so I use 3/8" ID vinyl tubing (big box store stuff - the horror! ;)) clamped to the cane - and to the threads of a standard 1/4" MFL style QD (you can literally screw the QD into the tubing then clamp it tight). This provides much less resistance than standard 3/16" ID beer line - and actually fits without any adapters.

- at the business end of my cane I rubber-band some nylon paint strainer bag material with an SS washer within. The washer keeps the mesh "bag" from collapsing or being sucked into the cane.

View attachment 662885

- and I cold-crash first, for two days typically, which really slams hops/trub/yeast right to bottom pretty firmly.

- Finally, when I start the flow, I position the end of the cane a good couple of inches above the debris, then when the beer level drops close to the end of the cane I'll gradually lower the cane to get the last bit of goodness into the keg. Note: though all of this I have a wedge under the carboy to tilt it back a bit which concentrates the last of the beer at the low side, where the cane tip ends up.

I don't leave hardly anything behind yet have never plugged a keg poppet, never mind a racking line...

Cheers!

For years when I've needed a fine mesh filter media my 'go to' has been Swiss voile. It's commonly used as the sheer lining material behind window curtains, and easily obtainable at fabric stores.

I don't know what the mesh count is, but I know it catches stuff that gets by a 300 micron filter, so it's really fine. Since it's temperature stable up to 500F and stays pliable well below freezing it perfect for use in BIAB. The surface texture is very 'slippery' and tends not to clog up in use. It's not as stiff as paint strainer nylon and will conform around just about any shape. I've even used it as a 'pre-filter' around a coarse pleated filter in a cartridge filter housing. It's pretty good stuff.

Brooo Brother
 
Sounds expensive for the task :)
Stiffer might be better, less likely to collapse...

Cheers!

I think the last time my wife bought some it was like $23 per yard (either 3 feet or 4 feet wide; I don't pay much attention to fabric purchases) so either 9 sq' or 12 sq' (or $2-$2.50 per sq'). You only need a few square inches. I've never had problems with collapsing around a siphon end, even without any sort of support ring. I used to do that when siphoning wine to keep from siphoning wood chips and seeds and skins from grapes from the fermenter into the aging carboys. Now I use a pump with pre-filter that saves my back but doesn't filter any better (or any worse) than the Swiss voile.

Brooo Brother
 
[shrug] I can make many years worth of screens out of one $5 paint strainer bag.
Been doing this for years, never plugged a single beer post, and I end up with little more than a coating of trub in the bottom of spent kegs so I don't see the need to spend more...

Cheers!
 
Many thanks to IslandLizard for this thread - it has been a huge help for improving my process!

I saw this thread several months ago and decided to give this process a try. The first 3 attempts worked - in the sense that I was able to get the beer into the kegs without ever removing the fermentor bucket lids - but they were pretty much a disaster. My basement floor was just covered in Star San and slopped beer, I had little segments of tubing and QD's scattered about, tripping over half-full buckets of this and that… just a total disorganized mess. Plus, it was taking waaay too long. I realized that if I don't streamline the process, I'm going to start talking myself out of doing it.

To that end, over the weekend I built a little stand for holding the fermentor at an appropriate height above the floor. The surface where the bucket sits is a board that has hinges so I can tilt the bucket forward as it drains. Tall wooden stops prevent the bucket from sliding off when I use the hinges. Wooden posts on each side of the bucket platform provide supports for me to clamp the gas and liquid tubing so I’m not putting too much strain on the bucket grommets and encouraging leaks. These posts tilt with the bucket so the strain relief is always maintained - see photo.

I also built a wheeled cart (barely visible in lower left of photo) with a self-priming diaphragm pump on it that I use to draw Star San (or water or PBW, etc.) from a bucket. This cart will primarily be used for pumping cleaner through my draft lines, but it also comes in really handy for this packaging process.

For liquid purging the kegs, I dump Star San into them through the open lid using a funnel, until they are about 85% full or so. Then I seal them, open the PRV, and use the pump to push star san into the kegs until it starts to spit out of the PRV.

The pump has a little pigtail of 3/8" ID tubing on the outlet, and my racking cane is fitted with 3/8" tubing and a liquid QD. To top off the kegs with Star San, I insert the suction end of my racking cane into the pigtail coming off the pump, and connect the racking cane's liquid QD to the keg. This way, I kill 2 birds with one stone - maybe 3, actually: 1) I top off headspace of keg with star san; 2) I sanitize the racking cane for the upcoming transfer of precious beer; and 3) I prime the racking cane for siphoning.

When the star san starts spitting from the keg PRV, I quickly switch off the pump, disconnect the QD, pull the racking cane out of the pump pigtail, and carefully set the racking cane assembly aside, still full of Star San.

I always do 10gal batches so I always have 2 buckets of beer to keg. At this point, I use CO2 to push the star san out of keg #1 into keg #2, until I see it start to sputter, at which point I disconnect the jumper between the 2 kegs. I invert keg #1 and use the residual CO2 pressure inside it to push the last bit of Star San out of the gas post and through a length of tubing, which also provides me with a purged CO2 line. I connect that line to the fermentor airlock.

Then, I take the star-san-filled racking cane, attach the little black nub thing on the suction end of it, and insert it into the bucket lid using the drilled stopper. I use a pen to open the QD and start the siphon. Then, I attach the QD to the keg and the beer starts to flow, pushing CO2 out the keg and into the bucket headspace.

I place a little LED light face down on the bucket lid, which illuminates the interior just enough for me to clearly see the level of beer in the bucket. When it starts to get low, I tilt the bucket toward the racking cane using the hinges. I used to do this tilt manually and just hold it there, but I'd always inadvertently jostle the bucket and kick up trub. The hinge makes it easy to gingerly tilt the bucket and stick something under it to hold it in a fixed position.

This worked amazingly well… I might have had 3 ounces of "wasted" beer left behind, tops. It wasn't even enough to fill a hydrometer tube more than half way.

Capture.PNG
 

Latest posts

Back
Top