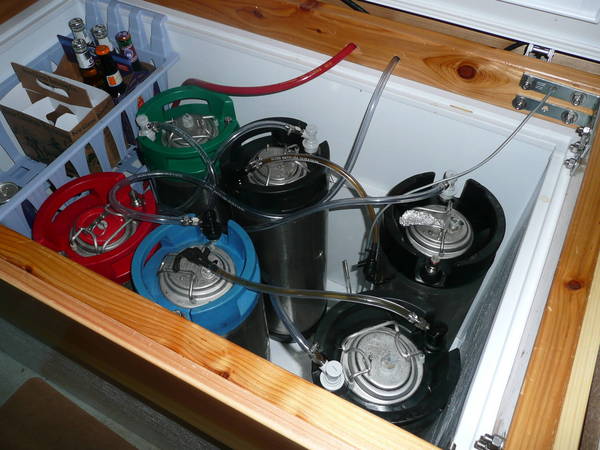
Nice job on making your keezers... I made my keezer slightly differently based on some other variations I saw on this site somewhere. I went with a 48" wide Whirlpool Chest Freezer that I luckily found on CL for $125. It was basically in brand new shape. This size allows you to load 8 Ball Lock Kegs for both serving and lagering without having to use the hump or removing the inner shelf ledges. They just barely fit and you have to remove the baskets to get 8 in but they do fit.
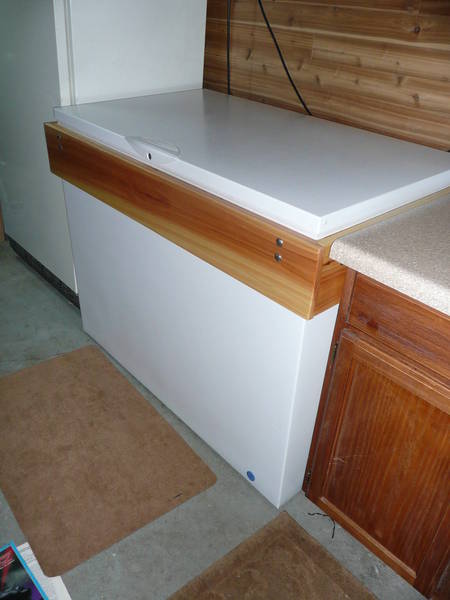
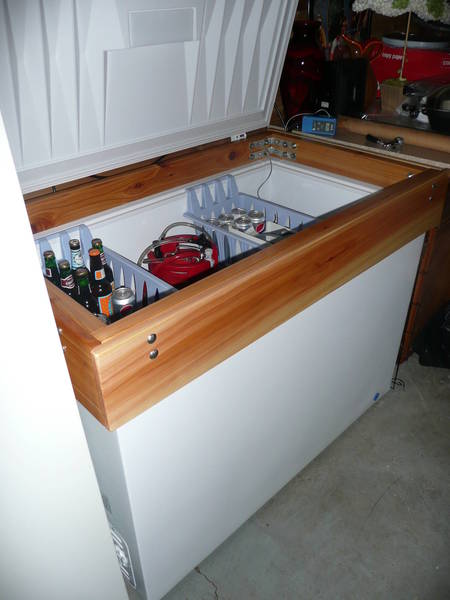
I located the CO2 tank in a cabinet next to the keezer and use the hump to store about 2 cases of bottles in six packs. The collar I made sat both on top of the opening and down the sides so that I could hide the joint between the two materials and provide a cleaner look. I used regular 2x4 Red Cedar for the wood that sat on top of the keezer and used clear 1x8 Red Cedar with a nice grain pattern for the wood section that fit around the sides of the keezer. I splurged and bought SS angles and SS Carriage Bolts to give the hardware a finished look. I put neoprene Home Depot weatherstripping between the wood and the top of the sides to seal the gap between the wood and keezer airtight. This approach gave me enough head space to fit the kegs and CO2/dispensing hoses and still match the top of my keezer with my countertop height in the basement. Having space for filled bottles on the hump in a definate plus. I sanded the heck out of the cedar and finished with a few coats of regular clear semi gloss polyurethane for a nice natural cedar look that matches my basement walls.
I went with picnic taps for now but may add outside taps. Makes for a bit of a mess with all the hoses inside but I have not finished mounting the CO2 distribution hardware. One thing to note is that putting the CO2 tank inside the keezer will give you false readings on the CO2 remaining so I moved it all outside in a bottom cabinet with a dual regulator so I can both carb and serve at different pressures and still have a CO2 hose accessible from inside the cabinet for pressurizing kegs or doing transfers from Carboys to Kegs.
Here are some pics to see what I mean. Still a work in progress to finish mounting everything where it works out best. This setup with part of the collar coming down along the sides also makes the keezer look less top heavy.

") Picnic taps work great and are cheap.
Picnic taps work great and are cheap.


![Craft A Brew - Safale BE-256 Yeast - Fermentis - Belgian Ale Dry Yeast - For Belgian & Strong Ales - Ingredients for Home Brewing - Beer Making Supplies - [3 Pack]](https://m.media-amazon.com/images/I/51bcKEwQmWL._SL500_.jpg)