• Please visit and share your knowledge at our sister communities:
  • If you have not, please join our official Homebrewing Facebook Group!

    Homebrewing Facebook Group

Cheap & Easy 10 Gallon Rubbermaid MLT Conversion

Homebrew Talk

Help Support Homebrew Talk:

This site may earn a commission from merchant affiliate links, including eBay, Amazon, and others.
I built this according to plan, but used two (for stiffness) nylon washers in place of the interior SS washer. Works great; no leaks when 80% filled. Leaks 1 drop every 5-10 minutes when filled to the brim. I can live with that.

This was my first all-grain, so I may be doing something wrong, but when vorlaufing my wort did not clear up very much. I did 4-5 quarts and there was slightly less particles than when I started. These particles were numerous, but were smaller than flecks of salt or pepper. Almost as if they were the proteins coagulating? Or is my SS hose a bit too porous? Or nothing to worry about? There were definitely no substantial chunks of husk...
 
I would just keep recirculating until your wort is as clear as you want it. I usually recirculate atleast 3-4 gallons of wort before I start sparging.
 
I would just keep recirculating until your wort is as clear as you want it. I usually recirculate atleast 3-4 gallons of wort before I start sparging.

Good to know. I see some people saying that usually vorlauf only 2-3 quarts... I thought perhaps something was wrong with my braid's connection (knocked it loose while stirring?), but it appeared to be alright post-mash.
 
slight variations on the design:
1. my Igloo cooler had a rather large spigot seal, so I added a 5/8 washer used for the hot water line on a washing machine. it seals around the nipple and snugs right up to the inside of the cooler.
2. i saw the solution of adding a barb + cap to the end of the stainless hose and went a step further. i added a 3/8" FIP Tee (watts #A-758) inside the cooler and used two 12" hoses that reconnected to each other via two barbs (watts #A-294) and a 3/8 FIP connector (watts #A-760). The added weight will keep the hose from floating for sure AND i assume the efficiency will improve slightly thanks to better coverage by the stainless hose.
Note 1: I had hell finding 5/8" stainless washers, so I gave up and bought 1/2 and 3/4 washers instead. I used my step drill to open up the 1/2" washers (one per side of cooler) to 5/8" size, then backed them up with 3/4" washers.
Note 2: I also added a second 3/8" MIP x 1-1/2" nipple (watts #A-786) and a 3/8" FIP coupling (watts #A-760) inside the cooler to keep the stainless hoses centered in the cooler.
Here are some shots of the parts before and after assembly:
IMG_0260.jpg

IMG_0265.jpg
 
Looks nice..........there wasn't really a need for all the teflon tape on all the parts. Just the parts that would leak outside.
 
i know that only the threads outside the cooler need the teflon for sealing.
the teflon on fittings inside the cooler is for ease of disassembly. i've had parts gall together in the past. an ounce of prevention...
 
Just finished mine today. Instead of a hose barb inside, I used a 1/2" FIP to 3/8" FIP adapter and screwed on my bazooka screen and keg adapter. It fits perfectly, and held up great to a massive Imperial Stout mash today. Not a leak in sight.
 
I put together a 2 gallon and 5 gallon version of this today. Have a 10 gallon on order from Ace Hardware.

I couldn't find 5/8 in fender washers at 4 different stores so I tried flat washers and they haven't leaked. I bought some vinyl tubing but ended up using a 1 1/2 inch section to secure the braid to the MIP and the Head Plug held the opposite end down nicely.

On the 2 gallon I forgot the SS washer on the inside but I have no leaks. Is it a must have on the inside? I spent a good ten minutes tightening everything down and would hate to redo it but will if needed.

I bought a little hacksaw for 4$ at home depot and was able to saw through the braid in about 30 seconds.

Another thing I noticed: Rubbermaid seems to be going away from the victory labels. I found the 5 gallon at target for 16.99 on sale - blue without the victory label. At Menards I found the orange with the victory label and with the same label as the blue one I got at target so I'm guessing they are the same coolers?

Also I first picked up the 2 gallon for 19.99!! at Ace but found it later at Menards for 8 dollars. I did see the 10 gallon at a hardware store for 69.99 but will go with one on order from Ace for 49.99.

I am now ready to do some big beers in the 10 gallon, regular beers in the 5 and test batches in the 2. Lots of practice now that I will be going all grain.

I've been downing my last extract Hefe and am ready for another batch and want to get in on the 9/9/9 Barleywine but both may sound like they may be slightly difficult for a beginning all grain brewer but might as well dive right in...
 
my coolers smell aweful. any reason to worry? or a little pbw and starsan?
If they smell awful, I bet they might contribute awful flavours as well, at least to some really light beers.

Try a soak in PBW, Oxiclean, or bleach solution. Just be sure to rinse REALLY well (many times) afterwards.
 
Just a heads-up... I just returned from Home Depot where I picked up a Home Depot branded Rubbermaid 1610 10 gallon cooler for $39.97. Home Depot item #875-786.
 
If they smell awful, I bet they might contribute awful flavours as well, at least to some really light beers.

Try a soak in PBW, Oxiclean, or bleach solution. Just be sure to rinse REALLY well (many times) afterwards.

After all that...meaning when they are cleaned, if they still smell, pour half a box of baking soda in there and fill with warm water.....leave them soaking for several days or even a week, then drain and rinse...Baking soda's amazing at absorbing odors from things (like smelly refrigerators.)
 
Every few brews, I fill up my MLT with starsan and leave it overnight. Totally clears up any smells left in there, and the stainless gets nice and bright and clean. Then I rack the starsan to my primary so it can sit in there until it's ready for wort.
 
I just made my MLT with a 10gal Rubbermaid. Tested it for leaks before and after I attached the braid. I followed the revised directions (put the braid over tubing with notches). The discharge rate/force was a bit less with this on, I suppose this is normal right? as the water must go through the holes to leave the cooler. Nonetheless, an easy build that I am excited to use once I get my new kettle.

RJ
 
Just a heads-up... I just returned from Home Depot where I picked up a Home Depot branded Rubbermaid 1610 10 gallon cooler for $39.97. Home Depot item #875-786.


SWEEEET! Just scored one. B@$t@rd at the counter in Home Crapo the other day told me he couldn't get me one (little did I know he had an alterior motive :mad:). I walked in today with the part number you posted and lo and behold, they had one in stock. It was the last one, and it was for "Store Use". The guy that searched the number for me tonight sold it to me! The pr!ck that "searched" the system for me the other night didn't want to give up the last one! :mad: When they come looking for it, it's going to cost them 70 bucks, just like if he bought it online. I have to go convert a cooler. l8r
:rockin:
 
SS Washer can't be found for the time being:
I know it isn't a really good or correct solution but in a pinch (places that would have the stainless washer not being open the rest of the weekend), you can use a fourth washer on the outside with 3 of the 5/8" O-rings between the cooler and the ball valve and an extra O-ring between the cooler rubber seal and the inside barb.

No hose SS clamps or vinyl tube (they cost too much anyway):
Cut short pieces of the vinyl tube from the inside of the braided supply. Use the same way as someone else suggested for using the short pieces of vinyl tube in just the plug end and barb end of the braid. I've trimmed the nylon fibers as short as possible (Hopefully so short they won't have an effect) - Scratch that. The plug doesn't fit into that tube. Plug the braid for wieght then crimp then end.

If anyone sees anything seriously wrong with this (ie concerns about the nylon) let me know before I drink this stuff. I'm doing Edwort's Haus Pale Ale. I'm going to go with a little modification if I can. I will mash at around 155 for a little less body and a little more alcohol.
 
I had a tough time finding a stainless washer too. Ended up having the guy at the hardware counter at Ace Hardware find one for me. They had them in stock, but for some reason they weren't with the other stainless steel stuff.
 
If they smell awful, I bet they might contribute awful flavours as well, at least to some really light beers.

Try a soak in PBW, Oxiclean, or bleach solution. Just be sure to rinse REALLY well (many times) afterwards.

I also push water through mine in reverse to dislodge any particles stuck in the braid.
 
Thanks for the wealth of info! I was able to get this 12gal cooler for damn cheap and plan on making my MLT out of this (http://www.walmart.com/catalog/product.do?product_id=9729814). Problem is, there's no thru-wall outlet. I'm planning on making a copper manifold to attach to a thru-wall nipple, so:

1) What is the best way to go thru the cooler walls, and which size hole given that i'm planning on 1/2" fittings (nipple, valve, etc.)

2) Does anyone have a quick & dirty parts list based on the 1/2" fabrication plan?

I'm trying to wrap my head around the assembly, and i'm hitting the store tonight and i don't wanna buy a butt-load of incorrectly sized hardware (washers, nipple, etc.)

Thanks in advance.
 
I found 1/2 SS fender washers at Ace, no luck at The Home Depot. The people at Ace seem more willing and capable of helping. They don't have WATTs parts, so have the descrition of the parts when you go there.
I was going to use an old cooler I had, but it sort of smeels, THD have coolers 40+ quarts for under $30 with spickots on them. So I plan on finishing this tonight, went to THD and Ace yesterday to get all my parts, cost was about $30 with tax.
I plan on drilling out the SS fender washers to 5/8
 
I was able to get this 12gal cooler for damn cheap and plan on making my MLT out of this . Problem is, there's no thru-wall outlet. I'm planning on making a copper manifold to attach to a thru-wall nipple, so:
1) What is the best way to go thru the cooler walls, and which size hole given that i'm planning on 1/2" fittings (nipple, valve, etc.)
2) Does anyone have a quick & dirty parts list based on the 1/2" fabrication plan?
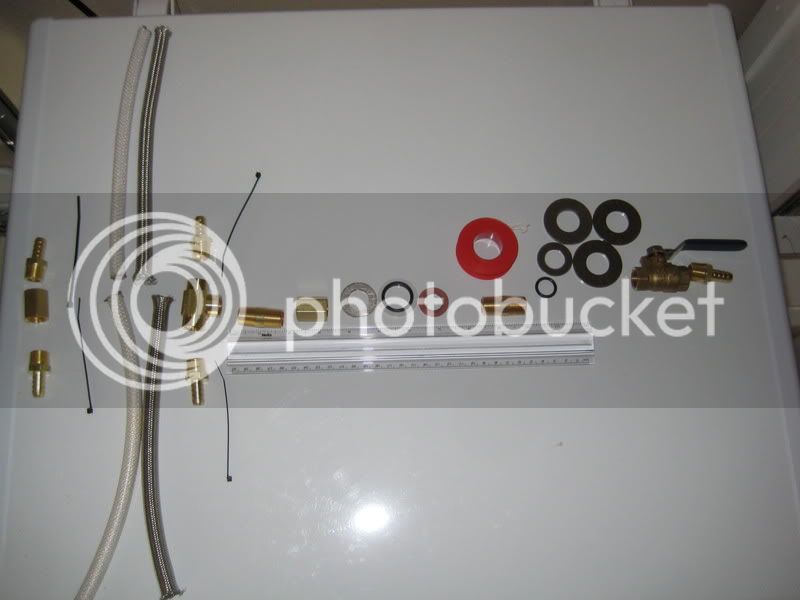
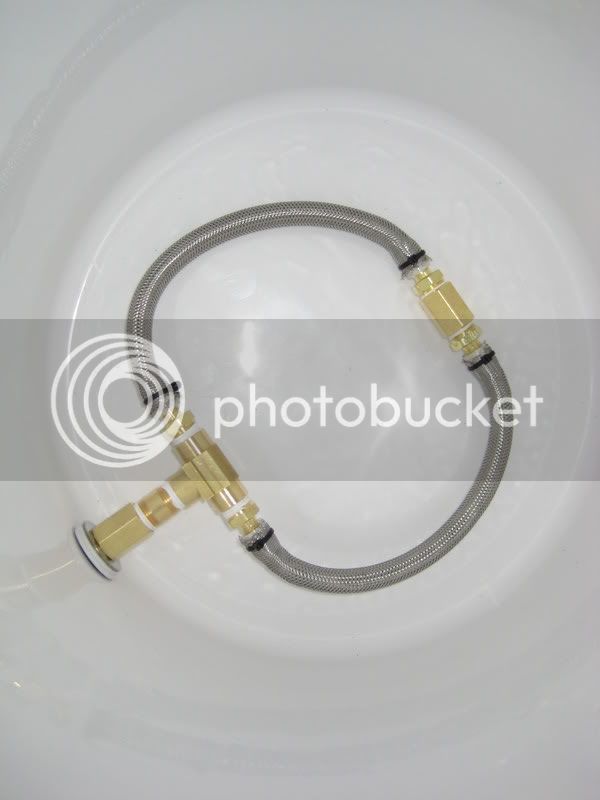
I use a similar 48qt Rubbermaid. Difference is mine had a spigot, not that it makes a difference. You have to drill it out anyway. The 1/2" pipe fittings need a 7/8" clearance hole. What worked well for me was putting a larger hole in the outer wall of the cooler and only sealing on the inner wall. Here’s my set-up using a plastic ball valve.


MLT6.jpg
 
Great. What did you seal the inside of the cooler (mash-side) with, that won't break down or negatively affect the wort?
 
Great. What did you seal the inside of the cooler (mash-side) with, that won't break down or negatively affect the wort?
I used a .91 ID x 1 1/2 OD neoprene bonded to stainless washer on both sides of the 1/2" pipe thread.

Edit: I've been playing with the round false bottom from a round Igloo cooler, but will be going back to my braided strand.

MLT7.jpg
 
In addition, to anyone who's used a 1/2" nipple i guess, which sizes of o-rings and washers fit the nipple well enough to prevent leaks?
 
for ss washers, your best bet is a marine supply shop (that is of course if there are any in your area). I just picked the closest one out of the phone book, called, and they had it.

To the OP, this was truely a great how-to. Easy and saved me a bunch of money! Thanks!
 
Back
Top