• Please visit and share your knowledge at our sister communities:
  • If you have not, please join our official Homebrewing Facebook Group!

    Homebrewing Facebook Group

Cheap and easy aeration gadget

Homebrew Talk

Help Support Homebrew Talk:

This site may earn a commission from merchant affiliate links, including eBay, Amazon, and others.
Well, I am very interested in this, but I had a performance question. About two brews ago, I switched from the whirlpool/siphon method or transferring to the dump the BK into a strainer method. Would the Venturi be as or more effective as dumping the brew (splashes and all) into a strainer, which would then cause there to be multiple small streams dropping into the bucket?

T
 
I swear someone ran some numbers on that and found them to be about equal. I cant find it though, so could just be talking out of my backside. Either way, it is a whole lot easier than picking up 5gal of wort and dumping it.
 
Just to update, I finally got this gadget working well (previous attempts were foiled by hops clogging my pickup tube on my kettle, false bottom to the rescue).

I brewed some of Da Yopper APA on Sunday, and after cooling I used the gadget. I could hear it sucking in a lot of air, and it created a ton of foam in the fermenter. Fermentation took off by the next morning, and by that evening I needed a blow off tube (first time I’ve actually needed one of these). I’m very happy with this little cheap homemade gadget.
 
I have been using one of these made from a section of copper tubing and it works great. FWIW, I cut a bunch of copper sections and tried various configurations: crimped tube, straight tube, multiple holes, different size holes, different hole locations. What ended up working best for me was a 1.5" section of straight 3/8" OD copper tubing with a single 1/16" hole in the middle.
 
Is it really necessary to insert the thinner 'Venturi' tube in the middle of the transfer tube as many seem to do? Would the Venturi effect be the same by simply using a few inches of the thinner tube(with the hole) as the wort leaves the bottom of the transfer tube??
Sorry if this has been answered already, just don't have time at the moment to read the whole thread!

Thanks

L

As long as it's never submerged i don't see why not. but others may have differing opinions or actual tests ;)
 
Larso said:
Is it really necessary to insert the thinner 'Venturi' tube in the middle of the transfer tube as many seem to do? Would the Venturi effect be the same by simply using a few inches of the thinner tube(with the hole) as the wort leaves the bottom of the transfer tube??
Sorry if this has been answered already, just don't have time at the moment to read the whole thread!

Earlier in the thread, someone claimed that it's better to have a length of tube after the air enters, since it prolongs the contact time (of the bubbles with the wort). But I haven't tried this yet either way -- so this is the blind leading the blind.

EDIT: Here's the post I'm thinking of (#13).
 
Thanks tophmck, read that. Makes some sense I suppose. Would love to borrow a do meter and do some testing
 
You should, Larso! It would be great to nail down how much the placement matters, and to double check that this actually gets the wort close to 8 ppm...
 
I'm going to try this into my plastic primary, got it in the other day and just waiting for a brew day. I'm hoping to have a similar effect when I pour the wort in.

http://www.usplastic.com/catalog/item.aspx?itemid=37444

Not to burst your bubble before you use it, but be prepared for it to clog. I have one and have tried to use it twice over the years. Both times it clogs pretty quick with hot break/cold break and hop debris.

Just thought I would mention it so you keep an eye on it. :mug:
 
Not to burst your bubble before you use it, but be prepared for it to clog. I have one and have tried to use it twice over the years. Both times it clogs pretty quick with hot break/cold break and hop debris.

Just thought I would mention it so you keep an eye on it. :mug:

Yeah it does. I have to watch it constantly! Using a drain and tube helps to wash the trub away from the filter to the wort can pass through though. Just pouring it in doesn't work really well.
 
Should my Venturi leak when starting off? Tried this today by strangling a section in the middle of my PVC transfer tube with 2 jubilee clips and I pierced a hole between the clips with a heated paper clip. It seemed to work when it gets going but leaked a little when starting (just did a dummy run with water). Is this normal?
 
Should my Venturi leak when starting off? Tried this today by strangling a section in the middle of my PVC transfer tube with 2 jubilee clips and I pierced a hole between the clips with a heated paper clip. It seemed to work when it gets going but leaked a little when starting (just did a dummy run with water). Is this normal?

yeah. you can cover the hole when you start pumping if the leak bothers you. if you are siphoning that can be a little tricky but if you're only opening a ball valve if shouldn't be too hard.
 
Made one of these by using a small section of copper in the middle of my transfer tube. Drilled a 1 mm hole in it. Transfer tube is1/2 inch and copper is about 8mm inner diameter. Damn thing just leaked all the time. I'm wondering if the flow from theboiler needs to be full on to achieve the Venturi effect? Only filled boiler about 1/3. Do you need a good head of pressure for this to work?

Thx

L
 
Thanks tre9, must do another test run with more water an see what happens
 
Hey Guys,

I read a fair chunk of this thread, very clever stuff!

I have figured my own version which requires nothing more than drilling 2 holes in a little bottler, and the great news is that the little bottler still works 100%!

Drill hole 1/4 way up Little Bottler adapter, push the wand fully home, drill again through same hole, so this time through the wand.

Little bottler - with holes misaligned.
Aerator - with holes lined up!

Here it is...
bottler.jpg
 
I used this on a Coopers kit to aerate the water top-up which is fermenting now.
For AG, I guess I could use it to syphon from boiler to fermenter, up to now I have relied upon a hefty pour with good results.
 
I found this when I visited Beer Beer and More Beer aka Morebeer.com in California.

I was just perusing and for a couple bucks figured I'd try it out. I use it with my CFC and it seems to work GREAT!!!

Wort gets a good head of foam on it and my fermentations have all been solid. This has been the only aeration I've used on the last 6 batches.

Wort Aerator.JPG
 
Just threw a Venturi rig together and used it on Saturday with excellent results! Video below... :ban:[ame="http://youtu.be/Ef0Ls4H4ufU"]http://youtu.be/Ef0Ls4H4ufU[/ame]
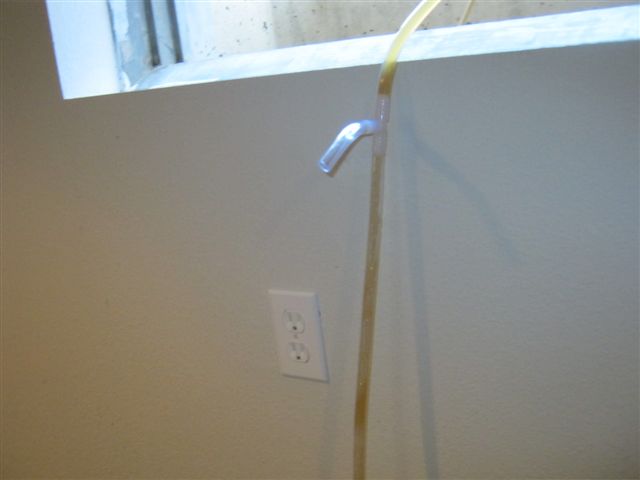
 
Forgot where i read about this, but I just did a similar thing with some spare hose i had to transfer from my kettle to the fermenter.

I just took my thermapen and stabbed like 20-25 holes in the end of my 3/8ths tubing, it works really great.
It can be hard to see in the video, but you can definately hear it! The sound you hear in the video is all from the tubing sucking in air, not just background noise.

The key i found is to keep the holes closer to the kettle, the vacuum seems to be much stronger as it gets sucked out of the kettle which causes a lot of air to get in...the lower holes dont seem to contribute as much as the ones near the top...maybe its just in my head, but it sort of makes sense.

Even with a crapload of holes it doesnt leak with the ball valve fully opened...there is a microscopic amount of fluid that comes from the holes but just sits there and doesnt flow down the tube or anything...not that i care as even if it leaked it would still make it into my kettle.

Theres a huge stream of white from the air bubbles coming from all sides all the way down my 5' of tubing into my fermenter.

 
Last edited by a moderator:
This build inspired me to make my own aerator using the Venturi effect. I didn't want to buy an aeration stone and I was struggling with this build and it's effectiveness/ use of the Venturi effect.

So I went to the drawing board and came up with what I call the Wormaeter it is free and takes two minutes to build and is extremely effective. It definitely uses the Venturi effect I even conducted an experiment on you tube to prove it. It worked every time for me with no hassle.

If your interested check out this thread.

https://www.homebrewtalk.com/f51/wormaeter-free-quick-effective-wort-aerator-383836/#post4815599

Thanks for the inspiration!

Cheers
 
Wow, what an ingenious idea! I've learned all about Bernouilli's Law and the venturi effect, but I'd never thought of using it to suck air into wort! Definitely going to have to try this.

One question: There is an obvious trade off where the venturi tube is placed.
1. Immediately after leaving the BK. This allows the longest amount of contact time between the wort and the air bubbles
2. Mid way down/near the bottom. Wort is traveling faster, creating a greater vacuum and pulling more oxygen in.

Can anyone confirm which has produced better results?


I'd also like to point out something that was mentioned much earlier in this thread (sorry I don't know the name of who mentioned it, but you take the credit for this one). Some sort of perforated plate should be placed immediately downstream of the venturi tube. This would serve to produce more turbulence and to break the bubbles into smaller bubbles, increase surface area and the rate of diffusion of oxygen into the wort. However, this is quite a restriction, and I'm not sure what effect this pressure loss effect would have on the rate of oxygen intake is.

Thanks again for this! Now no more lifting 50lb carboys!
 
Wort doesn't travel faster further down the tube. It's all travelling the same speed unless you have a smaller pipe.

If you put some sort of diffuser inline, pressure before the diffuser would be higher. You might end up with wort exiting the holes rather than air entering them.
 
So then putting this device right after the spigot to my BK will provide maximize its benefits?
 
Heres another version of an inline T. Sorry about the bad picture but you can see all the air being pulled in below the T. I think it helps to have an 8-10 foor drop into the basement.

Brew day 016.jpg


Brew day 015.jpg


Brew day 013.jpg


Brew day 012.jpg
 
So then putting this device right after the spigot to my BK will provide maximize its benefits?
+1 and all my future brews. This method took me all of 5 minutes and aerated my wort as much as I would have wanted to. Thank you for the quick cheap fix. No more agitating or splashing as my only aerate method.
 
Back
Top