BruControl: Brewery control & automation software

Homebrew Talk - Beer, Wine, Mead, & Cider Brewing Discussion Forum

Help Support Homebrew Talk - Beer, Wine, Mead, & Cider Brewing Discussion Forum:

This site may earn a commission from merchant affiliate links, including eBay, Amazon, and others.
I got it working... like my wife says, I can't leave well enough alone. I'm running a slightly older SQL2012 instance, so I used the 2012 MDF file as described in the install docs.

Steps:
1) Execute the new BC exe, then make sure BC is closed (this was the only way I could find to get the updated settings.brusettings file)
2) Extract the MDF file to a known location and attach the MDF file to your SQL instance (I used SSMS to do so).
3) Rename the database to something friendly, I chose BruControl.
4) Modify the connection string in the settings.brusettings file to the following:
<DBConnection>Data Source=ServerName\InstanceName;Database=BruControl;Integrated Security=True</DBConnection>
5) Start BruControl - check the controller log file for errors.

This took me a few iterations, and there may be something missing - please feel free to correct/update the info

Joe
RiverCity, we must have been doing the exact same process at about the same time. I was just coming over to post that I had got it working as well on SQL 2014 using pretty much the exact same steps as above. The only issue I have seen so far is that a ton of my formatting of elements, digital gauges, text etc have all changes and I have to reset all of those elements again. But DB connectivity appears to be working. Nice work sir.
 
I wouldn't think the database option would have anything to do with your element formatting, that should all be contained in the settings files.
 
I wouldn't think the database option would have anything to do with your element formatting, that should all be contained in the settings files.
I wouldn't think so either. I even tried restoring the default.brucfg file from the backup but formatting and placement is drastically different. It got a little better by changing the Environment theme back to what I was using previously but only restored minor things.
 
This "resetting" may be a function of our update to newer versions of the controls (any pics might help). I just realized this isn't noted in the change log (we suck at documenting all these)! LMK if you can't get your elements back the way you want manually.

Element ID should be determinable via a script, but I *think* this is not quite right yet. For example:

new string whatitis
whatitis = "Dispenser Temp" ID
print whatitis

I need to check on this. If this doesn't work, you should be able to cross-check them to the config file. Not ideal... we'll discuss how to expose this list best.
BrunDog,

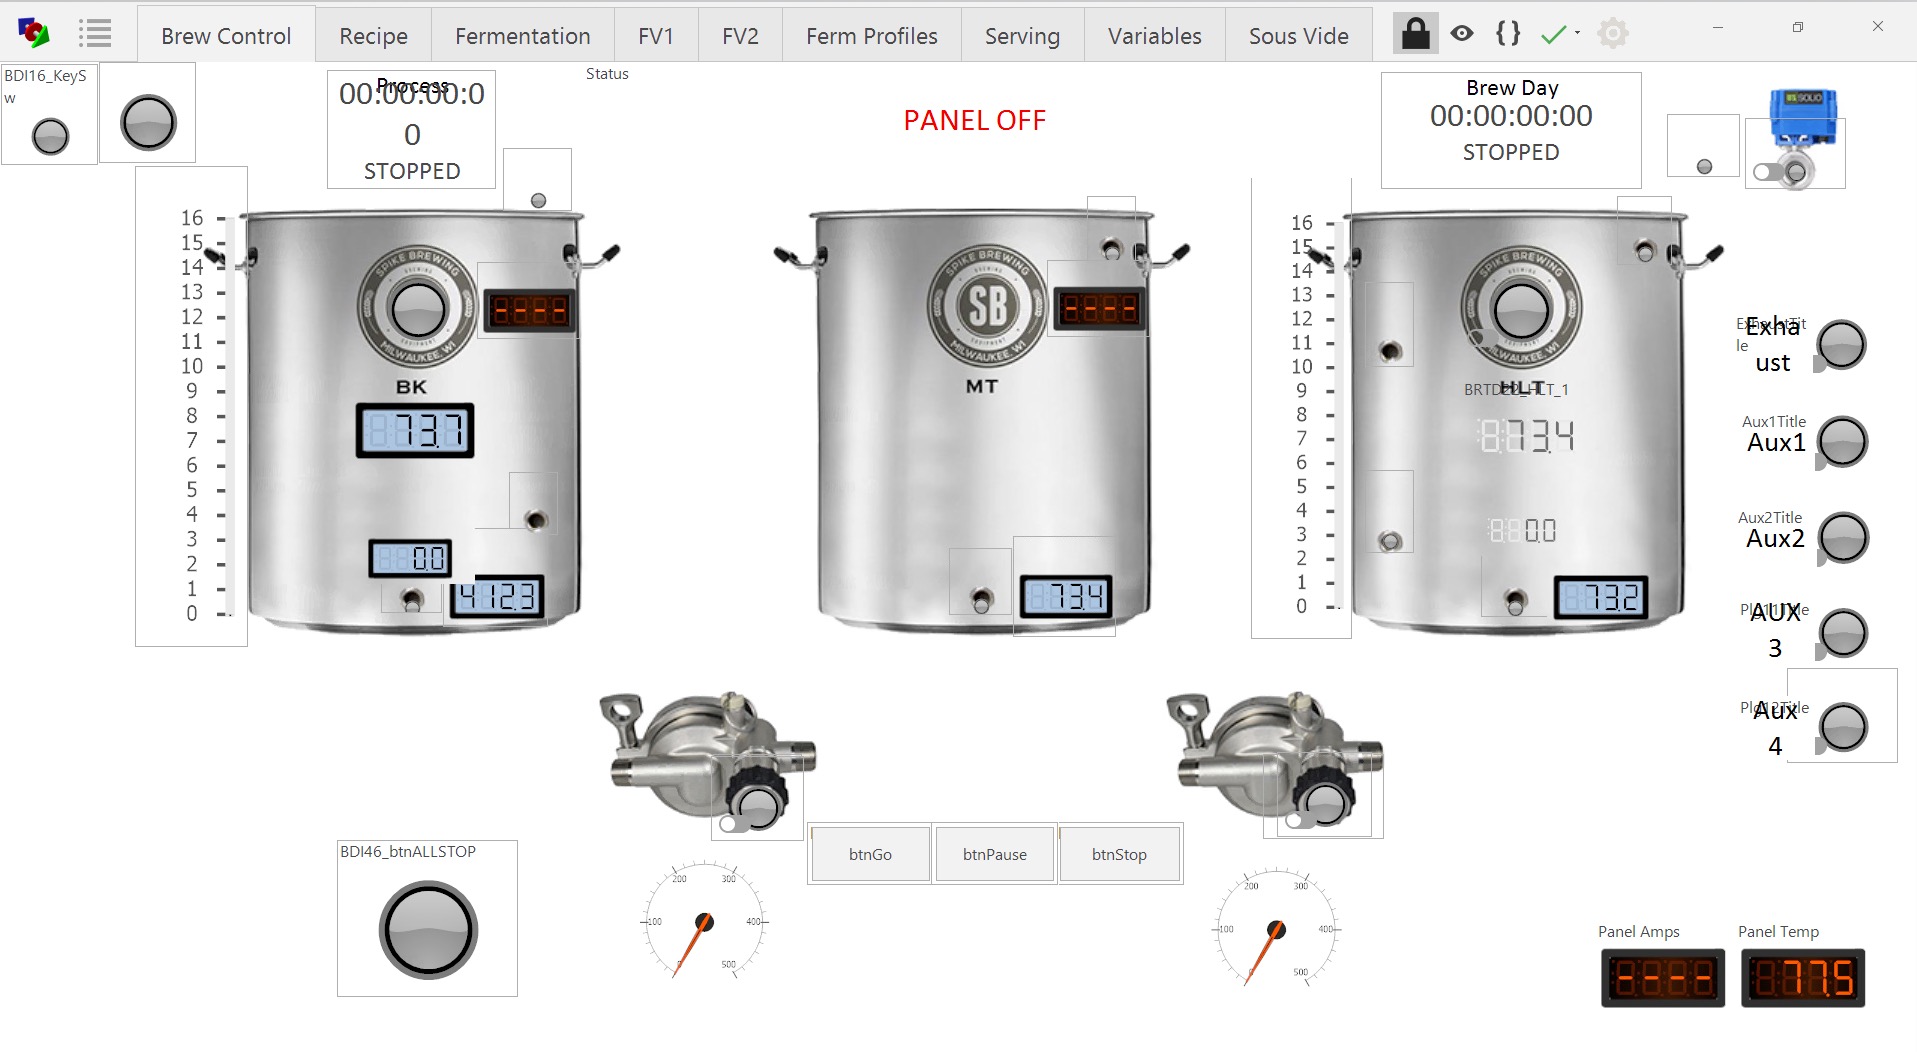
Looks like it may be more of a case of the default font family, size, etc getting changed from what I had set under Element Appearance Settings. I think the larger and different font is what moved some stuff around. As far as the gauge format changing, etc. I am not sure. Sorry the pics aren't great but here is a before and after. Can see the font sizes and colors most places and the gauge type on the right hand kettle. I had already reset the others.
Original.png

Screen Shot 2020-06-25 at 1.10.58 PM.jpg
 
The text, alignment and gauges definitely seem to be the changes I made to the "default" Element Appearance Settings not carrying over. Anything that was modified away from default stayed as I had put it. But anything that was using Default got changed to the standard default. Same thing for visibility in regards to the element names, etc. As I have modified these back close to what they were before alignment etc is much better.

If it doesn't by default, it would be nice if the element appearance settings that have been changed for the defaults would carry over as well.
 
I appreciate the details and pics. I'm afraid I'm not sure how we can control this without a ton of effort given all the different themes that everyone is using. We'll disclaim the Installation Product Note to let everyone know to expect possible changes and to capture a screen shot of their existing configuration. Cheap way out - I admit, but we need to direct our attention to the firmware and finalizing this release.
 
I appreciate the details and pics. I'm afraid I'm not sure how we can control this without a ton of effort given all the different themes that everyone is using. We'll disclaim the Installation Product Note to let everyone know to expect possible changes and to capture a screen shot of their existing configuration. Cheap way out - I admit, but we need to direct our attention to the firmware and finalizing this release.
No problem sir and I understand fully.

All of the issues I was experiencing appear to be related to what I had set previously when I changed the Element Appearance settings to make the Default as.
There appears to be two options that would have made it easier for me.
1. Make note of what I had set the default Element Appearance properties to so I could put it back..
2. Be consistent with how I created elements. Either use default or not but mixing between the two is what led to the discrepancies in the layout.
The digital gauges that were correct were once that I had manually changed the style on, the ones that were wrong were still set to use "default" and had been created after I changed the default view in the appearance settings.
I went back through and made the setup more consistent so that should help going forward but for a future update if the "Default Element Appearance" settings could be stored somewhere in the configuration file to be loaded back into the software that would make a world of difference, but I realize this is way down low on the list.
 
The script exposing the device ID does work, just clunky for doing 100's of elements.
RiverCity, When you ran the script that BrunDog provided have you compared it against a SQL table name. I ran the script and got a unique ID but could not match it to a SQL table. When I looked at the default.brucfg file and compared the UID returned by the script was actually the PortID not the ID that SQL was using. When I looked up the table from just the ID field I was able to query and get data. Was curious what your experience was.
 
Ya, I think this is in the list of things to be fixed. We just need to make sure we don't break the ability to change the InputPortID property of dependent devices such as Hysteresis, PID, and DeadBand.
Thanks. Wanted to make sure I wasn't missing something. Looking up the ID via the default.brucfg file worked fine
 
RiverCity, When you ran the script that BrunDog provided have you compared it against a SQL table name. I ran the script and got a unique ID but could not match it to a SQL table. When I looked at the default.brucfg file and compared the UID returned by the script was actually the PortID not the ID that SQL was using. When I looked up the table from just the ID field I was able to query and get data. Was curious what your experience was.

HA! Oops, I just checked that the script returned something, not that what it returned was actually correct! Open mouth, insert foot...

Edit: After looking at what it returned and checking the config file, I see what you are referring to about returning the PortID for the device vs the element ID. Global IDs are returned correctly though.
 
Last edited:
If anyone is experimenting with the new SQL database and want an easy way to get a list of element names and their corresponding ID without having to search through the default.brucfg file I have put together a PowerShell script that generates a text file with the Element Name, ID, and Element Type. Example shown below. I am not sure how to attach a file so I have included the PowerShell code below as well. Just need to copy it into Notepad and save it as a .ps1 file and run it in Powershell. It will generate a text file on your desktop called ElementIDs.txt. This should make it easier till the issue that BrunDog mentioned in a previous post is taken care of. If you have any questions or need any help please let me know.

Output
BDO34_HLTELM - f4a39ba6-7f90-4246-9575-184966cb142b - (DeviceElement)
BDO36_BKELM - 1a8c9a2f-6165-4288-b083-45b2700db299 - (DeviceElement)
BK_TARGET_TEMP - 706b0100-fc96-487a-a2b2-881dcd66b1f5 - (GlobalVariableElement)

PowerShell Code
Code:
#Get BruControl Folder Path
$BCPath = [Environment]::GetFolderPath("MyDocuments")
$BCPath = $BCPath + "\BruControl\default.brucfg"
#Text File Path
$OutFilePath = [Environment]::GetFolderPath('DesktopDirectory') + "\ElementIDs.txt"

#Create Text File
New-Item $OutFilePath

#Read BRUCFG file as XML
[xml]$CFGFile = Get-Content $BCPath


$Data = $CFGFile.Configuration.Workspaces.Workspace.Elements.Element

#Read through each Element and log Name and ID to text file
foreach ($Element in $Data)
{
    $ElementData = $Element.Name + " - " + $Element.ID + " - (" + $Element.Type + ")"
    Add-Content -Path $OutFilePath -Value $ElementData
}

You need to replace "default.brucfg" with "your_config_name.brucfg"
 
You need to replace "default.brucfg" with "your_config_name.brucfg"
Helibrewer, Good call. I only have the one brucfg file but if you have multiple or have renamed it then yes you would need to change the file name in the script to match as you have mentioned. I hadn't seen or tried multiple configurations before. Thanks for pointing this out. I can see a use for that going forward.
 
Helibrewer, Good call. I only have the one brucfg file but if you have multiple or have renamed it then yes you would need to change the file name in the script to match as you have mentioned. I hadn't seen or tried multiple configurations before. Thanks for pointing this out. I can see a use for that going forward.
Thanks, it's a nice little tool
 
Hell yeah, I'm looking forward to the database as it such a pain now to save all of my graphs from brew day.
Quick note regarding log files: logging is now off by default in v1.2. If you want to continue keeping log files (they automatically delete after 30 days), please enable this setting on a per-interface level. It is set in Settings... Interfaces... [interface]... Edit... Diagnostic Logging.
 
Couple more questions:

1.) What is the "Integrated I/O" option when purchasing the Uniflex?
2.) What are the minimum computer requirements for BruControl? OS/Processor/RAM
3.) Does the Uniflex Dual Vessel Option control one vessel at a time? How is the active vessel output selected? A GUI element or a script variable, etc...?

Took an hour and made a test - multi-step mash interface but haven't really pursued anything beyond this.

A couple things I've noticed is the laggy interface and intermittent "lock-up" or stalling of the script at times. Perhaps I need to upgrade to Win10 (as BruControl appears to written against WPF vs. WinForms) and get actual hardware, like a PID or the Uniflex, etc... The scripting language takes a bit to get used and isn't as "full blown" as a normal programming language but the manual helps some. Being able to lasso multiple controls and move then in a group would be useful (more accustom to the Visual Studio editor). Documentation could be a bit more expansive but most things can be learned or gathered from what's available. All in all I can envision creating a dual vessel BIABasket system with this.

1593187223199.png


Code:
[initialize mash]

new value sound_alarm 0
new value mash_temperature 0
new time t 00:00:00:00
new bool MT1 false
new bool MT2 false
new bool MT3 false
new bool MT4 false
new bool MT5 false
new bool MT6 false
new time MT1T 00:00:00:00
MT1T = "Mash Timer 1" value
new time MT2T 00:00:00:00
MT2T = "Mash Timer 2" value
new time MT3T  00:00:00:00
MT3T = "Mash Timer 3" value
new time MT4T  00:00:00:00
MT4T = "Mash Timer 4" value
new time MT5T  00:00:00:00
MT5T = "Mash Timer 5" value
new time MT6T  00:00:00:00
MT6T = "Mash Timer 6" value

[mash]

if "Mash Timer 1" value > t
    MT1 = true
    mash_temperature = "Mash Temperature 1" value
    start "Mash Timer 1"
else 
    if "Mash Timer 2" value > t
        MT2 = true
        mash_temperature = "Mash Temperature 2" value
        start "Mash Timer 2"
    else 
        if "Mash Timer 3" value > t
            MT3 = true
            mash_temperature = "Mash Temperature 3" value
            start "Mash Timer 3"
        else 
            if "Mash Timer 4" value > t
                MT4 = true
                mash_temperature = "Mash Temperature 4" value
                start "Mash Timer 4"
            else
                if "Mash Timer 5" value > t
                    MT5 = true
                    mash_temperature = "Mash Temperature 5" value
                    start "Mash Timer 5"
                else
                    if "Mash Timer 6" value > t
                        MT6 = true
                        mash_temperature = "Mash Temperature 6" value
                        start "Mash Timer 6"
                    endif
                endif
            endif
        endif
    endif
endif

    if MT1 == true
        if "Mash Timer 1" value <= t
            MT1 = false    
            stop "Mash Timer 1"
            if MT1T > 00:00:00:00
                sound_alarm = 5
                "Mash Alarm" Active = true
            endif
        endif
    endif

    if MT2 == true
        if "Mash Timer 2" value <= t
            MT2 = false
            stop "Mash Timer 2"
            if MT2T > 00:00:00:00
                sound_alarm = 5
                "Mash Alarm" Active = true
            endif
        endif
    endif

    if MT3 == true
        if "Mash Timer 3" value <= t
            MT3 = false
            stop "Mash Timer 3"
            if MT3T > 00:00:00:00
                sound_alarm = 5
                "Mash Alarm" Active = true
            endif
        endif
    endif

    if MT4 == true
        if "Mash Timer 4" value <= t
            MT4 = false
            stop "Mash Timer 4"
            if MT4T > 00:00:00:00
                sound_alarm = 5
                "Mash Alarm" Active = true
            endif
        endif
    endif

    if MT5 == true
        if "Mash Timer 5" value <= t
            MT5 = false
            stop "Mash Timer 5"
            if MT5T > 00:00:00:00
                sound_alarm = 5
                "Mash Alarm" Active = true
            endif
        endif
    endif

    if MT6 == true
        if "Mash Timer 6" value <= t
            MT6 = false
            stop "Mash Timer 6"
            if MT6T > 00:00:00:00
                sound_alarm = 5
                "Mash Alarm" Active = true
            endif
        endif
    endif

print mash_temperature
// set PID target to mash_temperature here
sleep 1000

sound_alarm -= 1
if sound_alarm < 0
    "Mash Alarm" Active = false
    sound_alarm = 0
    if MT1 == false
    if MT2 == false
    if MT3 == false
    if MT4 == false
    if MT5 == false
    if MT6 == false
        reset "Mash Timer 1"
        reset "Mash Timer 2"
        reset "Mash Timer 3"
        reset "Mash Timer 4"
        reset "Mash Timer 5"
        reset "Mash Timer 6"
        stop "Mash Control"
    endif
    endif
    endif
    endif
    endif
    endif
endif

goto "mash"
 
Integrated I/O is the option for user available inputs/outputs. There are 17 points: 12 high current drivers (5 - 24VDC @ up to 2A per point), 1 analog output (0 - 5 VDC), and 4 inputs (digital or 12 bit analog). We provide a mating I/O connector - where you wire these points up, and a mating power connector - to provide your own power or use the internal power supply for the I/O. The internal power supply provides 12VDC @ up to 1A.

System requirements are listed in the manual, but suggest any relatively modern PC running Windows 7, 8, or 10 with 4GB+ and 500MB disk space. Need one USB port minimum, internet connectivity, a monitor of better than 1024 x 768 is recommended.

On a slower machine, the use of the digital gauges will slow down performance, and regular text type Elements are recommended. The script is probably not lagging... just the cursor update is.

In terms of documentation... sorry you don't feel the manual is complete - we've tried to address everything, resulting in ~115 pages. I'm happy to address anything here, or if you feel something needs be better expanded in the manual, we will gladly take the feedback and try to tackle it.

Edit: Also, in your script... you are using many timers. I would suggest one timer, then reference it's time to determine when to implement the next mash step. You can ditch the booleans in favor of mash step times being zero - they will cycle through in one step without physically changing anything.
 
Integrated I/O is the option for user available inputs/outputs. There are 17 points: 12 high current drivers (5 - 24VDC @ up to 2A per point), 1 analog output (0 - 5 VDC), and 4 inputs (digital or 12 bit analog). We provide a mating I/O connector - where you wire these points up, and a mating power connector - to provide your own power or use the internal power supply for the I/O. The internal power supply provides 12VDC @ up to 1A.

Hrm... so you're saying the base unit includes a PID and 1 or 2 temperature inputs *without* the round 17 point connector on the front? Is that correct?

How do you switch between the two outputs?

System requirements are listed in the manual, but suggest any relatively modern PC running Windows 7, 8, or 10 with 4GB+ and 500MB disk space. Need one USB port minimum, internet connectivity, a monitor of better than 1024 x 768 is recommended.

Thanks thought my computer might be the cause of the lag.

On a slower machine, the use of the digital gauges will slow down performance, and regular text type Elements are recommended. The script is probably not lagging... just the cursor update is.

I'll give it a try.

In terms of documentation... sorry you don't feel the manual is complete - we've tried to address everything, resulting in ~115 pages. I'm happy to address anything here, or if you feel something needs be better expanded in the manual, we will gladly take the feedback and try to tackle it.

No problem

Edit: Also, in your script... you are using many timers. I would suggest one timer, then reference it's time to determine when to implement the next mash step. You can ditch the booleans in favor of mash step times being zero - they will cycle through in one step without physically changing anything.

One timer and many steps is an optimized view, but now quite how I want it to display/work. Remember my previous posts about the Braumeister interface... The booleans are there to make the script run as intended with the alarm.
 
Couple more questions:

1.) What is the "Integrated I/O" option when purchasing the Uniflex?
2.) What are the minimum computer requirements for BruControl? OS/Processor/RAM
3.) Does the Uniflex Dual Vessel Option control one vessel at a time? How is the active vessel output selected? A GUI element or a script variable, etc...?

Took an hour and made a test - multi-step mash interface but haven't really pursued anything beyond this.

A couple things I've noticed is the laggy interface and intermittent "lock-up" or stalling of the script at times. Perhaps I need to upgrade to Win10 (as BruControl appears to written against WPF vs. WinForms) and get actual hardware, like a PID or the Uniflex, etc... The scripting language takes a bit to get used and isn't as "full blown" as a normal programming language but the manual helps some. Being able to lasso multiple controls and move then in a group would be useful (more accustom to the Visual Studio editor). Documentation could be a bit more expansive but most things can be learned or gathered from what's available. All in all I can envision creating a dual vessel BIABasket system with this.

View attachment 686762

Code:
[initialize mash]

new value sound_alarm 0
new value mash_temperature 0
new time t 00:00:00:00
new bool MT1 false
new bool MT2 false
new bool MT3 false
new bool MT4 false
new bool MT5 false
new bool MT6 false
new time MT1T 00:00:00:00
MT1T = "Mash Timer 1" value
new time MT2T 00:00:00:00
MT2T = "Mash Timer 2" value
new time MT3T  00:00:00:00
MT3T = "Mash Timer 3" value
new time MT4T  00:00:00:00
MT4T = "Mash Timer 4" value
new time MT5T  00:00:00:00
MT5T = "Mash Timer 5" value
new time MT6T  00:00:00:00
MT6T = "Mash Timer 6" value

[mash]

if "Mash Timer 1" value > t
    MT1 = true
    mash_temperature = "Mash Temperature 1" value
    start "Mash Timer 1"
else 
    if "Mash Timer 2" value > t
        MT2 = true
        mash_temperature = "Mash Temperature 2" value
        start "Mash Timer 2"
    else 
        if "Mash Timer 3" value > t
            MT3 = true
            mash_temperature = "Mash Temperature 3" value
            start "Mash Timer 3"
        else 
            if "Mash Timer 4" value > t
                MT4 = true
                mash_temperature = "Mash Temperature 4" value
                start "Mash Timer 4"
            else
                if "Mash Timer 5" value > t
                    MT5 = true
                    mash_temperature = "Mash Temperature 5" value
                    start "Mash Timer 5"
                else
                    if "Mash Timer 6" value > t
                        MT6 = true
                        mash_temperature = "Mash Temperature 6" value
                        start "Mash Timer 6"
                    endif
                endif
            endif
        endif
    endif
endif

    if MT1 == true
        if "Mash Timer 1" value <= t
            MT1 = false    
            stop "Mash Timer 1"
            if MT1T > 00:00:00:00
                sound_alarm = 5
                "Mash Alarm" Active = true
            endif
        endif
    endif

    if MT2 == true
        if "Mash Timer 2" value <= t
            MT2 = false
            stop "Mash Timer 2"
            if MT2T > 00:00:00:00
                sound_alarm = 5
                "Mash Alarm" Active = true
            endif
        endif
    endif

    if MT3 == true
        if "Mash Timer 3" value <= t
            MT3 = false
            stop "Mash Timer 3"
            if MT3T > 00:00:00:00
                sound_alarm = 5
                "Mash Alarm" Active = true
            endif
        endif
    endif

    if MT4 == true
        if "Mash Timer 4" value <= t
            MT4 = false
            stop "Mash Timer 4"
            if MT4T > 00:00:00:00
                sound_alarm = 5
                "Mash Alarm" Active = true
            endif
        endif
    endif

    if MT5 == true
        if "Mash Timer 5" value <= t
            MT5 = false
            stop "Mash Timer 5"
            if MT5T > 00:00:00:00
                sound_alarm = 5
                "Mash Alarm" Active = true
            endif
        endif
    endif

    if MT6 == true
        if "Mash Timer 6" value <= t
            MT6 = false
            stop "Mash Timer 6"
            if MT6T > 00:00:00:00
                sound_alarm = 5
                "Mash Alarm" Active = true
            endif
        endif
    endif

print mash_temperature
// set PID target to mash_temperature here
sleep 1000

sound_alarm -= 1
if sound_alarm < 0
    "Mash Alarm" Active = false
    sound_alarm = 0
    if MT1 == false
    if MT2 == false
    if MT3 == false
    if MT4 == false
    if MT5 == false
    if MT6 == false
        reset "Mash Timer 1"
        reset "Mash Timer 2"
        reset "Mash Timer 3"
        reset "Mash Timer 4"
        reset "Mash Timer 5"
        reset "Mash Timer 6"
        stop "Mash Control"
    endif
    endif
    endif
    endif
    endif
    endif
endif

goto "mash"
This script is wayyyyyyyy more complicated than it needs to be. Set 1 timer, and use the "wait" syntax for when timer hits the mash time condition, set new pid target and continue to next wait.
 
This script is wayyyyyyyy more complicated than it needs to be. Set 1 timer, and use the "wait" syntax for when timer hits the mash time condition, set new pid target and continue to next wait.

Again, that's not how I want the interface to work, remember my previous posts about the Braumeister interface... What you suggest is an optimized view but not my intention. Recreate the interface, set a couple of times and run the script and you'll quickly see the intent.
 
Again, that's not how I want the interface to work, remember my previous posts about the Braumeister interface... What you suggest is an optimized view but not my intention. Recreate the interface, set a couple of times and run the script and you'll quickly see the intent.
I have no idea what a Braumeister interface is like. What is your intent? Being able to change values on the fly? If that's the case, just set up a while loop using something like [mash1] is enabled, looping condition (timer compared to mash step time), change pid value sleep xxx goto [mash1], else goto [mash2].... With that you can change temp or mash step time in the GUI and it will do it.
 
Last edited:
The UniFlex has some I/O that is internally wired. For example, there is an enable output for the interlock. There is an output for the pump/accessory. There is an output to the SSR, which can be driven by a PID or Duty cycle control (automatic or manual temp mode in classic PID speak). None of these are available for the user to use for external devices for automation (think valves, sensors, flowmeters, etc.). You can very easily brew beer, because the controller is handling heating and pumping. If you want to add external devices for automation (which no other controller has, including the braumeister), you can opt for the I/O option - which gives you the flexibility to add these devices as you wish. For example, say you wanted to add a valve to auto-fill your vessel and a proportional valve to regulate flow out of your pump... this can do that.

I'm also not familiar with the Braumeister interface. From a quick look, it seems quite small and limited in my opinion. The website doesn't show it up close. That said, you can certainly duplicate it, then modify as you see fit. We aim for ultimate flexibility, so you can create the brewery you want.

To be clear to your " Hrm... so you're saying the base unit includes a PID and 1 or 2 temperature inputs *without* the round 17 point connector on the front? Is that correct? " question... Yes. this is correct. The PID is a software control - you can actually have as many as you want, but each one needs to tie to a physical output of the interface microcontroller. In the UniFlex, using the supplied default configuration, both the PID and the Duty cycle device elements tie to the SSR to control heating. The UniFlex has a temperature input and includes one or two probes, but you can add more if you like, and each one will become a Device Element on the Workspace. Hope that helps.
 
Last edited:
I have no idea what a Braumeister interface is like. What is your intent? Being able to change values on the fly? If that's the case, just set up a while loop using something like [mash1] is enabled, looping condition (timer compared to mash step time), change pid value sleep xxx goto [mash1], else goto [mash2].... With that you can change temp or mash step time in the GUI and it will do it.

Changing temperatures on the fly is nice but in addition to that all mash steps and their respective temperatures and times are displayed on screen.

Enter the mash step temperatures and times (on screen, not in code), click play and the script steps through each giving visual indication of all step temperatures, times, remaining times, sounding an alarm when a step is finished etc...

It's just a nice interface, IMHO.
Yes... this can easily do this. Per above, use globals to enter your temps and times, then have your script work through those in sequence, displaying all that you want. Again, I think your script is more complicated than it needs be, but since you have coding experience, you'll easily make changes and figure it out.
 
The UniFlex has some I/O that is internally wired. For example, there is an enable output for the interlock. There is an output for the pump/accessory. There is an output to the SSR, which can be driven by a PID or Duty cycle control (automatic or manual temp mode in classic PID speak). None of these are available for the user to use for external devices for automation (think valves, sensors, flowmeters, etc.). You can very easily brew beer, because the controller is handling heating and pumping. If you want to add external devices for automation (which no other controller has, including the braumeister), you can opt for the I/O option - which gives you the flexibility to add these devices as you wish. For example, say you wanted to add a valve to auto-fill your vessel and a proportional valve to regulate flow out of your pump... this can do that.

I'm also not familiar with the Braumeister interface. From a quick look, it seems quite small and limited in my opinion. The website doesn't show it up close. That said, you can certainly duplicate it, then modify as you see fit. We aim for ultimate flexibility, so you can create the brewery you want.

I'm looking for a much simpler answer.

I'm confused about what I'm paying $219 for? For $219 you get integrated I/O! Great! But what is the Integrated I/O, is it the round connector on the front?
 
Changing temperatures on the fly is nice but in addition to that all mash steps and their respective temperatures and times are displayed on screen.

Enter the mash step temperatures and times (on screen, not in code), click play and the script steps through each giving visual indication of all step temperatures, times, remaining times, sounding an alarm when a step is finished etc...

It's just a nice interface, IMHO.
Yes that is what my post would do... All values are from the gui
 
Quick note regarding log files: logging is now off by default in v1.2. If you want to continue keeping log files (they automatically delete after 30 days), please enable this setting on a per-interface level. It is set in Settings... Interfaces... [interface]... Edit... Diagnostic Logging.
Awesome thanks! I haven't upgraded yet as I'm brewing today and didn't want to change anything up until after this batch is done. I had a bunch of additions and changes I worked on and haven't tested them out on an actual brew.
 
I showed my "Brew Params" workspace above, though I only have 3 steps defined right now. My bet is @JoeyChestnutFan's are on the tab 'Variables' in his image above.

You can have as many as you like. Also, we will be releasing a "Profile Element", in the final v1.2 which will control an element based upon the value of another. It will have a basic table, so that you can enter values for both. For example, you can set the temp of your PID Device Element based upon the value of a Timer Element. So for step mashing, you can just enable this element, and it will handle these changes for you, rather than needing to script these steps. If you prefer to script the steps like an original gangster... cool. This Profile Element will be primarily for users who prefer to avoid scripting or those who want a lot of dependencies (maybe... 30 steps in your mash?!?).
I didn't link an image. You can accomplish what you want pretty easily as we have mentioned. Utilize global variables which are made in the GUI and stay on the GUI. They can be changed via script or GUI.
 
I understand what you're saying... don't use 6 timers for 6 steps instead use 6 global variables of type time and decrement their values based on the value of a central timer element. I'm just not sure that's the same thing as having 6 individual real time countdown timers.
 
Many user two timers: one for total brew time (counting up), one for step time (counting up). You could easily add a total step time (counting down).

But again, there are many ways to accomplish what you want. And I guarantee you will change it from time to time as you tinker and refine.
 
How are the timer elements implemented in the background? System.Threading.Timer, Windows Timer, something else?
 
Back
Top