JoepH
Active Member
My sweetspot is 0.053 inchThe 35L or the 65L?
Batchsize?
PID settings?
I’v got the 65L
Batchsize 43 lite
P: 0.0683
I: 0.0010
D: 0

My sweetspot is 0.053 inchThe 35L or the 65L?
Batchsize?
PID settings?
I’v got the 65L
35L 110 VoltThe 35L or the 65L?
Batchsize?
PID settings?
I’v got the 65L
what did you end up setting the differential to for the bluetooth thermometer? 18F or something else?Just sparged. Will have 78% brewhouse efficiency when it's all said and done. The sweet spot for the hullwrecker is .040 inches it seems like with 5% rice hulls added to the grain bill. Now I did not stir during the mash either. I left the grains to sit for 10 minutes then started recirculation and began the automated step mash with the Bluetooth thermometer. The Bluetooth thermometer is a must! The mash temps were actually stabilized and this felt like the best brew day yet! The wort is also crazy clear! This is the first time the system has worked as advertised.
To sum up the Bluetooth thermometer and hed is a must with these units. So much so they should be included by default. Glad to finally have the unit I originally expected back in August lol Thanks for the continued support on the forums @KegLand
18Fwhat did you end up setting the differential to for the bluetooth thermometer? 18F or something else?
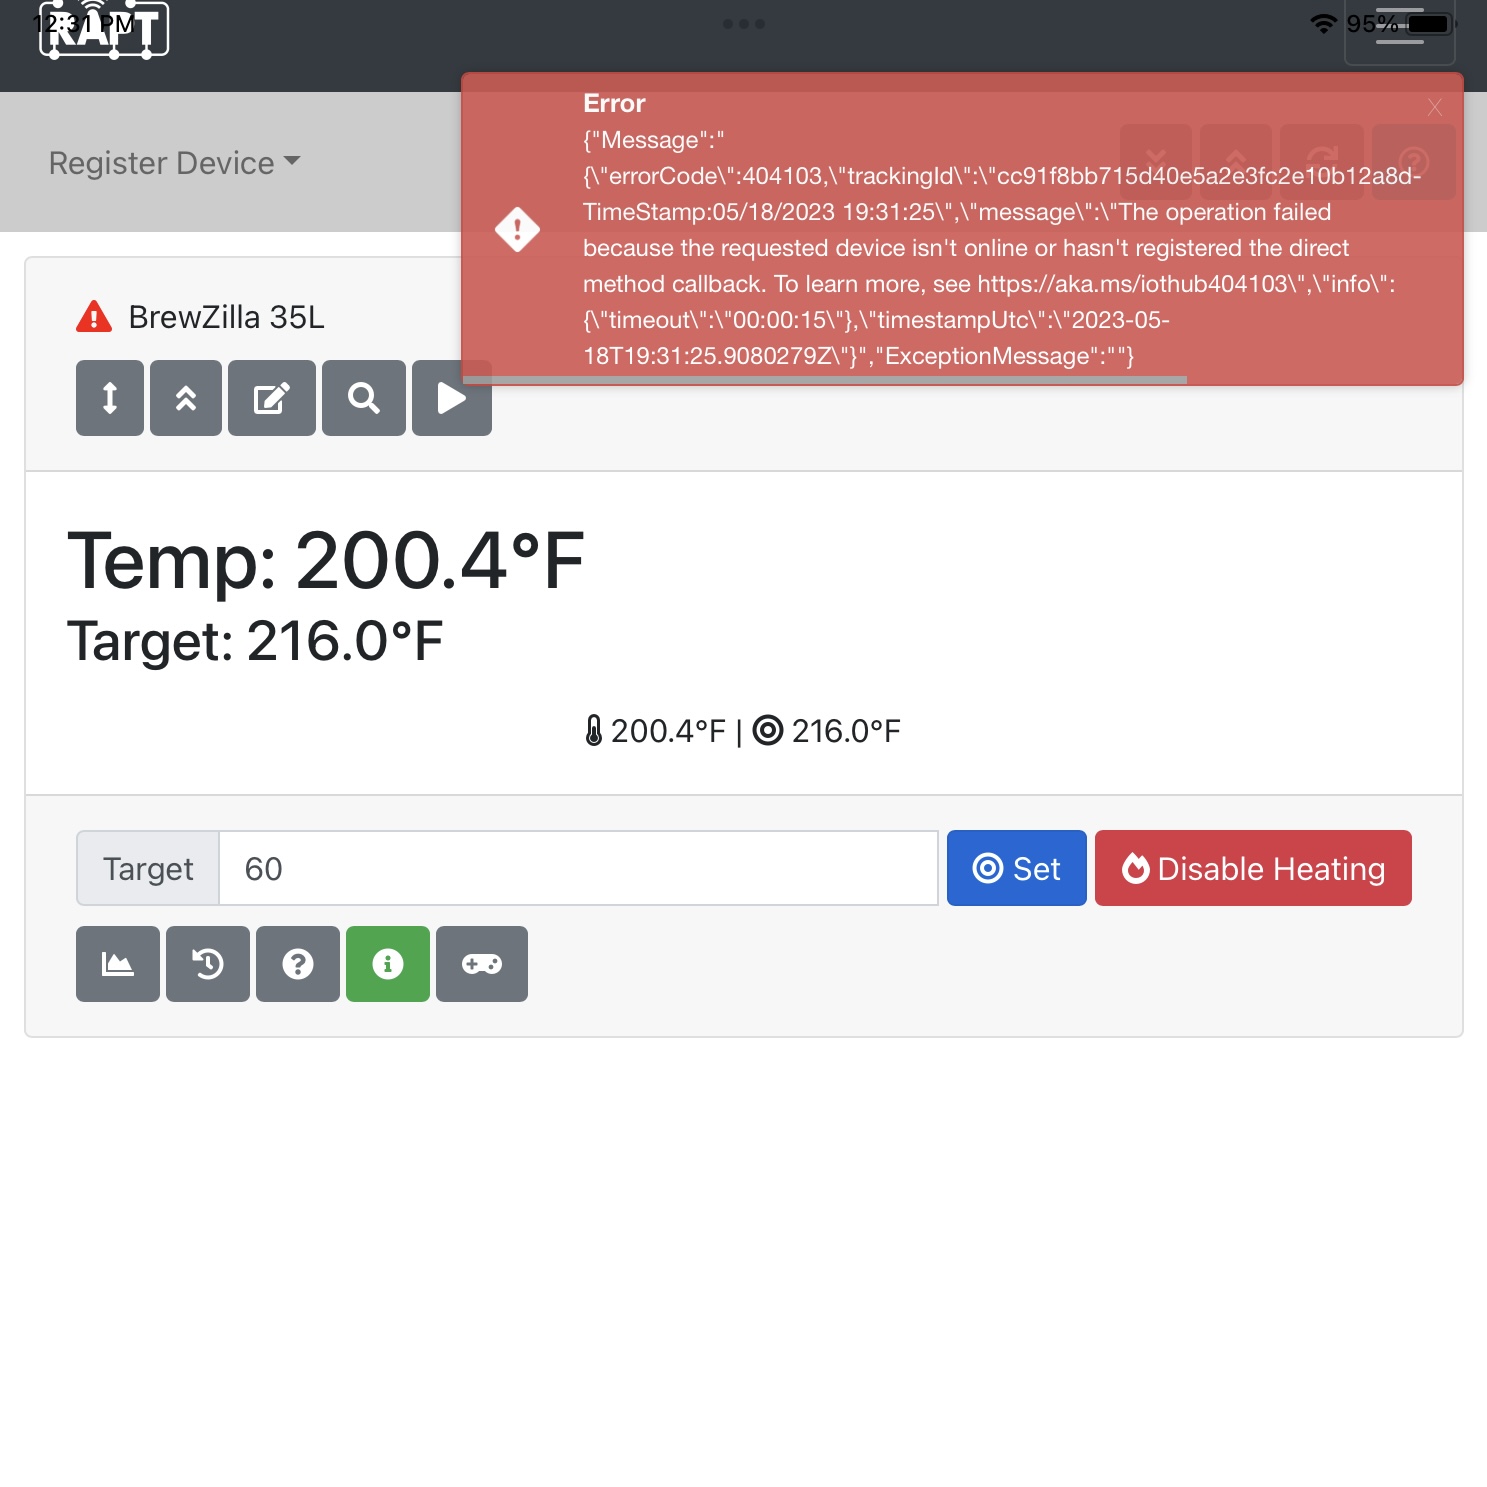
Hi, had the same issue. I have a newer Mesh Wifi network which means, as an IT guy, I have lost control over tuning my network settings. I noticed the Brewzilla was moving between access points (there are three in the house in the mesh). I took it over to the main access point and it worked the first try. If you have a mesh network, make sure the BZ is close to one access point.I've had an issue with getting error 5379 when trying to do an OTA update. I thought I'd post my "fix" to help anyone with the same 5379 error. I ran the check for OTA update a bunch, rebooted, forgot/connected WiFi, and rebooted my modem multiple times. I emailed tech support at Kegland and they said it was from weak WiFi even though my signal was always around -30dbm or less and everything else on my dedicated 2.4ghz network runs perfectly. Searched the internet pertaining to 2.4ghz networks and found recommendations to select between channels 1, 6, or 11 rather than auto. I put it on channel 11 and it failed but it took longer than normal to go from downloading to the error. Tried it a 2nd time on Ch 11 and it finally updated. Also found a RAPT group on Facebook that suggested enabling Bluetooth and "keep trying and it'll eventually download." Hope this helps.


![Craft A Brew - Safale S-04 Dry Yeast - Fermentis - English Ale Dry Yeast - For English and American Ales and Hard Apple Ciders - Ingredients for Home Brewing - Beer Making Supplies - [1 Pack]](https://m.media-amazon.com/images/I/41fVGNh6JfL._SL500_.jpg)

Seem to remember that replacements are cheap but cost a fortune in lost brew when you can't find, lose or get one fail on a brew sunday.Has anyone had an issue with the recirc arm not securing tightly? Just went through a fantastic brew day and noticed the locking lugs were very loose afterwards while cleaning. Wasn’t an issue for the brew, but there’s significant play and water leak by on the recirc arm. Same deal with the whirl pool attachment, did some sleeve work it’s way out or something? Very strange.
Edit: found the silicon seal at the bottom of my cleaning bucket! Must have gotten stuck on the recirc arm. Good thing to keep track of, could really have impact a brew day if not caught.
Just got my RAPT Bluetooth Thermometer and bonded it to my BrewZilla. Is there a calibration procedure for it?Just sparged. Will have 78% brewhouse efficiency when it's all said and done. The sweet spot for the hullwrecker is .040 inches it seems like with 5% rice hulls added to the grain bill. Now I did not stir during the mash either. I left the grains to sit for 10 minutes then started recirculation and began the automated step mash with the Bluetooth thermometer. The Bluetooth thermometer is a must! The mash temps were actually stabilized and this felt like the best brew day yet! The wort is also crazy clear! This is the first time the system has worked as advertised.
To sum up the Bluetooth thermometer and hed is a must with these units. So much so they should be included by default. Glad to finally have the unit I originally expected back in August lol Thanks for the continued support on the forums @KegLand
On youtube is a post from homework brewer about upgrade to a 25 Watt pump. L1,L2 and ground are mentioned.
I took a 3.1 board out of my 65L brewzilla and installed a Gen 4 board. I had to disconnect everything anyway. The Gen 4 board does no fit the old circuit board holder. It's too big. I had to make a water tight enclosure from a rubber maid container. You can't use the gen 4 circuit board with the 3.1 screen either. The voltage that powers the screen up is different. The gen 4 uses 12V the old 3.1 screen uses 5V. The gen 4 board uses a pull down circuit and the old 3.1uses a pull up circuit for controlling the relays.If you just put some water in the brewzilla before you turn it on you won't fry anything.
Might make a bit of steam.
A lot easier and safer than disconnecting elements.
Think I must have missed you were doing an organ transplant.I took a 3.1 board out of my 65L brewzilla and installed a Gen 4 board. I had to disconnect everything anyway. The Gen 4 board does no fit the old circuit board holder. It's too big. I had to make a water tight enclosure from a rubber maid container. You can't use the gen 4 circuit board with the 3.1 screen either. The voltage that powers the screen up is different. The gen 4 uses 12V the old 3.1 screen uses 5V. The gen 4 board uses a pull down circuit and the old 3.1uses a pull up circuit for controlling the relays.
I believe the circuit board is the same for the 110...or 240V model. You would just install a different cord. The resistance in the elements would stay the same.....your Amps would decrease going to 240V.....P=VxIWould you be able to comment on mash temp times and boil times with the 110V on the Gen4? Debating the 222 vs 110, would much rather the 110 for flexibility but having a hard time finding any info out there on ramp up times for the 110v. Thanks a lot
You have done the power analysis incorrectly. If your element puts out 1500W with 120V as input, it will put out 6000W if connected to 240V. The equation you want to use is P = V^2 / R, where R is the resistance of the element (which doesn't change if you change the voltage.)I believe the circuit board is the same for the 110...or 240V model. You would just install a different cord. The resistance in the elements would stay the same.....your Amps would decrease going to 240V.....P=VxI
Can anyone on this Forum verify that there is an equipment difference between the 120 and 240V model?....35L.
If I hook 120V up to my 65L 3500W I have to shut off an element to keep the APMS in range.....but it can be wired 120V or 240V.
So...the 35L is 1500 watts. It draws 12.5 amps. It would draw 6 amps using 240V
I would buy the 65L 240V. Wire it for 120V and just keep the 2000 watt element off while you use it on 120V

Thank you for correcting me. I'm not familiar with the 35L model but I think they have more than one element. They may even switch an element from parallel to series in order to get the proper current draw for the voltage change.. some one with both models 120V and 240V should take a look and verify this. I do know they use the same RAPT 4 board for 35 65 and 100.You have done the power analysis incorrectly. If your element puts out 1500W with 120V as input, it will put out 6000W if connected to 240V. The equation you want to use is P = V^2 / R, where R is the resistance of the element (which doesn't change if you change the voltage.)
So, your 1500W @ 120V element has a resistance of V^2 / P = 14,400 / 1500 = 9.6 ohms. The current drawn by the element is then I = V / R, so at 120V it draws 120 / 9.6 = 12.5A, and at 240V it will draw 240 / 9.6 = 25A. Now you can use your P = I * V, so at 120V you have 12.5 * 120 = 1500W, and at 240V you have 25 * 240 = 6000W.
To have a dual voltage capable system, and don't want to have a 4X power difference and 2X current draw difference, you have to have multiple elements, and disable one, or more, elements when configured for the higher voltage.
The control board is a simpler matter. The board actually runs on low voltage DC, and the low voltage DC is supplied by a switching power supply. Switching power supplies are a little like magic. They will work with any AC voltage from slightly above the DC output voltage, up to a voltage that will start to cause component failure in the power supply. Switching power supplies are why most digital electronics that run off of AC power are rated for pretty much any line voltage, and frequency, available world wide.
Brew on
Hello, having lots of trouble with my new gen 4 brewzilla. My temp probe was about 5 degrees off so I tried to recalibrate, I did not do the 2 step calibration properly. Should of done some research before hand but anyways I messed it up terribly. The temp was reading way too high and all over the place, also I got high temp alerts. I tried to figure out how to reset to the factory reset but then The brewzilla shut off and now when I turn it back on I get the flashing rapt logo and nothing else. Figure I Maybe blew a circuit or something idk. Any help is much apriecated
Thank you, will give this a try!You seem to have an old firmware at the moment. I should say that with the firmware once you do a firmware upgrade its important to leave the unit on for 20min. If you randomly turn the unit off after a firmware update then it will assume something is wrong with the firmware or it was a corrupt download and then automatically try and rollback to the older firmware. (we have several partitions on the drive to hold a copy of the new and old firmware so it can do this).
If you leave connected to the internet it will eventually attempt to download a new firmware copy again and then automatically try and download a new copy.
If however just leaving it connected to the internet doesn't fix the issue on it's own then you can get into the boot loader screen and then manually download the latest firmware but best to just leave it connected to the internet for a while and let it do it's thing first.
I should also say it will not attempt to upgrade firmware while a profile is running so please make sure you are not running a profile if you are trying to upgrade firmware.


I had issues the other day. Today I tried and it went through first try. I am assuming there was an issue on their end.Looks like I’m not the only one. Maybe a problem with the rapt portal?
I had a few events like that early into my 65L Gen4 use as well. Using David Heath's PID settings (found via YT video) and not using 100% heating power while mashing has made my rests much more stable and predicable. I now use 65% power when mashing for a 5 gallon batch (on 220V power), and ~75% for a 10-gal batch--seems to work well. And, while I have an HED and used it before (at the cost of mash efficiency), I now do not really need it. YMMV.Has anyone experienced what I’ll call a runaway heating cycle? I set my strike water target to 163F and the BrewZilla did just fine hitting it. I then poured in my grist, set the target to 152F. Had too thick of mash so added some room temp water which dropped temps into mid 140s which turned the heater on. I left to attend to other prep steps and when I returned the temp was 163F and the heater was off and Target was still set at 152F. Maybe a coincidence that it reached the same temp as my previous target. I’ve done 4 batches so far and never had the heater overshoot by 11 degrees.
Maybe the magnet is so you can attach a strong magnet to it!Just got my Rapt Bluetooth thermometer to complete the package with my Gen 4 and the HED.
What a total disappointment. The thermometer feels like a flimsy toy. Not sure why Kegland keeps dis-improving things like this by cheaping out on little things which ruin the whole experience. In this case removing the hard plastic backing clip and replacing it with a floppy silicone band that’s got plenty of cast in crevices to ensure it will never stay clean. One also wonders why they chose to outfit the unit with a magnet that is not strong enough to hold up the weight of the unit?!?! So how are you supposed to mount this thing to the system that it’s “designed” to integrate seamlessly with? Maybe tie it on with a piece of string? Come on guys.
I used to think these things were designed by people who actually brew beer but I can’t imagine how anyone except the accountants thought these were good ideas.
I keep pulling for Kegland to come through with their innovative products that sound so promising but boy they just keep falling short.
If anyone with the older model wants to trade just hit me up.
TLDR the new “improved” Bluetooth thermometer has no clip and other usability issues.
The idea of the PID is that it controls the heating when used my SmartPID varies it's output from 100% to 0% to maintain a steady temperature. So you should see it on 100% when ramping up and then as it gets near the desired temp it should reduce the power supplied automatically so that there is no overshoot and a steady state is maintained.I had a few events like that early into my 65L Gen4 use as well. Using David Heath's PID settings (found via YT video) and not using 100% heating power while mashing has made my rests much more stable and predicable. I now use 65% power when mashing for a 5 gallon batch (on 220V power), and ~75% for a 10-gal batch--seems to work well. And, while I have an HED and used it before (at the cost of mash efficiency), I now do not really need it. YMMV.
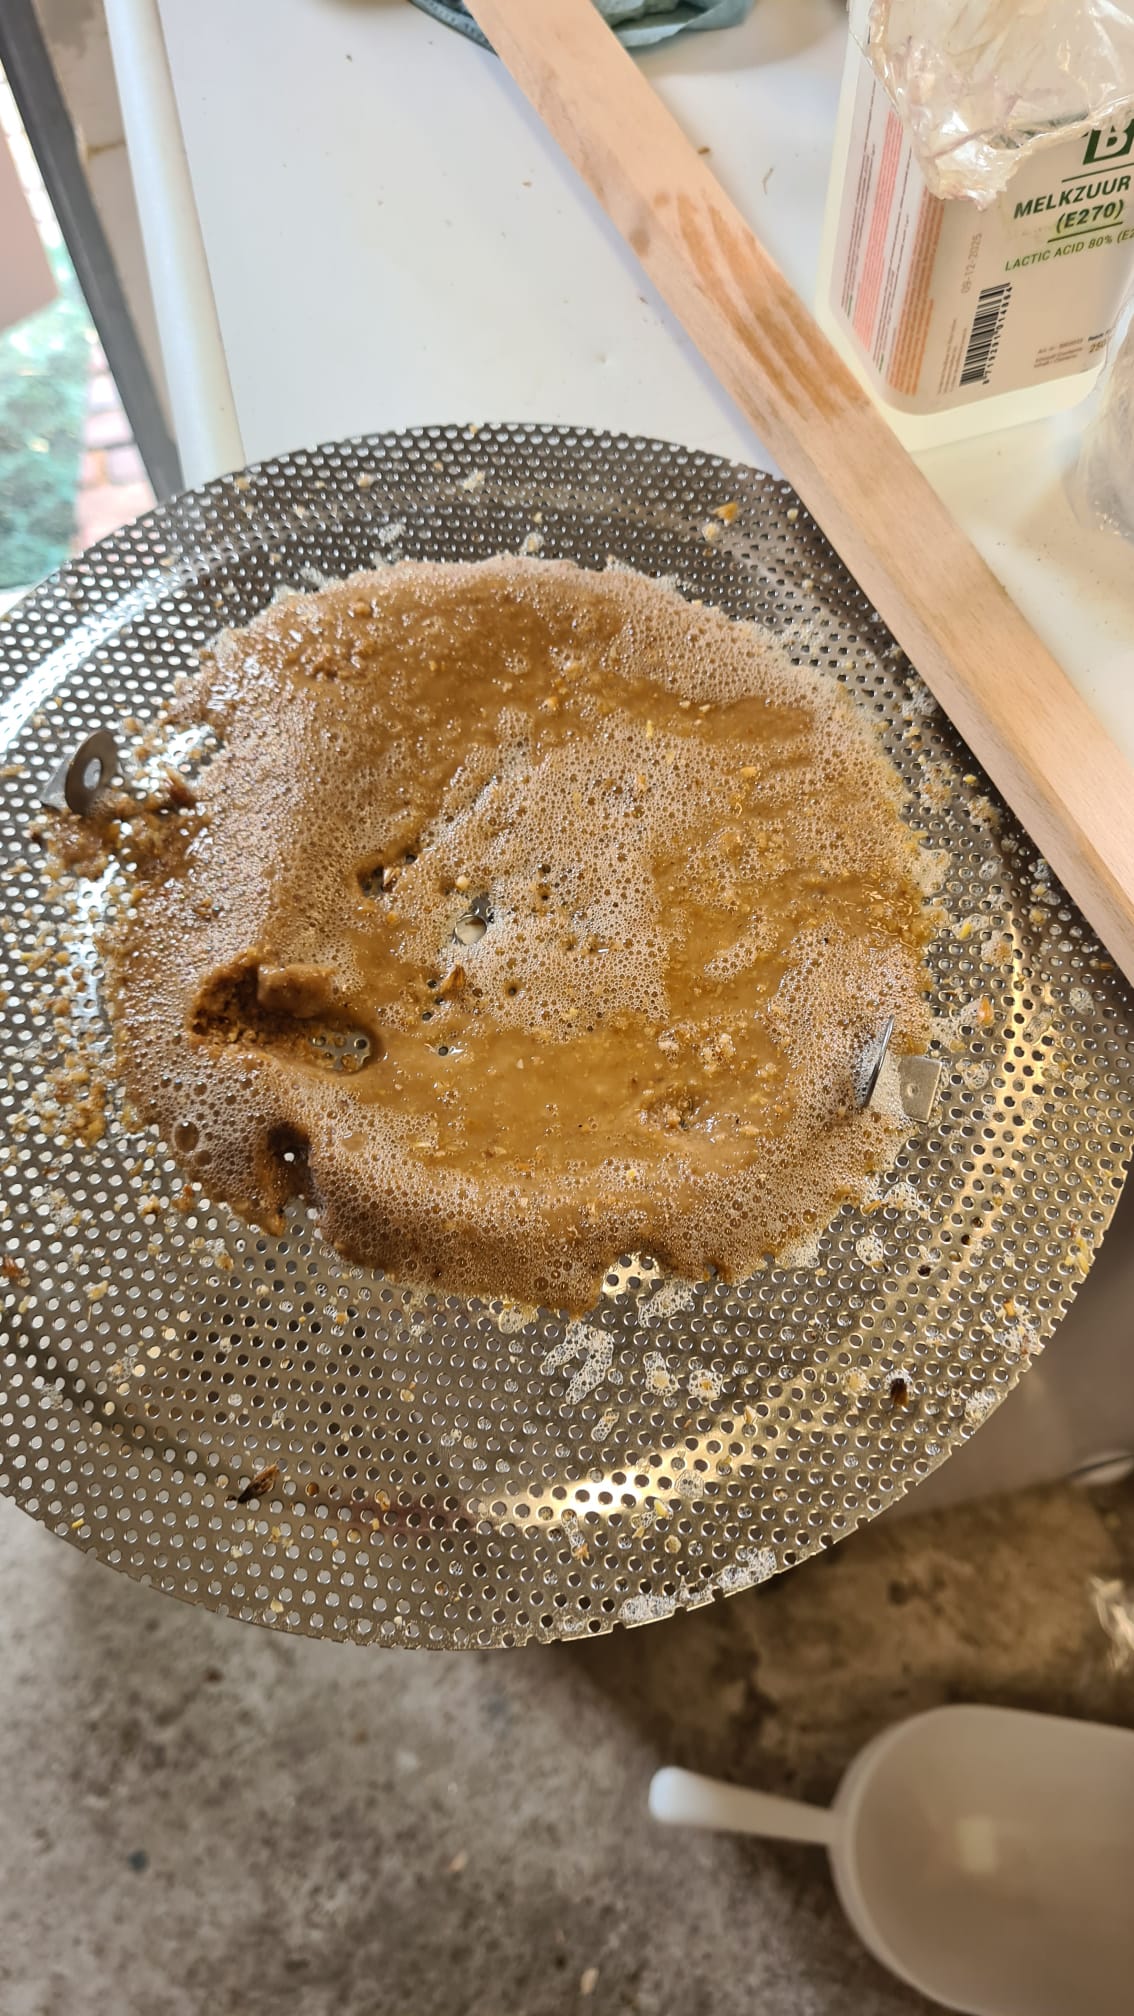
It looks like your crush may have been too fine. I fought that for almost 8 months. On the Hullwrecker I found a single pass at a .040 inch gap works great! I had been using a much tighter double crush on the old 3 tier system. Prior to that I was having similar issues as whats in your pics. What gap is your mill set to?Just did my first brew attempt on the gen4. Had some issues..
There was malt everywhere in the kettle, on the bottom pump filter, but also on the bottom on and around the temp probe. thus constantly overshooting the temperature by 10 degrees in like a second. also on the top screen there was this heavy sludge.
also i found using the top plate compacts the mash alot, on my brew monk i would not use this plate but with the brewzilla recirc arm i feel you need to use this as you have the silicone tubing.
Someone told me that the malt on the bottom could be from suckback as the pump shuts on and off and creates this suckback. how could you counteract this?
I canceled the brew as there were too many things going wrong. Added some pics.
1,40mm on mine so that would make it 0.055 inch. i do it with a hand dril and check constantly. this was the setting i used on my brew monk which gave good resultsIt looks like your crush may have been too fine. I fought that for almost 8 months. On the Hullwrecker I found a single pass at a .040 inch gap works great! I had been using a much tighter double crush on the old 3 tier system. Prior to that I was having similar issues as whats in your pics. What gap is your mill set to?
Just did my first brew attempt on the gen4. Had some issues..
There was malt everywhere in the kettle, on the bottom pump filter, but also on the bottom on and around the temp probe. thus constantly overshooting the temperature by 10 degrees in like a second. also on the top screen there was this heavy sludge.
also i found using the top plate compacts the mash alot, on my brew monk i would not use this plate but with the brewzilla recirc arm i feel you need to use this as you have the silicone tubing.
Someone told me that the malt on the bottom could be from suckback as the pump shuts on and off and creates this suckback. how could you counteract this?
I canceled the brew as there were too many things going wrong. Added some pics
Are you sure the bottomscreen of your maltpipe was placed correct. When you lower your maltpipe to fast the screen will lift and will land incorrect to the bottom of the maltpipe. Result a big opening.Just did my first brew attempt on the gen4. Had some issues..
There was malt everywhere in the kettle, on the bottom pump filter, but also on the bottom on and around the temp probe. thus constantly overshooting the temperature by 10 degrees in like a second. also on the top screen there was this heavy sludge.
also i found using the top plate compacts the mash alot, on my brew monk i would not use this plate but with the brewzilla recirc arm i feel you need to use this as you have the silicone tubing.
Someone told me that the malt on the bottom could be from suckback as the pump shuts on and off and creates this suckback. how could you counteract this?
I canceled the brew as there were too many things going wrong. Added some pics.


Hi, had the same issue. I have a newer Mesh Wifi network which means, as an IT guy, I have lost control over tuning my network settings. I noticed the Brewzilla was moving between access points (there are three in the house in the mesh). I took it over to the main access point and it worked the first try. If you have a mesh network, make sure the BZ is close to one access point.
Call Morebeer. I had one I got that had a huge dent in the side making it unusable. They immediately replaced it.Mine just arrived from MoreBeer and there’s a dent in the side body under the left handle and I couldn’t be more obsessed about how the aesthetics are all off now
Yea I sent them a message yesterday evening. With the weekend I’m assuming I’ll hear from them tomorrow.Call Morebeer. I had one I got that had a huge dent in the side making it unusable. They immediately replaced it.
So brew 3 completed using the HED and Bluetooth probe and my conclusion is the system is flawed. The Bluetooth probe is great for maintaining a set temp but as soon as you have to increase the temp(step mash) by more than a couple of degrees then it always overshoots by some way, which it will due to its design. This could be improved if you switch probes when moving to your next step but that's not east to do. This could all be fixed is you could select the probe in the rapt profile but you can't.
The system just seems so flawed at present, with fixes creating more problems.