Brewhemoth conicals?

Homebrew Talk - Beer, Wine, Mead, & Cider Brewing Discussion Forum

Help Support Homebrew Talk - Beer, Wine, Mead, & Cider Brewing Discussion Forum:

This site may earn a commission from merchant affiliate links, including eBay, Amazon, and others.
I pull it in very short spurts and give it time in between for the beer foam to settle. Or I've dialed down the spunding valve a few psi at a time to lower pressure. Just take your time so the beer doesn't foam up too quickly.

How much beer do you have in it anyway?
 
Filled it to the dome weld.
I think it holds 22 gal, so maybe 20 gallons?

Thanks for the help.
 
Just tried to dump the yeast off an IPA that has been fermenting actively and is at 1.010. Wanted to propagate more for another brew. I opened up the dump and all I got was a small amount of yeast followed by cloudy beer. where is the yeast?
 
I am used to looking for the yeast to settle and clear with carboys. is the yeast still in suspension?
 
sounds like you may have pulled a hole straight through the yeast cake and the bulk of the yeast could be still sitting on the sides of the cone. Did you open the tap slowly or fast. You could give the side of the cone a tap with something like a rubber mallet and see if you get any more yeast..I dont have one of these so I am not talking from experience but from what I have read...
 
I opened it slowly. I had been banging the sides with a rubber mallet throughout fermentation. This may be a reason to use a racking arm. I put a sampling valve on a tee off the racking port and get the same out of that...yeasty beer. I will try banging on it more to see if I can loosen the yeast.
 
The real solution is to dump smaller amounts of trub earlier and more often to prevent the yeast cake from compacting so thoroughly. After two weeks it should be a pretty tight cake, and it's not going to move easily.

I've been taking my first dump after I see fermentation pass its peak, maybe 3-4 days in.

-Joe

Joe--Are you dumping your first dump and washing the second dump? Or do you wash the first dump and dump the second dump.

I love the number of dumps I can get in in a single reply to this thread...
 
I believe you get rid of the first dump since it is primarily trub and dead yeast, then keep and wash the second and third dumps.
 
My friend and I just brewed up a fourth 15gal batch for the Brewhemoth, this time an American wheat. Both wives like this style. Previously we each brewed with our systems to come up with 15gal. As of this week I got my equipment in order to brew 15gal myself, including a 72qt cooler MLT, a 20gal kettle, a 50' IC and whirlpool attachment, a March pump, even a homemade mash paddle. The only thing I haven't made is a stand, I'm thinking about the design now that I've made a couple batches with my equipment.
 
I believe you get rid of the first dump since it is primarily trub and dead yeast, then keep and wash the second and third dumps.

Cool--that's what I figured.

On another note...Has anyone seen the new spunding valve Brewhemoth is offering?

So, correct me if I'm wrong, but this takes the place of the Pressurizer, right? I could do pressurized transfers to a corny AND I could pressurize during fermentation by "dialing in" what I need?
 
Yes you are correct.

I have the same adjustable valve on one of my spunding valves, it seems more robust than the plastic one on my other unit. It goes to 100psi so you are mostly working on the low end, and as you can see it has markings to estimate the pressure you want to set which is nice.
 
Yes it does look handy. My spunding valve is built on some heavy tubing and it attaches to the keg QD on the pressurizer. Every once in awhile I have an issue with the spunding valve leaking around one of the connections at the tubing. You shouldn't have that problem with this unit.
 
I wonder what the poppet valve is pushing against to keep it closed? It looks like it is just welded to the tee. I thought about adding a gas fitting to my spunding, but the poppet just pushes through when pressed in. On a corny keg, the poppet pushes against the dip tube.
 
The piece they weld to is solid and they cut a small hole in it that is smaller in diameter than the poppet. I believe this means you can't easily replace the poppet. You could drill out the hole to make it big enough for the poppet to pass through. Then you'd have to solder something back over part of the hole to hold the new poppet.

But a poppet lasts for years so I suppose its something of a moot issue.
 
There are several different styles of poppets, the one we use has three spring arms that hold it in a groove milled out in the housing. A pair of needle probes, the patience of a saint, and it can be removed thru the fitting. It can be rebuilt, but none of my ancient kegs have needed this rebuilt.
 
Maybe it is just operator error, but I am having a heck of a time getting used to the stainless fermenter over carboys. My latest problem is that my sampling valve is plugged. The pressure of the beer is not enough to push the blockage. I put a tee with a thermowell and a sampling valve on the racking opening. Everybody seemed to think that a racking arm was not necessary. I guess this means pressure is required. My other option is to rack from the bottom dump.
 
I suppose you might want to drain a little from the racking port every couple of days to prevent a lot of yeast from accumulating. The racking port is slanted downward so it does pick up a little trub during ferm as you've now seen. If you had the pressurizing attachment you could crank 30psi on the conical and I'm sure that would push the trub right on out.

I'd probably rack out of the top port this time, and modify my procedure for the next go-around. Sorry to hear that the sampling port got clogged, kind of an unforeseen situation.
 
30 psi would be a bit overkill! From experience (with the dump valve and very floculant yeast) 5 psi causes a massive gush! I would go with 2-3 psi, you can always add more.
 
If thats the case maybe add a little sugar and seal it up for a day or two, that should give you enough pressure to blow out the line.
 
I'm still learning which dumps to keep. This is what I got just now after 3 days of very active fermentation.

brewhemoth_dump_05302012.jpg

I'll see how it settles, and what I get out of it after another week.

-Joe
 
I'd hesitate to pull too much yeast out of the thing early on. The first dump will have trub, but I'd do that after 24hrs so I didn't pull too much yeast. Then for yeast harvesting, one or those containers would have been sufficient. I don't dump more yeast until a day before I'm going to rack the beer to kags.
 
Well, I waited until visible fermentation activity had almost stopped. I figure the yeast on the bottom isn't doing much work, and the active yeast is still in suspension floating around nomming sugars.

We shall see.

-Joe
 
Thats good, although I do think some cake is still active. I suppose the surface area is more limited in a conical though. I'm sure you'll be fine and at this point all that yeast ought to be good stuff.
 
Got another full pint of yeast out the dump today (6th day of fermentation). SG is 1.011, which is just what I'd expect from Wyeast 1968.

Also: I love drinking my samples :)

-Joe
 
Re-pitching the yeast from this into an esb. Been in a mason jar for two months according to this post. Wish luck!

I did taste the beer on top (the stout), and it had some autolysis but no contaminated or otherwise off flavours. Mr malty called for 0.5L of slurry assuming 50%viability. Prob pitched 1/3Liter in 16 gal, but it was jolly compact, so I compensated for that. Been at 33-35degF for this time, and fairly rigorous sanitation.

I pressure transferred that last batch using a bathroom scale. It was such a pos that I likely got no more than 4.25-4.5gal in each corney, as I was worried about filling too much. I think that if I just ferm under 5psi that I can keg under ambient pressures and not get too much foam, while at the same time filling the cornies to the brim.

Set to 4 full turns, and the fermenter controlled to 67F (it's hot out!).


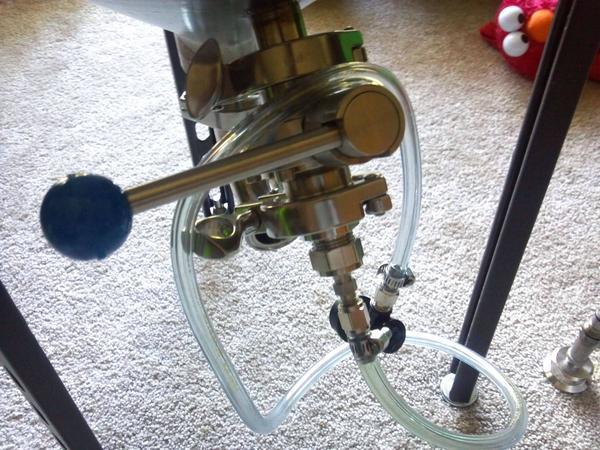
First pressure ferment. On this prv, I found that 3 full turns was a bit over 5psi, and 5 turns a bit over 10psi. 18gal of oatmeal stout in there. Chuggin along at 63.7degF and 10psi.

The valve and flare fitting will allow me to keep some pressure on the fermenter when transferring under pressure, which I think I'll have to do, although I have no experience with that. The ball valve/mfl seem like a more robust setup than having a corny post and qd, which seems redundant to me if you have an mfl on the qd anyways.

I just have the tubing on there temporarily to check the bubbling action - not worried about having an airlock with the spund setup. I am curious about sanitation in between uses though. Although beer doesn't touch the valve components directly, condensation dripping back into the beer would seem to me to be just as bad. Maybe a couple of squirts pbw, then water, and starsan right before using. I don't think I can immerse the whole thing in a bucket because of the pressure gauge. Lots of crevices with all the pipe fittings....
 
The prv I use seems to be pretty reliable in terms of # turns = psi. 4 turns and have 8psi. Another advantage of the pressure ferment is that you push out the yeast more easily. Helps with esb yeast etc.

Not totally happy with my decision to get a 1''tc installed on the side low down... for a thermowell. One, the spray ball doesn't really get to the back where the thermowell meets the tc flange, and two, the taped-on rtds respond better than the rtd in the thermowell anyway. No reason to have thermowells on stainless fermenters imo, unless they are jacketed for cooling or insulation etc.
 
I figured this would be a good place to post a question on my Brewhemoth setup.

I have 4 brewhemoth v2.0 fermenters and am looking to invest in the pressurizer for smooth transfer to kegs.

Since our fermenters are v2.0 does anyone know what all parts I would need to make this work? I figured not have tri-clover clamps fittings at the bottom may make this a bit more tricky.

Also, what is the process for correctly using the pressurizer to transfer to keg?

Thanks for all the help guys! Got an Irish red I'm looking to keg next week!
 
brentt03 said:
I figured this would be a good place to post a question on my Brewhemoth setup.

I have 4 brewhemoth v2.0 fermenters and am looking to invest in the pressurizer for smooth transfer to kegs.

Since our fermenters are v2.0 does anyone know what all parts I would need to make this work? I figured not have tri-clover clamps fittings at the bottom may make this a bit more tricky.

Also, what is the process for correctly using the pressurizer to transfer to keg?

Thanks for all the help guys! Got an Irish red I'm looking to keg next week!

NPT to TC fitting adapters are available from Brewershardware.com, but you don't need TC on the racking port to transfer. I hooked up a 1/4 inch MFL barb to an adapter on the racking port on 1/4 inch line with another 1/4 inch MFL barb on the other end. The other end was connected to a ball lock liquid out to push beer in.

Purge your target keg with CO2 and vent to little to no pressure. Turn on the pressure on your Brewhemoth (I use 5 to 10 psi) and open the ball valve attached to the transfer line. As your target keg fills, pressure will build and if not released the flow of beer from Brewhemoth to keg will stop.

Hope that helps! Let me know if you need more assistance.
 
thatjonguy said:
NPT to TC fitting adapters are available from Brewershardware.com, but you don't need TC on the racking port to transfer. I hooked up a 1/4 inch MFL barb to an adapter on the racking port on 1/4 inch line with another 1/4 inch MFL barb on the other end. The other end was connected to a ball lock liquid out to push beer in.

Hope that helps!

Purge your target keg with CO2 and vent to little to no pressure. Turn on the pressure on your Brewhemoth (I use 5 to 10 psi) and open the ball valve attached to the transfer line. As your target keg fills, pressure will build and if not released the flow of beer from Brewhemoth to keg will stop.

Awesome thanks for the reply. Would you happen to have a pic of your setup/fittings??
 
Here is a pic of the lower half of my Brewhemoth, as you may notice, I went with a TC version. But the transfer process works the same, just with different (and in your case, less) fittings.

I opted to use a TC beer thread adapter instead of ordering a TC 1/4" hose barb (which were hard to find when I ordered my fittings) with a 1/4" MFL tailpiece.

b87lu.jpg


I complied this list of fittings to order from Midwest for you, this should be everything you need assuming you have a 1/4" MFL on your gas line from your regulator.

If not, you should. MFLs are the way to set everything up in your kegerator so it is easy to go from commercial to corny and back.

1/4" MFL to 1/2" NPT X 1
http://www.midwestsupplies.com/1-4-mfl-to-1-2-npt.html

Barbed Swivel Nut, 1/4" Flare, 1/4" Barb X 2
http://www.midwestsupplies.com/barbed-swivel-nut-1-4-flare-5-16-barb-2.html

Ball Lock Liquid Disconnect, Threaded X 1 (If you don't have a spare)
http://www.midwestsupplies.com/ball-lock-liquid-fitting-threaded.html

Ball Lock Gas Disconnect, Threaded X 1 (if you don't have a spare, for the pressurizer)
http://www.midwestsupplies.com/ball-lock-gas-fitting-threaded.html

1/4" ID Beer/Gas Line X 5 (feet)
http://www.midwestsupplies.com/beer-and-gas-line.html

Stainless Steel Tubing Clamp X 2
http://www.midwestsupplies.com/stainless-steel-tubing-clamp.html
 
Back
Top