Yup. Not only is it less height to do it the way I did but it's also less cost (less parts) and less tri-clover clamps and gaskets to deal with (so less work too).
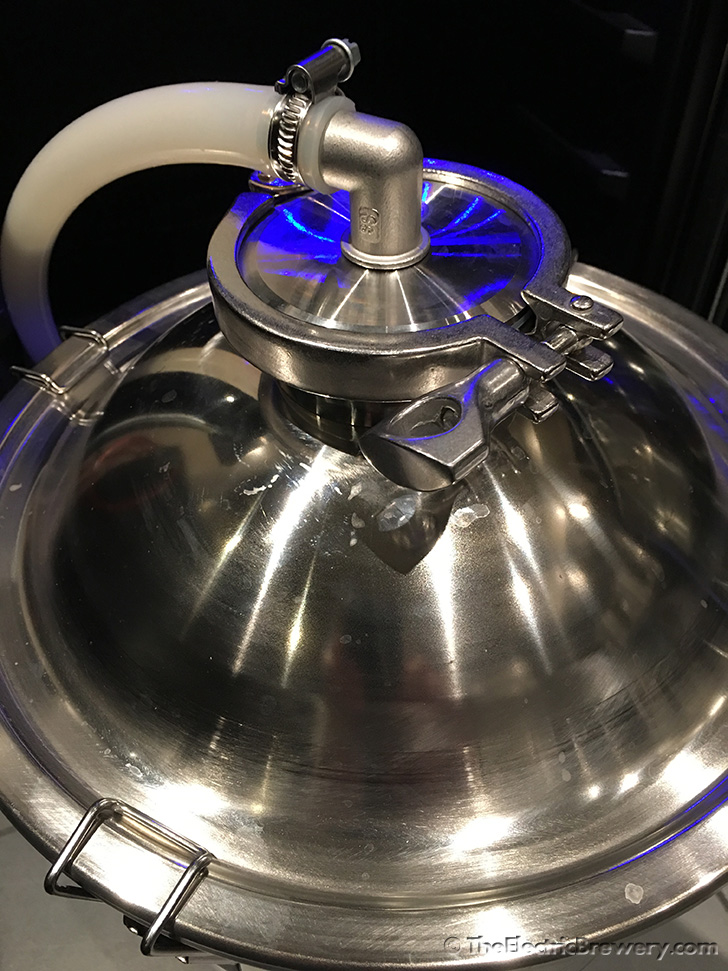
It's $45.90 + shipping for your setup vs $41.50 + shipping at BrewersHardware.com (including reducer, barb, flange, and clamp). I don't think cost is a deciding factor, but the 'standard' parts are cheaper. However, if it won't fit... well, it won't fit! I will note cleaning it easier below for other reasons. Also, note, I use the 3" domed lid with barb for my 14 gal Chronical and I use the normal flat lid with the 17mm barb you are using with my BrewBucket.
Really? I wouldn't think it would make much of a difference and the extra volume you'd get for krausen to sit in from the reducer is probably only 6-8 oz no? It's higher, but krausen can go anywhere. As soon as the reducer fills, it would just keep pushing forward.
Definitely - I have yet to clog the 1" hose. The 17mm opening has been plugged solid a couple times on me. Now, that being said, I was using the original lid. You are using a domed lid which will definitely get you more headroom and enough you might never see the issue.
Yup! The standard spring loaded one they often include that is said to blow at around 2 to 2.5 PSI.
I've only brewed one batch so far, approx 5.5 gallons in the buckets, fermented with WLP002 in one and WLP095 in the other and the krausen wasn't high enough to get near the blow-off/pressure relieve valve.
I actually dislike the pressure relief valves on the Chronical. It's one of their biggest faults in my mind. I ended up buying the 3" lid specifically because it does NOT have one so I could do a proper pressure transfer with my conical. The relief valve would constantly release at well under 1 psi and waste loads of CO2. I would consider getting the 3" domed lid for my BB if only to re-use the 17mm barb except for the pressure relief valve on the cap with 17mm hole. Seems like it would be a pain to clean krausen out of the spring.
I can imagine! You're blow off hose or airlock would of course also have to get plugged up. I'm using 1/2" ID hose so it's pretty huge and thick walled so that it holds the shape well and doesn't kink so I'm hoping (knock on wood) that it would be fairly difficult for it to get plugged. (Airlocks on the other hand are fairly easy to plug given the small diameter opening.) I'll know next time I use WY3068 (weizen) - that stuff has crazy krausen!
Kal
That barb that got clogged was sitting a couple inches above the wort (6 gals or so). The issue was not the hose per se, the blow off actually worked well for awhile. At 17mm, the opening of the barb had a small build up that stuck there and continued to grow. When it finally got stuck full up, the clamps on the side were apparently weaker than the krausen plug and... ugh. Cleaning that barb was a bit of a pain - getting it out of the threads. It eventually worked free with PBW soak and scrub brush.
The barb and reducer are definitely easier to clean. You can literally just pitch them into a bit of PBW and they clean out easily (fingers fit and they are smooth!). I throw them into either my CIP bucket when I clean my conical or into the basin for Mark's Keg washer. They come out nice and clean without scrubbing, while the krausen managed to loosen but stay in that threaded barb.
As I said earlier however - if that setup won't fit, then you really don't have much else of a choice. Just be aware that those 17mm barbs definitely do clog.
")


![Craft A Brew - Safale BE-256 Yeast - Fermentis - Belgian Ale Dry Yeast - For Belgian & Strong Ales - Ingredients for Home Brewing - Beer Making Supplies - [3 Pack]](https://m.media-amazon.com/images/I/51bcKEwQmWL._SL500_.jpg)