• Please visit and share your knowledge at our sister communities:
  • If you have not, please join our official Homebrewing Facebook Group!

    Homebrewing Facebook Group

BIAB Electric Brewing System

Homebrew Talk

Help Support Homebrew Talk:

This site may earn a commission from merchant affiliate links, including eBay, Amazon, and others.
SanMarzano said:
u can GFCI a 3 prong?

Yes you can. A friend of mine who is a master electrician installed it. It is a 50 amp GFCI protected spa panel that I bought off eBay for $40 a few months ago. The 3 prong outlet is hooked up to that.
 
Yes you can. A friend of mine who is a master electrician installed it. It is a 50 amp GFCI protected spa panel that I bought off eBay for $40 a few months ago. The 3 prong outlet is hooked up to that.

I'm not an electrician, but the scientist in me tends to make me want to understand how this works. So . . . I googled how a 220V GFCI breaker works.

I had previous thought that the GFCI breaker compared the neutral and ground wires (hence the need for 4 wires), but that is apparently incorrect.

If I understand it correctly (after reading some links), the GFCI breaker constantly monitors the current thru the 2 hot wires of a 220V line. If there is any mismatch between the two, the breaker will trip.

If something electrical comes loose in or around our control panel or kettle causing a bit of current to leak directly to ground, the current in the 2 hot legs will be unequal and will cause the circuit to trip.

Apparently, the neutral wire (3rd wire) in the 220V cord to the appliance is not necessary for the GFCI to operate. For example, many 220V motors have only 2 hots going to them, no neutral.

According to someone responding to a GFCI question on a forum having to do with wiring a boat lift (a potentially wet environment), the neutral wire from the 220V lift motor doesn't even need to be connected for the GFCI to operate. But . . . the breaker itself requires its neutral wire to be connected in order for the "TEST" button to function correctly. The test button sends a tiny bit of current thru the neutral thereby creating a mismatch between the two hot legs being monitored by the breaker causing it to trip.

If my thinking is correct, this process provides the reasoning behind the EPO button that P.J. includes in all his panel drawings. Pressing the EPO button shunts a tiny bit of current down the ground wire creating a mismatch between the two hot wires thereby mimicking what would happen if a ground fault were actually occurring. This mismatch is sensed by the the GFCI breaker (either in the main panel or in the spa panel adaptation) and the breaker is tripped.

EDIT: just clicked on a link in another thread that took me to High Gravity's EBC II and noticed the following statement in that item's description:

Standard 220V, 30A 3-Prong "Dryer" Plug with 6 ft. cord. GFCI type breaker cannot be used with the 3-wire model. Order the 4-wire version with separate neutral and ground to support a GFCI installation.

So I'm still a bit confused. BUT . . . . (as I also read on another forum) a ground might be requred since there is also a 110VAC circuit in this controller for the pump. I guess we'll wait to hear from others more expert.

Respectfully submitted,
Keith
 
Standard 220V, 30A 3-Prong "Dryer" Plug with 6 ft. cord. GFCI type breaker cannot be used with the 3-wire model. Order the 4-wire version with separate neutral and ground to support a GFCI installation.


I think this is due to 240 being split into 110 in the controller and neutral is needed to GFCI the 110 side as well? Thats my guess
 
SanMarzano said:
Standard 220V, 30A 3-Prong "Dryer" Plug with 6 ft. cord. GFCI type breaker cannot be used with the 3-wire model. Order the 4-wire version with separate neutral and ground to support a GFCI installation.

I think this is due to 240 being split into 110 in the controller and neutral is needed to GFCI the 110 side as well? Thats my guess

The quote refers to their controller, not to electricity in general.
 
Lots of valuable information in this post regarding BIAB using the High Gravity system. I'm planning to buy the 62 quart High Gravity model in a few months, once we get settled into our next house. The only place I would be able to brew is in the garage with the doors closed so the neighbors can't see what I'm up to.

What size, how many cfm, would you recommend to exhaust the boil vapors outside and prevent the garage from becoming a steam room? I know the guidelines used for a sizing bathroom exhaust fan recommend changing the air 8 times an hour.

To calculate the CFM's needed to comply with the ACH guidelines you're supposed to multiply the length times the width times the height of the brewroom, to get the total cubic volume of air in the room.

Next multiply that number by eight, to represent the number of air changes per hour, and then divide that number by 60 to get the number of cubic feet per minute needed. I wonder if this formula works as good for hot wort vapors and hop aromas as it does for bathrooms.
 
The only place I would be able to brew is in the garage with the doors closed so the neighbors can't see what I'm up to.

So your neighbors hate awesomeness?

Or perhaps they like it too much and dip into your supply too much?
 
So your neighbors hate awesomeness?

Or perhaps they like it too much and dip into your supply too much?
You can pick your friends but you can't pick your neighbors.

Just my luck I'll have either end of the spectrum the neighbor on the left hates the smell of brewing beer while the neighbor on the right loves drinking my homebrew. Either way I'm not used to attracting a crowd during brewday, close friends and family excluded of course. I guess I'm just an introverted indoor basement brewer at heart.

Right on man. Just messin' with ya. You'll have to post once you get your high gravity system up and running. It's a pretty sweet-looking and tempting setup - I've been eyeing it as well. This thread is great for getting feedback on it. Good luck with the neighbors and enjoy the brewing.

Cheers.
 
I did my test run today with water. Below is what I noticed;

1)Check all fittings I had issues primarily on the lid where the T fitting meets the lid and the thermo coupler
2)As noted by someone else the mash temp fluctuates 2-3 degrees higher than the set point. This can be adjusted by lowering your set point by a degree or two
3)the controller has a slight buzz, anyone else hear that?

Test run was with 6 gallons of water at 84 degrees
a)Took 16min to get to 156 degrees and 31min to get to a boil
b)Evaporation was 1.5 G per hour (doe that seem right?)

Looking forward to brewing on it soon

Definitely check the fittings. If others end up getting this system, save yourself some pain and disassemble the fittings, throw a couple wraps of teflon tape on there, and re-tighten it. I've had no issues after doing that and I've got about a dozen batches on the system now.

As for your other observations, I've recently discovered a lot depends on where you've got that analog dial set. Based on your times and evap., my guess is you have it cranked. I do that to come to mash temp and go to boil, but I've found you need to feather it down to better control the mash. I think that's why it seems to overshoot so much. I took the dial down between 1/2 to 2/3 during my last batch and it held temp much better. When I had it too low, it actually was missing on the low end. So the sensitivity could certainly be tuned better, but you can adapt with the analog dial.

I also don't have it going full out on the boil. I took it up to where I get a nice boil and made a mark that's probably around 2/3 to 3/4 full. At that setting, I have a steady boil, but only get about 1 gal/hr evaporation. If you've got it full tilt, 1.5 gal/hr sounds right. I think I tried that once. No reason you can't do that I suppose if you plan for it, but I was concerned about the extreme boil causing junk to build up on my element.

One other reason I love this system. On my last couple batches, I was having an issue where my sprayer tip was coming loose. No big deal and I put it back on. Well on my last time, I cross-threaded it and ruined it. I went to High Gravity to ask for a replacement. Even despite telling them it was my own dumb ass that broke it, they sent me a replacement assembly no charge. Can't beat that customer service.


Thanks for the tips. As for the 60 min boil, I did not have it running full on, rather I dialed it back a bit. It was 95 degrees and dry here..I wonder if thats the issue. One thing I noticed was that the spray head was a rainbird shrub sprayer.......Anyway we can find out if they are food safe?
 
OK. I hate to keep asking the same questions, but . . . how are folks enjoying their High Gravity Electric BIAB system? Any new kinks to iron out?

How is the EBC-SV controller working out?

Are you still using the basket and is it draining well for you?

I should be ready to restart brewing in a few months as I get some other projects going around the house - including some plumbing and electrical work.

Thanks,
Keith
 
kzimmer0817 said:
OK. I hate to keep asking the same questions, but . . . how are folks enjoying their High Gravity Electric BIAB system? Any new kinks to iron out? How is the EBC-SV controller working out? Are you still using the basket and is it draining well for you? I should be ready to restart brewing in a few months as I get some other projects going around the house - including some plumbing and electrical work. Thanks, Keith
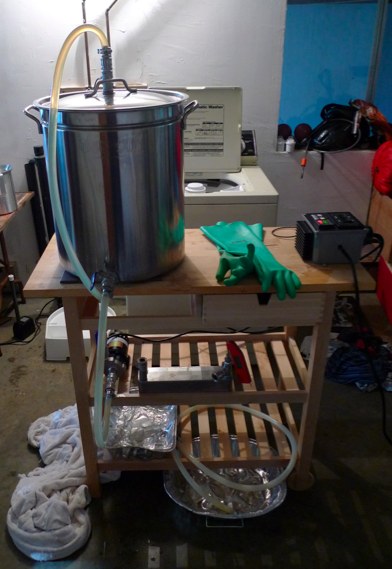
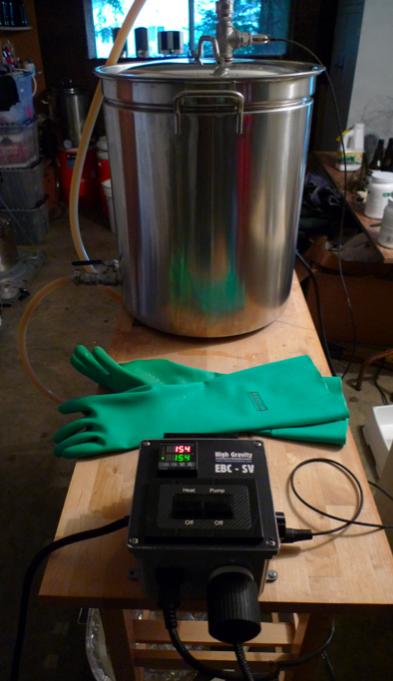
Still love it. I've learned how to better use the analog dial to help maintain the mash temp better which was one of my issues I was having. I keep it at about 50% and my mash easily stays within a degree.

I still use the basket and have no problems. Honestly, the thing has half inch holes in it. For those that think the basket is the cause of drainage problems, well, fluid dynamics isn't a strong suit. However, I have discovered the bag plays a huge part in proper draining. Using the more coarse bag that came with the system I have absolutely no problems. When I used a finer mesh bag I had though, I did run into issues if I didn't have the bag perfectly positioned. So I've stuck with the coarse bag and haven't looked back. My beers are perfectly clear and I crush pretty fine. If you insist on the fine mesh bag, some others have gotten around it by throttling the pump. Maybe bigger basket holes would help that, but I'm not too sure why when the problem is getting the fluid out of the bag through the finer mesh.
 
Got mine yesterday and set it up for a mock brew this morning. All I can say is AWESOME! The system ran flawlessly after Dennis at High Gravity was nice enough to help the electrically stupid (me) trouble shoot my spa panel GFCI. The EBC-SV controller is a breeze to use and the power adjustment knob makes dialing in your temps very smooth. I couldn't be happier with the system and the technical support from High Gravity. Now to add a sight glass and a whirlpool port and get to brewing.
 
Well I've been using the eBIAB system for about 6 months now and am really enjoying it. It took a while to figure out where I want the analog power knob for mash (a feather under 1/2 way / 12 o'clock) and boil (about 1 o'clock gives me a boil off rate of 1g per hour).

I have also incorporated a plate chiller that will chill my wort down to 60 or so in about 7 minutes.

Cleaning is great - I rinse the kettle out, add about 7 gallons of PBW solution, set the temperature to 150 and circulate for 15-30 minutes. I then switch the wort in/out hoses for the plate chiller and do the same again. After that, a rinse of hot water and then I run a couple of gallons of StarSan through both ways for a minute or so. The element gets nice and shiny without needing any scrubbing.

I am getting an efficiency of around 75-80% on brews around 1.050-1.060. In the 1.070 range, I am looking at around 70%. The highest gravity brew I have done on this is an imperial stout (OG 1.085) - I got 60% efficiency, but that was when I was still learning the system.

I brew in the basement with all the windows open. It can get a little steamy, but nothing major. If I owned the place I'd look at getting a vent installed, but I only rent so...

Attached is a picture of my current setup. Any questions, I'd be happy to answer them.

Screen Shot 2013-11-04 at 3.10.22 PM.png


Screen Shot 2013-11-04 at 3.10.33 PM.jpg
 
NWMushroom said:
It can get a little steamy, but nothing major. If I owned the place I'd look at getting a vent installed, but I only rent so...

You should at least put a fan in there for your landlords sake
 
My basement is actually above ground. I have 4 large windows and with the door open there's great airflow. I don't think it's a big deal TBH.

Your mileage may vary.

Did you buy your kettle from high gravity or did you copy their design yourself? I'm just wondering if you are using their sprinkler or came up with your own idea. I'm looking to do the exact same thing
 
I bought their system, but added my own pump (with ball valve) and a plate chiller.

NWMushroom,
Sorry about splitting hairs, but I'd like to restate/clarify huntb's question:

Did you purchase the whole High Gravity's BIAB system? The reason I'm asking is because, IIRC, their system includes a pump.

Did you purchase a different pump to use instead of their pump, or did you purchase an additional pump to add to your system for a different purpose?

Sorry about asking for another answer to the same question.

Thanks,
Keith
 
Hi Keith

No worries. I had my own pump (Stainless Chugger Center Pump) so I didn't buy the pump with the system. I believe their system comes with the inline version of the SS Chugger pump. There is an option to remove the pump from the order if you already have one.

I opted for the silicone tubing and I also requested stainless steel quick connectors instead of the polysulfone quick connectors that come in the standard package.

As mentioned before, I also added my own Duda Diesel plate chiller from Bobby at BrewHardware:

http://brewhardware.com/plate-chiller

If you have any more questions (or want to see any specific pictures of the setup), let me know.
 
Thanks, NWMushroom. Going back to the highgravitybrew website, I see where one can omit the pump. I will very likely purchase this setup. I planned out a controller build, but I simply don't have the energy to build from scratch. I don't mean to brag, but I have a little more money than time. Additionally, you may notice from my avatar that I'm an amateur organist. I have a pipe organ project in my basement with 500+ pipes that needs to be assembled as well - quite a money drain itself.

I'm going to post a question regarding pumps on the equipment forum so as to not hijack this thread.

Thanks, again, for clarification.
Keith
 
I opted for the silicone tubing and I also requested stainless steel quick connectors instead of the polysulfone quick connectors that come in the standard package.

Thanks, again. I saw where one could request the silicone tubing, but did not see where one could request the SS connectors. I imagine that one can communicate with HighGravity to make such a request. I assume that the SS connectors are a bit more expensive.

I would probably add a ball valve after the pump as output must be controlled by impeding flow after the pump as opposed to before the pump.

Keith
 
I dont have this system but I have a very similar system with the ball valve before the pump and I am able to control the flow just fine. I dont believe it has to be after the pump. Just an FYI in case that helps anyone.
 
I have the envy of your high grav system.

Still fiddling with a 32l tamale steamer and a heatstick. I enjoy seeing the wonderful build-outs that others have created or bought. How does one know of excellence if you don't see it?
 
I dont have this system but I have a very similar system with the ball valve before the pump and I am able to control the flow just fine. I dont believe it has to be after the pump. Just an FYI in case that helps anyone.

It depends upon the type of pump, but for centrifugal pumps like we normally see in brewing, starving the input with a valve is not recommended. Can it work? Yes, but you are increasing the likelihood of problems with cavitation, pump running dry, overheating, etc. Placing the valve on the output of the pump, instead, mitigates all of these issues.
 

Latest posts

Back
Top