Best designed immersion chiller?

Homebrew Talk - Beer, Wine, Mead, & Cider Brewing Discussion Forum

Help Support Homebrew Talk - Beer, Wine, Mead, & Cider Brewing Discussion Forum:

This site may earn a commission from merchant affiliate links, including eBay, Amazon, and others.

LibertyTrailBrewing

Active Member
Joined
Jan 8, 2011
Messages
32
Reaction score
1
Location
Schwenksville
I'm planning to buy an immersion chiller and would like some feedback regarding which immersion chiller has the best design for my purposes.

Here are some specifics of my situation:
1. I have a Bayou classic 11 gallon kettle that is about 17" high
2. I plan to do 5 gallon full boil batches
3. I'm not planning to make my own chiller

I've researched and read the threads here concerning chillers. It seems that a 25' copper immersion chiller should be fine for 5 gallon batches. However, I have noticed that there seems to be quite a few 25' chillers out there with varying designs. So, here are my questions:

1. Are garden hose connectors superior to vinyl tubing connected with clamps?

2. It seems to me that there would be less of a chance of unwanted water leaking into your wort if the intake/outtake tubes hung outside of the kettle and curve downward. Am I correct in this assumption or being too anal?

3. Are the 25' chillers that hang on the side of the kettle too short for my kettle since the kettle will only be about half full when its time to cool?

4. I welcome any reccomendations for specific immersion chillers that will fit my needs.

Thanks in advance for any replies:D
 
1. In my opinion yes because I connect directly to a garden hose, but this is a preference thing

2. You absolutely want the ends of the chiller to stick over the edge of the pot and turn down for the reason you suggested. I wouldn't consider a chiller that wasn't constructed this way.

3. You'll have to check dimensions, as long as the whole coil is submerged, you'll be fine. the hottest wort is near the top of your kettle, so it doesn't have to touch the bottom if it will hang on the side.

4. Not really, but I would recommend 1/2" tubing as more surface area = more cooling.

Thanks for the reply.

3. The whole coil getting submerged is what I am concerned with. Since my 11 gallon pot is 17" high and it will be half full with 5.5 gallons of wort, I'll have 8.5 inches of space between the wort and the lip of the kettle. This means the intake/outtake tubes of the chiller will need to be that long before the coil starts.

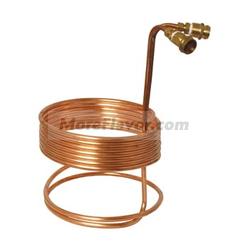
I had another thought. It looks like the design of this B3 chiller would allow you to raise and lower the height of the coils by compressing or expanding the bottom part. Is this correct? can you accomplish this with most chillers?
7035.jpg


4. Can you get 25' chillers with 1/2" tubing? I've only seen 50' chillers with 1/2" tubing

Thanks again.
 
I just came across this chiller from NY Brew Supply. Their site states the overall height of the chiller is 16" to the top of the risers. The coil height is 6.5". So it would appear that this chiller would hang on the side of my kettle with the coils just below the surface of my 8.5 inches of wort :rockin:

I'm not exactly a math wiz, so someone correct me if I'm wrong.
wort-chiller-copper-immersion-3825-gh-full.jpg
 
I had another thought. It looks like the design of this B3 chiller would allow you to raise and lower the height of the coils by compressing or expanding the bottom part. Is this correct? can you accomplish this with most chillers?
7035.jpg

That really isn't meant to adjust the coils, i don't think. I think the basic idea is that the heat will rise in the kettle, so why put a lot of effort into cooling the part that isn't the hottest.

If you are still just looking, i might suggest you check out the idea behind whirlpool chilling. Even if it's too much for right now, you might consider steps that would allow you to upgrade later. You also don't need two pumps if you use an aquarium pump or just straight tap water for the coil feed.
 
You said you won't be building, but, if you change your mind. Follow the link in my sig.

Fastest time from boiling to pitching time I got was 9 minutes. ;)

That is a pretty cool looking design. Nice work. Sounds easy too. I think I'd have to get quite a bit more copper since my tukey fryer is 3.5 gallons larger than yours. With the cost of copper what it is, I think I'd rather spend a few extra bones and get a nice premade one with garden hose fittings.
 
That really isn't meant to adjust the coils, i don't think. I think the basic idea is that the heat will rise in the kettle, so why put a lot of effort into cooling the part that isn't the hottest.

If you are still just looking, i might suggest you check out the idea behind whirlpool chilling. Even if it's too much for right now, you might consider steps that would allow you to upgrade later. You also don't need two pumps if you use an aquarium pump or just straight tap water for the coil feed.

I understand the purpose is to get the coils up near the top of the wort. However, since copper is so maleable I was thinking the loosely coiled bottom part would make it easy to make adjustments to the height of the coils.

That whirlpool chilling was a pretty interesting read. Looks like it would be pretty easy to add the whirlpool tube to the immersion chiller once I get one. Then you just need tubing and a pump. Easy.

I'm wondering if you could get similar results for ale pitching temperatures by simply stirring the wort with a spoon and causing the whirlpool effect. I do realize the pump method allows you to set it up and walk away, which can certainly be more convenient. I think the real advantage to the pumping method is the ability to circulate ice water for faster cooling or getting down to prime lager pitching temps... but you could still stand there and stir it :)

yeah, you can stir... enjoy that.

seriously, though, it's not hard to retrofit. Using the pump means that it happens at a much faster speed and allows you to do something else while you wait for it to cool. It's not necessary, but very convenient.
 
yeah, you can stir... enjoy that.

LOL.... I hear you bro.

That whirlpool retrofit is definitely a good idea. I suppose those 10 minutes or so you would be standing there stirring you could be getting your fermenter and such ready. It definitely looks easy enough to do without much cost.


Wow, thats a good price. Wonder what the dimensions are? I think I'm gonna go with the NY Brew Supply 25 footer. I like the dimensions of that one. I think it will work with my current kettle really well.
 
LOL.... I hear you bro.

That whirlpool retrofit is definitely a good idea. I suppose those 10 minutes or so you would be standing there stirring you could be getting your fermenter and such ready. It definitely looks easy enough to do without much cost.


Wow, thats a good price. Wonder what the dimensions are? I think I'm gonna go with the NY Brew Supply 25 footer. I like the dimensions of that one. I think it will work with my current kettle really well.

Resting on the counter with the coils compressed it's 12" tall, the coils start 7" down from the hose adapters. The coil is 10" in diameter.
 
Resting on the counter it's 12" tall, the coils start 7" down from the hose adapters. The coil is 10" in diameter.

Hey.... thanks for taking those measurements, I really appreciate it.

I think that one would leave the coils about 1.5 inches above the wort in my kettle. That makes the decision easier to go with the NY brew version. Too bad though, I could have saved ten bones going with the learn to brew chiller.

Thats what I get for having an 11 gallon kettle.... I almost went for a nine gallon, but for 17 bones more I though the extra 2 gallons of head room for 5 gallon full boils was worth it.

Thanks again for your time.
 
Back
Top