ANVIL FOUNDRY ALL-GRAIN BREWING SYSTEM

Homebrew Talk - Beer, Wine, Mead, & Cider Brewing Discussion Forum

Help Support Homebrew Talk - Beer, Wine, Mead, & Cider Brewing Discussion Forum:

This site may earn a commission from merchant affiliate links, including eBay, Amazon, and others.
My guess would be is that you recirculated way to fast and compacted the grain bed on this brew and the remaining water filled the malt-pipe to the brim.

Good idea for what may have happened. I do a water / grain ratio aiming for 1.33, then I add another 10% for the space around the pipe, then another 3 qts for the space under the pipe. Just so I actually have close to my intended 1.33 where the grain actually sits.

Too little water (if say you went with 1.25 and didn't factor the dead space), plus a semi stuck or stuck mash, and the bottom could well have been empty.
 
Rick S mentioned he was uploading a Beersmith Profile for you 👍 Anvil actually did profiles for their Foundry (6.5 & 10) on Beersmith maybe a year ago. I’ve been using it since that time and find it to be spot on. If you don’t see it you may want to send Brad (BeerSmith) an email. You may need to check your version and ensure you can access their info from the Cloud.

Cheers 🍻

KBW.
Thanks. I did set the Foundry as my equipment profile in BeerSmith but was unsure of what mash step to use. I ended up using the BIAB and the numbers were very close to the manual for the Foundry. I think I just need to play around with the program some more to get an idea of how it works.
 
What was the total mash volume for this batch? Grains + strike water? By my calcs, I believe the malt pipe for the 10.5gal foundry is 7gallons. So was your total mash volume less than 7gallons? Ive never had this error in about 45 brews but Ive always had greater volume than the malt-pipe can handle so if the mash got stuck, the water would overflow and render any chance of a dry fire (E3) null. My guess would be is that you recirculated way to fast and compacted the grain bed on this brew and the remaining water filled the malt-pipe to the brim. Start recirculation very slow, ramp up a little when stepping but it also helps to stir at least the top of the grain bed to avoid compaction and stuck mashes.
I used 6.3 gallons of strike water and 9.75 lbs of grain. I was not recirculating because my I was doing a multi-step infusion and started it at 122 degrees. I'm not sure if it was the right thing to do or not? but I was not going to start recirculating until I ramped up to 148 degrees for the 30 minute rest there. I was then going to stop recirculating for the final 30 minute rest at 158 degrees. The grain bed was not compacted.
 
I was not recirculating because my I was doing a multi-step infusion
Maybe i am off on this, but i think even when doing a rest you want a gentle recirculation to help even out the temperature. You don't have to, but i think the ability to recirculate and maintain an even temp is why these all-in-one's are better than the old school cooler.
Again, maybe i am off on that.
 
Thanks. I did set the Foundry as my equipment profile in BeerSmith but was unsure of what mash step to use. I ended up using the BIAB and the numbers were very close to the manual for the Foundry. I think I just need to play around with the program some more to get an idea of how it works.
Yeah BSmith takes a while to get used to. I’ve been finding minor discrepancies at times between data calculations but not enough to make big difference. The Anvil is a BIAB system but mash steps depend on recipe of course…I’m still playing with mine on step mashes.

Are you liking the Foundry so far? I’ve only used mine 5-6 times but really like it. It’s convenient, streamlined, and just plain works for me when doing quick test batches. Have 4 new Anvil recipes on the schedule for next 2 weeks.

Cheers 🍻

KBW.
 
I am considering an Anvil Foundry and want to make a dual voltage GFCI extension cord so I can plug it into my dryer outlet or into a regular 120v outlet just by adding or removing the extension.

In the Amazon reviews for this in-line Southwire (TRC) dual voltage GFCI product a couple describe using this part to make the extension cord for an Anvil and one shows a picture of the parts used.
https://www.amazon.com/dp/B004SBV6B...olid=38BLVKFA5E23M&psc=0&ref_=lv_ov_lig_dp_it
Unfortunately Southwire apparently has discontinued that part (25000016-6) and I can find no one including Amazon that has it in stock.

I found the product below on Southwire's site which looks like it would also work but I can only find retailers who will sell it in 5 or 6 unit lots.
https://southwire.com/power-managem...age-user-attachable-elci-black/p/p-26140010-6
Has anyone made something like this for their Anvil and if so what parts did you use?

Just came across this - FYI only. I have separate GFCI breakers so never used these. Looks like they can be purchased individually.

https://shop.worldcordsets.com/shop...manual-resetuser-attachable-gfci-inline-style
Cheers 🍻
 
I operate my 10.5 Founders on 4 red bricks. I arrange the bricks specifically to allow me to reach under and hit the reset switch.

I keep mine on this, it seems like I was always moving it to get to my FC anyways. I've had the rare occasion of needing to move the Foundry on a brew day because I didn't put enough space between Items 1 & 2, so it has helped for those scenarios as well.

https://harborfreight.com/18-in-x-12-in-1000-lb-capacity-hardwood-dolly-63098.html
 
Last edited:
Does anybody do a mashout with their Foundry? My first system was a PicoBrew C, and they included that step with all of their kits. You effectively just pushed go and watched it do its thing, but I was curious enough to try and figure out what it was doing and why.

This is a step that I think I've done on a couple of my brews w/the Foundry, for no other reason than I thought maybe it needed to be done? But if not....then..one less step.
I tend to agree with @tracer bullet. Not really sure if it matters too much for the all in one systems. BUT, for the extra 10 minutes out of my life, I still do it too lol. My rationale is that is supposedly decreases the viscosity of the wort making for a better later and sparge. Thats the rationale I use. I really am not sure about the "locking in the wort profile" benefit considering the time from mash to boil really isn't that large. So, if you do full volume mashes with no sparge and you just lift the basket and boil, I really don't see the benefit. But if sparging, like I do regularly, there MAY be a benefit. Its one of those variables that I hadn't cared to explore myself though.
 
The chances of a mashout making any significant difference, either way, in the 5-10 gal batch is almost zero. How much thinner is a mash at 168 to one at 153? I don't know the answer, but my guess is not much. If you have 100+ lbs of grain to lauter/sparge it may make a difference, but with a dunk sparge or a 1-2 gals poured over, don't waist your time with a MO rest. JMHO. :mug:
 
The chances of a mashout making any significant difference, either way, in the 5-10 gal batch is almost zero. How much thinner is a mash at 168 to one at 153? I don't know the answer, but my guess is not much. If you have 100+ lbs of grain to lauter/sparge it may make a difference, but with a dunk sparge or a 1-2 gals poured over, don't waist your time with a MO rest. JMHO. :mug:
Viscosity reduction from 150°F to 170°F is about 20%. Diluting the wort with sparge water gives a much larger reduction in viscosity. If doing full volume (no-sparge) mash/lauters, the viscosity starts lower because the concentration of sugar in the wort is lower.

Brew on :mug:
 
Viscosity reduction from 150°F to 170°F is about 20%. Diluting the wort with sparge water gives a much larger reduction in viscosity. If doing full volume (no-sparge) mash/lauters, the viscosity starts lower because the concentration of sugar in the wort is lower.

Brew on :mug:
Doug, I looked at the link, and I can't make much sense out of it, but it sure doesn't look like it is a 20% reduction in viscosity between 150 f (65.6c) and 170 f (76.7c) on the graph at any of the concentrations listed. I guess a mash out may liberate a gravity point or two and it it works for those who do it great. I'm just not going to sweat it. I lift my basket and set it to boil, if I sparge I'll dunk the basket in hot/warm water or pour some through the grain and call it a day. Brew on :mug:
 
Doug, I looked at the link, and I can't make much sense out of it, but it sure doesn't look like it is a 20% reduction in viscosity between 150 f (65.6c) and 170 f (76.7c) on the graph at any of the concentrations listed. I guess a mash out may liberate a gravity point or two and it it works for those who do it great. I'm just not going to sweat it. I lift my basket and set it to boil, if I sparge I'll dunk the basket in hot/warm water or pour some through the grain and call it a day. Brew on :mug:
Looking at the data for 20% sugar (SG =1.083) the viscosity at 150°F is 0.731, and at 170°F is 0.613 (units don't matter when looking at % change), so the percentage reduction in viscosity is:

% Reduction = 100% * (0.613 - 0.731) / 0.731 = -16%​
So, a bit less than 20%. The point of my previous post was that the viscosity reduction wasn't all that large.

Brew on :mug:
 
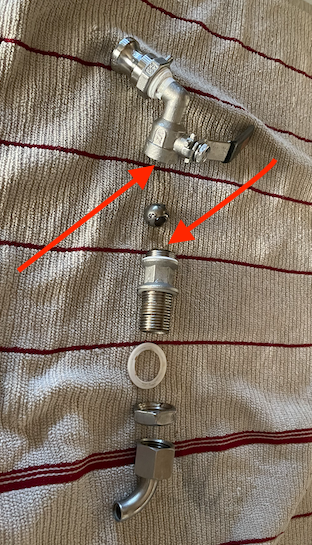
Has anybody had to replace the white nylon washers that surround the ball in the ball valve?

I looked on Anvil’s site and didn’t see it listed as a replacement part. Wondering if it standard enough that Home Depot would have it, or if a trip to a specialty store like Ace Hardware or Tru Value is needed?
 
Interesting question. Are they normal, or sort of cup shaped for the ball itself? Hopefully it's a somewhat generic part, if so online might be an option. McMaster Carr?

Any issues with yours or gathering backups just in case?
 
Does anybody do a mashout with their Foundry? My first system was a PicoBrew C, and they included that step with all of their kits. You effectively just pushed go and watched it do its thing, but I was curious enough to try and figure out what it was doing and why.

This is a step that I think I've done on a couple of my brews w/the Foundry, for no other reason than I thought maybe it needed to be done? But if not....then..one less step.

I do a mash out, but usually only for 5 minutes as I don't think it really adds much unless you are sparging which I am not. I just look at it as well I need to get to boil from mash temps, so need to pass 168-172 anyway, so no harm. Then I pull the basket and while it drains I will let the wort continue heating towards a boil.
 
Last edited:
Hey MBG - who was the winner? Salivating beer lovers would like to knowl 🥴

If you have a recipe that was better than original please share...if you already have, my apologies. I’ll fire up the Foundry and try the clone 👍

Cheers🍻

KBW.

@KBW PilotHouse - Sorry for the delayed response but my son and I did the taste test this past weekend. Five of us tasted the three beers and mine won! The real Zombi Dust had a harsh bite at the beginning whereas mine and my sons were very smooth. Mine just seemed to have a bit more hop taste to it.

I dry hopped in my AllRounder in a muslin bag and I seemed to not give it enough space to expand the pellet hops so I put them in a nylon hop bag and put it in the keg for a couple more days. This probably gave mine the better hop taste.

My sons beer was quite a bit clearer then mine and the real ZD. What was strange my sons beer was a darker than the other two. He and I used the same grains. It was fun doing this again with him.

ZD.JPG
 
Interesting question. Are they normal, or sort of cup shaped for the ball itself? Hopefully it's a somewhat generic part, if so online might be an option. McMaster Carr?

Any issues with yours or gathering backups just in case?

They're cupped and sit inside the upper piece and nestled into the top of the below piece.

Screen Shot 2021-10-20 at 9.26.29 AM.png

Problems no..but I do need to replace at least one of them.

I think I brewed a couple of times before I decided to take it apart and see....yuck.

So now I take it after every brew day. But I must have cranked down on the lower one a little bit too hard or something at some point because it sits kinda off kilter when peering down the cavity. This presumably reduces flow a little bit.
 
Last edited:
@Knightshade Im just curious as to what your process was early on when you started using this system for clean up? Reason why I ask is that Ive brewed on the foundry 47 times now and have taken apart the ball valve 5-6 times (can't remember) and while there is a little bit of gunk, its really not too bad at all. However, I do run a PBW CIP routine after every brew at 130 degrees for one hour with the ball valve at 3 different open positions for about 20 minutes each. All in all, I haven't seen the need to replace any of the parts of the bag valve yet as they always get squeaky clean.
 
@Knightshade Im just curious as to what your process was early on when you started using this system for clean up? Reason why I ask is that Ive brewed on the foundry 47 times now and have taken apart the ball valve 5-6 times (can't remember) and while there is a little bit of gunk, its really not too bad at all. However, I do run a PBW CIP routine after every brew at 130 degrees for one hour with the ball valve at 3 different open positions for about 20 minutes each. All in all, I haven't seen the need to replace any of the parts of the bag valve yet as they always get squeaky clean.

You’ve been better than me then. Outside of my last 2 brew days, I’ve never run a cleaning cycle outside of my first setup of the equipment. It involved a lot of scrubbing, rinsing, dumping, repeating. Some portion in there would involve letting water run through the valve.

For some reason…I thought that was easier less work, with less water waste. I could not have been more possibly wrong. Evidence in that my back hasn’t been SCREAMING 🤬🤬🤬🤬 at me after these last two brew sessions.

I did need to take it apart after my last one though…because, well..basically I’m an idiot. First recipe(kit) that used whole hops and I thought the system could handle it w/o a hop spider. Long story short.

*Ball valve was clogged.

*I tried to transfer with the only racking cane I had available which was designed for 1.5G batches…

*Which stopped really being useful after about 2G

*Then had to dump from Foundry into keg (fermenter) via a REALLY small (but biggest food safe one I had) funnel.

At least it wasn’t boring though…
lol TBH Im not that systematic with the three ball valve positions when PBW CIPing. I usually am running the CIP around dinner time so I have time for family stuff while it runs so no big deal for me. My CIP strategy also helps making the anvil pump squeaky clean as well so good bonus. I haven't ever used a hop spider but also haven't ever used whole cone hops either so my valve hasn't ever gotten clogged. Glad you had some excitement in your recent brew day though! lol
 
I do a mash out, but usually only for 5 minutes as I don't think it really adds much unless you are sparging which I am not. I just look at it as well I need to get to boil from mash temps, so need to pass 168-172 anyway, so no harm. Then I pull the basket and while it drains I will let the wort continue heating towards a boil.
The purpose of a mash out is to make it easier to sparge. If you do their no sparge method and pull your basket then you probably don’t need to do a mash out.

I found that pulling the basket really clouds my wort though and defeats the purpose of doing an hour mash with a recirculating pump to get clear wort. Not to mention having to deal with that stupid basket rest thing that flies out at the slightest touch. So I do not pull my mash basket now. I drain from my Foundry into my brewpot for boil on my stove top and I sparge. So I do a mash out. 170 for 10 min.
 
They're cupped and sit inside the upper piece and nestled into the top of the below piece.

View attachment 746374
Problems no..but I do need to replace at least one of them.

I think I brewed a couple of times before I decided to take it apart and see....yuck.

So now I take it after every brew day. But I must have cranked down on the lower one a little bit too hard or something at some point because it sits kinda off kilter when peering down the cavity. This presumably reduces flow a little bit.

Just from my experience, Anvil probably has these available but probably not on website. If you call them I suspect they’ll send you sever replacements, and perhaps at no cost. They did that for me with adapters for Anvil thermometers.

Cheers 🍻
 
@KBW PilotHouse - Sorry for the delayed response but my son and I did the taste test this past weekend. Five of us tasted the three beers and mine won! The real Zombi Dust had a harsh bite at the beginning whereas mine and my sons were very smooth. Mine just seemed to have a bit more hop taste to it.

I dry hopped in my AllRounder in a muslin bag and I seemed to not give it enough space to expand the pellet hops so I put them in a nylon hop bag and put it in the keg for a couple more days. This probably gave mine the better hop taste.

My sons beer was quite a bit clearer then mine and the real ZD. What was strange my sons beer was a darker than the other two. He and I used the same grains. It was fun doing this again with him.

View attachment 746364
Thanks for sharing this! And congrats on winning! I’ll be doing a Z-Dust clone this spring to kick off summer 2022 on Memorial Day. I’ll follow your recipe 😁

Cheers 🍻

KBW.
 
Just from my experience, Anvil probably has these available but probably not on website. If you call them I suspect they’ll send you sever replacements, and perhaps at no cost. They did that for me with adapters for Anvil thermometers.

Cheers 🍻

They’re just going to ship me a new valve today. As you suspected, they do have the part but…..that damn supply chain.

I’m paraphrasing a bit, but they’re out and can only get them when they order foundries or bucket fermenters and due to shipping delays…

This is twice now where their customer service has completely blown me out of the water.
 
The purpose of a mash out is to make it easier to sparge. If you do their no sparge method and pull your basket then you probably don’t need to do a mash out.

I found that pulling the basket really clouds my wort though and defeats the purpose of doing an hour mash with a recirculating pump to get clear wort. Not to mention having to deal with that stupid basket rest thing that flies out at the slightest touch. So I do not pull my mash basket now. I drain from my Foundry into my brewpot for boil on my stove top and I sparge. So I do a mash out. 170 for 10 min.

Sure pulling the basket will cloud the wort because it's splashing, but doesn't it clear up after the boil when it settles after chilling? I whirlpool during chilling and once at temp will pull chiller, let it whirlpool for 10 more minutes, then shut off whirlpool and let it sit for 15-20 minutes and wort is pretty clear. Below is my Helles brewed this past Saturday after doing these steps and pulling a sample. Will say I do use whirlfloc and Brew Tan B which combine to drop all the suspended protein, so when I say clear wort, I really mean clear.

246440278_10224537422537173_7000315977362883976_n.jpg
 
The purpose of a mash out is to make it easier to sparge. If you do their no sparge method and pull your basket then you probably don’t need to do a mash out.

I found that pulling the basket really clouds my wort though and defeats the purpose of doing an hour mash with a recirculating pump to get clear wort. Not to mention having to deal with that stupid basket rest thing that flies out at the slightest touch. So I do not pull my mash basket now. I drain from my Foundry into my brewpot for boil on my stove top and I sparge. So I do a mash out. 170 for 10 min.
Is the reason you don't boil in the Foundry only because you don't want to pull the mash basket?
 
So how long do you think before Anvil does something similar for the Foundry? I know that some of your are pushing the absolute limits of this thing already. Might be handy for somebody who bought the 6.5, who finds themselves wanting to brew bigger batches and doesn't want to buy a 10.5 too?

 
So how long do you think before Anvil does something similar for the Foundry? I know that some of your are pushing the absolute limits of this thing already. Might be handy for somebody who bought the 6.5, who finds themselves wanting to brew bigger batches and doesn't want to buy a 10.5 too?


What fun you'll have when one of those clips fails (or you fail to secure one properly.) :oops:

Brew on :mug:
 
What fun you'll have when one of those clips fails (or you fail to secure one properly.) :oops:

Brew on :mug:
It’s a nice idea in theory, but hoping Anvil doesn’t go that route. I agree with Doug - those clips seem sketchy. If the extension were to leak during boil it’d be a legit safety concern.

It‘s possible they’d never leak but is it worth the risk? I’m in the camp with selling the smaller foundry, saving for the additional cost and buy a larger one. I have a Foundry 6.5 and would never try to extend the height. Just MHO though.

Cheers 🍻
 
Anyone have a hop spider recommendation? One that can be moved to the center of a wort chiller when the time comes? I’m also considering wilser hop bags.

edit: this for the 10.5 gallon foundry
 
Anyone have a hop spider recommendation? One that can be moved to the center of a wort chiller when the time comes? I’m also considering wilser hop bags.

edit: this for the 10.5 gallon foundry
sorry I personally don't have a recommendation on this. Ive always just let my hops roam free and take a little bit more losses into the fermenter after letting the hops and trub settle. I have a wilder hop bag which I got along with my wilser bag for mashing but never used the hop bag.
 
Does anybody do a mashout with their Foundry? My first system was a PicoBrew C, and they included that step with all of their kits. You effectively just pushed go and watched it do its thing, but I was curious enough to try and figure out what it was doing and why.

This is a step that I think I've done on a couple of my brews w/the Foundry, for no other reason than I thought maybe it needed to be done? But if not....then..one less step.

Basically I will just heat from mash temps to 170, but then pull the basket immediately at that temp and will continue ramping up to 200 while the basket drains, then one I remove the basket, bump it up to boil.
 
Back
Top