ANVIL FOUNDRY ALL-GRAIN BREWING SYSTEM

Homebrew Talk - Beer, Wine, Mead, & Cider Brewing Discussion Forum

Help Support Homebrew Talk - Beer, Wine, Mead, & Cider Brewing Discussion Forum:

This site may earn a commission from merchant affiliate links, including eBay, Amazon, and others.
OK, brewed today. NEIPA, ~30% white wheat/oats. This was the second brew I did on this setup with all the modifications I mentioned in post 1462. My RIS in post 1184 didn't utilize the loc-line or ball valve but did use the second kettle for a big beer. But from that RIS experience of draining the wort to the second kettle and having a big sparge with the bag in place was extremely effective (80% mash/lauter efficiency) and easy so I decided to move forward with my current setup with all modifications in post 1462. Last week I used this setup for the first time (belgian dubbel) and nailed 83.7% mash/lauter efficiency but since I was over on my pre-boil volume a little, the corrected mash/lauter efficiency was 82%. So this week I did an NEIPA which would be a true test of this setup since lots of wheat and oats. Mash/lauter efficiency was 78% on the nose. SO happy with this. Below are the pics of my current setup with modifications listed in post 1462.

Mash w/ recirculation pics (nice clear wort, only stirred the top of the bed once at 20 and 60 minutes (90min mash)):
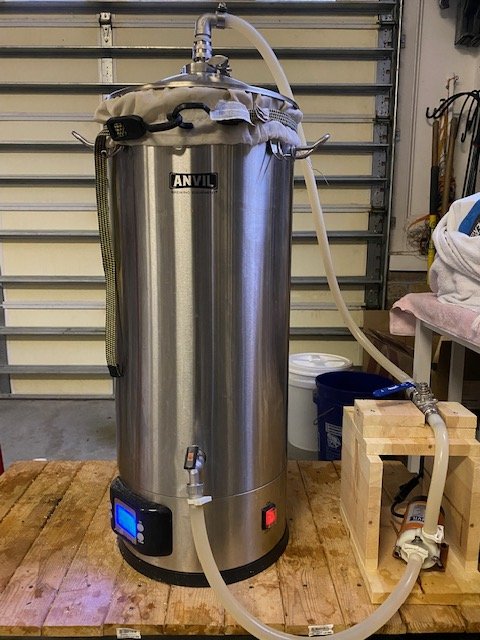
IMG_9266.jpg


IMG_9269.jpg

IMG_9270.jpg


Draining to second kettle and sparging one quart at a time to keep water level at the top of the grain bed. Nice clear wort into second kettle (pic looks red but its not lol).
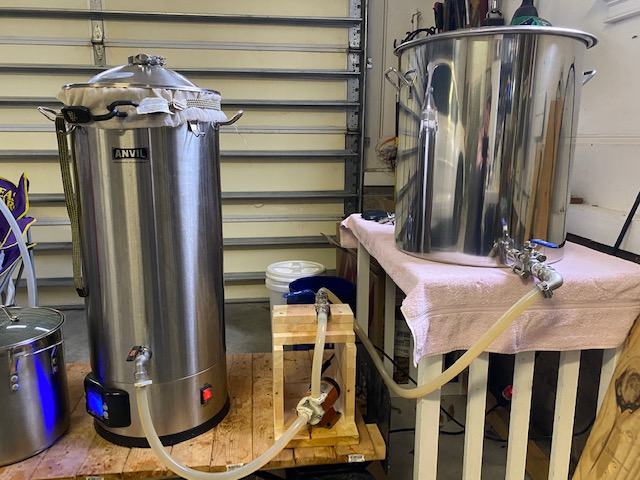
IMG_9271.jpg


IMG_9273.jpg


IMG_9274.jpg


Draining back to kettle for boil after I sparged and lifted the bag to drain:

IMG_9275.jpg


Recirc arm setup at end of hop stand (hops roam free, I don't actually whirlpool) getting ready to put the immersion chiller in and recirculate. FYI, the WP arm points to the right in the picture and the dip tube of the anvil points to the right as well when the nozzle on the outside looks like its down.
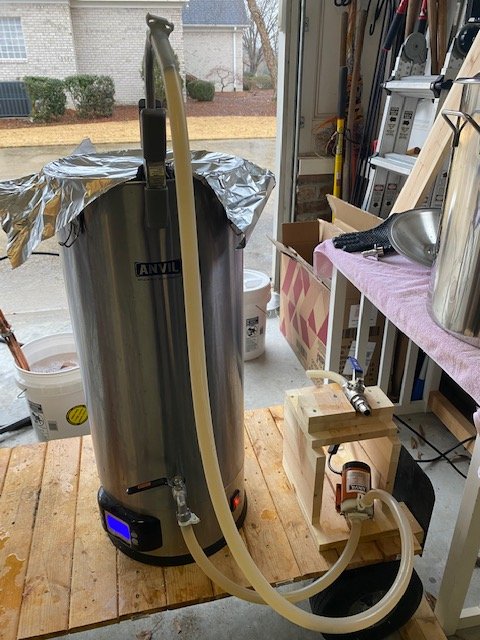
IMG_9277.jpg


So once I chill to pitching temps (took 8 minutes today - rocking the winter temps!) I wheel the hand truck the anvil sits on over to my fermonster housed in its minifridge, start cleaning everything else while the hops and trub settle to get clear wort into the fermenter with minimal trub in the fermenter (about a little less than 0.25 gallon based on my mark). Not bad for free roaming hops :) Poor lighting on this pic. yeast about to be pitched.

IMG_9280.jpg


So thats my current process based on my modifications. Really enjoyable brew day. Hope this helps anyone wanting to do some modifications to the system/setup.

Cheers!
 
OK, brewed today. NEIPA, ~30% white wheat/oats. This was the second brew I did on this setup with all the modifications I mentioned in post 1462. My RIS in post 1184 didn't utilize the loc-line or ball valve but did use the second kettle for a big beer. But from that RIS experience of draining the wort to the second kettle and having a big sparge with the bag in place was extremely effective (80% mash/lauter efficiency) and easy so I decided to move forward with my current setup with all modifications in post 1462. Last week I used this setup for the first time (belgian dubbel) and nailed 83.7% mash/lauter efficiency but since I was over on my pre-boil volume a little, the corrected mash/lauter efficiency was 82%. So this week I did an NEIPA which would be a true test of this setup since lots of wheat and oats. Mash/lauter efficiency was 78% on the nose. SO happy with this. Below are the pics of my current setup with modifications listed in post 1462.


So thats my current process based on my modifications. Really enjoyable brew day. Hope this helps anyone wanting to do some modifications to the system/setup.

Cheers!

Very nice and detailed. Sounds like you are having fun dialing this system in.

Looks like you are pumping uphill into the kettle?

On my last brew I had 80% mash efficiency (my best on the AF) putting the drained grain bag into a 5-gallon Igloo beverage cooler then adding sparge water. It was a bit of a tight fit so I ordered a 10 gallon version of the Igloo so we will see on my next how it works out.

Mike
Thanks man! Glad you are hitting nice efficiencies yourself. What I like most about this setup is that I have ZERO worries of a stuck mash compared to the same exact grain bill inside the bag in the malt-pipe. Everything is loose and stirring a TON less. This grain bill was 17.71lbs (0.75lb rice hulls included) and it was thicker in the malt-pipe but super loose this way. That equates to less flour on the burner and little chance of any scorching. So I am still dialing the system in this way as I upped the grain absorption because Id rather not have to squeeze the bag to hit my volume like I didn't today. So kept all the extra goop from the mash in the bag.

Yeah, I pumped uphill to the kettle lol but this setup allowed for easier return to the AF since the kettle is elevated some. I simply take the recirc hose from the AF lid and reattach to the kettle and drain at the same exact pace to the kettle (~ 0.5gal per minute). Easy peasy. I do need to switch hoses and such when going back to the AF. No biggie.

I contemplated doing it like you with the igloo, but didn't own one and the kettle Im using got for $71 from AIH. With the fancy dip tube (high flow edge pickup from brew hardware.com) and the 3 piece valve is was about $110 total. No too shabby.

I was pumped to get the 78% mash/lauter efficiency on this sticky grain bill though. Normally got 75-76% with the bag in the malt-pipe so its debatable if that alone was worth it, but my wort is "cleaner" from the mash and into the fermenter than before and I get less trub into the fermenter. So Im happy for now lol.

Because I can now, might even try moving the strike to the other kettle once heated so that I can underlet the mash. Just gotta test the drop in temps first moving to a cold kettle and back to the AF so that I can hit my mash temps

...the rabbit hole continues.... :cool:
 
I'm curious how you connected that loc-line setup on the lid hole? Do you happen to have some pictures?
See my previous post here on page 37. ANVIL FOUNDRY ALL-GRAIN BREWING SYSTEM its a kit from brew hardware.com. comes with the loc-line and the SS fitting. You then need to purchase a weldeess TC bulkhead and TC clamp and gasket. I got all of them from brewhardware.com @Bobby_M has some quality stuff for sure. VERY satisfied with this.
 
Whelp got my unit in at the end of last week. I was not too thrilled to see a dent in it. I'd have to assume someone accidentally got the bottom w/ a steal toe boot(this wasn't just tiny dings that are inevitable in rolled sheet metal). Fortunately it missed the electronics and it was able to be knocked back into place w/ a little bit of TLC. Standup customer service asked for pictures, never accused me of mishandling it out of the box. I had photos of everything from start.

Anvil Support offered to send a replacement unit to swap out the damaged/dented one. Let them know I was ok w/ the unit I had after a bit of clean up. Not much worse than I'm going to do to it over the next few years. It will see many small dings. All worked out well sent final pics back and they offered gift card/% refund. I chose the gift card option.

If anyone is hesitant. They are amazing customer service. I can share pictures privately, but not looking to put these guys on blast for the dent.

Cheers everyone, cant wait for the beer supplies to get in and get this beast its first batch!
I've been in some form of customer service management all my professional life... Bad things will happen no matter what company or product. It is HOW the company responds that makes it a good company, a bad company, or a great company.
Thanks for sharing.
 
I've been in some form of customer service management all my professional life... Bad things will happen no matter what company or product. It is HOW the company responds that makes it a good company, a bad company, or a great company.
Thanks for sharing.

I agree entirely.. many different forms of customer service myself. Never was looking to blast them. More or less heads up for future qc. Small dents/dings are whatever... I can see how some would be concerned. But it's a 3 foot tall rolled sheet metal. This was on the bottom collar which houses all the electronics. They handled it very well!
 
I agree entirely.. many different forms of customer service myself. Never was looking to blast them. More or less heads up for future qc. Small dents/dings are whatever... I can see how some would be concerned. But it's a 3 foot tall rolled sheet metal. This was on the bottom collar which houses all the electronics. They handled it very well!

Agree - great service. I'm a long time gas-kettle/cooler-tun brewer that sold all my previous equipment after using the AF just once. Took three deliveries before I received one without shipping/packaging damage. My first one had damage on the inside wall of the kettle from the feet on the pipe, the second one had big dents on the bottom or the kettle from the bottom pipe feet, and third one was perfect (they shipped it without a pipe). I received all three deliveries within 1-1/2 week of each other. So yes excellent service.

Side note: maybe they have but in my opinion they need to improve the packaging. They helped this recently by using hooks to hang the pipe on the kettle instead of feet that stick out. My AF only had a thin layer of cardboard between the pipe and kettle. Same with the bottom - only a cardboard disk between the bottom of the kettle and pipe. Even though they make things right in the end it has to cost them and us more for the product than it should. Also, would be much more satisfying to get one in good condition the first time. ( I'm beyond the issues now but frown when I see others still going through the same thing).

So it was packed amazing. They had a box in a box with styrofoam layer in between. This clearly was pre going into the box
 
What was the packaging between the malt pipe and kettle?

So I had the pump kit with mine. Buy the new design doesn't have anything on the side really. The plastic on as well. Everything didn't really move around internal. Also had the chiller inside with another ring of cardboard. The top now has a swing handle as well so less things moving. Came with the lid clamped down snug as a bug
 
Thanks man! Glad you are hitting nice efficiencies yourself. What I like most about this setup is that I have ZERO worries of a stuck mash compared to the same exact grain bill inside the bag in the malt-pipe. Everything is loose and stirring a TON less. This grain bill was 17.71lbs (0.75lb rice hulls included) and it was thicker in the malt-pipe but super loose this way. That equates to less flour on the burner and little chance of any scorching. So I am still dialing the system in this way as I upped the grain absorption because Id rather not have to squeeze the bag to hit my volume like I didn't today. So kept all the extra goop from the mash in the bag.

Yeah, I pumped uphill to the kettle lol but this setup allowed for easier return to the AF since the kettle is elevated some. I simply take the recirc hose from the AF lid and reattach to the kettle and drain at the same exact pace to the kettle (~ 0.5gal per minute). Easy peasy. I do need to switch hoses and such when going back to the AF. No biggie.

I contemplated doing it like you with the igloo, but didn't own one and the kettle Im using got for $71 from AIH. With the fancy dip tube (high flow edge pickup from brew hardware.com) and the 3 piece valve is was about $110 total. No too shabby.

I was pumped to get the 78% mash/lauter efficiency on this sticky grain bill though. Normally got 75-76% with the bag in the malt-pipe so its debatable if that alone was worth it, but my wort is "cleaner" from the mash and into the fermenter than before and I get less trub into the fermenter. So Im happy for now lol.

Because I can now, might even try moving the strike to the other kettle once heated so that I can underlet the mash. Just gotta test the drop in temps first moving to a cold kettle and back to the AF so that I can hit my mash temps

...the rabbit hole continues.... :cool:
@Noob_Brewer I'm interested in brewing something like this. Have a couple more questions:

1) Think loc-line is as good as a spray ball I've seen some use ( Amazon.com Shopping Cart ).
2) I see you mentioned pulling the bag to drain sparge water. Do you not use a false bottom? If a false bottom is used is there a need to pull the bag?

I just received my 10 gallon Igloo cooler. I need to add a bulkhead & valve (suggested source of supply welcome). So here is what I plan to try based on your process:

a) mash as usual.
b) slowly drain or pump wort to Igloo as I sparge.
c) after sparge let liquid fall from bag through false bottom and drain to Igloo.
d) remove bag from AF
e) drain or pump wort to kettle
f) hang bag over Igloo to get ever last drop while heating wort to boil - then add this to AF
 
1) Think loc-line is as good as a spray ball I've seen some use ( Amazon.com Shopping Cart ).

I'm not picking on you but I don't get the loc-line. I'm familiar with the stuff but not sure how it's better than what came w/ the Anvil. For decades sparge water going back to the wort has been done in igloos with contraptions to spread the wort evenly (tubing with holes) and that's what the included disc does. This seems like changing things for fun with no real evidence it helps. My propane setup uses a fry splatter screen in a similar way as the Anvil plate w/ the holes and works quite perfectly.

The simple job is: Flow wort through the grains to filter it and boost efficiency. I struggle to think any one method is actually superior to any other.

a) mash as usual.
b) slowly drain or pump wort to Igloo as I sparge.
c) after sparge let liquid fall from bag through false bottom and drain to Igloo.
d) remove bag from AF
e) drain or pump wort to kettle
f) hang bag over Igloo to get ever last drop while heating wort to boil - then add this to AF

This sounds like way more work than is needed. And you don't get the time saving benefit of heating the wort towards boiling while you drain or sparge.

Mash, lift basket and drain some. Squeeze if desired to boost it. Then add water to grain and repeat (simple version). Or, instead of adding water directly, move bag to separate vessel, batch sparge it, and then move bag back to the malt pipe to repeat the drain / squeeze cycle. Pour any collected wort from that 2nd vessel in to boil too of course.

Think basics. 1) Drain grains, 2) rinse them to get a little extra, 3) put it all together to boil and turn into beer.
 
Last edited:
Think loc-line is as good as a spray ball I've seen some use ( Amazon.com Shopping Cart ).
Link doesn't work lol, it just goes to my amazon shopping cart. Nonetheless, I chose the loc-line specifically because I wanted the wort to discharge under the wort level. I don't worry about how "even" its dispersed because as long as its not a fire hydrant, once its in the liquid it mixes evenly. Im not a LODO guy (yet anyways ;) ) but I am not sure that the spray ball wouldn't aerate the heck out of the wort more so than the original disc. Finally, I think it would be easier to monitor the flow rate when I lift the lid from the loc-line vs eye-balling the spray pattern. In the end I think this is just preference for the user.

2) I see you mentioned pulling the bag to drain sparge water. Do you not use a false bottom? If a false bottom is used is there a need to pull the bag?
I do use the brewzilla false bottom. I think having some free liquid below the bag allows the wort to more freely flow into the dip tube and it keeps the bag off of the dip tube, thermometer, and element. I pull the bag after I wait about ~5 minutes after adding all my sparge water. I hoist it vertically to let it drain and then immediately pull the false bottom (I have this attached to SS wires attached to the outside handles so this is an easy step. I don't wait until ALL the sparge water has drained but most of it when I pull the bag. Then I let it drip above the kettle and immediately pump the wort from other kettle back to the foundry. Once I hit my pre-boil volume, I take the bag off the hoist, discard, and then move to boil.

a) mash as usual.
b) slowly drain or pump wort to Igloo as I sparge.
c) after sparge let liquid fall from bag through false bottom and drain to Igloo.
d) remove bag from AF
e) drain or pump wort to kettle
f) hang bag over Igloo to get ever last drop while heating wort to boil - then add this to AF
I do a-d exactly as you are proposing. But at step e, while I am pumping the wort back to kettle, my bag of grains is still elevated over the foundry and I let the drips go directly into the foundry. SO I don't see a need for your step f in general. If you have a means for hoisting vertically above the kettle, there is no need IMO to then have to move the bag of grains laterally (manually) to let it drip over the igloo (or 2nd vessel). Ive thought about this process a lot. I move the grain bag vertically by a hoist after sparging, and when I want to move wort laterally from kettle to kettle the pump is the work horse. The only time I manually lift the grain bag now is to take it off the hoist and into a bucket for discarding.

Hope this helps, keep us posted on what you settle on! Cheers!
 
I got the loc line thing off of brew hardware as well, but I'm just trying to reduce parts. I put a bag in the mash basket, and when stirring I personally find it a PITA to:

stop pump
remove return hose & pipe
remove lid
remove disc
stir

and damn it all to heck...every single one of those pieces drips before I can place it into the HD bucket I have right next to the AF.

then shove the disc back in
wonder if the next time I shove the disc back in, I'm going to rip the bag
replace lid
replace hose & pipe
restart pump

So I'm hoping via that loc line piece, when time to stir. Turn off pump, lift bucket to lid, remove lid, place bucket on floor, stir. Damn...sounds much easier already.

It is supposed to arrive today, and I'm hoping to use it...maybe this weekend.
 
Last edited:
Anyone have handy what size tubing they are running off the drain spigot? My second brew (pilsner) went well, but when I went to drain there was some spraying of wort that I wasn't too psyched on and had to "Angus "Mac" MacGyver" some smaller tubing to drain.

Also, anyone on the fence of picking one of these up, go for it. I've had many brew systems in my 20yrs homebrewing and this one is by far my favorite system. I have the 6.5 and have done a 2.5 gallon batch and a partial boil 5 gallon batch and both were very enjoyable brew sessions.
 
Hi All, has anyone carried or lifted a full foundry? My brew room is in the basement, but I'ld like to brew upstairs tonight while having movie night with my kids. I'll have to take the foundry down to my brew room to hook up the chiller. I'm not worried about managing the weight (its only a 2.5 gallon batch and I did this with an SS BrewTech kettle many times), but I am worried about the handles breaking! Thanks!
I always lift it up when I'm transfering to the fermenter to do use the gravity for the transfer. Never seen any sign of weakness.
 
I'm planning on using my pump for whirlpool additions this weekend.

Since I use the pump during the mash, and whirlpooling takes place after the boil, will I need to disassemble the pump and clean/sanitize between the mash and the whirlpool? I'm sure I'd have plenty of time during the boil. Is it even worth it? Will I get the same results simply doing a hopstand instead? I generally just throw pellet hops in without bags or other devices. I'm assuming this method may not be a good idea for me as it could cause clogging.
 
Manual specifically says not to lift when full.
I'm gonna lie and tell you that I've read the f manual. And now I'm gonna be a smartass and answer that 5 gallon is half full lol. Cheers mate! Have a good Friday! (And thanks for pointing that out, I definitely didn't think about that).
 
I'm planning on using my pump for whirlpool additions this weekend.

Since I use the pump during the mash, and whirlpooling takes place after the boil, will I need to disassemble the pump and clean/sanitize between the mash and the whirlpool? I'm sure I'd have plenty of time during the boil. Is it even worth it? Will I get the same results simply doing a hopstand instead? I generally just throw pellet hops in without bags or other devices. I'm assuming this method may not be a good idea for me as it could cause clogging.
I am waiting for my machine (ordered a 10.5 last week) but i think if you start running wort at after boil (not 212 degrees, say start at 200) and circulate it for a few minutes it should sanitize the lines and pumps.
Someone here posted a chart on time and degrees to sanitize.
 
I am waiting for my machine (ordered a 10.5 last week) but i think if you start running wort at after boil (not 212 degrees, say start at 200) and circulate it for a few minutes it should sanitize the lines and pumps.
Someone here posted a chart on time and degrees to sanitize.

Makes sense. I thought I read somewhere to not pump boiling water through the pump. Not sure what the magic temp that is hot enough to sanitize, but not hot enough to damage the pump/tubes. Might be best to be safe and clean/sanitize during the boil. I'm still concerned that the hops may cause a clog.
 
Makes sense. I thought I read somewhere to not pump boiling water through the pump. Not sure what the magic temp that is hot enough to sanitize, but not hot enough to damage the pump/tubes. Might be best to be safe and clean/sanitize during the boil. I'm still concerned that the hops may cause a clog.
Again- I am probably NOT the guy to answer, since I am still waiting for my unit! BUT- i did read this entire thread... so.... The thing I think about boiling wort is the steam- so it will not function properly. I think the "magic" temp is ABOVE 170, since that is the temp that kills (hence why we want to whirlpool around there), and about 10-15 minutes. My plan will be to pause the cold water feed into the chiller at about 200 or so, for 10 minutes, and continue to circulate wort.
 
Again- I am probably NOT the guy to answer, since I am still waiting for my unit! BUT- i did read this entire thread... so.... The thing I think about boiling wort is the steam- so it will not function properly. I think the "magic" temp is ABOVE 170, since that is the temp that kills (hence why we want to whirlpool around there), and about 10-15 minutes. My plan will be to pause the cold water feed into the chiller at about 200 or so, for 10 minutes, and continue to circulate wort.

Sounds about right. Thanks!
 
Brew DAY! now that all is settled / rolled out most of the dent got all that cleaned up. Beer kits are in, and we have a cream ale started, so far this is actually way more convenient than I could of ever imagined. Don't mind the extension cord, its on GFI and I'm home to babysit. The cord on this is just not long enough to reach my outlets. Its permanent home will be on a brew cart in the garage. This is the latest model of course, with the upgrades and hooks instead of the ring for the grain basket. Big thumbs up here
 

Attachments

  • PXL_20210205_172146342.jpg
    PXL_20210205_172146342.jpg
    1.7 MB · Views: 61
I'm planning on using my pump for whirlpool additions this weekend.

Since I use the pump during the mash, and whirlpooling takes place after the boil, will I need to disassemble the pump and clean/sanitize between the mash and the whirlpool? I'm sure I'd have plenty of time during the boil. Is it even worth it? Will I get the same results simply doing a hopstand instead? I generally just throw pellet hops in without bags or other devices. I'm assuming this method may not be a good idea for me as it could cause clogging.

I've never bothered to clean in between recirculation and whirlpooling, but I've always used hop bags or spider. Think your own experience will probably dictate what you end up having to do. I use a riptide as well, which seems to look a little bigger than the anvil pump? Not sure if that is what you're using.
 
I've never bothered to clean in between recirculation and whirlpooling, but I've always used hop bags or spider. Think your own experience will probably dictate what you end up having to do. I use a riptide as well, which seems to look a little bigger than the anvil pump? Not sure if that is what you're using.

I'm using the anvil pump. I think I'll try it out. Worst case scenario it clogs and I use a paddle to make a whirlpool. I doubt it will break the pump.
 
Manual specifically says not to lift when full.

In my defense...cuzz I've definitely lifted it and it was HECKA full. I was going ballistic because I thought the pump that I had just flipping bought was defective....and it had worked just fine the previous evening when I gave it a test run/cleaning. (Turns out I just cranked the head on too damn tight..dummy...)

Did the super squat, core flex and lifted it up to the top of our chest freezer in the garage. Which sucked cuzz I'm not that tall and that freezer is just an inch or so below my waist. 2 thoughts I remember having. I damn well better not hurt my back because of this crap...and I really hope these handles hold....

LOL I can picture myself doing exactly this. But I'd have to imagine.. if this bad boy is full of boiling / near boiling hot water and one of those handles happens to give way... you got a real mess + burn situation.
 
I'm planning on using my pump for whirlpool additions this weekend.

Since I use the pump during the mash, and whirlpooling takes place after the boil, will I need to disassemble the pump and clean/sanitize between the mash and the whirlpool? I'm sure I'd have plenty of time during the boil. Is it even worth it? Will I get the same results simply doing a hopstand instead? I generally just throw pellet hops in without bags or other devices. I'm assuming this method may not be a good idea for me as it could cause clogging.
I personally have not done this between mash and whirlpool and everything has worked out fine thus far. @Oginme posted a chart in this thread that showed that 30 minutes at 145 would be sufficient. ANVIL FOUNDRY ALL-GRAIN BREWING SYSTEM So I put that in context of the mash at ~150-152ish. After a 60-90 minute mash and based on this chart, I could be wrong with this, but the pump is already sanitized prior to boil. So I don't think its necessary to run boiling wort through any pump as long as the pump stays closed post mash because the mash temps. But if you need to switch hoses for whatever reason post mash, then what I usually do is quickly recirculate wort through pump at ~190 for a few seconds to take care of it. After my mash, I boil, and after boiling is done, I turn the chiller (immersion chiller on) and once it hits ~190, I recirculate through the pump while the wort is on its way down to whirl pooling temps which for me is 150-160ish. So that short recirculation from 190-160ish Im thinking is sufficient to sanitize as well.

Im like you and let my hops roam free. So to combat any potential plugging in the anvil pump (which has a restriction on the inlet making it easier to clog I do the following: 1) during the whirlpool I DON'T actually whirlpool but rather steep the hops without recirculation at all. Im thinking this lets the hop pellets extract into the "whirlpool" quickly while also settle to the bottom. To be honest, I cannot tell the difference in the slightest bit in the final beer product to think that actual whirl pooling (moving the wort) while steeping at 150-160 degrees is any different than steeping alone anyways. Just my anecdotal experience here. 2) when its time to chill with my IC and I DO recirculate through my whirlpool arm, I orient the whirlpool arm directly above the dip tube and its pointing in the same direction as my dip tube. If its opposite direction your anvil pump WILL clog....Ive made that stupid mistake lol.

My post on 1481 here ANVIL FOUNDRY ALL-GRAIN BREWING SYSTEM shows the setup I use when chilling and whirl pooling. Bobby_Ms spin cycle arm (18") is perfect for the foundry by the way.

Cheers!
 
Last edited:
See my previous post here on page 37. ANVIL FOUNDRY ALL-GRAIN BREWING SYSTEM its a kit from brew hardware.com. comes with the loc-line and the SS fitting. You then need to purchase a weldeess TC bulkhead and TC clamp and gasket. I got all of them from brewhardware.com @Bobby_M has some quality stuff for sure. VERY satisfied with this.


So...I DONT make a second mistake. Is this the part you’re referring to? This is secured to the anvil lid, then you secure locline with QD tri clamp fitting to that, which is then secured secured with o-ring and actual clamp?

https://www.brewhardware.com/product_p/tc15wlf.htm
 
So...I DONT make a second mistake. Is this the part you’re referring to? This is secured to the anvil lid, then you secure locline with QD tri clamp fitting to that, which is then secured secured with o-ring and actual clamp?

https://www.brewhardware.com/product_p/tc15wlf.htm
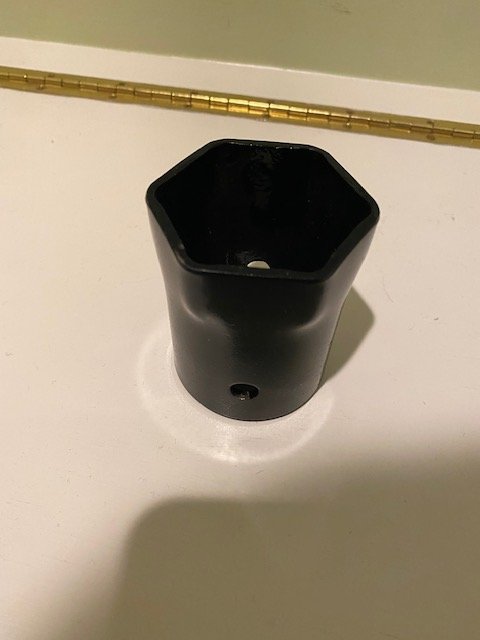
yes this is exactly what I bought. I also bought this from Bobby to tighten it down properly:
IMG_9310.jpg

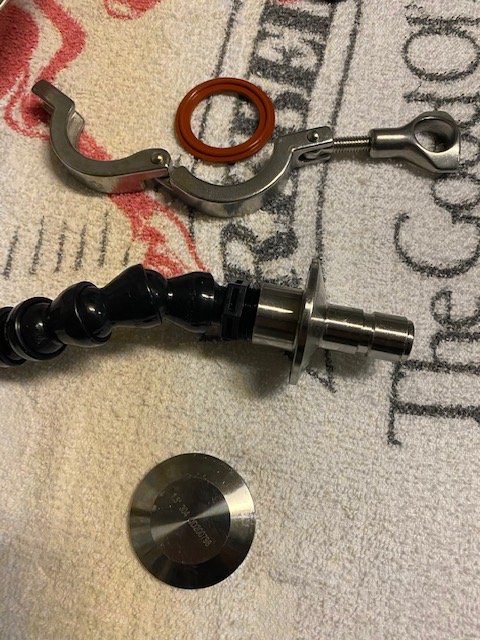
The oring fits on the weldless TC bulkhead, then the loc-line attachment with SS fitting on top of the oringand and all secured with the tri-clamp. I also bought a flat TC cap from bobby too. After the mash when you don't need the loc-line attachment anymore, I swap it out with the flat TC cap so that when I do my hop stand, the lid is full closed. It works very well all together.

IMG_9309.jpg
 
I personally have not done this between mash and whirlpool and everything has worked out fine thus far. @Oginme posted a chart in this thread that showed that 30 minutes at 145 would be sufficient. ANVIL FOUNDRY ALL-GRAIN BREWING SYSTEM So I put that in context of the mash at ~150-152ish. After a 60-90 minute mash and based on this chart, I could be wrong with this, but the pump is already sanitized prior to boil. So I don't think its necessary to run boiling wort through any pump as long as the pump stays closed post mash because the mash temps. But if you need to switch hoses for whatever reason post mash, then what I usually do is quickly recirculate wort through pump at ~190 for a few seconds to take care of it. After my mash, I boil, and after boiling is done, I turn the chiller (immersion chiller on) and once it hits ~190, I recirculate through the pump while the wort is on its way down to whirl pooling temps which for me is 150-160ish. So that short recirculation from 190-160ish Im thinking is sufficient to sanitize as well.

Im like you and let my hops roam free. So to combat any potential plugging in the anvil pump (which has a restriction on the inlet making it easier to clog I do the following: 1) during the whirlpool I DON'T actually whirlpool but rather steep the hops without recirculation at all. Im thinking this lets the hop pellets extract into the "whirlpool" quickly while also settle to the bottom. To be honest, I cannot tell the difference in the slightest bit in the final beer product to think that actual whirl pooling (moving the wort) while steeping at 150-160 degrees is any different than steeping alone anyways. Just my anecdotal experience here. 2) when its time to chill with my IC and I DO recirculate through my whirlpool arm, I orient the whirlpool arm directly above the dip tube and its pointing in the same direction as my dip tube. If its opposite direction your anvil pump WILL clog....Ive made that stupid mistake lol.

My post on 1481 here ANVIL FOUNDRY ALL-GRAIN BREWING SYSTEM shows the setup I use when chilling and whirl pooling. Bobby_Ms spin cycle arm (18") is perfect for the foundry by the way.

Cheers!

Perfect. Thank you so much!

I never understood the argument for whirlpool vs steeping/hopstand. I don't see how moving the wort changes anything.
 
I'm not picking on you but I don't get the loc-line. I'm familiar with the stuff but not sure how it's better than what came w/ the Anvil. For decades sparge water going back to the wort has been done in igloos with contraptions to spread the wort evenly (tubing with holes) and that's what the included disc does. This seems like changing things for fun with no real evidence it helps. My propane setup uses a fry splatter screen in a similar way as the Anvil plate w/ the holes and works quite perfectly.
I agree with you in that the anvil plate does a solid job at distributing the wort with recirculation when using the malt pipe for sure. However, the malt-pipe is limited in grain capacity (Ive gone to about 19# of grain/hulls for higher gravity beers). So when I wanted to do a RIS with over #20lbs of grains. See my post here on this attempt: ANVIL FOUNDRY ALL-GRAIN BREWING SYSTEM I still used the anvil disc but since no malt-pipe was used, I had to suspend the disc with SS wire. It worked and was functional, but a bit of a PITA if I wanted to stir the grain bed and it tilted often. So the loc-line solved this for me. So with bigger grain bills that are too big for the malt-pipe, I think the disc isn't that advantageous and the localize solved that for me. Im not a LODO guy but in my head the discharge of the wort through the loc-line below the wort level is perhaps an advantage over the disc but obviously that advantage is debatable for sure. So the loc-line wasn't necessarily for fun but made my brew day a little easier by not fiddling with the disc suspended from the kettle when not using the malt-pipe.

The simple job is: Flow wort through the grains to filter it and boost efficiency. I struggle to think any one method is actually superior to any other.
I completely agree with you in the "superior" part of this, but I think that without the malt-pipe, regardless of grain bill size, the wort flows MUCH easier through the grain bed. Ive done over 30 brews on this system with a bag in the malt-pipe and one thing that I began to detest was the constant need to stir the whole grain bed to avoid a stuck mash with grain bill sizes above ~15lbs. More water mixes with the grains without the malt-pipe so everything runs more smoothly. Superior? probably not, but definitely easier and smoother for me with no worries about the stuck mash with recirc. I was still getting ~76% mash/lauter efficiency with the bag in the malt-pipe process and Im about 3-5 points higher without the malt-pipe all together. Efficiency boost is nice but not my motivation to ditch the malt-pipe all together.

a) mash as usual.
b) slowly drain or pump wort to Igloo as I sparge.
c) after sparge let liquid fall from bag through false bottom and drain to Igloo.
d) remove bag from AF
e) drain or pump wort to kettle
f) hang bag over Igloo to get ever last drop while heating wort to boil - then add this to AF
This sounds like way more work than is needed. And you don't get the time saving benefit of heating the wort towards boiling while you drain or sparge.
While I agree that moving wort around to other kettles negates the time saving benefit of heating as soon as you raise to drain the bag, I personally (because Ive been brewing for only over a year) like to make sure that I hit my pre-boil vols first prior to heating to boil because measuring volume is a PITA when the hot break starts foaming lol. But once I get my volumes dialed in, I totally agree with you in that once you raise the bag to drain, start that heat to boil to save some time!

Mash, lift basket and drain some. Squeeze if desired to boost it. Then add water to grain and repeat (simple version). Or, instead of adding water directly, move bag to separate vessel, batch sparge it, and then move bag back to the malt pipe to repeat the drain / squeeze cycle. Pour any collected wort from that 2nd vessel in to boil too of course.
When using the basket you are right, this is VERY easy to sparge and the process is very simple. But again, since the malt-pipe is limited in grain capacity compared to without it, this process is limited as well. But the "move bag to separate vessel, batch sparge it, and then move bag back" etc seems to be just as cumbersome or more than what I outlined in my process in post 1481. To me having to move a full bag of grains laterally to another vessel would not be fun and probably pretty sticky in my garage lol. With the process I outlined in 1481, I raise the bag vertically with a hoist and when moving laterally to another kettle, the pump does the leg work. The only time I have to lift the bag without a hoist is when its drained and Im taking it off the hoist and into a bucket to discard.

Think basics. 1) Drain grains, 2) rinse them to get a little extra, 3) put it all together to boil and turn into beer.
I am certainly a proponent of the KISS principle myself. Agree fully with this. The process IS simple in the end. I have some friends who do BIAB with propane and a bag and get fantastic results. But with the anvil foundry 10.5g system if you want to do 5gallon batches of OGs over ~1.070 without the use of dextrose or DME, you simply need more grains to accomplish this where the malt-pipe can't handle it. For me, because I like these higher gravity beers, my modifications weren't really for fun but to extend the capabilities of the awesome system the foundry is.

In the end, the foundry is a great system and has been my first and only system to date. What I love most about this particular thread on HBT is that it is obvious to me that the foundry is probably the most flexible all-in one systems on the market for people to brew how they want and enjoy. I do think there are some advantages to using this system how I outlined in post 1481 vs using it as originally intended: 1) you can brew bigger beers with ease, 2) I have gotten a small but noticeable efficiency bump with this setup, and 3) I personally think that draining the wort to a second vessel and then sparging with the bag in place without disturbing the grain bed helps with keeping unwanted proteins/goop out of the boil and you get cleaner beer in the long run. Not trying to say this is superior than the original setup of the foundry, but I personally prefer it. To each his/her own of course. What a great hobby this is!

Cheers!
 
Brew DAY! now that all is settled / rolled out most of the dent got all that cleaned up. Beer kits are in, and we have a cream ale started, so far this is actually way more convenient than I could of ever imagined. Don't mind the extension cord, its on GFI and I'm home to babysit. The cord on this is just not long enough to reach my outlets. Its permanent home will be on a brew cart in the garage. This is the latest model of course, with the upgrades and hooks instead of the ring for the grain basket. Big thumbs up here
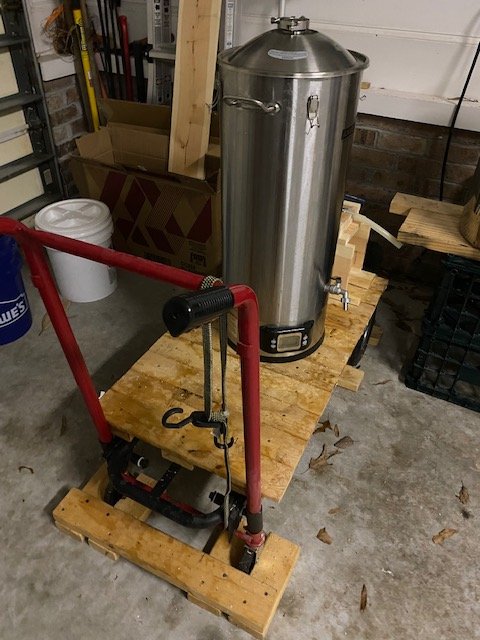
congrats on the first? brew day with the foundry! its a great system overall. If you are fortunate like I am where your brew kettle and fermenters are in the same area (mine is the garage), I highly recommend a brew cart of some sort. I use an old Lowe's handtruck/furniture dolly combo. I brew towards the end of my garage and when the wort is chilled, I wheel it over to my fermentation fridges and use the pump to get the wort into the fermenter. Ive never had to move/lift a fermenter full of wort/beer. works great!
IMG_9311.jpg
IMG_9313.jpg
 
congrats on the first? brew day with the foundry! its a great system overall. If you are fortunate like I am where your brew kettle and fermenters are in the same area (mine is the garage), I highly recommend a brew cart of some sort. I use an old Lowe's handtruck/furniture dolly combo. I brew towards the end of my garage and when the wort is chilled, I wheel it over to my fermentation fridges and use the pump to get the wort into the fermenter. Ive never had to move/lift a fermenter full of wort/beer. works great!

Nahhh I'm not that fortunate! My fermenter is inside. My garage is a detached garage. Although it is insulated, its only r11 I put in for 'comfort' while working outside in hot/cold. Although my keezer is in the garage and I could use it for fermenting. But not really ideal. I do like the flat cart idea, that is awfully handy. I'm likely going to make a simple 2x4 frame with some scrap lumber I have laying around. First edition is going to be awful and end up in the burn pit eventually. BUT it will teach me what I want/need for a long term cart.
 
Back
Top