• Please visit and share your knowledge at our sister communities:
  • If you have not, please join our official Homebrewing Facebook Group!

    Homebrewing Facebook Group

Another KEEZER build.... w/ pics.

Homebrew Talk

Help Support Homebrew Talk:

This site may earn a commission from merchant affiliate links, including eBay, Amazon, and others.
It looks like you ditched the freezer lid, and I take it you are going with a tower.

Yes, the lids gone, but no, I'm planning to put two taps out the front of the collar, spaced wide enough to permit the addition of a third one in the center.

Speaking of which... what's the "standard" spacing? I was planning to go with a 14" long drip tray, so was figuring on about 3.5 inches between 'em... or 7" to start with just the 2.

Would end up leaving 3.5" of tray on each end of the outside tap, and then 3 evenly spaced taps the same 3.5" distance apart. Sound reasonable?
 
Question for all:

How much height did you leave between the outlet of your taps to the drip tray on your keezers/kegerators? I think most 60 oz pitchers measure about 10 inches tall (?).... so maybe in the range of 12-14 inches?

Sounds about right. Measure your pitcher to double check.
 
Now just for the money shot with stain....

Not quite as dark as I was going for (the camera flash makes it look even lighter), but the wood conditioner I used first seemed to limit the color. While a second coat would probably do it, the first one took forever (and about 4 beers), so I think I'm good with it....

IMG_2238.jpg


Now for the varnish.

And my Kegging goodies are in the mail from kegconnection.... so she's comin' together. :D
 
Can you give a rundown of the type of skin you used, as well as the type of wood you used to make the top?
Is there a solid piece for the top, and then the laminate on top of that?

Looks good. I will be stea... err borrowing some of your ideas!
 
Can you give a rundown of the type of skin you used, as well as the type of wood you used to make the top?

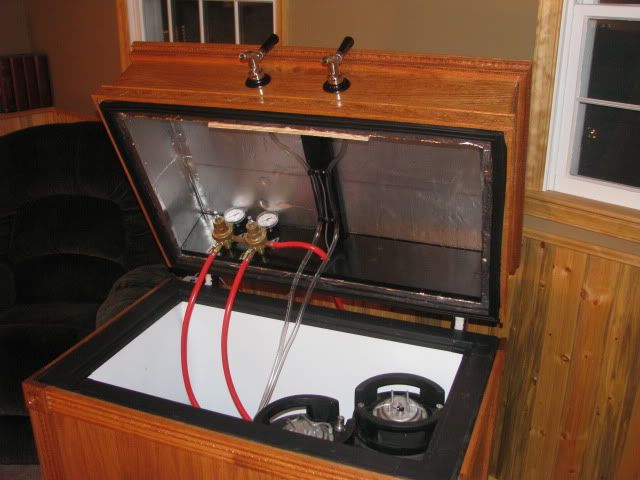
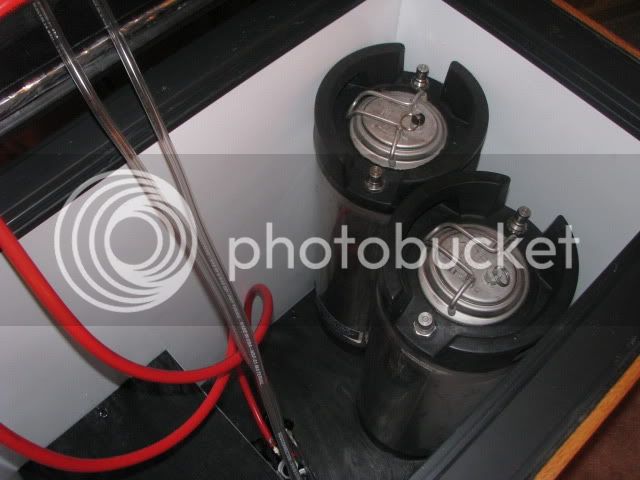
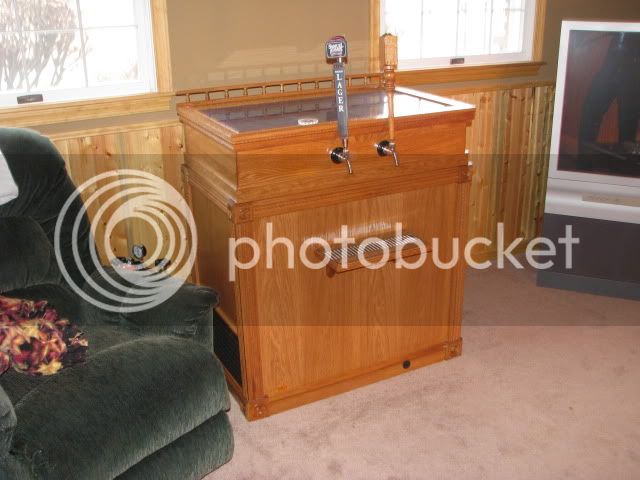
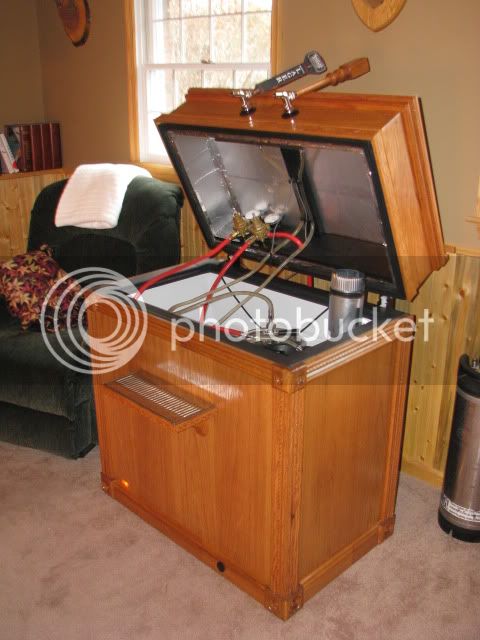
Complete parts list (sorry for the detail, this is as all-inclusive as I could get, for those that need it to the penny....) Also included a few more pics to-date.... though the kegging goodies are still in the mail....

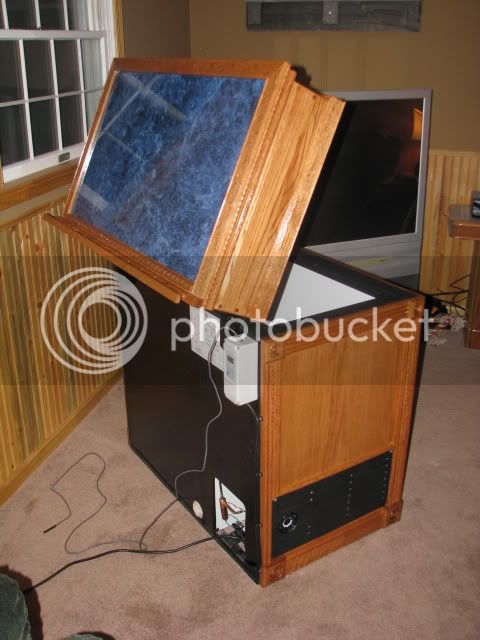
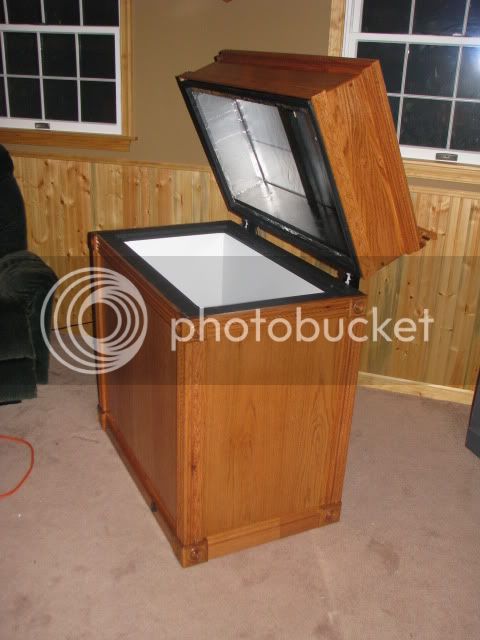
Frigidaire 7.2 cft Freezer $241.68 (after tax)

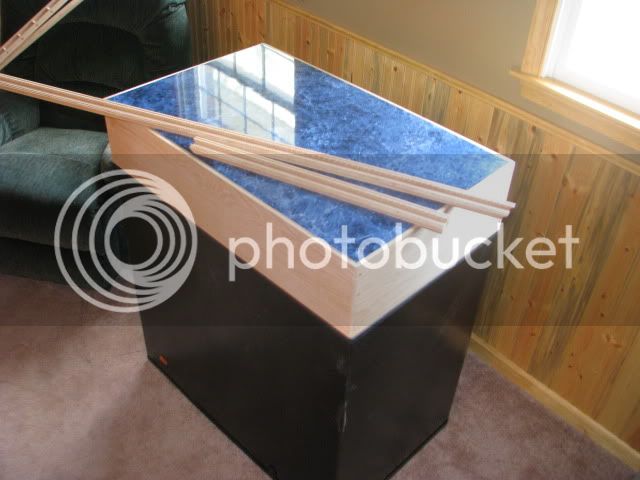
1x 4’x4’ Marble Laminate @ $9.99
1x Quart Laminate Contact Cement @ $5.97
1x 4’x4’x¾” Particle Board @ $7.79

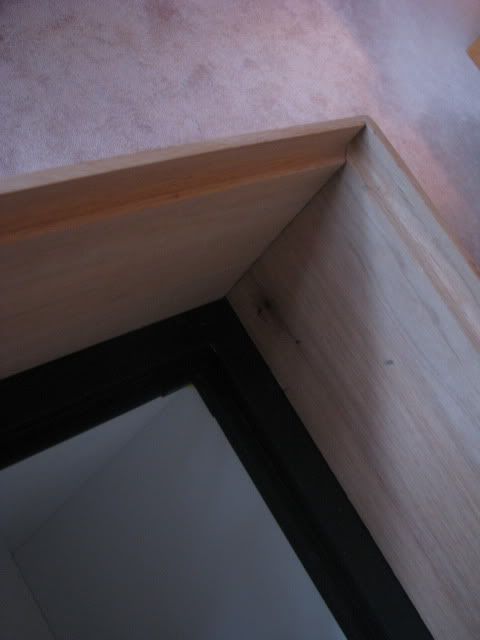
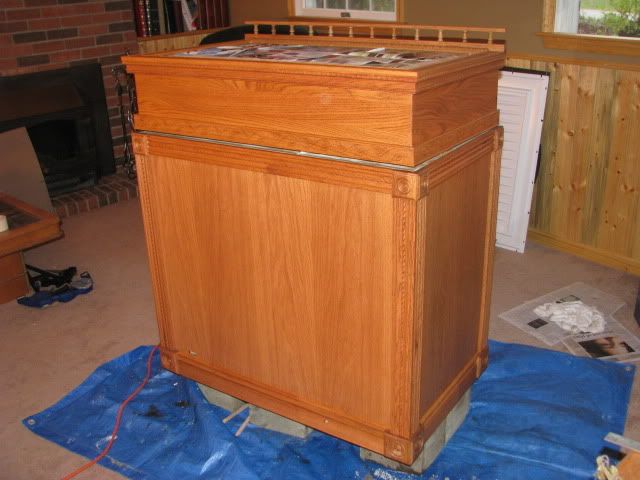
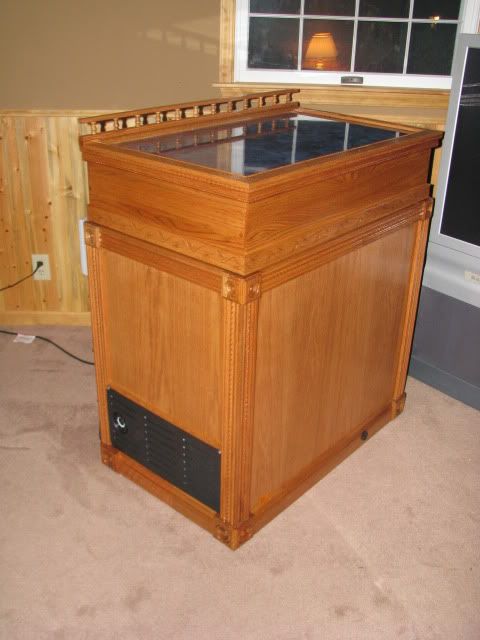
4 x Oak Stair Riser – 7-3/4” x 42” @ $8.49

1x Package 3/8” Oak Plugs @ $1.84
Screws
Wood Glue
1x Finishing Nails @ $2.19
Tube Red Oak Wood Filler @ $4.97

3x 4’x 4’x1/8” Oak Veneer @ $16.48
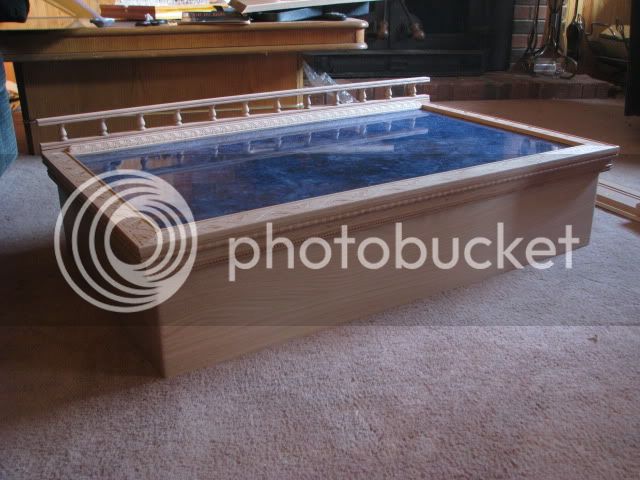
1 x 8’ Base Board @ $9.97

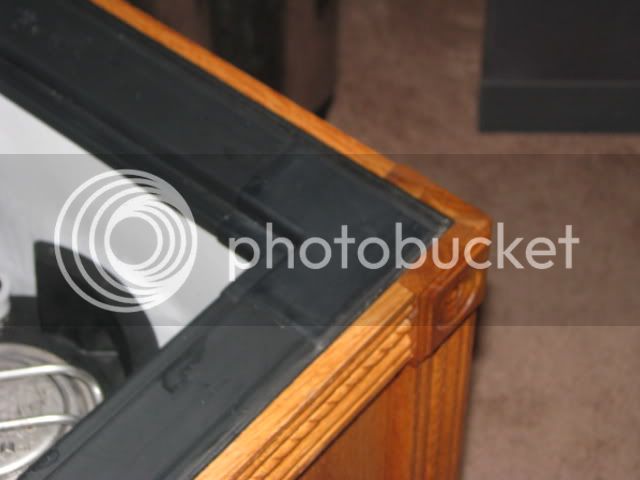
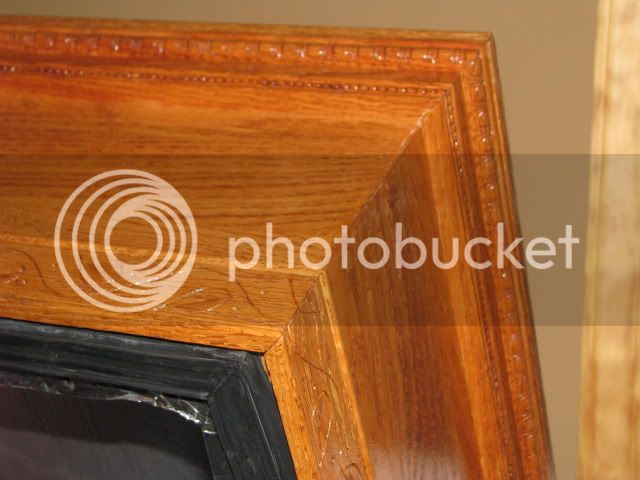
3x 8’ Beaded Rope Trim @ $12.99
2x 7’ Leaf-Vine Banded Trim @ $11.99
2x 7’ Beaded Crown Molding @ $14.99
1x 8’ Oak Beaded ¼” Round @ $10.99
1x 8’ Oak Plain ¼” Round @ $8.79
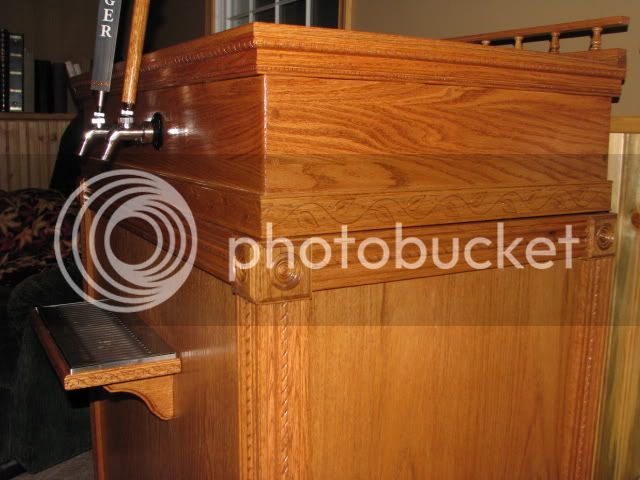
1x 6’ Rail @ $14.99

1x 4’x8’x1” Super Tuff R Insulation @ $15.55
1x Roll Foil Tape @ $7.74

1x Package ½” Plastic Wire Clamps @ $1.59

1x Can Black Spray Pain @ $0.97

6x Large Rosettes @ $2.67
6x Small Rosettes @ $2.37
1x Black Caulk @ $2.48
2x - Construction Adhesive @ $2.49

1x Quart Varathane Wood Sealer @ $5.50
1x Quart Varathane American Walnut Stain @ $6.79
3x Cans Minwax Clear Gloss Varnish @ $5.97
120, 140, 180, 200 grit Sand Paper
Steel Wool

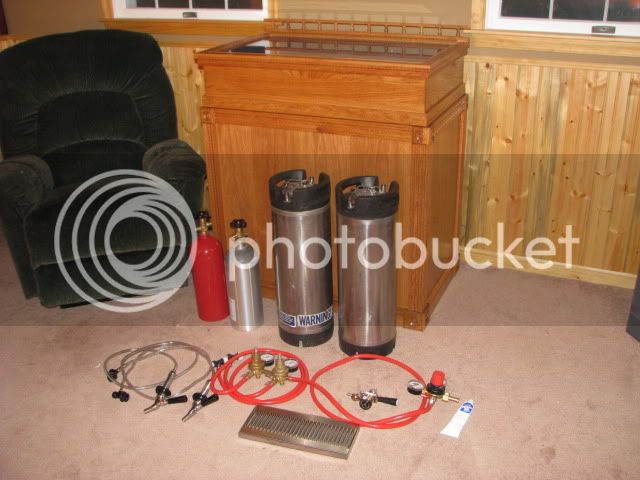
Un-wired Ranco Temp Controller @ $64.95

KegConnection Premium 2-Keg 5# Kit w/ adjustments @ $450 or so.
- Eliminated regulator/manifold in place of a single body/dual valve regulator on bottle and dual valve regulator in keezer with 6’ of gas line.
- Perlick Taps
- Add another 5 # bottle (2 total)
- 14" Stainless Drip Tray

Total: $1104.20 (to-date... much more to come)

IMG_2252.jpg


IMG_2249.jpg


IMG_2246.jpg


IMG_2245.jpg
 
Is there a solid piece for the top, and then the laminate on top of that?

The collar/top is a box made out oak stair risers, stood on their sides, cut to 45's, glued on the ends, and screwed. Screw heads are countersunk with oak plugs. Prior to assembling the collar, a 3/4" datto was cut along the top edge of each piece to receive the 3/4" particle board with laminate, which was glued up separate, using particle board due to it's smooth, flat, consistent nature. The top was then dropped into the collar.

IMG_2194.jpg


IMG_2204.jpg


Then I used a variety of trim to finish it off.

IMG_2213.jpg
 
If you're like me, you like pictures, so here's a few more....

IMG_2259.jpg

Goodies arrived from kegconnection... quality looking stuff, great communication, and fast fair-priced shipping.

IMG_2261.jpg

Plumbed and ready... plenty of room for expansion to 3 taps and another line for gassing a keg in advance.

IMG_2263.jpg

Can fit 3 cornies on the lower level, and 1 easy one on the hump. I think I can even fit two on the hump if I make the hump a little wider.... 4 easy, 5 possible.
 
You should listen to the recent Brewstrong show on perfect pours. Great info about tube length and pressure to get a smooth pour every time. Basically it talks about the resistance in beer line (@ 2.2 pounds per foot) and how you match length to the CO2 in your beer. Say you have a beer that is carbonated with 14 PSI at 45 degrees serving temp. So, 14 divided by 2.2 equals 6.3 feet to balance. You want a little pressure left over so the beer doesn't just trickle out, so maybe you want 5.5' of beer line to get the beer out. You also need to calculate the rise from the top of the keg to the spigot. Listen to the show and John Palmer will explain it all.
 
You should listen to the recent Brewstrong show on perfect pours. Great info about tube length and pressure to get a smooth pour every time. Basically it talks about the resistance in beer line (@ 2.2 pounds per foot) and how you match length to the CO2 in your beer. Say you have a beer that is carbonated with 14 PSI at 45 degrees serving temp. So, 14 divided by 2.2 equals 6.3 feet to balance. You want a little pressure left over so the beer doesn't just trickle out, so maybe you want 5.5' of beer line to get the beer out. You also need to calculate the rise from the top of the keg to the spigot. Listen to the show and John Palmer will explain it all.

Will definitely give it a listen.

For beer line, I talked with the guys at kegconnection, who said that I should be good with 5' given the set-up I have as long as I have good even temps and run primarily 12 PSI beers (as I anticipate with primarily IPAs). I've been nervous about this, after hearing all about 10-foot plus lines, but they were re-assuring, so we'll see....

Unfortunately, I'm going out of town tomorrow and won't be back until Thursday, so the trial will have to wait. But I've got an IPA dry hopping and a 1/6th of Boston Lager on order.
 
I would believe 5" at 12 PSI is going to be great. Really nice job on your set-up. I am sure it could even make Bud taste good!
 
A few "final" pics since I realized I never added them to the end of this thread.
IMG_2273.jpg

IMG_2275.jpg


Have the plumbing in hand to add a third gas line off the end of the existing regulators to provide a spot to gas a third keg while I'm drinking the other two.... and eventually I'm sure I'll slide a 3rd tap in the middle of the other two as well as another reg.

With the fan I've added now, I can maintain a friggid' serving temp of about 38 with no freezing at the bottom. At 10 psi I've got beautiful pours from both taps and ice cold brew. 12 psi poured well also, but seemed over carbed after I lowered the temp from around 42 or 44.
 
That is incredible! I have spent so much money in my head looking through all the DIY threads.
 
That is the most beautiful keezer build i have seen yet. Myself i like the way you have surrounded it with wood and stained it. Good job!
 
This is very fine! When I do get tot he point where I'm able to convert my deep-freeze, I'd really like to panel it out like this one. I like!

-Tripod
 
Great looking unit. I will do something similar when the time comes.

I have some questions:

- How did you fasten the panels? Construction adhesive? Perimeter only or entire panel?
- The seam between the chest and the lid - which did you fasten it too?
- Would you mind shooting a close-up of the corner detail? How you mated the two rosettes and pilasters from adjoining surfaces is what I'd like to see. Corner to corner or mitre?

Again - it looks great and thanks for the inspiration.

sp
 
I have some questions:
- How did you fasten the panels? Construction adhesive? Perimeter only or entire panel?
- The seam between the chest and the lid - which did you fasten it too?
- Would you mind shooting a close-up of the corner detail? How you mated the two rosettes and pilasters from adjoining surfaces is what I'd like to see. Corner to corner or mitre?

1. Construction adhesive... the entire outline of the panel and then randomly throughout. Held it tight using clamps and a lot of weight, gluing each piece separately and turning the freezer on its side as needed.

2. The original seal is attached to the collar.... using the original plastic push "pins" and a bead of caulk. I'll get you a couple pics tomorrow when I'm not drunk....

3. The rosettes were mitered on a 45, clamped, and glued before afixing them to the freezer. The front pilaster was then attached as a single unit to the front of the freezer, while the side portion of the same pilaster was ripped to width, eliminating enough of the last remaining portion to make the profile match the front when considering the width of the front piece... again, I'll get you some pics a little later.

Corner Pilaster Details.... easier to show than describe. Easier to conceal than a miter.
CornerTrim.jpg


Otherwise, I appreciate the good words... she's a work in progress, with plenty of things I'd already have changed.
 
Thanks for the explanations.

I should have been clearer on my second query... I meant the trim piece that you used to cover the seam between the body of the freezer and the collar that can be seen in post #5. Which component did you fasten it to? It looks like the collar...
 
Thanks for the explanations.

I should have been clearer on my second query... I meant the trim piece that you used to cover the seam between the body of the freezer and the collar that can be seen in post #5. Which component did you fasten it to? It looks like the collar...

A couple pics to help detail it... but yes, the horizontal leaf trim is attached to the collar/lid assembly, which overhangs the main frame of the collar to conceal the rubber seal.

Top of freezer body with lid open:
IMG_2325.jpg


The underside of one corner of the lid:
IMG_2319.jpg


Side/corner view so you can see the slight gap between the horizontal leaf trim and the horizontal beaded trim at the rosettes.
IMG_2314.jpg
 

Latest posts

Back
Top