• Please visit and share your knowledge at our sister communities:
  • If you have not, please join our official Homebrewing Facebook Group!

    Homebrewing Facebook Group

Another fermentation chamber build

Homebrew Talk

Help Support Homebrew Talk:

This site may earn a commission from merchant affiliate links, including eBay, Amazon, and others.
Nicely done sir... Love the sharing of ideas and what works best and what you would do different next time. Helps the rest of us when we decide to make one of these our self's.

Well done!
 
Gonna try to pull off a picture from the iPhone app. Cross your fingers!!

3829a154.jpg


So, I mentioned way back I'd try to post a pic of my current fermenting space, and this is it. So yes, this chamber will be a step up in the world. Basically, I've been leaving my fermenters in my basement between two workshop cabinets with a wood panel covering that space to keep out the light. If it's a little too cool, I keep the fermenters just off the floor and that seems to be "enough". If it's more than a little to cool, I've got a brew belt and a timer I can play around with and get fairly close to target temps. If it's too warm, well, then I build a fermentation chamber!

Seriously though, the batch in this pic was around 67 or so during it's first week, and has slowly gotten warmer since (currently about 72).

This weekend I've primed the chamber and gotten a first coat of paint on most of it. I think I can have the paint wrapped up by the time I have my temp controller... Only snag I've hit so far is this; in my rush to test this thing out, I put weather stripping around the door before painting. This is what I now like to call a "bad idea," as I'm going to need to remove the now-painted weather stripping and replace it. Could've been worse I guess...
 
Could have been worse. Like forgetting about the fridge and making the cabinet too small. I didn't do that but just saying. Lol. Good luck. I'm stuck on a door design.
 
Well, a little bit of an update...

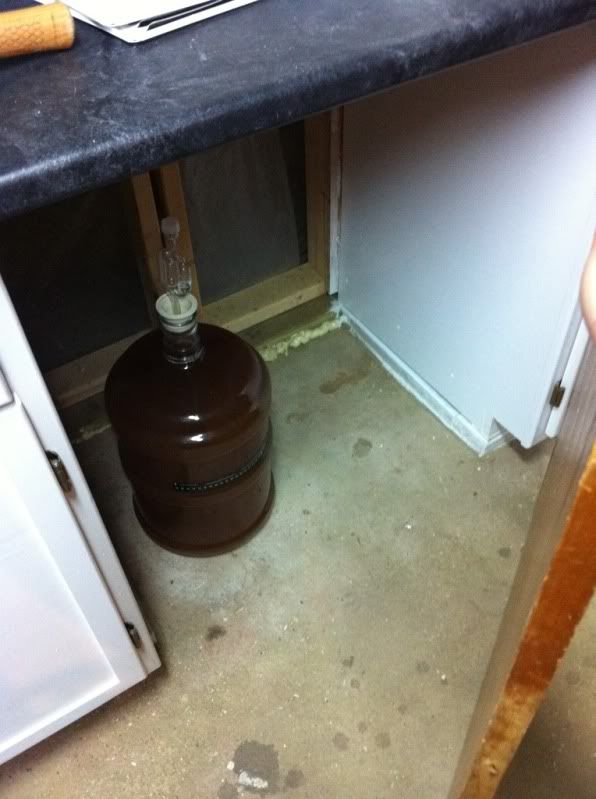
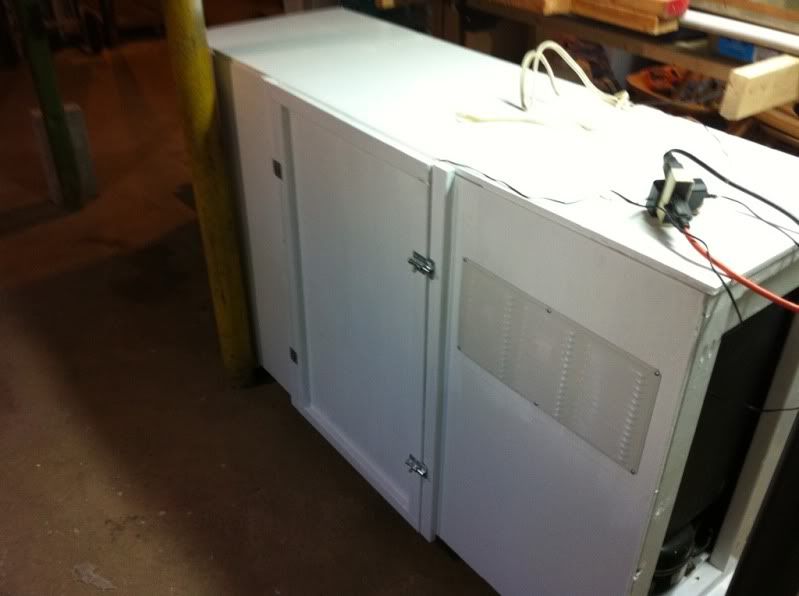
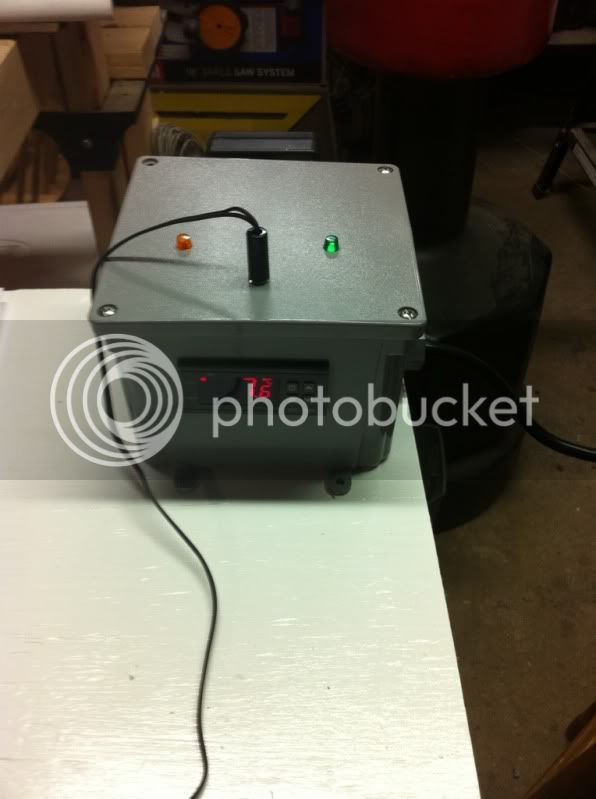
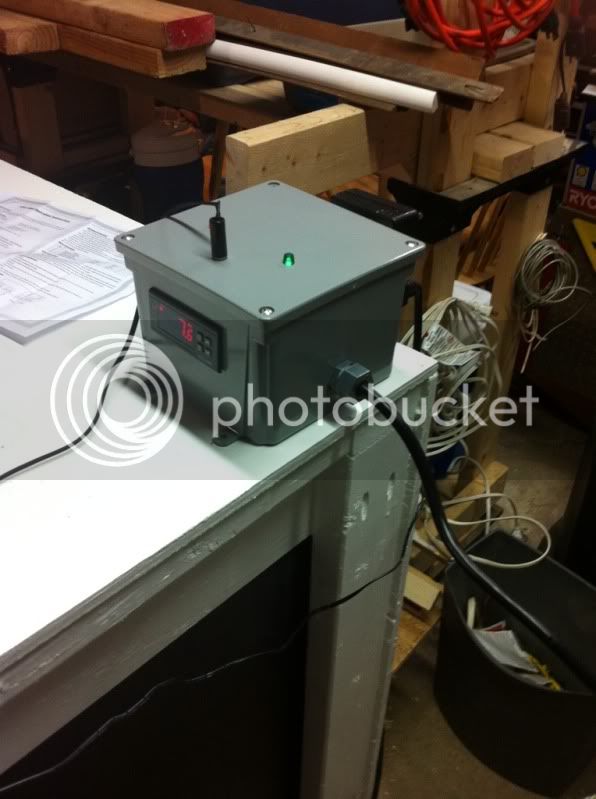
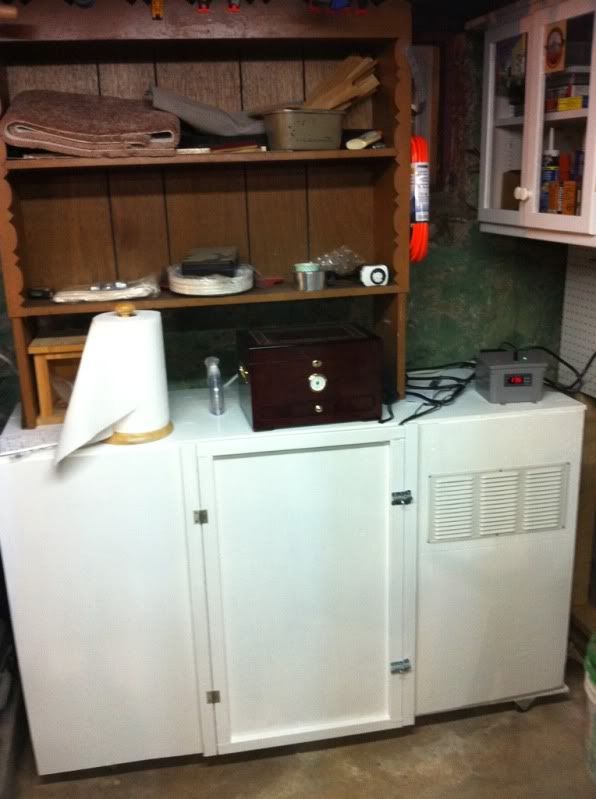
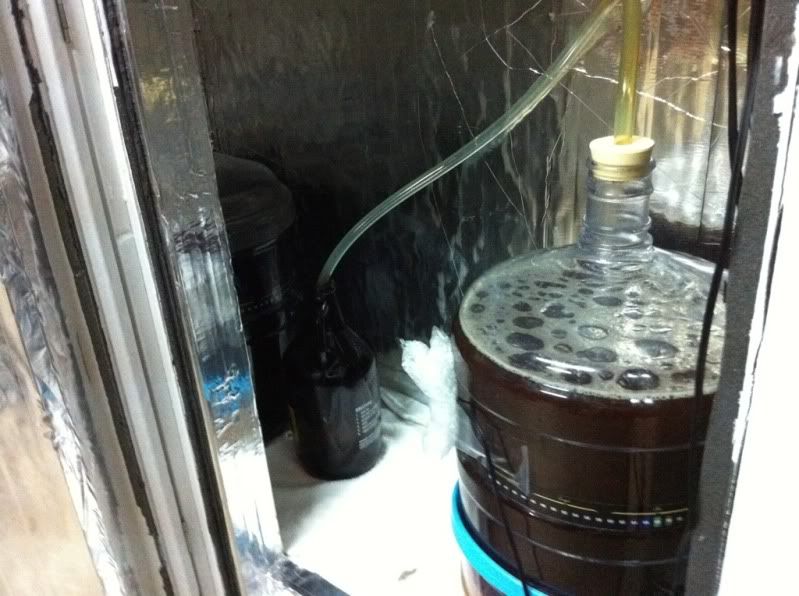
First off, the chamber is painted and up and running, though still no temp controller. One thing has been updated though, above and beyond the paint job - I've got a PC case fan installed and running, sitting right on the freezer coils. As a result, I've got the fridge currently set to 2.5 out of 7 - and the beer pictured above is crash cooling in there and down to 38F after about 48 hours. Not too shabby. ;)

b69e7d7c.jpg


So, I mentioned earlier I'd be building a temperature controller - specifically, the one from this thread.

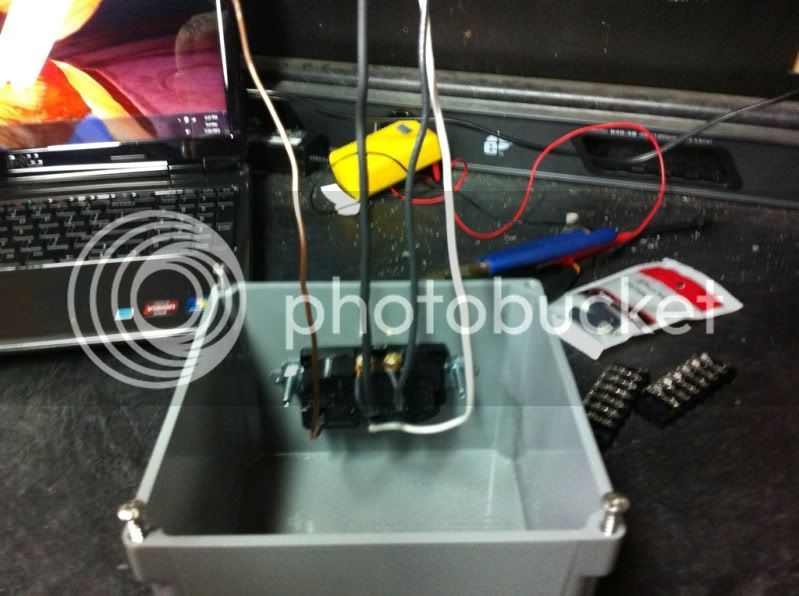
I'm waiting for the controller itself to show up, but I've gotten all the other bits and pieces together and started putting it together, so hopefully most of the work will be done when the box turns up:

83b0a28a.jpg


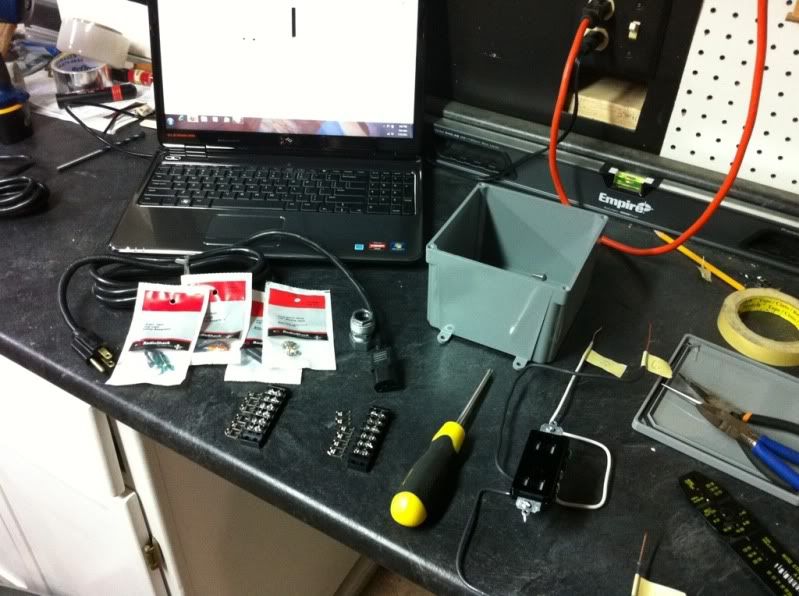
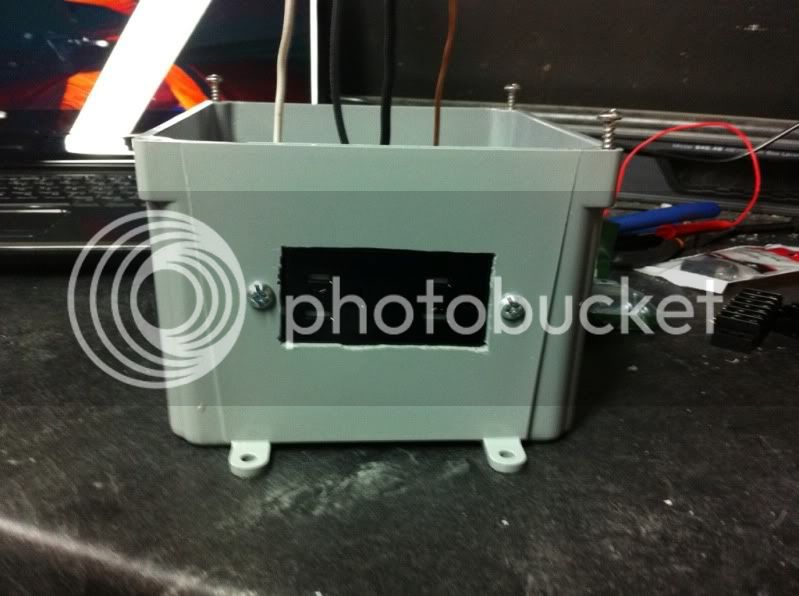
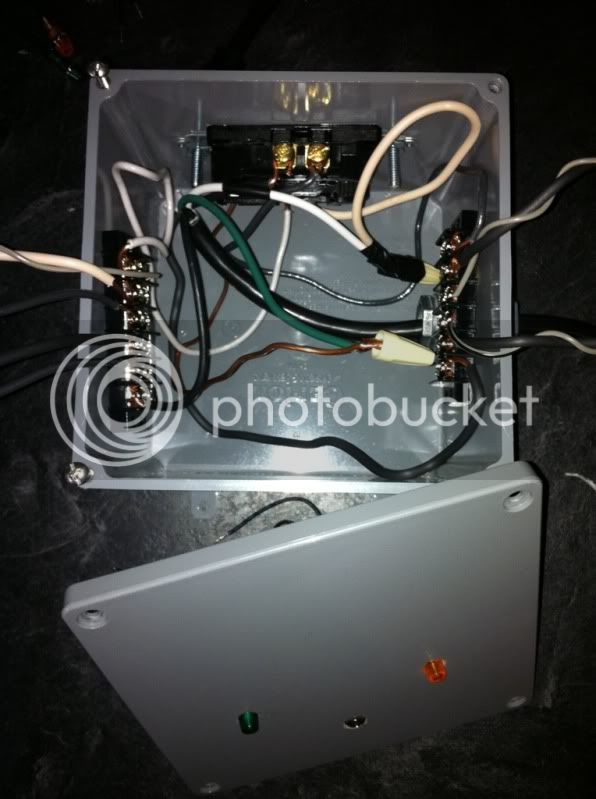
I'm using a few ideas liberally borrowed from the thread I linked to, many in the last 5-10 pages of that thread. I'm using a 6x6x4 outdoor plastic junction box from Home Depot (I'm told this is overkill and that 4x4x4 is doable - but I wanted as much room as I could get so I could see what I'm doing). In addition to the basics from the very first post in that thread, I'm stealing a couple ideas from KrazyDave... One, that should be pretty dang easy, probably pretty dang unnecessary, but I think pretty cool, is a pair of LED lamps to indicate when the heat or cool side of the controller is running. The other idea, and the one that intimidates me a bit, is that rather than directly and permanently connecting the temperature probe to the controller, I'm going to permanently attach a 1/8" mono headphone jack to the controller, and a 1/8" mono headphone plug to the probe. I'm doing this for a few reasons:

1) I'm clumsy, and it's only a matter of time before I snag something on that wire - no matter how carefully concealed - and cause damage. The 1/8" plug should make for a semi-effective break away connection to protect from just that eventuality.

2) It'll force me to do a little minor soldering of electrical components - something I've never done before and want to learn how to do. Hopefully this doesn't go horribly wrong. Even if it does, I have 2 plugs and 2 jacks, so I have 2 tries at either option before I have to re-purchase anything.

3) It just looks cool.

Anyway, here's my current progress - not a whole hell of a lot is done so far:

29a81036.jpg


971130b3.jpg
 
Thanks - I've kinda stuck with the all-white coloring, with the exception of the countertop, for everything down in my workshop area. It's a rather dark basement, so the white helps to brighten things up and reflect the light around when I'm working down there...

So, Ive worked on the wiring for a little while now, and I'm 90% ready for the box itself to arrive:

4a2fc105.jpg


I've got all the wiring in place, got the lamps and the 1/4" jack installed in the top (but neither is wired up yet). I actually forgot, last time I ran into Radio Shack, to grab solder, so I'll have to run out tomorrow at lunch to grab some so I can hopefully knock out the solder job on the jack. I also have to get something in there to permanently affix the terminal strips to the sides of the box - but for now I want to be able to get them out of the way.

So, once the wire is soldered in for the jack, I simply have to wait for the controller to show up. At that point, I'll cut a hole for the controller, connect all my wiring, solder the probe to one of my 1/4" plugs, and be more or less ready to rock!

With luck the controller shows up tomorrow, maybe Tuesday. If it's any later, I'll have to wait for sometime next weekend to wrap things up, since I need to get a bunch of my stuff out of the way on Thursday so a contractor can remove my old oil tank...
 
And the last bit is complete!

Got home today to find STC-1000 in my mailbox. So, I cut the hole, mounted the STC, then hooked everything up - including my first ever electrical solder connections.

d657e8d9.jpg


166c1fd9.jpg


It's holding at a nice 6C right now. I've got my buddy's share of an overcarbed beer in there right now - I can't let that beer warm up or I'll risk (more) bottle bombs. Basically, I need that buddy to pick up his beer, then I'll get a good idea of how much (or how little) work will be necessary to maintain ale temps.
 
Sweet! ! Mine is set to 67 right now and it actually reads 65-66 most of the time. Holding ale temps well for me. I used 2" foam and glued acrylic sheets to all sides. How many carboys can you fit?
 
I can easily fit two in there, and maybe squeeze in three. If only one or two, I can also get a cornie or two in as well for aging...

I still have to catch the thing when it gets down to the correct temp... I haven't yet watched long enough to find out 1) if I'm overshooting my target temp by much and 2) how long it takes, in total, to reach that temp again once it's warmed up...
 
So my initial test. Took my bottle of 77 degree water 5 hours to get to 66 degrees. My probe is hanging from the chamber ceiling. The water maintained temp fine. Do I stick probe in water jar or leave it hanging?
 
I hear that the probe hanging in exposed is a "Bad Idea"(tm). I've got mine taped to the side of my carboy with a layer or three of bubble wrap to insulate it from the outside world. I've seen others who place them in a jar of water like you're suggesting, others in a jar (or WL yeast tube) full of some kind of gel.

Also - do you have a fan in there? I definitely saw a major difference in the speed of cooling once I introduced a computer case fan to my setup - I could try to get a picture up tonight, but basically it's a 12v computer case fan, wired to an AC-to-12v DC adapter I had lying around, sitting right on the cooling coil in my freezer section. Keeps the cool air circulating, and seems to work like a charm.
 
I don't have the fan installed yet but may bypass that. Cools quick enough and my probe is almost to the end of the opposite side of the fridge.
 
Just keep the following in mind, with that setup:

1) You'll be monitoring your ambient ferment temperature, not the actual temperature of your fermenting beer. Since fermentation generates some heat, fermenting beer is typically warmer than ambient temps. With the probe stuck to the side of a carboy, you're closer to the temp of the beer. With a thermowell (someone linked to a $14 stainless one over in the ebay temp controller thread that I'm strongly considering adding to my setup), you're getting the actual temp of your fermenting beer.

2) With the probe exposed to air, it's WAY more susceptible to temperature swings when you open the door to your chamber. This may cause your fridge to cylce more often than is necessary. Stuck to the side of your fermenter, or in a jar of water, or a container of gel, the probe will be more insulated against those temp swings.

3) Depending on the size of your chamber, if you don't have air circulating, you have the potential for the temp to be at least a few degrees lower on the fridge side than it is on the end where you've got your probe. This could possibly compensate for 1) above, but it could also cause you problems if you can't accurately measure the temperature your fermenters are at.
 
1) You'll be monitoring your ambient ferment temperature, not the actual temperature of your fermenting beer. Since fermentation generates some heat, fermenting beer is typically warmer than ambient temps. With the probe stuck to the side of a carboy, you're closer to the temp of the beer. With a thermowell (someone linked to a $14 stainless one over in the ebay temp controller thread that I'm strongly considering adding to my setup), you're getting the actual temp of your fermenting beer.

I just stick a LQT on the side of the carboy and figure out the difference between the ambient temp my probe reports and the relatively reliable indicator of the beer temp from the LQT and adjust accordingly. During fermentation it requires a bit of checking as the beer temp can jump up relative to the ambient temperature, but it's pretty reliable.
 
I would like to know your dimensions. I have a kreg and plan on building a ferm chamber next weekend. I am using a mini fridge in the same Ish size as yours. I would like to know your measurements for framing.

Thank you in advance
 
I did almost everything based off the exact dimensions of my fridge;
- Outside width of the frame was the outside width of the fridge + 1/8" or so
- Inside height of the frame was the outside height of the fridge almost exactly (wanted a snug fit)
- Length was 60". If I had it to do again I'd probably go a little bit smaller - but chances are I'll grow into this thing before too long...
 
Um, go back a page??? ;)

Seriously, there's one or two shots of the chamber fully completed, then another two shots of the temperature controller completed, hooked up, and sitting atop the chamber (granted, only a small corner of the chamber is visible in those two).

As for an update, I've had a pumpkin ale (my own first AG!) in there for about 2.5 weeks now. Kept a nice steady and solid temperature, and the fermentation went great. I racked to secondary (mainly because I wanted to free up a fermenter, thought I was going to be brewing last weekend), and man is that going to be a good beer. Only problem? Since it's my first AG AND my first temperature controlled fermentation, I won't really know how much improvement (assuming there IS improvement) I can attribute to AG or temp control.

I think I sense at least another extract batch or two still in my future. For science, of course. ;)

EDIT: Just the same, when this weekend's brew goes in, or the pumpkin comes out to be kegged, I'll try to snap a couple more shots...
 
Nice build. I converted my chest freezer ferrmentation chamber into a keezer so i have been trying to decide what to do for a fermentation chamber and this is pretty high on my list.
Thanks for the details.
 
OK, here's a couple shots of the chamber, in action:

b196e025.jpg


You can see I've placed an old hutch up on top of the chamber, just to give me a little more storage space above the thing. Also in the shot you see my humidor (well stocked!) and on the right side, sitting on top of the chamber is the gray box that is my tem controller

Inside:
31de4cfe.jpg


On the right is a Wiezenbock I brewed today (second AG brew - woohoo!), further back you can just make out the pumpkin ale I brewed about 3 weeks ago (first AG brew).

The thing is working out great so far... If anything, the only complaint I've got is that one of the door latches sticks and makes it hard to get in and out of the chamber. That latch is already shimmed out to where it should be less of a problem, though I might have to stick another washer or two in there for some additional shimming.
 
At first glance, your fermentation chamber looked like a washer dryer set.
Its... the laundry room.

Weizenbock - yum. How long are you going to age that ? What recipe did you use ?
 
I'm using Jamil's Trick or Treat Wiezenbock recipe from Brewing Classic Styles. Not sure how long I _should_ be aging it, to be honest... It's currently fermenting like crazy - by the time I came down this morning, it was blowing off something fierce (yay blow-off tybe!). So it's definitely healthy so far!
 
It's been a while, but I do have one new update to report on this build out...

I've now fermented out a pair of good ales and a lager in this chamber, and it performed admirably where all that was needed was cooling.

I've got a robust porter in there right now, and it needs to ferment a little warmer than my basement temps right now. So, I picked up a reptile heater and plugged it into an old lamp I had hanging around, then plugged that into the hot side of my ebay temp controller.

I'm pleased to report that this seems to be working perfectly! I had let the fermenting beer sit, not realizing that the temps were too cool. It had settled down to about 62 or 63, when the yeast I used called for 68-73. Once the heating element was introduced, it took a couple hours to warm the fermenter up sufficiently. I believe I did overshoot the temps a bit and the fridge kicked in as designed. I'm not sure exactly how much the two overshot before finding equilibrium (I didn't really feel like sitting down and watching my chamber for hours last night!), but when I checked this morning it was happily sitting at exactly my configured temperature. I've got it set to a tolerance of .5C, and it's happily sitting right in there, with no apparent tug-of-war between heating and cooling elements.

I am quite pleased. ;)
 
Back
Top