• Please visit and share your knowledge at our sister communities:
  • If you have not, please join our official Homebrewing Facebook Group!

    Homebrewing Facebook Group

All-Grain Tutorial/Nut Brown Ale

Homebrew Talk

Help Support Homebrew Talk:

This site may earn a commission from merchant affiliate links, including eBay, Amazon, and others.
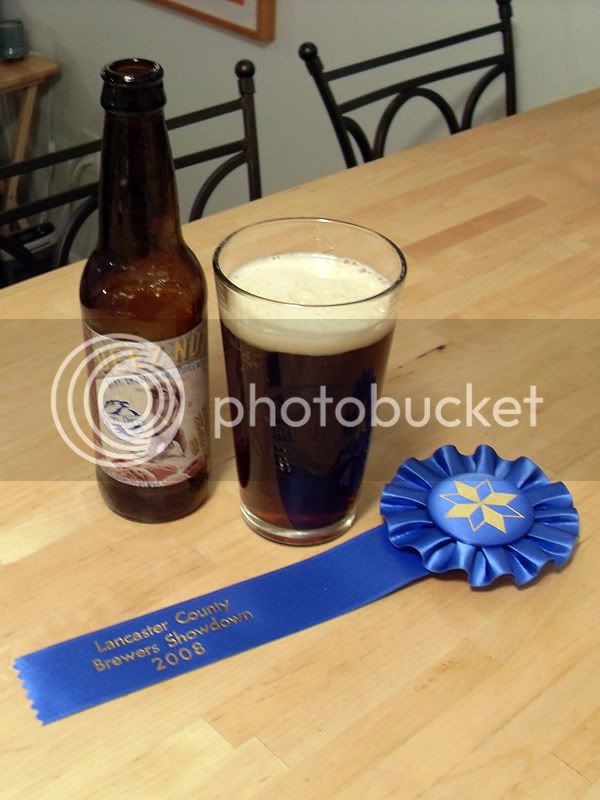
Sorry for my slow reply ... looks like a great beer you have there.

Yes, you are correct in that a thinner mash versus a thicker one (ALL other things being equal) should produce a more fermentable wort. From Fix* (via DeClerk): "It has been known that thicker mashes favor proteoletic activity whereas thinner mashes favor carbohydrase action because of the restraining influence [high] sugar concentrations have on alpha and beta amylase activity."

In other terms, if it's too thick, the enzymes will be prohibited from doing a thorough job of breaking sugars down into fermentables.

I would say that mash temperature plays a MUCH larger role in producing a more or less fermentable wort so, if your process is working for you and you are hitting the mash temps you have designed into your recipe (higher = less fermentable) then the thickness is probably of minor concern. It is, however, one more tool in your brewer's toolbox.

Again, great work.

*Fix, George : Principles of Brewing Science (2nd ed) - 1999
 
#2
mash
vorlauf and drain
add half sparge amount @ 185F, stir, vorlauf, drain
add second half sparge amount @ 185, stir, vorlauf, drain

3 runnings at progressively higher temps, very high efficiency

I plan on trying this method this weekend.

I have a quick question. How long do you let it sit after adding the sparge water each time. 10 or so minutes then stir?

Also, I'm getting a little confused after reading this whole thread. But once you get your first runnings (using this method) do you start to bring those to a boil?

Thanks, this has been very helpful.
 
So hey.... Finally got arount to designing a label and fixing it to all the Nut Brown bottles. Yeah, I've been wanting to use the big-nutted internet scuirrel for a long time on a bottle, so I went for it:

labels_nutbrown.jpg


My wife got a paper cutter from a craft store before our wedding for all the design projects I had to do for that... But it's pretty much mine now. I like that it has a rolling blade instead of the big chopping arm:

KIF_1140.jpg


Nice, straight cuts... I use this paper for the labels. It's gummy on one side, so I just swipe it with a wet paper towel and stick it on. I then spray a clear coat of shellaq on them. They are printed on a Dell 3000CN laser printer (also a wedding prep prize!)

KIF_1142.jpg
 
Quick question bout your Manifold. What size is the PVC you used, and what kind of holes and pattern have you drilled into it? Im looking to move to AG soon but was struggling with a manifold or false bottom, that looks like a very suitable solution to me. Does it work well?
 
Quick question bout your Manifold. What size is the PVC you used, and what kind of holes and pattern have you drilled into it? Im looking to move to AG soon but was struggling with a manifold or false bottom, that looks like a very suitable solution to me. Does it work well?

5/8" OD CPVC... drilled with a 1/8" bit.

I did a straight row right down the middle of the pipe, holes separated by 1/2 inch.

Then I did identical rows on either side of that, but I shifted those rows 1/4" to stagger the rows, if that makes sense.

Seems to work very well, I only vorlauf about 32 ounces before it runs clear. I am having efficiency problems (54%), but I sincerely believe it's the crush at my LHBS. I just bought a mill that I will use Sunday 12/14 for the first time, so we'll see if that fixes it. I'll post here for you if it does.
 
So essentially 1 row along the top half inch apart, and then a row along each side shifted a quarter off the top ones? so only 3 rows of holes? Also does the manifold rest on the bottom of the cooler?

Sorry for the dumb q's, just wanna make sure to make it right! Keep me posted on the efficiency, and let me say, Deez Nuts look delicious!

Cheers
 
For each running do you wait ten minutes in between sparges?

It is. It's MOSTLY for denaturing enzymes while you're doing a rather long fly sparge. If you didn't raise the temp, you'd still be converting over that 45-60 minutes which you may not want. It has a side effect of loosening a bit more sugar but it's absolutely NOT necessary with batch sparging.

The best efficiency I've ever gotten was 94% and it was taking 3 distinct runnings. One following the mash (no mash out infusion), then two runnings following half sparge volume infusions. I don't recommend a mash out infusion unless you want to reduce your number of runnings to two (for a slight reduction is task load/time).

In summary you have two choices:
#1
mash
infuse an amount equal to your grain absorption (about .1 gallons per pound of grain) for your mash out (200F).
stir, vorlauf and drain.
Infuse single batch sparge volume @ 170F, stir, vorlauf and drain.

two runnings, both at elevated temps, relatively high efficiency

#2
mash
vorlauf and drain
add half sparge amount @ 185F, stir, vorlauf, drain
add second half sparge amount @ 185, stir, vorlauf, drain

3 runnings at progressively higher temps, very high efficiency
 
Nice tutorial here, did using your own grain mill ever increase your efficiency?
 
Math and what not aside that settled ALOT of questions I had im going to order the supplies and set up my All Grain equipment soon Thanks Buddy
 
I know this post is old but...wouldnt it work nice to put the piping in a grain bag to keep out the grain and make it so much easier to clean and such?? I am going to try this...thanks Jeff
 
This i going to be my next brew as well, Just discovered Sam Smith's Nut Brown and liked it very much. Thanks for the recipe.
 
Just brewed this today. I used just over 9.5 gallons of water and ended up with 7 gallons pre-boil. My pre-boil gravity was 1.053 and I ended up with about 6 gallons to go into the Carboy. My OG ended up being 1.058, a bit high for this style of beer. Being my 3rd AG batch and my new Mash Tun, I need to work on my efficiency numbers. As a side note, I ended up with 3 Sparges for this. I took a gravity just before the 3rd Sparge and was still getting 1.029 gravity so decided I would just go ahead and top off my Brew pot (hence 7 gallons).

Bottom line, this was a great tutorial. Thanks
 
Quick question. What/how did you make the thing you use to measure the volume in your kettle? The graduated cpvc.
 
... and she caps them. Note the Troeg's Brewfest shirt because she rocks!!!

KIF_1125.jpg


Everything is capped and then gets a quick dip in a bucket of warm water. I like to rinse the beer off of them.

KIF_1126.jpg


And they are cased up and ready to store in the basement at 65-70 degrees for 2-3 weeks.

KIF_1127.jpg


I got 44 bottles this time... I was a little under 5 gallons, so I got more than I thought, actually. I am going to rig up a dip tube for the back of my bottling bucket valve asap. I leave too much in the bucket.

I have a label design in the works, but I am going to alter it a bit before posting. I used blue caps this time, and the graphic artist in me needs to match. More soon!

Thank you...first thanks for this awesome thread and tutorial, it has been immensely helpful, my hat is off to you and I salute your great efforts to teach us about AG...and secondly and most importantly thanks for reminding me why I keg and gave up bottling about 5 years ago.....I forgot how much extra work it is...seeing your photos of the bottles int eh dish washer and you and your wife racking into them brings back years of bad ,yet fun memories, thanks again and keep up the great work!!! :mug:
 
I'm sure this is a dumb question, but I'm new! Are there holes in the PVC pipe that goes into the cooler?
 
great post! When I finally venture away from BIAB, i'll definitely be consulting this thread
 
Yup, guess I should clarify. What did you use to mark it with?

A Sharpie... High tech up in here!

I'm sure this is a dumb question, but I'm new! Are there holes in the PVC pipe that goes into the cooler?

Yes, on the bottom:

bottom_manifold.jpg


Nice tutorial here, did using your own grain mill ever increase your efficiency?

It did.... I went up by about 10%. Not long after that, the LHBS got a new mill too. Ha!

I know this post is old but...wouldnt it work nice to put the piping in a grain bag to keep out the grain and make it so much easier to clean and such?? I am going to try this...thanks Jeff

No.... Not a factor. Never had it get clogged, or had a stuck sparge. I usually vorlauf twice, about a pints worth each time until it runs clear, so no grain rushing through. To clean it, I just set the hose to "jet" and blast it through the opening, making it rain out. About every 5 brews or so, I take it apart and soak it really well in Oxy.
 
Huge thanks to ya DubbelDach for the write up and pics, and the rest of the posters with thier great insight and helpful tips. Helped make our first two AG batches run smooth. :rockin:
 
Thanks, Dubbel Dachs! I am still an extract brewer, but I am a couple of batches (and paychecks) away from going all grain. I really like your CPVC setup in your mash tun.

Right now, I only have a 5-gallon brew kettle and that is keeping me from going AG. Once I get the budget for a new kettle, I will convert a Coleman Extreme cooler into a mash tun and go AG.

Thanks for the inspiration!
 
I know this is an oldie but after reading this whole thread, I finally feel ready for my first AG batch coming up soon. Thanks everyone!

Tom
 
I always use this Mash Calculator for my strike and sparge water. Now, call me crazy, but it always gives a larger volume of water for the sparge, not the strike, so I always reverse them. Makes sense to me to add the larger volume first, where grain absorbtion is higher.

Are you still doing this? I'm reading How to Brew by Palmer and he says you'll use approx 1.5 times as much sparge water as you do for the mash. Just curious, as I'm about 1 mo away from my first AG batch.
 
Back
Top