• Please visit and share your knowledge at our sister communities:
  • If you have not, please join our official Homebrewing Facebook Group!

    Homebrewing Facebook Group

3-in-1 "Boil Kettle, Jacketed Chiller, Conical Fermenter" by Brewha

Homebrew Talk

Help Support Homebrew Talk:

This site may earn a commission from merchant affiliate links, including eBay, Amazon, and others.
The temperature of the liquid in the reservoir(I use water and not glycol) is controlled independently by the chiller and not the ETC so it's always cold. The chiller's pump has its own circuit which is what the ETC switches.
Ah, got it. That sounds pretty awesome. Thanks for the info.
 
Interesting... did you experiment with fermentation heating by applying 1-2% power to the element?

I have the older, analog version of the controller so never tried it. If I was buying one now I would definitely consider that + the glycol for fermentation management.
 
I just placed my order for a medium BIAC with the wedge wire colander, and the order total came out to more than $2500. Nathan emailed me that I would need to provide my SSN for customs purposes (on orders over $2500). Obviously I'm a little hesitant to provide it.

Have any of you had to provide your SSN when ordering your BIAC?
 
Yep, pretty much everyone had to supply it. If you are worried about it call Nathan, but my transaction was trouble free.

Joe
 
Can anyone recommend an aquarium chiller for use on the medium BIAC? What size? 1/4hp? Can it be connected directly to the jacket with an aquarium pump supplying the input power to the solenoid valve? Hotter summer than last year and I'm realizing I need a chiller. I apologize as I have no knowledge of how a system like this should work and only wish to use it for fermentation temps.
 
I would recommend the one from Nathan at Brewha. I'm currently fermenting at 60 degrees Fahrenheit with his chiller and it's about 90 in my garage. It's been over 100 here for more than a week and I could easily lager even with the high ambient temp. I only have the chiller temp at setting 2 (50F) and it goes to 7 (32F)
 
I have this one http://rapidswholesale.com/3-gal-glycol-unit-1-3-hp-120v.html
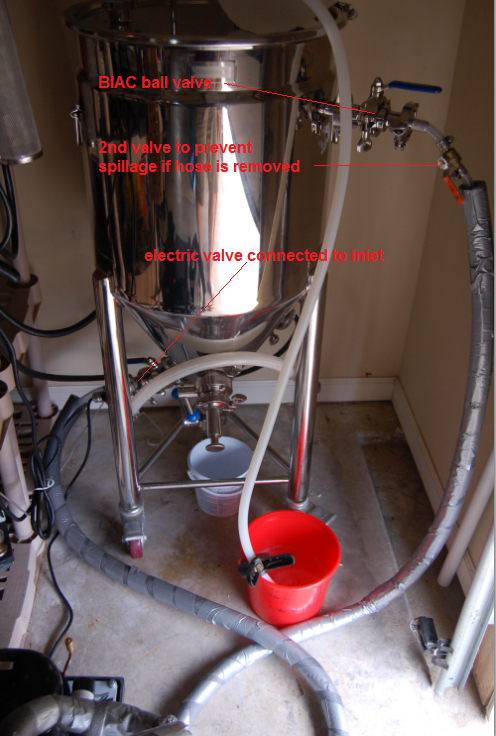
I built a recirculating loop just like a brewery would use so that when not needed in the jacket, the glycol solution just flows back into the chiller reservoir. When the electric valve on the BIAC opens, the glycol takes the path of least resistance and flows through the BIAC. A ball valve slightly closed on the loop creates restriction in the flow thus creating a path of least resistance when the BIAC electric valve opens. I posed a diagram on here somewhere last year.

You will also need a bucket that will fit under your BIAC to catch condensation unless you have the neoprene jacket. I have to empty my 1gal bucket every day in summer.
 
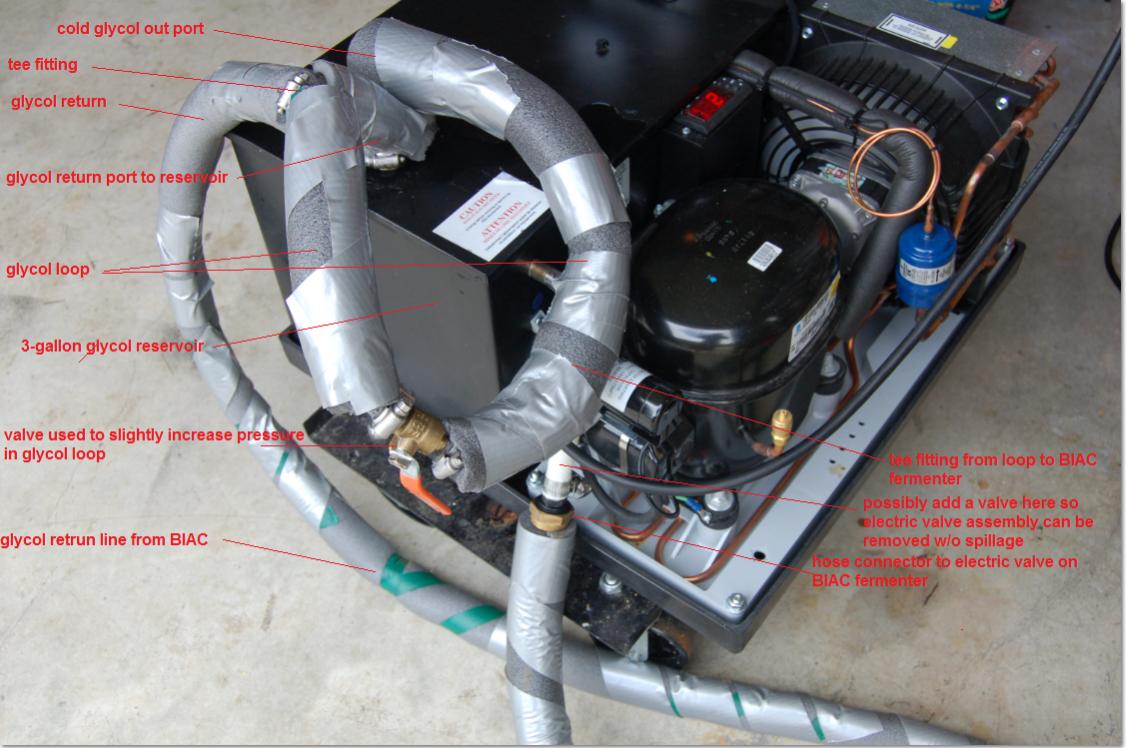
I found the schematic and a photo of my chiller. The schematic pdf is at the bottom. I'm using an auto wheel dolly to set my chiller on. It is one of those things that come in sets of two from Harbor Freight or Tractor Supply:

View attachment glycol loop schematic.pdf

glycol loop.jpg


Fermenter side of glycol loop.png
 
If you end up going with a TK series, let me know your plans and I can let you know which one would suit you best. The 500 was around $600 but the 2000 I have now cost just as much as a glycol setup. But, I love having the built-in heater so it's more "all-in-one" than the glycol setup.

cuda6pak,
Would you mind giving me a few pointers on this please? I have a couple of medium BIACs and it would be good to have an 'all-in-one' solution for heating/cooling, in some instances to the two of them in tandem (assuming that I want to run them at the same temperature at the same time). I brew in my shed, where the ambient temperature throughout the year ranges from about 2 - 30°C (36 - 86°F).

Does this bit of kit serve to get down from boil to pitching temperature, or are you more likely to use municipal water to get down to, say, 30°C and then swap over for the final push?

How noisy are these units (I currently have an old shelf chiller that I picked up cheap, but it makes a right old racket)?

Am I likely (when cooling) to need to expel the heat produced to the outside on particularly hot days?

Any help would be appreciated.
 
I found the schematic and a photo of my chiller. The schematic pdf is at the bottom. I'm using an auto wheel dolly to set my chiller on. It is one of those things that come in sets of two from Harbor Freight or Tractor Supply:

Thank you limulus for the schematic and photos. I'm considering the same unit now. If you don't mind I have a few questions regarding the unit and your set up:

1. Do you use a glycol/water mix?

2. Your schematic shows a solenoid valve at the higher output port of the jacket. If that is so, can you tell me why you use a solenoid valve there? (I have a solenoid valve on the input port for the jacket.)

3. I'm confused by the glycol loop. Is this to assist with lessening the loss of glycol when disconnecting the chiller from the BIAC?

4. I didn't see a pressure gauge in the photos. Is this needed to keep the PSI range below 5 based on Nathan's recommendation?

Thank very much for your help on this!!!
 
cuda6pak,
Would you mind giving me a few pointers on this please? I have a couple of medium BIACs and it would be good to have an 'all-in-one' solution for heating/cooling, in some instances to the two of them in tandem (assuming that I want to run them at the same temperature at the same time). I brew in my shed, where the ambient temperature throughout the year ranges from about 2 - 30°C (36 - 86°F).

Does this bit of kit serve to get down from boil to pitching temperature, or are you more likely to use municipal water to get down to, say, 30°C and then swap over for the final push?

How noisy are these units (I currently have an old shelf chiller that I picked up cheap, but it makes a right old racket)?

Am I likely (when cooling) to need to expel the heat produced to the outside on particularly hot days?

Any help would be appreciated.


I always bring it down to 100F by municipal water before switching over to the TK2000.

The units are fairly quiet, basically just a fan that kicks on along with the compressor when it's in cooling mode. Heat mode it makes no noise. Only noise would be from your pump of choice that is circulating the water.

This depends on what you are doing. If you are simply maintaining fermentation temperature, you will not have a problem. Even with the TK-500 and two medium BIACs in tandum with a regular sized cooler you should not have an issue. The problem with the size of the unit and heat expelling in a small room only becomes an issue when you are trying to cold crash on the hottest parts of the year. Now, if you're not trying to cold crash, but simply maintain fermentation temperature, you would be fine with a TK500 or even TK1000.

If you are planning on cold crashing, I would go with the TK2000 for sure. When it gets to those really hot days that thing will be running full bore to get the beer down to 40F or so, and if all that heat was being expelled into a small shed, I could foresee problems getting down to the temp you want. The garage I used to brew in would get to 90F during the summer, and when cold crashing it would get even hotter in there and struggle a bit.

Another thing you can do to help is insulate the lines coming to/from the TK and cooler, as well as a neoprene jacket that Nathan sells.

Now, having said all that, with the new digital power box Nathan sells as well as the Glycol unit which is around $1k or the same price as a TK2000, I'd be hard pressed not to go with the glycol unit and put the digital power box at 1% for heating. But, you will also need to remember that even if you drain the glycol from the jacket after cold crashing, if you use municipal water there will still be some glycol mix left in the jacket, albeit not much, but something to consider.

When I bought my medium BIAC it came with the old analog power box, hence my current setup today.

If you search my posts in this thread you can see all the different combinations I tried - TK500, TK2000, both in tandem, insulated lines, half-ass neoprene jacket, and what I was able to do to give you an idea.
 
If you search my posts in this thread you can see all the different combinations I tried - TK500, TK2000, both in tandem, insulated lines, half-ass neoprene jacket, and what I was able to do to give you an idea.

Thanks for the advice. I'll check out your other posts on this.

By the way, I'd be looking to use this to lager. Perhaps not that important how long it takes to get down to lagering temperatures (I would only ramp it down a few degrees (°C) per day anyway), but it needs to be man enough to stay there.
 
I ended up building a whirlpool arm out of an old 1/2" stainless racking cane and a few triclamp parts from brewhardware.com

This mounts to a top port and allows pumping from bottom port through the tube. The compression fitting in the middle is just snug so it can be moved up and down and rotated. Waiting on the current batch to finish before I can try it and I'll post a video.

I have made use of your suggestion and I recirculate through the racking valve. I use the bottom port to dump the trub before aeration and pitching. Thanks again for the contribution! It works great for whirlpooling hops as well. My last hefe, wit, and pale have been varying degrees of juicy. I don't recall if you said you added this too, but I am looking to put a 90degree elbow on the unit so the valve and hosing is perpendicular from the ground.

But I'm now looking to upgrade the brew process. Has anyone added a racking arm to the system? I would like to pull my wort from the middle of the kettle to maximize cooling and I like the idea of getting as much clear beer as possible.

I've also been looking at building/buying a mash/sparge distributor. Does anyone have any good ideas?
 
But I'm now looking to upgrade the brew process. Has anyone added a racking arm to the system? I would like to pull my wort from the middle of the kettle to maximize cooling and I like the idea of getting as much clear beer as possible.

I've got this racking arm on my BIAC and have been happy with the results. I'm not sure how much it helps with cooling but it's a pretty good size for transferring with little being left in the cone.

On a separate note for anyone that uses Beersmith, a new version was released this week which should more accurately work with the BIAC in terms of water usage. In the mash tun equipment profile there's a new field called "Mash Tun Addition" where you can add the volume of deadspace under the colander. That volume will then get added automatically to the first mash step.
 
Thank you limulus for the schematic and photos. I'm considering the same unit now. If you don't mind I have a few questions regarding the unit and your set up:

1. Do you use a glycol/water mix?

2. Your schematic shows a solenoid valve at the higher output port of the jacket. If that is so, can you tell me why you use a solenoid valve there? (I have a solenoid valve on the input port for the jacket.)

3. I'm confused by the glycol loop. Is this to assist with lessening the loss of glycol when disconnecting the chiller from the BIAC?

4. I didn't see a pressure gauge in the photos. Is this needed to keep the PSI range below 5 based on Nathan's recommendation?

Thank very much for your help on this!!!

Hey JB, I just saw this. I'm about to get on a conference call but I will come back and answer your questions today.
 
Well, the call is at 2:30, not 2:00, so I'm back to post answers below:

Thank you limulus for the schematic and photos. I'm considering the same unit now. If you don't mind I have a few questions regarding the unit and your set up:

1. Do you use a glycol/water mix? Yes, I can't remember the ratio, but it is on the glycol jug.

2. Your schematic shows a solenoid valve at the higher output port of the jacket. If that is so, can you tell me why you use a solenoid valve there? (I have a solenoid valve on the input port for the jacket.) Actually, it is a ball valve at the output of the jacket. It is on the exit hose so I can close it and not drip water/glycol all over the garage floor when I detach the hose. **Also, I have a small plastic bucket and a lid I bought at Home Depot to drain the glycol/water from the jacket into. I believe it is 2-gal. I fill the reservoir of the chiller and let it flow into the fermenter jacket. That takes about 2-gal and at that point the chiller reservoir is low and starting to suck air. I then fill reservoir with more water/glycol solution. I then have a total of 5-gal (2 in the fermenter and 3 in the reservoir of the chiller).

3. I'm confused by the glycol loop. Is this to assist with lessening the loss of glycol when disconnecting the chiller from the BIAC? The chiller has a pump that runs continuously. So, I made the loop following a plan I got from an actual brewery. There is a valve in the loop near the return to the reservoir that is just slightly closed so that it increases the pressure just a little but still allows the solution to flow through the loop and back to the reservoir. The leg that goes to the fermenter is before that valve. When the solenoid at the bottom of the fermenter opens the solution follows that leg since it is the path of least resistance. For my loop, I used braided tubing from Home Depot and Styrofoam insulation and duct tape.

4. I didn't see a pressure gauge in the photos. Is this needed to keep the PSI range below 5 based on Nathan's recommendation? There is just not enough pressure to damage anything and I've had that thing running for weeks. The brewery I got the plan from does use a pressure gauge. I think vacuums are the biggest danger to damaging the fermenter unless you have a fire hose connected to it.


BTW, you will need either a drip bucket or the neoprene jacket. That little white bucket under my fermenter is 1-gal and in summer when the humidity is high, that thing fills up every day.
Thank very much for your help on this!!![/
quote]

Limulus,

Thank you very much for taking the time to address my questions. Everything is much clearer now. I believe this is the route I'll go. Thanks again for all your help! :mug:
 
A previous contributor in this thread said that the jacket holds 2 gallons. Is that for the small? I wanted to fill it with sparge water but I may need another solution. Nathan's website has a suggestion of running the tap throught the jacket but my water needs acid and caclium additions. Any thoughts/suggestions, I'm getting ~82% efficiency with about 4-5 gallons of sparge for 18 gallon batches. I have a medium.
 
A previous contributor in this thread said that the jacket holds 2 gallons. Is that for the small? I wanted to fill it with sparge water but I may need another solution. Nathan's website has a suggestion of running the tap throught the jacket but my water needs acid and caclium additions. Any thoughts/suggestions, I'm getting ~82% efficiency with about 4-5 gallons of sparge for 18 gallon batches. I have a medium.

I believe the medium holds approx 2 gal of water in the jacket.
 
Yep, 2-gal for the medium. Also, are you wanting to get better than 82%? At a certain point you'll start dragging in a lot of "off flavors". I think 82% is really good.
 
Agreed with the 82% leaving as-is. I just opened up my mill on my brew Saturday and at 0.050" hit 73% efficiency and was able to recirculate extremely fast, so I will be staying there for the foreseeable future.
 
what mill do you have? I may do some experimenting.

MM-2Pro. At some point I tried closing the gap more and more to get more efficiency and it did the opposite. Hurt efficiency and draining/recirculating was abysmal. Sunday's brew was a treat with the rate at which I could recirculate and the short amount of time it took to drain. Didn't even throw in a handful of rice hulls either :mug:
 
what mill do you have? I may do some experimenting.

It is a custom mill made by an old school biker machinist, 3 roller. It mills a little fine for my liking but it is set to my boss' liking on his system. 82% is great and I'm happy with it. I generally use .75 to 1.75 pounds of rice hulls depending on the grain bill (I like flaked wheat).

I brought up the volume because I would like to maintain the efficiency and streamline the sparge process. Right now I'm filling a kettle that I heat on the stove, adding salts and lactic acid and then plopping next to the unit and sticking the pump input line in the bottom. It works when I have a second person but it takes away from other activities during the brew day (checking temps, tipping the kettle during the sparge, so on).

I will try a brew where I only sparge 2 gallons and see how my efficiency goes. Ultimately, efficiency is a like for me not a need, a smooth brew day with no avoidable hitches is much more valuable to me than a few more points of a given base malt. Thanks all for the input.

One more question, how has the beersmith update worked for y'all? I downloaded it just before I left on a trip and would love to make volume adjustments. Is it just the mash and kettle deadspace you changed to 0?
 
I have Beersmith and I tweaked the settings which got me better results. However, that is on a laptop and at the moment, I can't find that laptop computer :confused: I have a Kegco 3-roller mil but I don't remember where it is set. I need to get my gauges out and check it.
 
One more question, how has the beersmith update worked for y'all? I downloaded it just before I left on a trip and would love to make volume adjustments. Is it just the mash and kettle deadspace you changed to 0?

In the"mash tun additions" page you would add whatever volume is under the colander as mash tun dead space. From what i recall it's around 5 gallons for the medium biac . That volume gets included with your initial mash step.
 
I got my medium BIAC a few weeks ago and have been slowly putting the rest of the system together. This thing looks beautiful and I cannot wait to brew on it!

As it happens I'm trying to get something together in time for a local homebrew contest on October 1st, and I realized I might be able to turn out a Berliner Weisse in plenty of time. However, I'm a little skittish about intentionally souring my brand new equipment.

Logic tells me that since everything's gonna get boiled after a kettle souring process that I shouldn't worry (as long as I don't let any hoses touch the souring wort) but I can't help but feel what might be undue cautiousness... I searched the thread and found this post:
I've been brewing a Berliner Weisse using this method quite frequently
...

The BIAC is the perfect setup for brewing kettle soured beers. It allows you to remove the grain easily while leaving the wort behind, you can maintain temp with your heating element, and then you simply boil it afterward.
Which is pretty much what the logical part of my brain is telling me... but I'd love some more real-world info.

Jimmy82, have you had any issues with kettle souring in the year since you posted this? Anyone else out there have similar experience with kettle souring in a BIAC?
 

Latest posts

Back
Top