• Please visit and share your knowledge at our sister communities:
  • If you have not, please join our official Homebrewing Facebook Group!

    Homebrewing Facebook Group

2nd brew

Homebrew Talk

Help Support Homebrew Talk:

This site may earn a commission from merchant affiliate links, including eBay, Amazon, and others.

Amy Kemp

Not really Amy.....
Joined
Oct 31, 2018
Messages
36
Reaction score
2
So I have had the itch for quite some time to make beer. I have done 7 or 8 5 gallons of home wine so the sanitation doesn’t appear to be a problem.

I have done my home work. Jim palmers book, another beyond the basics of brewing (I forget the name off the top of my head), quite a few article here and BBQ and Beer with Larry on you tube (you rock!)

My first was a NE IPA all grain kit from my local home brew shop. I dove head first with an all grain setup to keg. Lessons learned were patience with temperature. The beer was very drinkable, not great but also not bad. I know I pitched the yeast when the wart was still way to warm ( alas my impatience).

I am fourtunate that I knew how I wanted my setup. Was able to acquire all equipment quite cheap through friends and haggling on selling sites. I have a 2 vessel setup going with a batch sparse method. I just got an ink it’s temp controller for an extra small chest freezer I have with the plan to have a dedicated fermentation tank.

I think my biggest question at the moment is about the term cold crashing and understanding where I should be setting my temperature at based on the ranges from the recipe list. Any other useful information on temperature management during fermentation would be great. Looking forward to further discussion. Thanks.

Cold crashing is a way to get the trub to drop out sooner. The colder you get the beer, the faster that happens and if you get it cold enough the proteins the cause chill haze will drop too. Don't freeze the beer. I'm more patient and let my beer have time in the fermenter to settle out the trub. Then I load the refrigerator with a few days worth of beer and let the chill haze settle there.
 
Cold crashing is a way to get the trub to drop out sooner. The colder you get the beer, the faster that happens and if you get it cold enough the proteins the cause chill haze will drop too. Don't freeze the beer. I'm more patient and let my beer have time in the fermenter to settle out the trub. Then I load the refrigerator with a few days worth of beer and let the chill haze settle there.
What time frame do you cold crash? End of fermentation? And for how long? Is their any need to warm it back up after crashing ? I will be going right into keg.
 
Here's my typical time frame:

I typically ferment an ale at 64-66 degrees. When the krausen falls, I'll bump the temp up to 71 degrees, usually in two stages. This lets the remaining yeast become more active, and it cleans up off flavors and such.

I'll let it stay at 71 for 36 to 48 hours--the process is resilient, it's not that crucial to hit an exact number--then I'll move the temp back to 64 or so for a few more days. When I'm convinced it's all done--this all takes maybe a week to 10 days, then I crash it, which is to get the temp to drop to (for me) as close to 32 as I can. Beer won't freeze until it's about 28 or less, assuming a normal 5 percent or so ABV, so 32 is fine--though 40 degrees or less will work.
 
What time frame do you cold crash?
Cold crash after fermentation is completely finished and you're ready to package your beer. Chill it down to 35-45 and leave it there for a couple days- 1 week. Hit it with gelatin if you really want a clear product! You can warm it back up before packaging, but you don't need to.
 
What time frame do you cold crash? End of fermentation? And for how long? Is their any need to warm it back up after crashing ? I will be going right into keg.

You want to be sure that fermentation is finished because the last stage of that is when the yeast clean up the byproducts of the early part of fermentation. That will happen faster if the beer is warmer than when it was in the initial part of the ferment. You cold crash for as long as it takes for the beer to settle out or until your patience wears thin, then keg. No need to warm the beer again and cold beer absorbs the CO2 better than warm beer.
 
Here's my typical time frame:

I typically ferment an ale at 64-66 degrees. When the krausen falls, I'll bump the temp up to 71 degrees, usually in two stages. This lets the remaining yeast become more active, and it cleans up off flavors and such.

I'll let it stay at 71 for 36 to 48 hours--the process is resilient, it's not that crucial to hit an exact number--then I'll move the temp back to 64 or so for a few more days. When I'm convinced it's all done--this all takes maybe a week to 10 days, then I crash it, which is to get the temp to drop to (for me) as close to 32 as I can. Beer won't freeze until it's about 28 or less, assuming a normal 5 percent or so ABV, so 32 is fine--though 40 degrees or less will work.

I assume that you are using a cooler and a warmer to bring the temp up to the 70’s. You have any product recommendations?
 
I assume that you are using a cooler and a warmer to bring the temp up to the 70’s. You have any product recommendations?

Here's what I use.

1. Inkbird 308 temp controller. This will control both a heat source and a cooling source and will maintain temps within a degree of what you set.

2. A small dorm-style refrigerator, the tall kind. You can find these on Craigslist, maybe there's a university nearby with some they're dumping. Mine has a bunch, they want $30 apiece for them. I bought mine for $60 used. You need to take along your fermenter to ensure it fits or if it doesn't, that removing the plastic molding on the door will allow it. I got lucky with mine, didn't have to remove the plastic. It BARELY fits.

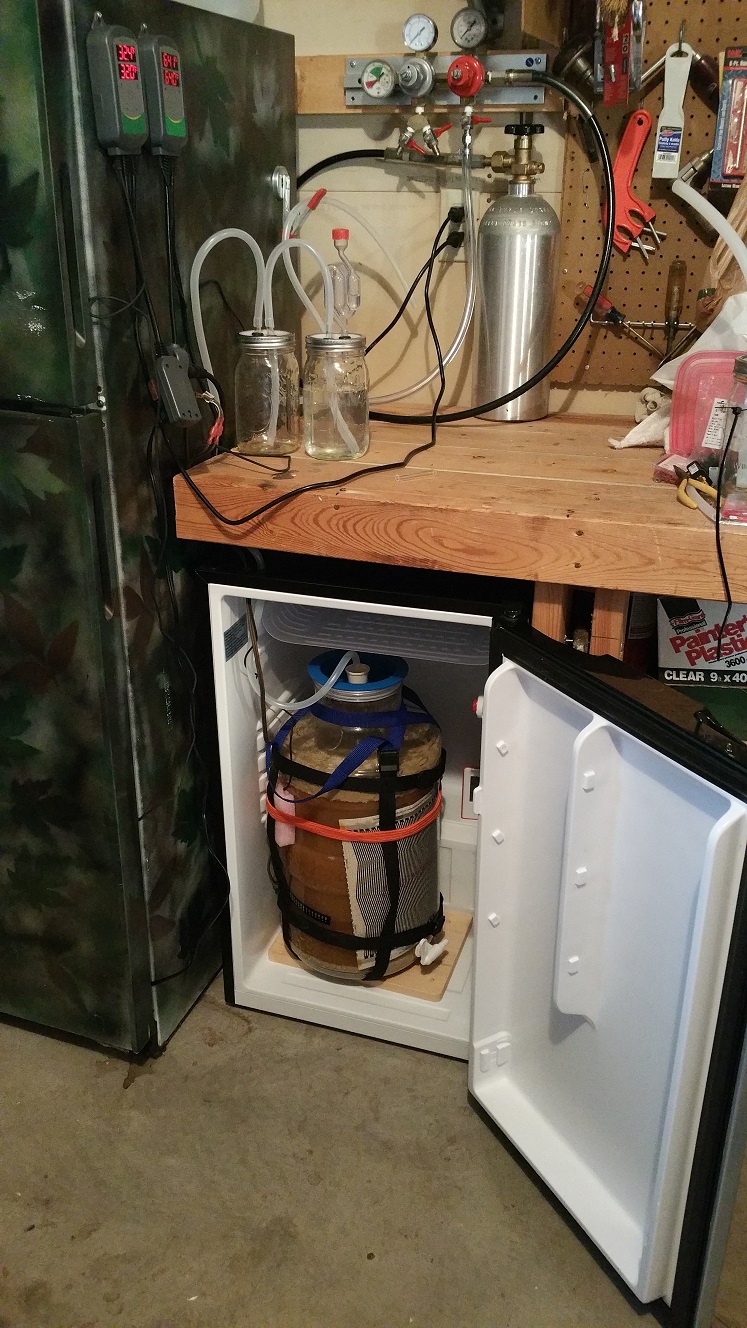
3. A small jar for a blowoff airlock. Generally the airlock on top of the fermenter won't fit in such a fridge. I use a drilled stopper with a piece of rigid tubing in it, then run a short piece of tubing to a jar for that purpose. Usually there's room for one.

4. A heat mat. I have two types, a reptile heat mat that goes for $9.99, and a fermwrap, which you can get for in the $25 range. Might be cheaper elsewhere.

The reptile heat mat produces 21 watts, which I've found to work. The Fermwrap has 40 watts of heat so if you have this in a cold place (like a garage), you may need the added power. If the fridge is in the house, then the reptile mat is fine.

Below are a couple pics showing this, including my small fridge. I even went so far w/ the small fridge to drill a couple holes in the front top to pass the tubing for escaping CO2 out to my bench where i can see it bubbling, and for the inkbird temp probe and wire for the heat mat. You can also just run these between the fridge and the gasket if you do it on the hinge side, that works pretty well too.

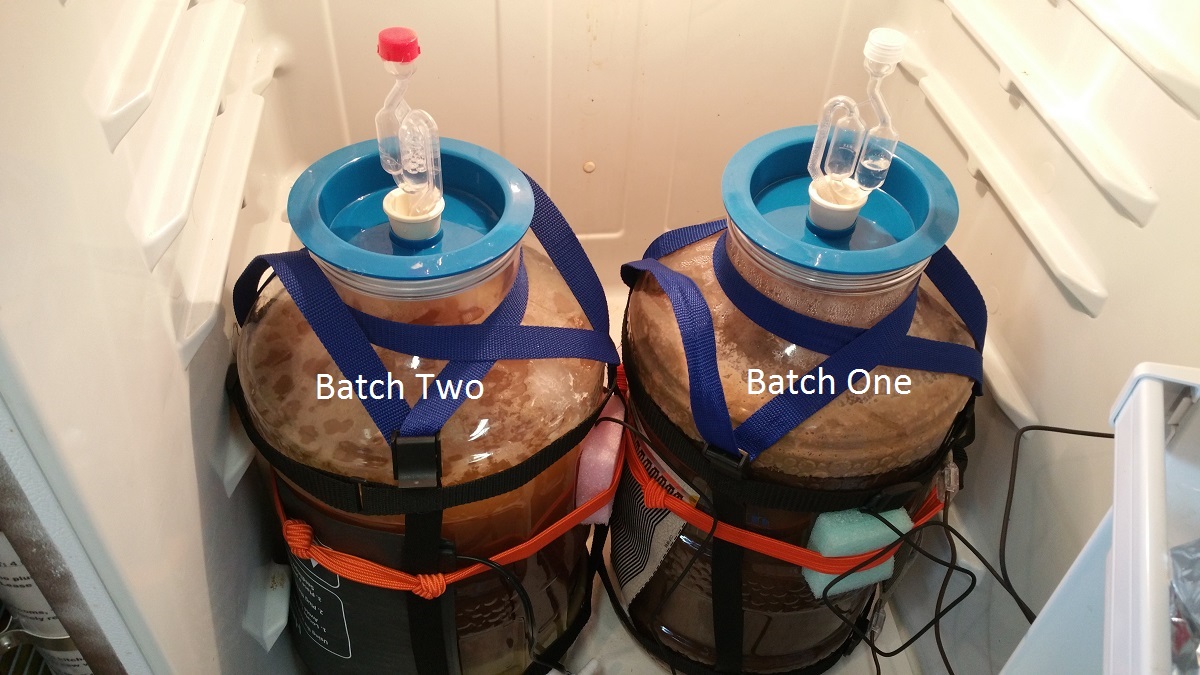
Below shows two fermenters each with one or the other of the two heating pads. You need something to hold it against the fermenter--bungee cords will work, or I have mine in between the fermenter and the lifting straps.

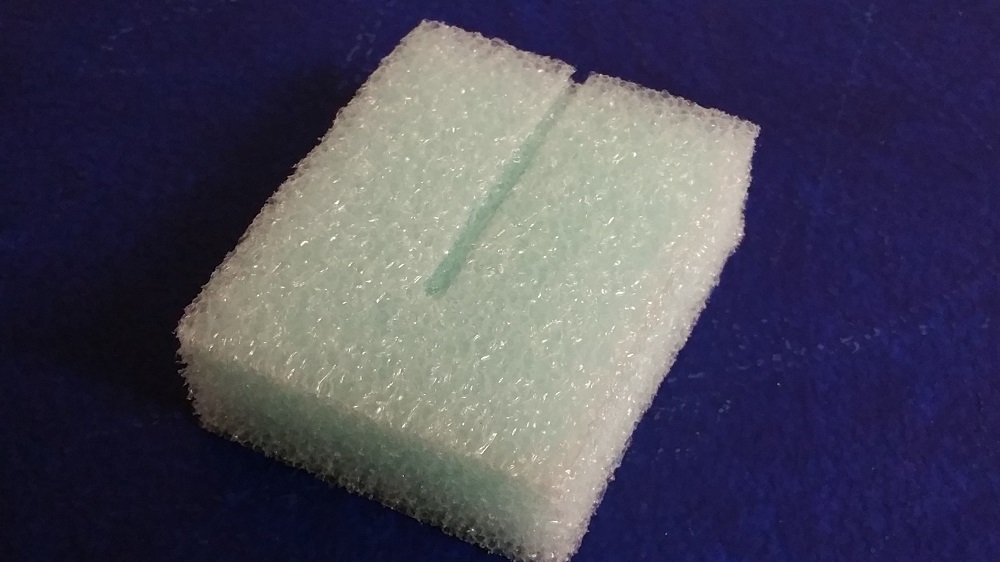
The Inkbird probe is held against the fermenter with a piece of closed-cell foam (one blue, one pink in the pic below). I cut a little channel for the probe so it's nestled against the fermenter. Styrofoam could work as well, and some people even use folded towels and such. The idea is to get the probe to take the temp of the wort, not the air.

fermchamber2a.jpg
minifermchamber.jpg

probefoam.jpg
 
Here's what I use.

1. Inkbird 308 temp controller. This will control both a heat source and a cooling source and will maintain temps within a degree of what you set.

2. A small dorm-style refrigerator, the tall kind. You can find these on Craigslist, maybe there's a university nearby with some they're dumping. Mine has a bunch, they want $30 apiece for them. I bought mine for $60 used. You need to take along your fermenter to ensure it fits or if it doesn't, that removing the plastic molding on the door will allow it. I got lucky with mine, didn't have to remove the plastic. It BARELY fits.

3. A small jar for a blowoff airlock. Generally the airlock on top of the fermenter won't fit in such a fridge. I use a drilled stopper with a piece of rigid tubing in it, then run a short piece of tubing to a jar for that purpose. Usually there's room for one.

4. A heat mat. I have two types, a reptile heat mat that goes for $9.99, and a fermwrap, which you can get for in the $25 range. Might be cheaper elsewhere.

The reptile heat mat produces 21 watts, which I've found to work. The Fermwrap has 40 watts of heat so if you have this in a cold place (like a garage), you may need the added power. If the fridge is in the house, then the reptile mat is fine.

Below are a couple pics showing this, including my small fridge. I even went so far w/ the small fridge to drill a couple holes in the front top to pass the tubing for escaping CO2 out to my bench where i can see it bubbling, and for the inkbird temp probe and wire for the heat mat. You can also just run these between the fridge and the gasket if you do it on the hinge side, that works pretty well too.

Below shows two fermenters each with one or the other of the two heating pads. You need something to hold it against the fermenter--bungee cords will work, or I have mine in between the fermenter and the lifting straps.

The Inkbird probe is held against the fermenter with a piece of closed-cell foam (one blue, one pink in the pic below). I cut a little channel for the probe so it's nestled against the fermenter. Styrofoam could work as well, and some people even use folded towels and such. The idea is to get the probe to take the temp of the wort, not the air.

View attachment 595789 View attachment 595790
View attachment 595805

Mongoose, I have a inkbird and a chest freezer in my basement. Do you leave your +\- value at the factory 2 degree?
 
Back
Top