• Please visit and share your knowledge at our sister communities:
  • If you have not, please join our official Homebrewing Facebook Group!

    Homebrewing Facebook Group

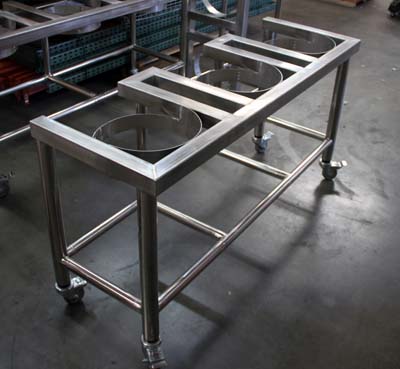
2 x 2 16 gauge - OK for 15+ gallons?

Homebrew Talk

Help Support Homebrew Talk:

This site may earn a commission from merchant affiliate links, including eBay, Amazon, and others.
Dog house, sorry, just want to be clear.

This build is identical to what I'm shooting for, but it's going to look nothing like it....:(

Sorry to ask, but using this photo, would you mind gong in a bit more as to which pieces you're talking about? And by grinding, do you basically mean, grind and sever the welds, and start over? The horizontal support member I'm talking about is to the left; the vessel struts I mean are the 6 struts going L-R starting in the foreground (pretty certain we're on the same page, just wanted to make sure). My vessel struts do not rest on the support member; or several don't, I should say.

I don't know if it was you, or someone else. But did I blow this by not just first tacking the entire frame before welding main structures? (e.g., right now I have the top, front, and back; planned to install the remaining and the frame is done, if completely screwed up).
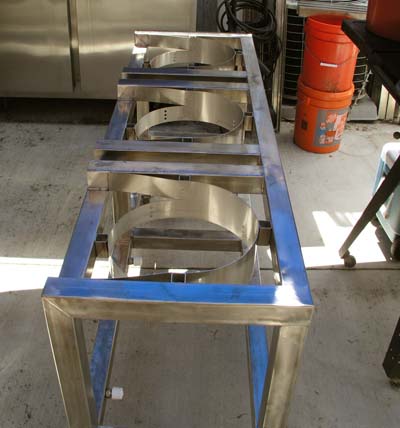
heat shield with back support lower.jpg
 
If I was building something like that, I'd definitely tack it all together, and once I was satisfied everything was level/plumb/square, then weld it completely. :yes:

...and Ya, if you've got some part of it totally hairball, don't be fraid to grind off the welds and straighten it out. (it's not permanent until you say so )

Lastly, don't be so hard on yourself Gad, it's entirely possible the welder may be to blame. Heck, I don't used flux core cuz I cant see a dang thing through all the smoke either.
 
Last edited:
I don't know why I didn't pick up on it sooner, it's right there in the thread title. 16 gauge! That's auto body metal, or used to be on my old Internationals. Trying to run a bead without burn through is very difficult.

I would use a series of very short tack welds, maybe 1/8" long, say 1/2" apart. Grind flush, then repeat, overlapping the last tacks a bit. A sanding disc is good if you find the grinding wheel too agressive. Keep filling in until the weld is complete. Same process for filling holes. Fill a bit, grind or sand, fill a bit more.


I completely agree with Sleepycreek, tack everything before you commit to final welds.

There comes a point in every major project where you wish you'd never started the damn thing. You just have to push on, and suddenly it's all down hill.
 
Guys, both, thanks very much. Ancient, I'm sorry, if I can change the title I will, as I'm using 14 gauge, not 16 (in mild, this is all the co. offers). I don't know how much this was an issue yesterday but I only noticed today the tip had wound all the way back to deep recess inside the nozzle. I pulled it back it to a hair outside of flush and we were back in business, at least more so. T-joints (is this what you call them? around the corner from a fillet joint) were still not pretty but I'm getting a better feel so less burnthrough and some with cleaner beads. Fillets better, vertical fillets nice.

Tacking everything first and checking much more today (thanks), finished the back vertical assembly of the frame and have the front tacked for tomorrow (do you guys get nasty migraines? Along with another thing, I've a pretty messed up back and I have a weird tendency to migraines when low back pain starts roaring on. But I wondered if that's just welding fumes, or something. (Welding outside, though no respirator). Anyway, do you get migraines? Have to knock off daily when these and my other stuff come on).

After that, it's connecting the front and back with horizontals, and laying the already-completed top on top, and see where we are. Thanks on knowing nothing's set in stone, because I know I'll want to do over at least 1 of the vessel supports. Feeling much better today and you said it so well, ancient - I actually think I'm going to live through this one and taste a brew from it eventually!
 
Don't want this to sound like a flogging ;) but a lot of this learning-curve ascension should have occurred during "play time".
I kept practicing on scraps making butts and miters until I was comfortable with dialing-in the machine and confident I could do a passable job, and that took a good three weeks of play.
The fails and near-fails also sharpened my grinding skills, so that was kind of a win, too :D
Like nearly everything to do with brewing beer, being long on patience helps...

Cheers!
 
Tack it, if it isn’t right, grind through the weld and start it over. 14ga should be easy to weld with a series of tacks. Keep at it and when you get too frustrated, quit. Sometimes things fall right together the next day.

Dog, thanks very much. Perfect.
 
Don't want this to sound like a flogging ;) but a lot of this learning-curve ascension should have occurred during "play time".
I kept practicing on scraps making butts and miters until I was comfortable with dialing-in the machine and confident I could do a passable job, and that took a good three weeks of play.
The fails and near-fails also sharpened my grinding skills, so that was kind of a win, too :D
Like nearly everything to do with brewing beer, being long on patience helps...

Cheers!

Trippr, you're totally right. And in just about everything patience, probably more accurately perfectionism, is something I take to a sincere fault (I'm not trying to say it's a good thing - I'm saying it's something I've had to unlearn). Not trying to overpaint it but as a traditional French chef who for example maintained 15 or so meat, poultry, fish, shellfish stocks and sauces derived from them, brooked not a speck of surface scum to sit (i.e., trained my cooks, skim relentlessly - nothing is allowed to "simmer overnight"), blah blah, or as a live-in apprentice to a Japanese martial and zen master, receiving daily a$$-kickings to "hone" self and technique, I get it.

I'm being very honest here. And it goes against everything I spent the last decades doing. But with what's happened to my physical self over the last 10 years, I don't know how long I can do any of this. Total crap shoot. I loved brewing like we all do, with a driving passion. Get up in the middle of the night to do an idea for an outdoor Helles at -10F kind of mania. I've said them too much and all of you probably know these bits of memory lane. But I want to get going.

Meaning, this stuff, as necessary as it is, doesn't grab me. I seriously need to get brewing as quickly as a safe build will allow. Kind of sheepish saying all this, but it's just the truth.

I should also say, I made a "MIG" (FCAW - I called it MIG) then, as I've said, without issue. So I thought, well, with good instruction and advise here, and a bit of practice, this will go easy. I was wrong, but I can't back up. I'm in. At any rate, like ancient and doghouse have kindly advised, new day. Everything came out really well today and I see it coming together - knock on metal - rather easily from this point to finish. All thoughts deeply appreciated, though - and you should know I'm very grateful to you trippr for everything you've contributed.

Oh, if I could, one more. The stainless heat shields to the mild 1 x 1 stubs. How much do you guys who use these do, in terms of securing them? I was going to try the mixed metal techniques I've researched (meaning, proper tweaking of the machine and technique to deal with the thinner ss-thicker mild, but welding otherwise fully on all side, as per normal), but I don't know how much these need and was actually thinking of just doing a line along the tops, and maybe a tack on each side, along the vertical of the 1 x 1's. I honestly don't know what would be recommended so thanks for any thoughts.
 
I get it, the best game plans have to adjust for health stuff. Hope you have better days ahead :mug:
Wrt to the shields, 14 gauge will take a stainless sheet metal screw. Might consider that...

Cheers!
 
Pace yourself, man. If it stops being fun, go do something else for a while. We'll wait for ya.

Concerning heat shields and such, I wouldn't be in too big a rush. It might be best to do just enough to make it usable and do a test burn. You'll quickly find out where you need guards and where you don't. You're almost certain to find something you want to change, add, subtract. Best to find it before paint.

I like Day_trippr's suggestion about sheet metal screws. Use short pieces of metal tube for standoff spacers. That would make for a very clean installation.
 
Thanks very much guys, you've been really helpful. We're making good progress and took your advice ancient, doing it in smaller but more focused chunks. All that's left is correcting the top, seating it, and installing the heat shields. Trippr, awesome idea, many thanks.

All of you, many thanks again. I'll post some pics once it is done.
 
BTW, addendum. Coughing up nasty black chest sputum is not my idea of smart. It only took the welding sessions to date to accept the "duh" of this. Stepping away, not a bad idea at this point as I want to make sure the top itself is well done - it's the last main thing. The main bar is bowed from the vessel supports pulling on it, and I've learned to tack since then, so thinking on next step.

But mainly taking a break today to recoop (I know, and it feels lame, but this knocks the crap out of me), and look for a relatively cheap way to help limit coughing up coal for my family's enjoyment.
 
Positive ventilation if you're working in a closed space. And keep your head up-wind :)
I have a legit/pricey respirator in my shop but with enough airflow and staying up-wind I haven't needed it for welding.

btw, I noticed you were having issues with your helmet.
When I started I picked up an autodark model from Harbor Freight and love it.
Huge aggravation reliever compared to the fixed shade that came with the welder...

Cheers!
 
Last edited:
OK, thanks Trippr. I'll try to ensure that ventilation before the next, possibly final welding session. I think that HF helmet is the one I saw Jody from Welding Tips and Tricks recommend, and it seems like it makes it so much easier. At this point I'm so close to finishing I'll probably just use this helmet (weirdly, I guess, morning-noonish sun makes for great light - just right, with no glare - in the garage. So I try to jump in heavy in the morning), but if I continue with this, it's a no-brainer, I think. Thanks.

OK, wanted to ask you and the others. A fairly disheartening result as I looked today, and I don't know if it's salvageable. My first frame, "Ugly Betty," was distorted like crazy, as I think I mention above. Didn't know a thing and just welded the uprights right to left, and the horizontal bottoms distorted so that the frame had the mild appearance of a toboggan. And it rocked, like a bad restaurant table - like the whole frame was not only curved like the toboggan, but twisted some.

Well, on this frame, I probably overwelded too many joints in trying to deal with burnthrough, etc., not knowing (and now, it seems obvious), that the more I did this, the more the potential for heat distortion. I'm also just a crappy welder. The frame rocks. As it is, it all goes to one leg and tilts out of plumb. If I basically do like a restaurant table and rock off that leg and support, all of the three other legs are solidly on ground and the frame at least appears plumb (your instrument looked great, trippr. "Next time," if there is, another lesson learned).

Can I just weld a small portion of tubing as a butt weld on this leg, so that the whole thing is more or less corrected? Or is that begging for failure, the piece coming off (Murphy: middle of a 20 gallon brew), and that's a bad idea? Any thoughts?
 
It doesn't take much difference to make something rock like a bastid. Assuming your legs have "ends" I'd try to solve the problem with your angle grinder.
Block each leg until you get the frame level - presumably the longest leg will remain on the floor - measure the block heights, translate the differences into solid marks on the legs that need some love, then go to town...

Cheers!
 
Are you sure your floor is flat and level? You might consider adding some leveling screws so that you can make the frame stable regardless of floor geometry

No, I'm not ancient and thanks for raising that. Another noob admission is that I don't yet know how to install casters, which I have and had planned to install, but I love your idea. The legs are simply open ended at this point. I did have the thought tonight after trippr's suggestion to place the frame where I'll actually be brewing, which is just outside the garage, and check for level there. And this is exceedingly uneven ground, the driveway. I am compelled to this because as I've said elsewhere we rent, and share the garage with our neighbors. Never thought of the idea of adjustable leveling screws so I have more of a choice - many thanks! Now comes the noob part - how do you install these? Weld caps on the legs, then drill and install the screws?

OK, while we're here, man, truly embarrassing (my expertise is so not in these arts), but I presume, trippr, we're talking machine screws for installing the shields? Er, um, do you drill a smaller hole first through the shield/1 x 1, then drive the screws?
 
The way I like to install leveling feet on square tubing:

Start with square plates about 1/4" larger than your tubing. Drill a clearance hole for your leveler in the center. Using a bolt with the same thread as your leveler, sandwich the plate with a nut on each side. Just gently finger tight, no wrenching.

Now tack weld both nuts to the plate. Remove the bolt and run a good bead all around the nuts. This has to be solid, because you'll never have access to the upper nut again. When the assembly is cool, run a tap all the way through to clean up the threads.

Now weld this nut plate to the end of your tube. You've created strong threads in material too thin to tap.

I took a look on Amazon and ebay for leveling feet. Not much on Amazon, and very high prices. Ebay was better. Or you can just use regular bolts.
 
wrt casters, I used the kind with the rubber compression sleeves, but they're not actually height-adjustable as you're supposed to stuff them fully into the open tubing end to the stop before cranking the compression bolt.

But you can buy casters with threaded stems. Generally folks weld a cap on the tube end, drill an over-size clearance hole in the center, then weld a nut to the cap. You'd then run a lock nut onto the caster stem, screw it into the cap nut, and lock the elevation with the lock nut.

As for the screws, with 14 gauge I believe you could use sheet metal screws with a pilot hole, or use machine screws with tapped holes.
The former would be easier/cheaper for sure if you don't have a tap set.

For sheet metal screws I use a micrometer on the screw and drill a hole sized for the skinny section (between the threads).
But there are tables like this one on the web for pilot hole sizes vs sheet metal screw size...

Cheers!

[edit] ancient posted while I was in the edit pane, but I like his idea, it'd be a stronger solution.
 
Self-drilling and tapping screws are available. The drill is built in to the screw, so it's always the right size, and you have a new drill point for each screw. Just be sure to center punch, they do like to wander.
 
Are you sure your floor is flat and level? You might consider adding some leveling screws so that you can make the frame stable regardless of floor geometry
This ^^^^
I’m guessing your floor could be off. Myself, if I had 3 that were flat, and I knew the floor was flat, I’d just extend the one. If you get casters, you may be able to add a few flat pieces to the bottom of the off leg if it isn’t crazy off.
You do need a fan going. FC wire puts off the funk.
Keep rocking, a pretty structure doesn’t make better beer. [emoji1417]
 
Was away over Christmas in the U.P. without internet (a "back 40" of my SIL's, intermittent connectivity), you guys, so a much belated thanks for your help. I think I'll be doing this in stages, as I want to get brewing!, so will just be leveling on the bare open ended legs until I get going enough to say, "OK, finish it up."

This has been a real PITA, all of my doing. So, the Spike Vessels would fit perfectly on supports spaced 17 3/4" (outside, 13 1/4" space between the 2 x 2 supports) - IF THEY WERE FLAT ALL THE WAY. My complete negligence in forgetting part of the design of their vessels is a beveled bottom, so the tri-ply disc is much narrower and 15 1/2 OD/11 1/2 ID spacing would give the vessels solid support, with some of that tri-play sitting fully on the support.

Fine. Grinding and cutting existing supports off to start over. However, in fitting it up, going with supports at 15 1/2" OD, that 11 1/2" gap is now too narrow for the Brewer's Hardware heat shield, which is 12" D. That's without any spacer studs whatsoever, it would mean drawing the shield in a bit and anchoring it directly to the support, which I don't really want to do (I'd prefer not to drill into the supports, and I'd prefer if there's some heat buffer between the shield and supports. Maybe it's all a non-issue. Something like this:

BH5418.jpg


It feels like this is a heck of a lot more complicated than it should be, and I've just goofed this thing up from the start. I see a ton of vessels resting well on the supports, with 1" spacer studs to the heat shields, top split splayed forward as shown on the BH site. What am I missing?
 
Last edited:
Well guys, first of all, happy new year to friends here and abroad. I hope 2018 turns out to be a year of prosperity, peace, and good health for all of us. Northern and Cire (and I'm sure others), I do feel badly I've not yet replied to your considered thoughts....feel if someone takes the time to reply, it behooves to take it in and at least reply back. Just want to say, haven't forgotten, just playing catch up.

Now:

I burned my friend's angle grinder trying to cut these supports off. I've never seen this - like, not sparks, but a serious amount of fire shooting out. It was an older one, but I'm concerned I did something wrong. Stupid, and I count myself lucky anyway. Diamond wheel and no guard.

My friend gets a new grinder of course; I'm still left with trying to get these things off. In addition, on another piece, I got a moment of pretty nasty kickback though I hold strong with two hands. Given my long history of being a klutz and consequent accidents (did I say I shot myself with my brother's crossbow as a kid?), I'm wondering if I'm courting disaster.

I only have 4 supports to do. I understand trying to hacksaw through the bead itself is futile, but what if I saw on the near side of the bead, and use a grinder to simply grind everything flush again? I've no experience with oxy, much less cutting torch. That being said, is that the standard, really, in doing something like this? Is there a big issue with distortion near the area of the cuts (these would be perpendicular to the horizontal support member)? My friend actually has an oxy setup with torch....and I know....but I'd like to learn this anyway....

Finally, I hate to do it as I've come this far, but any thoughts on taking it in to a shop to just sever these supports, and make clean, flush surfaces, so I can weld new ones in place at the correct position (about 2" closer together)? Any idea on what a reasonable cost would be?

And this may sound ridiculous, wasteful, and a host of other things. Part of me also thinks, just buy another $140 worth of stock and start over, as I do feel like I've learned a lot in doing this one, listening to you guys and just getting a feel in place, as opposed to reading from a book. I then have a pretty well-connected piece of scrap for future projects. (on the other hand, itching to brew and it's so close. So....)
 
I don't see a problem with hacking below the beads to free up the tube then grinding it smooth.
I think a torch would be bound to make at least as big a mess and potentially scorching things you don't want scorched.
And if you take the frame to a shop you're gonna be tempted to let them finish it. Questionable juju ;)

Cheers!

Man you just read my mind, trippr, lol. I was not totally honest and yes, I was thinking, "and what would you guys charge to put the 4 supports here, after you sever them? Then, these things, the heat shields...then....."

Yeah, busted, well done buddy.:D Alright, will give it a try. And thanks for the insightful post.
 
Well, if nothing else, you've learned why welding is considered a skilled trade!

I noticed you are using a diamond grinding wheel. Those are for ceramic tile and concrete, I'd expect trouble using it on mild steel. I use reinforced aluminum oxide cutoff wheels. If you have a reciprocating saw with a metal cutting blade, that might work better for you. Just slow the blade speed down. Just saw or grind right through the bead.

A plasma cutter does a good job of cutting weld beads, a cutting torch is better suited to demolition and scrapping.

I think, if I were in your position, I would scab this Mk1Mod0 rig together and start brewing. Then you'll have a full list of what you want for your 'final' rig.

You might be dissatisfied with what you have done so far, but you are light years ahead of the great majority who never even try.
 
Thanks fellas. I gave it a try today but at -10F it wasn't too successful going as my bod just can't take the cold like it used to. Using the diamond wheel in attempting the cuts, I feel like a moron, ancient. I'm sure my friend presumed I'd know this most basic thing when he handed over the angle grinder w/diamond wheel on board. I do have a cheap HF recip saw with bimetal but it was really slow going. My other friend lent me his grinder, which I've kept to grinding all along and feel a bit loathe to attempt cutting with it. I don't know if I can keep the guard on, and mount an abrasive cutting wheel, anyway?

I feel like I've maybe dodged serious injury a couple times at least on this build, just from sheer ignorance. So close to the end, I'll probably just use a hack saw to remove the supports and fit the second side/mitered member that remains (farthest, short member in photo above). Everything is tacked up otherwise and it looks serviceable to me, so I'll wait out this frigid spell (highs not breaking low teens all week - mostly 5-10F) and finish it up. I can't see any way to do these but 12" between the supports and the heat shields directly attached to those supports, without spacing studs.

Thanks for the help and support guys, all of you. Happy New year once again!
 
Sounds like you have a plan. Grinding the welds out with the right disk shouldn’t give you any issue. Maybe go to the big box store during the cold spell and get you a few cutoff disks. Have a grinding disk to finish it too. Learning on your own is a hard road. I remember my father years ago when I was starting my first fab job. It was a pipe rack for my truck when I started in business. I was already to be the student. He came out, turned on the lights holding his coffee cup and responded, “there is the welder, let me know if you need some coffee.” Out the door he went, he said nobody learns chit by watching. Good on ya for getting it done. If you ever build another, you’ll know what is up. My pipe rack may not have been perfect, but it is still in use today 20 years later. [emoji6]
 
Back
Top