• Please visit and share your knowledge at our sister communities:
  • If you have not, please join our official Homebrewing Facebook Group!

    Homebrewing Facebook Group

☕ Coffee ☕: Ingredients, Roasting, Grinding, Brewing, and Tasting

Homebrew Talk

Help Support Homebrew Talk:

This site may earn a commission from merchant affiliate links, including eBay, Amazon, and others.
@BrewinHooligan

Here is the Sidama Station espresso roast. It will be getting brewed as espresso but I can do an Aeropress or V60 if you want any specific feedback.

LT9vCQ8.png


I order 1lb of the latest Kenyan SM's posted and here is my stab @ it for drip. I tried my best not to be dogmatic and follow my olfactory senses here. Really looking forward to try both of these.

LKtxvqd.png
 
@jammin, I haven't been able to justify a decent espresso machine to my wife so I am stuck with wither the Aeropress or V60 prep. If you can provide feedback for those that would be awesome. I appreciate the roast profile. That roasted faster than I have been so I will be either decreasing batch size or turning up the heat, or both to hit those targets.
 
How many grams of water:tea are you using? Any tips on making a good cup?

I only made one cup so far and just placed some in the steeper without any measurements. I will for sure take notes the next time I make some. Life’s been so busy lately, but maybe tomorrow night I’ll make a cup and take notes. Then respond back after a few cups hopefully later this week at different ratios.
 
Just curious if any of you have tried the Prismo on the Aeropress? Got mine a couple days ago and just this morning got a chance to use it. I did 3 shots...:eek:...2 of them a little on the sour side, which I'm blaming on a lighter than optimal roast level, at least for doing espresso, which led me to go with a Costa Rican bean I brought right up to 2nd crack and then dropped. More prominent roast flavor on that one. None of them produced a crema that was appreciable...I ground one on setting 2 on my encore...which you have to put some force down on the plunger when doing the extraction, so the next 1 I did at setting 3...lighter pressure needed...but that didn't give me any better results, so I went back to setting 2 for the 3rd attempt. The body of those shots seemed to be where an espresso should be. I didn't have muddy or grainy characteristics...just the 1st 2 shots a little on the sour side, and the 3rd shot was the best out of them but lacked any crema......anyone have any insights they could share....other than to get a real espresso machine!!!:D That will be a couple years from now, unless I win the lottery!!!
My delonghi i just saw was 74 at bestbuy and iirc as low as 60 on amazon. Take the pressurized filter off and it pulls shots, which I canlive with, ymmv. I have posted tons of pics on this thread. Plenty of crema. I drink iced esspresso drinks and wife likes lattes. Will be nailing them tomorrow morning, usually 2 or 3 double shot drinks.

Has me wondering if a lets say 300 dollar type machine (still pressure porta filter) is any better. Assume would use it no pressure filter too?


@jammin so interesting you hit first crack that quick and extended 3 min. The other is fairly well extended too and a nice sounding drip profile. Could you describe how you adjust heat to do that? Since i fill the single hopper i am stuck with drip roast for esspresso too. I think the darker roasts are sweeter, but sadly cant say for sure.
 
Last edited:
@applescrap I charge the roaster @ min heat/fan. after 1 minute heat goes up, fan goes to medium. 1C incoming: heat goes back to min, fan goes towards high.

that's the frame to most of my roasts. small tweaks to this can make noticeable changes in the cup.

lately ive been trying my best to use my olfactory senses to end the roast. hopefully 2018 will be the breakout year to get over the hump
 
Last edited:
going back to the nose knows @jammin ? How do you escape the overwhelming smokiness (acrid) to pull something out that is usable? I suppose that would be a benefit of exhausting the smoke outside, but is there still enough aroma left on the beans themselves? Kinda like what you smell in the storage bags after the roast...just doesn't seem like you would be able to separate it that much while the roast is underway...
 
@BrewinHooligan - I pulled 2 shots of the SS this morning. It’s a pretty light for an espresso roast but the shots are fantastic! Flavors are a bit hazy bc it’s so fresh but the berries are def there with nice acidity. The body is there too! Speaking of espresso machines - I have a new one on the the way. ECM Synchronika. Can’t wait to get it set up. It will be plumbed in/out and can do line pressure preinfusion.

@Ruint - the trier on my TJ-066 is about 3x as big as the little one on my old Quest M3. While the M3’s was serviceable, this larger trier has made sensory feedback of the roast much easier. You get a heaping tablespoon of beans or so to smell & take a closer look at. I think you’d be surprised at the clarity of the aroma in this manner. I also have a light focused near there so I can get a really good look at the beam development. It helps to see the color & texture. Some “profressional” roasters will use a previous batch they liked or a color swatch (similar to what you’d see in the paint section) to reference roast color
 
Very Nice @Jamming!!! Not having a "real" roaster with a trier I am not fancy to that yet!!! I definitely appreciate all the info you've shared...and anxiously await your next bean selection!!!:D 
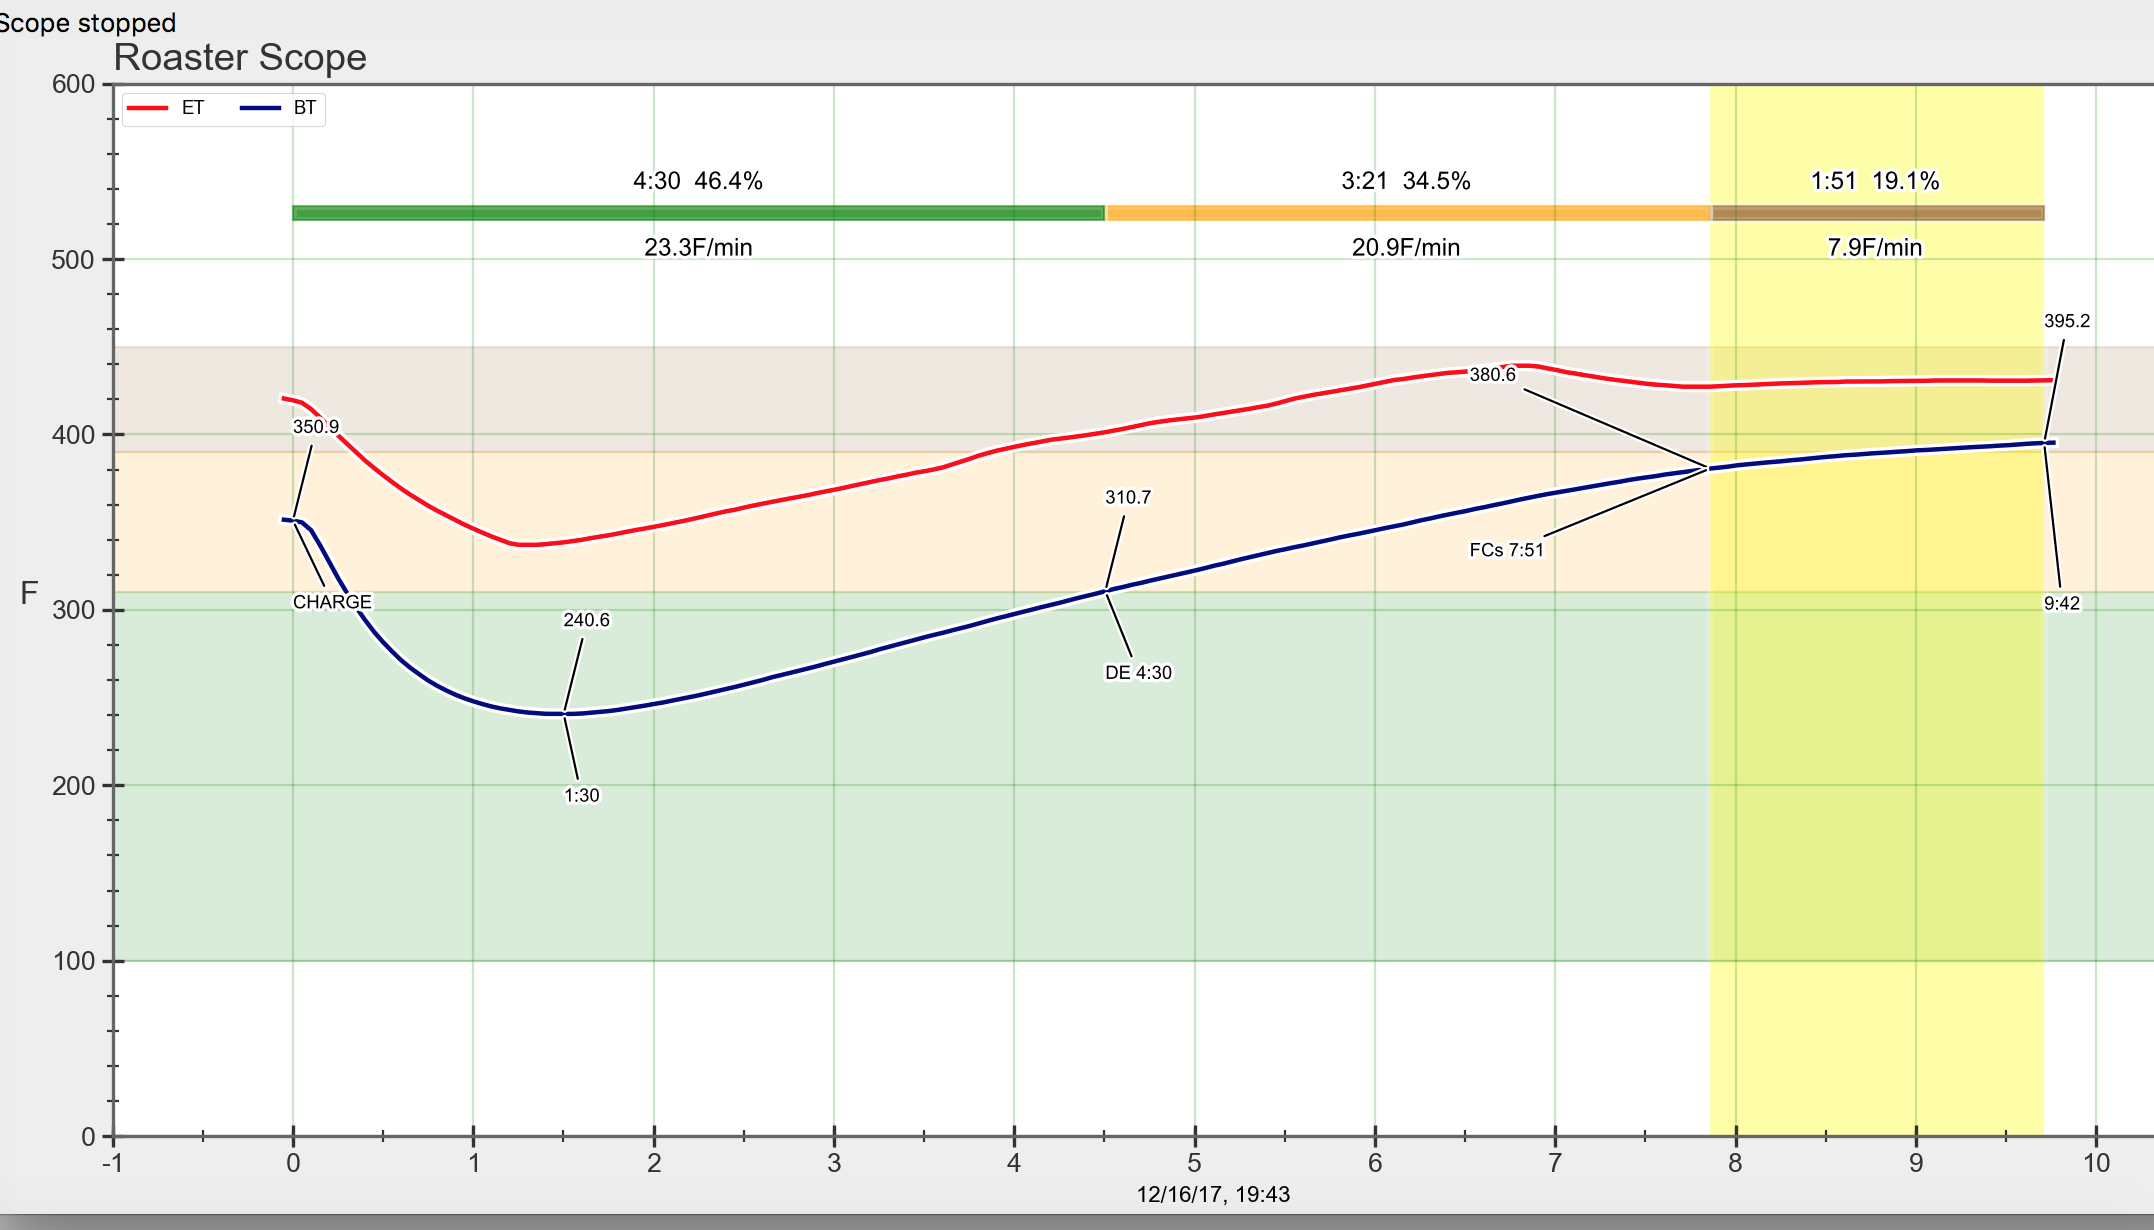
Especially being I roasted the last bit of that Banko yesterday after roasting something to try for an espresso with the Prismo/Aeropress.
 
Speaking of espresso machines - I have a new one on the the way. ECM Synchronika. Can’t wait to get it set up. It will be plumbed in/out and can do line pressure preinfusion.

Looks nice. I could see something like that for my next machine even though I'm not ready to take that plunge yet. I'd definitely like to move up from the single boiler Silvia at some point though.
 
Looks nice. I could see something like that for my next machine even though I'm not ready to take that plunge yet. I'd definitely like to move up from the single boiler Silvia at some point though.

The p/i and ability to switch back to line pressure to the end shot are exciting features to me. The e61 has a spring loaded passive preinfusion chamber already. This means the ramp to line pressure for starting a shot is soft and you can also ramp back down to line pressure to end a shot. This guy has some great video of this in action:
https://www.home-barista.com/espresso-machines/ecm-synchronika-t41126.html#p467518
I have no idea what any of this means, but I seem to feel oddly aroused by it. :D
 
Pulled some shots this morning. Its the ec 155 or something like that. Google delonghi esspresso and this cheap one pulls up. First one broke sent me new one no questions asked. I remove pressure plug and voilla.

My trier is nifty in my opinion but not quick enough, I agree smell is the way to go at the end, I can smell very well even outside.

20171217_081624.jpg
20171217_081629.jpg
20171217_081650.jpg
 
Now that I have almost 4lbs of beans roasted under my belt, I did my first small roast of a bean from Sweet Maria’s. I know my experience is still very young and this is why I am asking all of you for your thoughts. I also know pictures are not the best way to tell, but it’s better than nothing else. With that being said, I was aiming for a “City +” roast. How do these beans look? I have a feeling they are a little more roasted than a “City +” roast. The ones on the right were the first 100g batch & the one on the left was from the second 100g batch. The second one I pulled a littler earlier and I was able to shake the canister more than the first batch early on. A new technique I found on various videos with the Fresh Roast SR500.

So with that being said, please let me know how you think they look. Do they look like a “City +” or not? Thanks in advance everyone!

IMG_0302.jpg


IMG_0303.jpg
 

That’s what I am basing it on and using as my reference. To me they look a little more roasted like a “Full City” to a “Vienna” roast. The colors change very little or look very similar to me. I’m curious to know what others think since I’m still learning and figuring this out. Does my assumption seem correct that they may be more of an”Full City” roast or am I way off?
 
I will venture a stab at this @pshankstar...the roast on the right looks close to a FC, maybe even a "+". The one on the left would be city to city +....that's
what I would judge them as if they were mine....let's see what some of the others say...
 
I think left is full city and right full city +. The beans rounded side look fairly smooth (full expansion) and the flat side cracks pretty open. I think City and city+ the rounded side should have deeper fissures with a more molted look and also a tighter crack on the flat side. Different beans do/can have different looks for the same roast levels which makes things sort of hard to tell sometimes.
 
Idk, but they look good to me. I am impressed how dark they are with such a light split (?). Curious how were they roasted, time, etc..?
 
Ethiopian Sidama just pulled to cool. Haven't cleaned the chaff yet. The house smells amazing to me, pretty excited to cup this one
20171217_224048.jpg
 
Honestly, it's not really worth worrying about what they look like. Just take good notes of how long the roast took overall, how long first crack was, and how long after 1c ended that you dropped the roast. Try a few different profiles, give them all a taste, and see what tastes good to you.

People on these FB coffee roasting pages are always posting pics asking what the beans look like. Without proper lighting (like, an incredibly complex setup), there's no way to truly capture a picture of how the beans actually look in real life. And ultimately it doesn't matter as long as you figure out what tastes good AND how you did it so you can replicate it.

Just putting that out there. When I first started I would compare my roasts to a chart to see what the color looked like, how smooth the beans' edges were, and all that. But after a while I realized it didn't matter because I taste coffee with my tongue, not with my eyes.
 
I think left is full city and right full city +. The beans rounded side look fairly smooth (full expansion) and the flat side cracks pretty open. I think City and city+ the rounded side should have deeper fissures with a more molted look and also a tighter crack on the flat side. Different beans do/can have different looks for the same roast levels which makes things sort of hard to tell sometimes.

@ba-brewer, thank you! This is what I was looking for is feedback confirming or negating what I am seeing. I didn't think they went higher like @Ruint mentioned but as a new roaster its nice to get some feedback from others. Again thank you for this feedback!

Idk, but they look good to me. I am impressed how dark they are with such a light split (?). Curious how were they roasted, time, etc..?

@applescrap This is the first time I took notes and will try to do so moving forward. Keep in mind I am using the Fresh Roast SR500 roaster. I did two 100g batches following the same method except where noted below.
  1. Set timer to 7.5, temperature to "Low" and fan to the highest setting.
  2. 7.0 minutes remaining I picked up the chamber and shook it. *NOTE - The second batch I had an oven glove so I could shake it more at this step and future points where I shook the chamber. The first batch I did not have the glove and it was hot and I couldn't shake it as much.
  3. 6.5 minutes remaining I bumped the temperature to "Medium".
  4. 6.0 minutes remaining I shook the chamber again.
  5. 5.0 minutes remaining I shook the chamber again.
  6. 4.5 minutes remaining I reduced the fan to 50%.
  7. 3.6 minutes remaining I reduced the fan to 33% (+/-). *NOTE - The second batch I reduced the fan at the 4.0 minute mark.
  8. 2.9 minutes remaining I reduced the fan to 25% (+/-). *NOTE - The second batch I reduced the fan at the 3.4 minute mark.
  9. 2.0 minutes remaining I reduced the fan all the way down. *NOTE - The second batch I reduced the fan at the 2.7 minute mark.
  10. 1.5 minutes remaining I bumped the temperature to "Low". *NOTE - The second batch I bumped it to "Low" at the 2.0 minute mark.
  11. First Batch - After cycle was complete it cooled for 3 minutes with the fan at high. Second Batch - Stopped the roasting and switched to the cooling cycle with 1.2 minutes remaining. Cooled for 3 minutes too.
  12. Both batches weighted 84 grams afterwards.
Now with the picture I posted of the beans in post #3285, the beans on the right are from the first batch. The beans on the left are the second batch.

I hope that information helps @applescrap but please let me know if you have any questions.
 
@pshankstar....I didn't say your roast was higher...I thought they were lighter than what you suggested....I made a reference to my roast as a comparison with the fact that they were dropped well into second crack, and the picture taken of them really didn't show accurately as to how dark they really are, which relates to what HTB is saying! Nice notes btw.
 
@pshankstar....I didn't say your roast was higher...I thought they were lighter than what you suggested....I made a reference to my roast as a comparison with the fact that they were dropped well into second crack, and the picture taken of them really didn't show accurately as to how dark they really are, which relates to what HTB is saying! Nice notes btw.

Oops, I was thinking faster than my fingers could type. I knew you didn't mean they were darker like a Vienna roast. I meant to say they didn't have the color or oils which are apparent in a darker roast, like you had mentioned and was helpful. Sorry I wasn't clear on that.
 
@jammin, ran the Ethiopian Sidama through the aeropress this morning after only a short rest. Wasn't a pure cup because there was a little bit of Guat/Tanz blend left in my grinder I wasn't going to waste. What I ended up with was a cup that tasted like a chocolate covered blueberry. I'm hoping future cups are equally as good. I expect I won't have the chocolate notes as strong anymore and more intense blueberry. I wasn't able to mirror your roast profile exactly but was able to make some tweaks that I think made a very positive impact on the roast.
 
IMG_6581.JPG
Speaking of chocolate covered blueberries....while my wife was making Christmas candies I had her coat some of the Ethiopian Banko beans in chocolate. First impression was meh, 24 hours later it was like chocolate covered blueberry crack!!
 
@ba-brewer, thank you! This is what I was looking for is feedback confirming or negating what I am seeing. I didn't think they went higher like @Ruint mentioned but as a new roaster its nice to get some feedback from others. Again thank you for this feedback!


@applescrap This is the first time I took notes and will try to do so moving forward. Keep in mind I am using the Fresh Roast SR500 roaster. I did two 100g batches following the same method except where noted below.
  1. Set timer to 7.5, temperature to "Low" and fan to the highest setting.
  2. 7.0 minutes remaining I picked up the chamber and shook it. *NOTE - The second batch I had an oven glove so I could shake it more at this step and future points where I shook the chamber. The first batch I did not have the glove and it was hot and I couldn't shake it as much.
  3. 6.5 minutes remaining I bumped the temperature to "Medium".
  4. 6.0 minutes remaining I shook the chamber again.
  5. 5.0 minutes remaining I shook the chamber again.
  6. 4.5 minutes remaining I reduced the fan to 50%.
  7. 3.6 minutes remaining I reduced the fan to 33% (+/-). *NOTE - The second batch I reduced the fan at the 4.0 minute mark.
  8. 2.9 minutes remaining I reduced the fan to 25% (+/-). *NOTE - The second batch I reduced the fan at the 3.4 minute mark.
  9. 2.0 minutes remaining I reduced the fan all the way down. *NOTE - The second batch I reduced the fan at the 2.7 minute mark.
  10. 1.5 minutes remaining I bumped the temperature to "Low". *NOTE - The second batch I bumped it to "Low" at the 2.0 minute mark.
  11. First Batch - After cycle was complete it cooled for 3 minutes with the fan at high. Second Batch - Stopped the roasting and switched to the cooling cycle with 1.2 minutes remaining. Cooled for 3 minutes too.
  12. Both batches weighted 84 grams afterwards.
Now with the picture I posted of the beans in post #3285, the beans on the right are from the first batch. The beans on the left are the second batch.

I hope that information helps @applescrap but please let me know if you have any questions.
Great notes. Very detailed. I think understanding how the bean is roasting and what changes it undergoes gives guidance to creating the roasts. Seeing the end product and tasting it, and making changes to change the end result is key in experimenting in my opinion. Not saying you aren't doing those things just offering what really makes coffee fun in my opinion.
 
Back
Top