• Please visit and share your knowledge at our sister communities:
  • If you have not, please join our official Homebrewing Facebook Group!

    Homebrewing Facebook Group

Simple SSVR-controlled e-BIAB rig

Homebrew Talk

Help Support Homebrew Talk:

This site may earn a commission from merchant affiliate links, including eBay, Amazon, and others.

pogden

Well-Known Member
Joined
Dec 30, 2011
Messages
107
Reaction score
14
Location
Phoenix
It has taken WAY longer than it should have for me to get to this point, but last weekend I was finally able to take my new brew rig for a test run. I've been spending a lot of time on HBT since getting back into brewing a couple of years ago. Last year I built a stir plate (had to figure out how to do that with a 4-wire PWM fan) and an fermentation chamber based on an STC-1000 and a Whirlpool 7.2cf chest freezer.

I also started mulling over what I wanted in the way of an all-grain setup. My objectives were as follows:
  • Electric powered
  • Capable of brewing 5-6 gallon batches
  • Compact and storable
  • Easy cleanup
  • As simple as possible (no pumps, purpose-built sculpture, etc.)
  • Fun to build

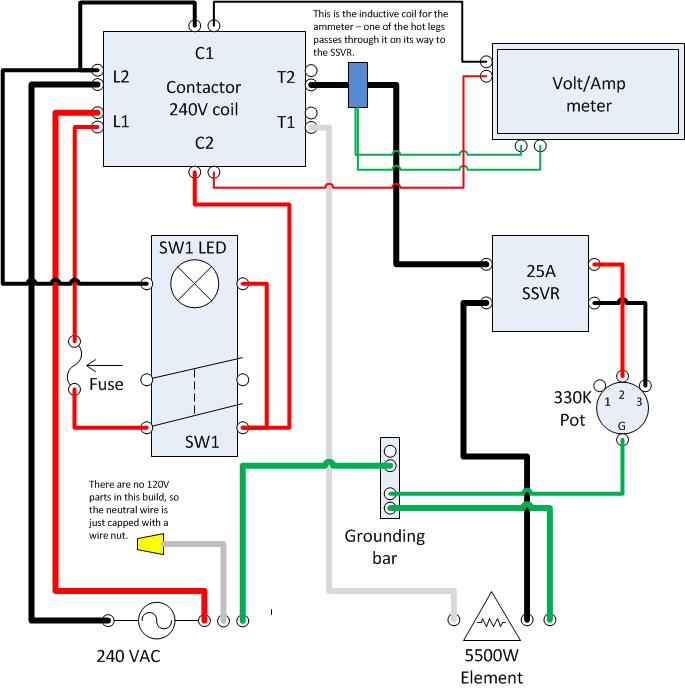
I decided early on that BIAB seemed like a good place to start - fewer vessels to store and clean. PID-based controllers are fascinating and definitely the way to go in a 3-vessel system, but in a BIAB setup it just seems to me that a knob is all that's needed. About the time I was ready to start building a PWM-based controller, Auber came out with their solid state voltage regulator.

So, here's what I came up with. The vessel is a bottom-drained e-keggle with a single 5500W element driven by a SSVR-based controller. The voltmeter/ammeter looks a bit blingy but it's actually there to give me an indication of the power that is being supplied to the element (the relationship between knob position and power output is non-linear).

brew_rig_front_view-61375.jpg
controller_front-61376.jpg


There are a few more pictures in my gallery (use the link in my sig).
 
One thing about e-BIAB that concerns me is maintaining temperature during mash. Using a PID is an obvious solution but it seems that it works best with circulation, which introduces another problem: how to prevent the bag full grain from getting sucked down onto the hot element. This seems to be a problem for some guys and not for others, but I was sort of hoping to avoid it altogether by preventing as much heat loss as possible by insulating the keggle with a KegSkin.

During my hot water test run yesterday I learned that the KegSkin by itself will not be sufficient to maintain mash temp. What I did learn is that a very small amount of power (~1 amp) is required to keep the temperature steady for an hour or more. Granted, that's with plain water; a bag full of grain will probably impede convection, requiring at least some stirring, which will cause heat loss, which will require more heat, ... Something to sort out during my first brew, hopefully next weekend.
 
Really nice build. Where does that giant dial come from? Is there a pot behind it?

Thanks, PassedPawn!

The dial plate comes with the 330K Ohm pot that comes with the Auber SSVR (the exact pot supplied depends on the voltage and frequency of the power to be regulated, but you select this when you order the part).

The dial plate is just a visual indication of dial position. Output does not increase proportionally with dial position (that is, 30 on the dial is not necessarily 30% power).
 
Beautiful build! Bookmarked.

Is that an inexpensive digital food thermometer to the left of the kettle? They have never been within 10F for me. This is in comparison to a lab-quality glass thermometer. You may be more fortunate.

The large thermal mass of a full BIAB batch helps reduce temperature fluctuations. I have a smaller 8 gallon kettle and insulated it the best I could to help maintain the temp. The sides are wrapped in 3 layers of Reflectix and could use another. The lid has 2 layers. When I use a heatstick, the kettle sets on a folded towel to insulate the bottom. The R value of a Kegskin is less than Reflectix but you have a large element to supply heat.
 
The dial plate is just a visual indication of dial position. Output does not increase proportionally with dial position (that is, 30 on the dial is not necessarily 30% power).

That's interesting. Was there documentation that came with the SSVR indicating the relationship between the dial value and the duty cycle or % power?
 
Beautiful build! Bookmarked.

Is that an inexpensive digital food thermometer to the left of the kettle? They have never been within 10F for me. This is in comparison to a lab-quality glass thermometer. You may be more fortunate.

The large thermal mass of a full BIAB batch helps reduce temperature fluctuations. I have a smaller 8 gallon kettle and insulated it the best I could to help maintain the temp. The sides are wrapped in 3 layers of Reflectix and could use another. The lid has 2 layers. When I use a heatstick, the kettle sets on a folded towel to insulate the bottom. The R value of a Kegskin is less than Reflectix but you have a large element to supply heat.

Thanks, Epimetheus.

The remote-probe thermometer is from Thermoworks, the same guys who make the Thermapen. I calibrated my Thermapen when I got it (well, I checked it, but it required no adjustment). I checked the oven thermometer against the Thermapen at 74F and and 160F yesterday and they were spot on. Though I hear you - I need to remember to check that often.

Thanks for the info on your setup and Reflectix vs. KegSkin R-value. Maybe I'll try some Reflectix as well, though my first thing will to see whether a small amount of heat can be used to maintain the temp effectively.
 
That's interesting. Was there documentation that came with the SSVR indicating the relationship between the dial value and the duty cycle or % power?

No, not really. But the description of the SSVR on the Auber website does describe this. It says that the "middle section" (I'm guessing 35-65?) is more sensitive due to the sine waveform of the AC power.

I need to play with it some more, but it seemed VERY sensitive at the lower end (~10) where just moving the dial a hair was enough to change the reading on the ammeter from 2A to 1A.
 
Where did the stand come from?

It's my handy old Black & Decker Workmate 200 with a table top made from a scrap piece of 3/4" MDF with some 1/8" cork ($10 for a roll at Lowes) glued on top.

The Workmate jaws clamp onto a cleat made of scrap 3/4" particle board that I screwed into the underside of the table top. The whole thing is nice and stable, but at the end of the brew day the top comes right off and the Workmate folds up flat for storage.

In fact, the Workmate by itself would make a decent brew stand, and the bottom drain and valve assembly would fit nicely through its open jaws, making the red "Keg Spacer" unnecessary. The extra work surface is nice, though.
 
I can't tell from the photo, but if you haven't already done so, insulate the lid. That's where most of the heat loss will occur.
 
I can't tell from the photo, but if you haven't already done so, insulate the lid. That's where most of the heat loss will occur.

I haven't done anything fancy, yet. But I did put a big folded-up towel on top during the "mash test" (after the temp started to drop), and it seemed to help.

I've been pondering a better solution, but haven't come up with anything yet. Ideally, it would conform tightly to the contour of the lid and the domed rim of the keggle that the lid rests on, yet be easy to remove.

Or, maybe just a couple of circles of Reflectix with slots cut in the center to allow the lid's handle to poke through?
 
Awesome job Pogden! I just moved away from my SSVR BIAB setup to a PID to maintain mash temps. As of now I still like the way the SSVR maintains a boil.

I ordered that same volt/ammeter about two weeks ago. Did you bring each hot lead to the voltage input and pass one leg through the transformer just before the element?
 
Your build looks very nice.
What do you do about trub?
Is there any way to filter the trub?

Thanks, Brew.

I'm glad you asked, but I really don't know. I have yet to brew anything besides hot water as I just got my power supply sorted out last Sunday. I'll know more after next weekend, hopefully.

I will use a hop sock during the boil, and a bit of Irish moss at the end. When the boil is done I'll drain 5gal of wort into a waiting corny keg (perhaps through a paint strainer, just to see what I can catch), seal it, invert it to sterilize the lid, then stand right-side up in my pool to chill. The next day, I'll push whatever trub I can out with CO2, open the corny, oxygenate, pitch, reseal, and push it all slowly to my quarter-barrel sanke fermenter.

I am mildly worried that the bottom drain on my keggle will clog, and a bit more concerned that the corny dip tube will. I'm prepared to shorten the dip tube if needed to avoid this, and I'm fine with leaving a quart or more of trubby chilled wort behind.
 
Awesome job Pogden! I just moved away from my SSVR BIAB setup to a PID to maintain mash temps. As of now I still like the way the SSVR maintains a boil.

I ordered that same volt/ammeter about two weeks ago. Did you bring each hot lead to the voltage input and pass one leg through the transformer just before the element?

Thanks, Weissbier. I saw your thread about boil control with your PID - I hope you get that sorted out.

The hot leads are connected to extra spades on the C1/C2 (coil) terminals of the contactor, so the meter is only powered when the switch is on. Then, one of the 10 gauge hot lead leaving the output side of the contactor runs through the transformer to the load side of the SSVR. I posted some pics of the inside of the controller box in my gallery, see the link in my sig.
 
pogden said:
The next day, I'll push whatever trub I can out with CO2, open the corny, oxygenate, pitch, reseal, and push it all slowly to my quarter-barrel sanke fermenter.

Aren't you going to leave yeast behind if you don't push the entire contents?
 
I was asked via PM about a parts list and a wiring diagram. Here's the parts list in PDF format, though I'm not sure the links are working right.

I used a 25A SSVR, but Auber now sells a 40A one. The 25A part is probably okay (a 5500W element draws less than 23A), but many people here recommend using a higher-rated part, and if I had it to do over again I would go with the 40A.

I drew the wiring diagram for this controller on my whiteboard and I *think* I may have a picture of it somewhere. Meanwhile, I'll post a few pics of the inside of the controller.

img_20131119_203644-61413.jpg

img_20131119_203523-61414.jpg

img_20131119_203341-61415.jpg

img_20131119_202856-61416.jpg


View attachment SSVR_e-BIAB_controller_parts_list.pdf
 
Just looked through your pics. Did you build that beautiful element enclosure or where did that come from? It looks so clean!
 
Aren't you going to leave yeast behind if you don't push the entire contents?

I suppose a few will settle onto the trub bed, but won't most of them still be in suspension (and therefore be transferred)? I expect the transfer to take at most maybe 10 minutes after pitching.
 
Just looked through your pics. Did you build that beautiful element enclosure or where did that come from? It looks so clean!

There are definitely guys on this forum with the skills (and equipment) to make something like that, but I'm not one of them! I bought it from Brewers Hardware - look under RIMS tubes, I believe.

I like it a lot, but it just might be the single most expensive part in my entire system. I wanted to be able easily remove the element from the kettle during cleanup and this seemed to be the way to go.

Silver-soldering the matching tri-clover ferrule after dimpling the keggle was kind of satisfying, too. That sounds wrong ...
 
I found a post about a bottom drain electric brew kettle HawkATP had built. He used a strainer with the handle cut off on top of the outlet to filter the trub.

Link to post

Here are some pictures
41139d1324403066-bottom-drain-brew-kettle-20111220_08.jpg


41412d1324672574-bottom-drain-brew-kettle-20111223_01.jpg
 
KPSquared said:
I just ordered one from Bobby at BrewHardware but that thing looks like a serious piece of hardware. . .

Yeah, Bobby started iterating on his element enclosure shortly after I ordered mine. It looks sweet too. Looking forward to seeing how your build turns out.
 
Brewing_on_the_Internet said:
I found a post about a bottom drain electric brew kettle HawkATP had built. He used a strainer with the handle cut off on top of the outlet to filter the trub.

Thanks for this. I'll definitely keep it in mind if I have difficulty with clogging. And I like the fact that it would make a hop sock/bag/spider unnecessary.

What would be really cool would be a stainless steel mesh cone or cylinder that fits into the drain ...
 
I couldn't find the cell phone picture of the wiring diagram I had on my whiteboard, so I whomped this up in Visio in case anyone's interested. A PDF version is attached as well.

I would not not have known where to start on this without all of the freely-shared knowledge from people on HBT. Thanks to P-J in particular, who's wiring diagrams made things very clear, and of course Kal, who started me thinking about going electric in the first place.

ssvr_ebiab_controller-63157.jpg


View attachment SSVR_eBIAB_Controller.pdf
 
Is there any reason that the SSVR couldn't be wired inline with a traditional SSR output? My thinking is that after I am done mashing and want to boil I could just set A PID to like 250 and control the intensity of my boil with the SSVR Knob
 
Bartman6969 said:
Is there any reason that the SSVR couldn't be wired inline with a traditional SSR output? My thinking is that after I am done mashing and want to boil I could just set A PID to like 250 and control the intensity of my boil with the SSVR Knob

I have never thought of that, and I'm definitely not the right one to give an authoritative opinion. Assuming that the output of the SSR is really 240V when the PID is set to 250F, I suppose it might work. But think of this: SSRs generate a fair bit of heat, which has to come from somewhere. You would have to be drawing more power, or sending less that you expect downstream to the SSVR. And, I'm not sure how well an SSVR works if it doesn't see a relatively steady 240V on its input side,which it wouldn't if the PID was was set to maintain a temp below boiling or below 100% in manual mode.

What you could do is use a double pole selector to switch between a PID and a PWM controller as control inputs for an SSR. There's a P-J diagram around here somewhere for that, and a good thread or two on how to build a PWM controller.
 
Is there any reason that the SSVR couldn't be wired inline with a traditional SSR output? My thinking is that after I am done mashing and want to boil I could just set A PID to like 250 and control the intensity of my boil with the SSVR Knob

If you choose the correct PID, i.e. one with manual control, placing a SSVR w/ knob after it would be redundant.

There are many PIDs that support manual mode.
 

Latest posts

Back
Top