Saving propane/time while winter brewing

Homebrew Talk - Beer, Wine, Mead, & Cider Brewing Discussion Forum

Help Support Homebrew Talk - Beer, Wine, Mead, & Cider Brewing Discussion Forum:

This site may earn a commission from merchant affiliate links, including eBay, Amazon, and others.

purplehaze

Well-Known Member
Joined
Mar 2, 2011
Messages
398
Reaction score
27
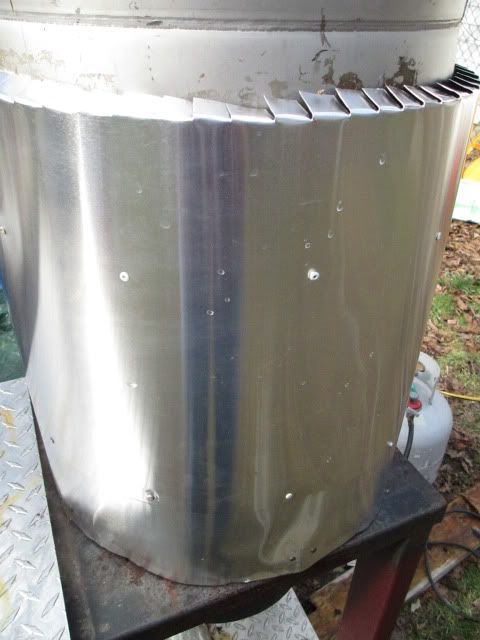
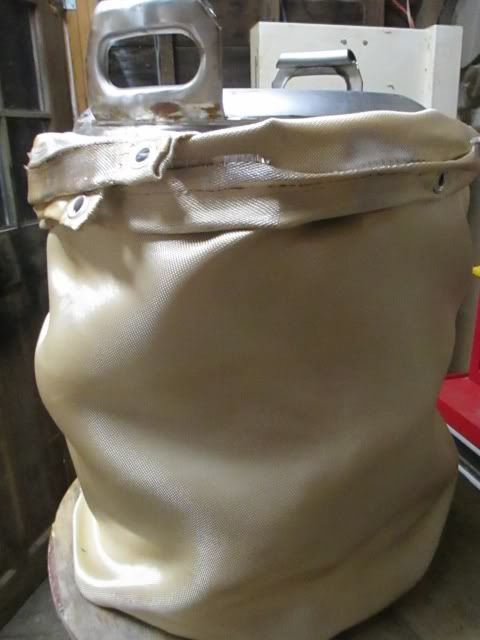
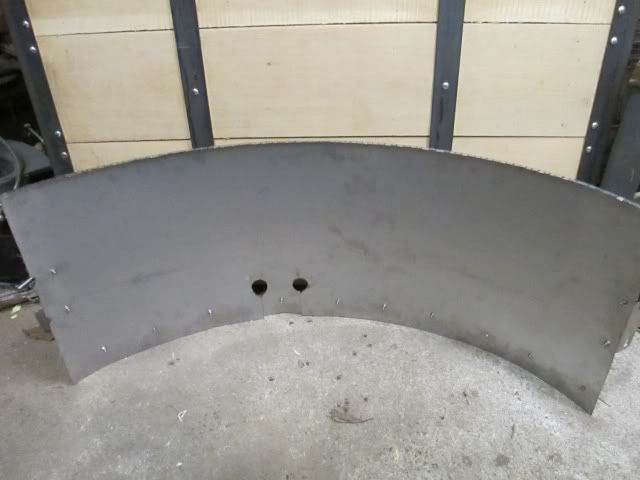
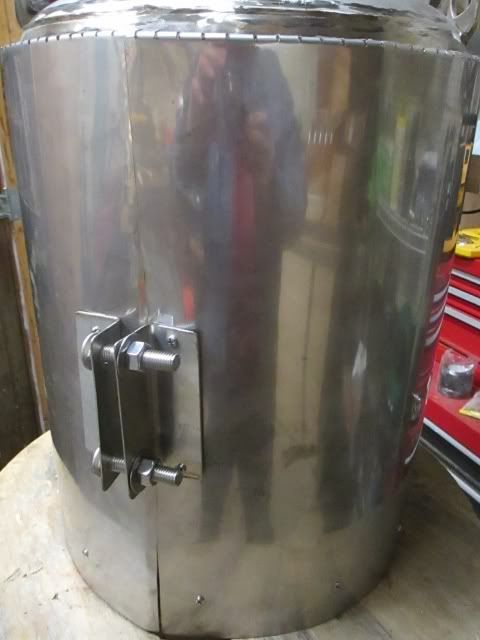
Figured I would pass on some info I came across that helped me reduce the amount of propane and time it takes to brew outside during winter. It always seemed to take forever for my wort to boil. I ended up building an insulated pot skirt out of some $12 aluminum flashing, rivets and a cheap fiberglass welding blanket. I actually got a few ideas from threads here and then stumbled upon this link below that has lots of info.

http://www.vrac.iastate.edu/ethos/f... and Heat Transfer/Skirts Paper_Andreatta.pdf

When I built and tested the skirt it was a windy 32 degree day. With 6 gallons of 130 degree wort it took 16minutes to bring it to a rolling boil. I did open the lid to take a temp reading at 10 minutes and it was already at 200 degrees. I was surprised the first time I used it when it started boiling from the sides instead of from the bottom.

Normally Exhaust gasses come out from under the keggle and dissipate on the wind. The skirt captures these gases and forces them up the sides of the keggle adding heat. Additionally since the environment is cooler than the pot, it also loses heat from the sides. Adding insulation to the skirt keeps most of the heat in the pot.

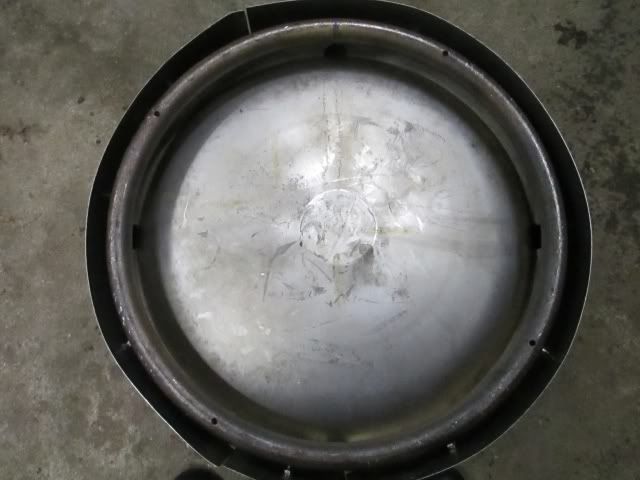
The aluminum is very flimsy and requires some rebending of the bottom to keep it symmetrical and to reduce the crumpled areas that occur between brew days. I did rivet some bent aluminum standoffs to the base of skirt in an effort to maintain an equal gap all the way around. One thing I do not like about this is that I cannot see the flames on my burner.

IMG_0778.jpg


skirt4_zpse40c3438.jpg
 
Whatever it takes :D

It sure looks like that aluminum shroud has become a chimney - because looking at its base it doesn't look like there's any other way for the burner exhaust to escape (other than around the frame). I guess the boiling from the sides really points to some serious heating going on inside that aluminum!

Cheers!
 
Day-trippr now that you mention it it does look like a chimney.

Having the "chimney" sitting on the brew stand platform does two things. Being that it sits lower that the keggle it does trap most of the exhaust but it also prevents cooler air from being draw in from the sides and up the chimney.

One issue I have encountered is with hop additions. You know when you add hops to the boiling wort and it foams up? The hop debris that stick to the side of the keggle will start to toast so you need to stir them back into the wort. Once they are mixed back into the wort and the foaming subsides you no longer have to stir.
 
I have to say this is a great idea. I had seen your chimney in another post and built one for my pot. Adding it made a huge difference in the time to get to boil and the strength of the boil. Very easy to make and cheap too.

I made mine removable by adding some 1/2" SS bolts with wingnuts.

The only down side is the flaps at the top are sharp. As a result, you do need to be careful when moving it. I call mine "The finger slicer 5000."
 
I agree the flaps at the top are very sharp but are not necessary. I made it that way to help keep the gap between the skirt and keggle the same. You could just as easily use some screws with nuts to keep this distance the same. I did make one out of SS that is somewhat adjustable and I used screws around the bottom.

skirt1_zps70437f56.jpg


skirt3_zps6c53c902.jpg


skirt2_zps2b2f0147.jpg


I would not recommend making a SS one. I does look purty but the price and difficulty of construction go way up.
 
That's a really good idea. I will make one for myself when i will build my rig.
Can you tell me what distante do you have from the burner to the bottom of the keggle?
I plan to make a windshield for the burner, that will stay under the rig, and on the rig place the keggle with the skirt. Do i need something else to capture the gases?
 
Its been a while since I posted keep that in mind in case I repeat what I have already posted.

The distance between my burner and keggle is around 2 3/8". The closest I can get my burners to the bottom of the keggle is 2". When I added the SS bolts to the base of the keggle, the distance increased to 2 3/8". Others have tested distances and they posted better boil times with the distance of 2". That is without a shroud but I think it still applies.

Make sure the gap between the pot and shroud is no more than 1/2" (slightly less is OK)and consistent all the way around the pot.

You definitely need to insulate the outside, I use a cheap fiberglass welding blanket loosely wrapped round the shroud. Even during hot weather there is a noticeable difference in how vigorous the boil is after removing the blanket.

My keggle is lifted by the SS bolts so that the shroud actually sits on my brew rig capturing all of the hot gasses.

With a shroud the boil can be more vigorous so I always have to lower the heat once the wort comes to a boil. It also boils from the sides more than the from the middle so be careful. Here is a quick video of a 10 gallon batch boiling.

http://s94.photobucket.com/user/purple11haze/media/20130810_182016_zpse5864033.mp4.html
 
Great boil, i never had such a powerful boil. I like how you cut your keg, i will do this to mine to bring the weight a little down.
Cheers!
 
I did a cheap version of this on my last indoor brewday. My gas stove will get 6 1/2 gallons of wort to a boil but it takes a while and it's not a strong boil when it gets there.

Last brewday I wrapped a long piece of heavy duty aluminum foil around my BK. I used a slight cone shape to completely cover the burners. It was kind of a spur-of-the-moment decision and there was nothing fancy or even about what I did. Just a loose tent of foil around the BK. Still, I got up to boiling faster than normal and got a better boil than normal for my stove - not as good as my propane burner but it was at least a rolling boil.

I think I'm going to have to experiment some more with this.
 
It's been a while since I've brewed in doors but I'm glad this worked out for you. I've used the tin foil myself when deep frying a turkey outside in the cold. It definitely helps direct the heat to the sides of the kettle speeding up the whole process.

If you want to experiment take a look at the link I posted in post #1 it's got some good info.
 
I used the rocket stove calculator and the gap for a sanke keg between the keg wall and insulation layer should be 16mm.
 
Keep in mind that the larger the gap the more the heat tends to ride the shroud instead of the side of the keggle. Also a rocket stove uses wood for fuel while we tend to use HP propane.

I have never had the time to experiment with varying gap sizes and stuck with .5". Give the 16mm a try I am interested in seeing what kind of results you get.

One thing you can do is use .75" screws so that the gap can be easily adjusted for whatever the optimal distance is.
 
An excellent idea!! Aluminum isn't really the optimal material due to it's high thermal conductivity and being pretty flimsy..... but it's cheap and readily available.

The other strategy that would save a lot of propane is to do a 30 minute boil. Unless you are using a lot of Pilsner malt you really don't need a full hour boil in my experience. Particularly with your harder than normal boil. The gospel of the long boil dates back a long way.... and should not be disregarded, but in many cases it is not necessary (speaking from experience). It merely requires you to rebalance your hop additions.


H.W.
 
In my case it's ability to boil I want. I'm doing 10gallon batches with a big banjo burner on natural gas, and it's already hard to get a boil without boosting via a 1100W heat stick. When it's subzero temperatures in a couple months it'll be even worse. I'm fine with aluminum. I'll be going with a double layer of metal with an inch or two of mineral wool insulation sandwiched between. Because of the design it'll be difficult to vary the gap width.
 
My advice would be to start small, simple and cheap. You can always experiment using just one layer of aluminum and the welding blanket until you get the best performance. Then you can add the more permanent insulation for even better efficiency. Just keep diminishing returns in mind.

What kind of insulation are you planning to use? Are you planning on encapsulating the insulation top and bottom to prevent it from getting contaminated with water or wort? Ceramic fiber can withstand some pretty high temps but it is expensive and its not something you want in your lungs. Calcium silicate is another cheaper insulation that could be used or even Perlite from the garden section of the big box stores.

Which ever way you go keep us posted with results and pics.

Owly55: Shortening the boil times sounds like a good idea since my boil off rates using the keggle are higher. However I have since changed to a 23 gallon BK. The larger diameter and brewing 15-20 gallon batches reduces the intensity of my boil somewhat. The shroud seems to shine when using keggles for ten gallon batches but it still helps when using larger BKs.
 
I'll be using rockwool. Cheapish, fire resistant to something like 1000 degrees, and doesn't put out fumes.

I don't really have the opportunity to experiment with this - I don't weld / have no equipment, so I'll be using my welder. Nice guy, made some bottom drain keggles for me for $40/keggle plus materials. Great guy if you're in the Toronto area.
 
My advice would be to start small, simple and cheap. You can always experiment using just one layer of aluminum and the welding blanket until you get the best performance. Then you can add the more permanent insulation for even better efficiency. Just keep diminishing returns in mind.

What kind of insulation are you planning to use? Are you planning on encapsulating the insulation top and bottom to prevent it from getting contaminated with water or wort? Ceramic fiber can withstand some pretty high temps but it is expensive and its not something you want in your lungs. Calcium silicate is another cheaper insulation that could be used or even Perlite from the garden section of the big box stores.

Which ever way you go keep us posted with results and pics.

Owly55: Shortening the boil times sounds like a good idea since my boil off rates using the keggle are higher. However I have since changed to a 23 gallon BK. The larger diameter and brewing 15-20 gallon batches reduces the intensity of my boil somewhat. The shroud seems to shine when using keggles for ten gallon batches but it still helps when using larger BKs.

I'm shifting more and more to 30 minute boils, not so much to save propane as to save time. I can see no negatives so far other than having to use a larger bittering addition. I never use Pilsner malt, and that is the one place where I think it might matter. Efficiency should be slightly less due to less sparge water (do BIAB and dunk sparge), but I'm not seeing it. I brewed yesterday and hit an OG of 1.071 when Brewer's Friend which defaults to 75% efficiency said I should hit 1.065.... I did a 30 minute boil and hit my volume right on the money. I doubled my bittering addition and put it in at 30 minutes for an IBU of 54........ everything else went in at 1 minute and whirlpool.

H.W.
 
Yeah brulosopher proved that 30 minute boils are fine, even with pilsner malt. I think he even had someone do gas chromatography to prove it too.

My brew process is now a 30 minute mash, fly sparge 60 minutes (for a 10g batch), boil 30 minutes,chill to below 130, toss in the fridge, then pitch once it's at temperature. ...I should probably waste the water to chill down to pitching temperature faster.
 
Stumbled on this thread last week. I was brewing this weekend so thought I would give it a try. I have aluminum, but it is for siding and is painted so i did not want to use that. I have been wrapping my kettle in my old welding blanket until now.

I went to the Home Depot and bought a sheet of hvac panning in 3x5 and cut it to fit. I also used 6x6 post ties, bent at 90* to act as a hasp. I used 1" gap, and stand offs on the inside to keep the gap uniform. I folded over the top, and "hemmed" the bottom. I wrapped it in my welding blanket.

This saved me a full 2 hours on Saturday, doing 16 gallons preboil. I have never heated this fast, or had such a vigorous boil. Thanks to OP for posting this.

The only thing that may be bad using panning is that it is galvanized. I don't know if it gets hot enough to release harmful gases, and if it does, I do not know if it matters as it is outdoors and I am not standing over it breathing it in. That is for someone smarter than me to answer.

image.jpg
 
Im glad this worked for you. That zinc coating is bad when it vaporizes; causes flu like symptoms. I have read that muriatic acid or vinegar will remove the zinc.
 
Well, I finally got mine made. Except for a couple of mistakes (more below) this screen worked very well on a test run.

I had a fast and strong boil. This was 9 gallons of water in cold and windy weather. In similar conditions I've had trouble keeping even 5 gallons just barely at a low boil. At one point I had flames licking up the side of the pot and over the top of the screen. As you mentioned, I noticed that the boil was coming from the sides of the pot. In fact, I splashed some water on the side of the pot above the water line and it instantly vaporized. Just wow!

The mistakes? Well, I also used a galvanized hvac sheet. It is rated for a max temp of something like 400 degrees. My infrared thermometer measured north of 800 degrees on the outside of the screen. I assume the zinc coating did start to vaporize since the metal has become discolored all the way around at the height of the burner. Plus there was a definite smell... I'm not sure how much to worry about this since it will always be used outside and it is almost always windy.

The second mistake was that I made this thing pretty airtight. I didn't drill any air holes. Just a very small pass-through for the end of the burner where the NG hose attaches. So the flame was burning really rich. When I was done the inside of the screen and all parts of the pot that were inside of the screen were covered with black soot. That was fun to clean.

So I'm thinking I will probably build another one using aluminum instead. Bummer because the aluminum is harder to come by and about twice as expensive. And I will drill some air holes around the bottom.

Finally, a question. Do you know how thick the aluminum is that you used? :what: I found a reasonably priced roll of aluminum flashing on amazon that is like .006 or .007 thick. I also found aluminum sheets that are either .019 or .04 thick. More money though.

Thanks for the idea and sharing your build. This will be a game changer in cold weather. Summer too!
 
truer, thats great that this works for you. During the summer I have to turn the burner way down once the boil begins. If I want to add flame out hops or whirlpool them at a lower temp I have to remove the welding blanket. If I don't the wort will continue to simmer for quite a while.

I don't remember the thickness but the aluminum I used was very thin flashing in a roll from HD. It lasted quite a few brews but eventually the aluminum started to break down and flake away at the bottom. The thickness of the aluminum does not matter it is just a barrier to force the hot gasses up the sides of the pot.

A photo would help me understand where you want to drill holes. Do not drill them in the skirt, the flame should draw its O2 from below the burner. If the flame is yellow then adjust the burner Venturi opening.

The zinc fumes from the galvanized steel will give you flue like symptoms.
 
I don't remember the thickness but the aluminum I used was very thin flashing in a roll from HD. It lasted quite a few brews but eventually the aluminum started to break down and flake away at the bottom. The thickness of the aluminum does not matter it is just a barrier to force the hot gasses up the sides of the pot.

Hmm, ok. Maybe I will get the roll of thin flashing material that I saw online then. It was long enough to make more than one of these. So if it starts to break down it would be easy to quickly turn out another one.

A photo would help me understand where you want to drill holes. Do not drill them in the skirt, the flame should draw its O2 from below the burner. If the flame is yellow then adjust the burner Venturi opening.

The skirt I made sits flat on the ground. It goes all the way around my BG14 burner and stand, from ground level up to just below the pot handles. So yeah, there were no air holes anywhere. I couldn't see the flame but I had the venturi wide open. So my thinking is to add some air holes down around ground level, at or below the level of the flame.

The zinc fumes from the galvanized steel will give you flue like symptoms.

Right. I really don't think it would be an issue since I'm generally fighting the wind. But I'd rather not have to worry about it. Especially with little helpers running around. That said, I am brewing this weekend and debating whether to use the galvanized version. (zinc vapor in your wort anyone... :what: ) Maybe I'll just position it loosely on the upwind side and only wrap it halfway around, just to divert the worst of the cold wind.

:beer:
 
I still wouldn't drill any holes just use some spacers between the ground and the skirt. You don't need much of a gap, start with 3/4" and go up from there.

Here is a tip for the soot on your pot. Take a bar of soap and rub it on the outside of the pot before using. The soot will just wipe away with a cloth when its time to clean.
 
Yeah brulosopher proved that 30 minute boils are fine, even with pilsner malt. I think he even had someone do gas chromatography to prove it too.

My brew process is now a 30 minute mash, fly sparge 60 minutes (for a 10g batch), boil 30 minutes,chill to below 130, toss in the fridge, then pitch once it's at temperature. ...I should probably waste the water to chill down to pitching temperature faster.

Not to say that you can't do 30 min boils. I've even done 15 min boils with great results. But Brulosopher hardly proved anything. He only did one experiment that suggested it. In order to actually prove it, it would require testing with a wide range of styles and conditions with several repetitions.
 
I still wouldn't drill any holes just use some spacers between the ground and the skirt. You don't need much of a gap, start with 3/4" and go up from there.

Here is a tip for the soot on your pot. Take a bar of soap and rub it on the outside of the pot before using. The soot will just wipe away with a cloth when its time to clean.

BTW, I used my galvanized skirt as is but only wrapped about 3/4 of the way around my pot and used 3/4 inch spacers underneath. The spacers probably weren't necessary because it was open. Anyway, it still worked amazingly well. With about 3 inches of space all around the pot the skirt stayed cool enough that there was no reaction but it still cut the wind, kept the warmth in, generated no soot, and resulted in a very strong boil that I had to keep a close eye on. Very happy customer here. :D Cheers!

View attachment 1450757678442.jpg
 
This is commonly used by those of us who smelt lead for bullets. Only bring it halfway up the pot to keep the upper part a little cooler so you aren't boiling more from the sides than the bottom. I had a pot of lead and the stainless pot itself glow red before i cut it back to halfway...
 
Back
Top