• Please visit and share your knowledge at our sister communities:
  • If you have not, please join our official Homebrewing Facebook Group!

    Homebrewing Facebook Group

How To: BrewPi LCD Add-On

Homebrew Talk

Help Support Homebrew Talk:

This site may earn a commission from merchant affiliate links, including eBay, Amazon, and others.
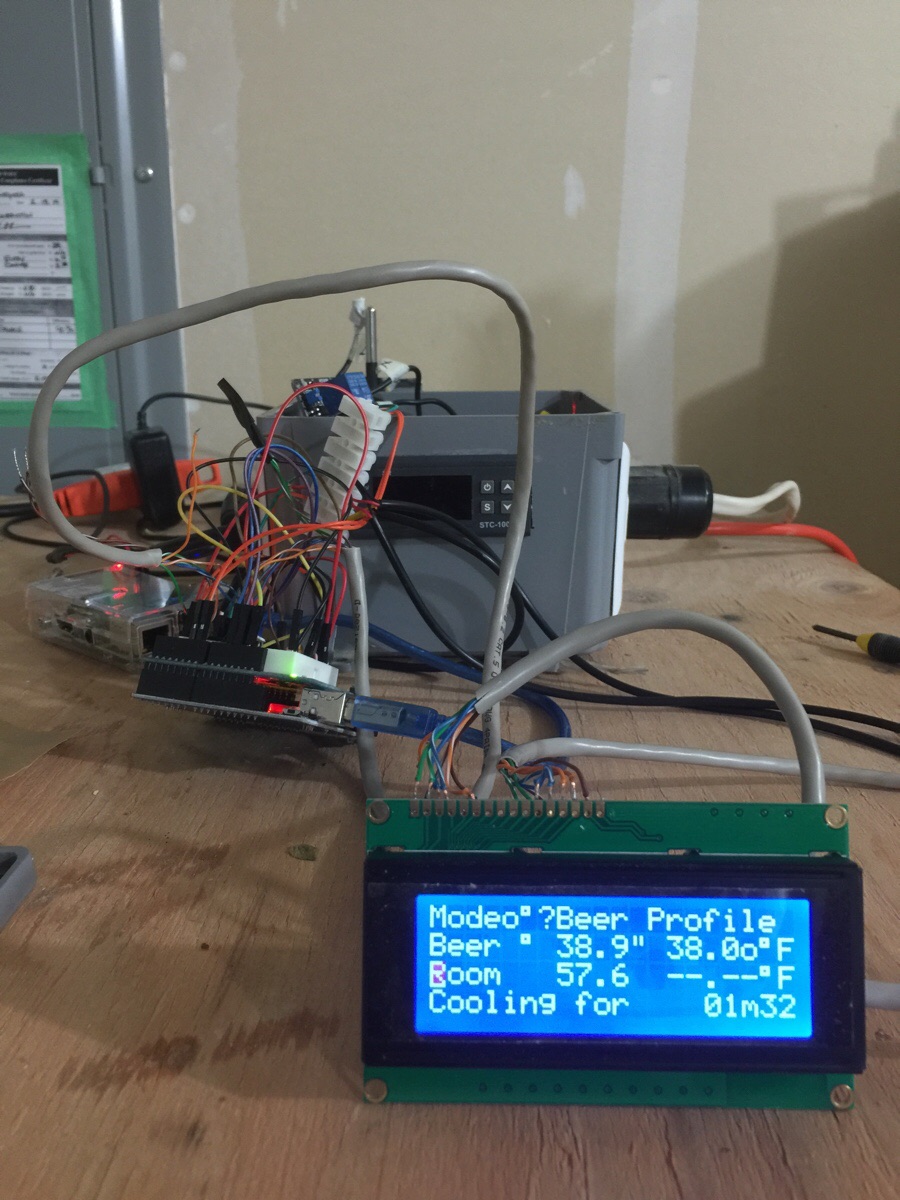
Bingo. Stupid engineer documentation trick ;)

The grounds versus control signals were swapped at their respective switch inputs. Here's the corrected drawing...

Cheers!

Is there a reason you chose to bypass the relay board for the switching and go AC instead of DC? I feel like bringing in 5v into the switch and outputting to the relay board would be easier and could use much smaller toggles. I don't have anything rated for 10A as far as toggles go, so I'll probably go that route unless you can think of a reason why I shouldn't?

And for clarification, do D5/D6 go High or Low to engage the relays? Obviously that would change the switching schematic for me.
 
My intention for the manual modes is to bypass as much as possible.
Relying on the relays to be functional goes against that goal.

I patterned this after my Love TSS2 implementation (same box, switches, duplex outlet, AC ingress, just different control guts) which has worked out well.

The SainSmart relay modules require low levels on the two optocoupler inputs to energize the relays, so actuators D5 & D6 are configured in BrewPi to be active low...

Cheers!
 
If you want to employ the relays all the time you can use a very light duty SPST center-off toggle switch instead of the 20A rated DPDT center-off switches I used.

Then you would put the control output from the Uno (eg: D5) on one pole, a connection to logic ground on the other, and then connect the common to the relay module input.

So with the switch in one position it's routing the Uno control to the relay, in the other it simply drives the same relay control to ground, and in the center-off position the relay input would float high and thus would be "off".

Do that for both stages (cool and heat, using D5 and D6, respectively) with a pair of switches and you'd be in business...

Cheers!
 
I have everything setup, and almost running right. I cannot figure out how to wire up my rotary encoder. I was able to figure everything else out based off of the wiring diagrams, but for my encoder it doesn't make any sense to me so far. My encoder has three pins (A,B, and common I assume) along with the two for the push button. If I understand correctly, I need to ground the common pin, and one of the push button pins. The rest has me lost. I see that three resistors and three caps seem to be required to use it, but how do I wire those up to the encoder pins?

Here's my progress so far, it's quite a mess, but it's working and I know what everything is so far. The protoshield I got on Amazon was crap, it's designed for a completely different setup, so I'm using a breadboard on top until my other protoshield gets here from China, then I can solder it up and mount it behind my fermenter. Thanks to all who have put this together so far!

7w9955X.jpg
 
Wire the common for the rotary encoder side to either of the two pins on the other side, then connect that to any handy Ground pin on your shield board.

The other three pins connect as shown here.

247280d1420685923-how-brewpi-lcd-add-shield_wiring_newest.jpg


Don't worry if you can't figure out which of the two encoder pins goes to which AVR pin - just connect them to IO 8 & 9. When you try it out, press the push button and set the Mode to Beer Constant, then when you adjust the Beer Temperature goal you'll see if turning clockwise increases the value or decreases it. If it decreases, swap your connections to IO 8 & 9...

Cheers!
 
Thank you, that worked great! It even fixed the weird characters on my LCD for some strange reason. So is that filtering circuit for the encoder on your original wiring diagram not needed?
 
Wire the common for the rotary encoder side to either of the two pins on the other side, then connect that to any handy Ground pin on your shield board.

The other three pins connect as shown here.

247280d1420685923-how-brewpi-lcd-add-shield_wiring_newest.jpg


Don't worry if you can't figure out which of the two encoder pins goes to which AVR pin - just connect them to IO 8 & 9. When you try it out, press the push button and set the Mode to Beer Constant, then when you adjust the Beer Temperature goal you'll see if turning clockwise increases the value or decreases it. If it decreases, swap your connections to IO 8 & 9...

Cheers!

having seen rcm_rx7 post above, does the addition of a push button rotary encoder act as a reset for a scrambled display?

I am now waiting on protoboard number 3 and 4 to arrive so i can have a 3rd/4th attempt i've orders some from Aliexpress so they'll take a month to arrive but they were dirt cheap, although they're the Arduino and not sainsmart style boards, so i'll have to reconfigure the layout slightly.
 
OK so i've tried to remap the original layout onto the arduino protoboard id' love to keep using the v6 board as it looks like the cheap boards i've got coming from China require a lot more connections. but hey they're cheap.

Also being pretty much electronically illiterate i've used fritzing and my WYCIWYG design. i think i've mapped the components and connections pretty accurately, i've not added in bluetooth or the rotary encoder although i think this would be great to add at a later date.

can anyone see anything that shouts "it'll never work"

here's a link to the shared friztzing sketch too, i figure i should probably change the resistor colours to make it easier to follow.

also the resistor under the shift register i plan to run under the board between the 5v an the pin

Screen Shot 2015-02-27 at 09.49.04.png
 
having seen rcm_rx7 post above, does the addition of a push button rotary encoder act as a reset for a scrambled display?


I am now waiting on protoboard number 3 and 4 to arrive so i can have a 3rd/4th attempt i've orders some from Aliexpress so they'll take a month to arrive but they were dirt cheap, although they're the Arduino and not sainsmart style boards, so i'll have to reconfigure the layout slightly.


Well when I woke up this morning it was back to a few scrambled characters, the same ones in my picture above. Using the encoder did not change that at all, a reset of the arduino fixed it.

My arduino is powered through USB, and I measure a little over 5v at all points on the protoboard, though that may change a little when the relays kick on, I haven't tested that. I have a 12v power supply I can wire into the arduino, and I can also shorten up the wires from the register to the LCD, as they are about 3ft in length right now. I'm not too concerned as this is all still mounted on a breadboard, and my good protoshield won't be here for a few weeks. I will definitely update with my results though.
 
For folks that are having LCD noise issues: the comment Elco made about missing a pull-up on an AVR pin causing LCD corruption got me inspired to dig a bit to see if there might be other pins that could be prone to noise.

Considering sensors most folks might never wire up, the first candidate was the Door sensor input on Digital IO4.

By default, the web gui has this sensor unassigned, so it's basically ignoring it. I scoped the AVR pin and it was sitting at "0" volts. Then I used the BrewPi configuration gui to assign the device to Door Sensor, leaving it set for inverted mode, and suddenly there was a pull-up on that net. Then I de-assigned the sensor, but the pull-up remained. It persisted until I reset the Uno.

This doesn't seem right to me. There should always be a pull-up assigned to that low-asserted input, whether its state is ever processed or not. Conversely, if the sensor is set for non-inverted mode, there should be a pull-down assigned.

So, an easy long shot to try: enable the Door sensor device (it'll be the last device listed in the Detected Devices list). It's hard-wired to digital IO4, and set for inverted mode (meaning a LOW indicates the door is open). Assign it a valid slot and set the Function to Chamber Door then hit Apply.

Because the pull-up that gets invoked will hold the input in the negated state you won't ever get any messages. But see if it makes any difference wrt boinking the LCD.

There are likely other pins to inspect. I'll try to get to all of them...

Cheers!
 
Nice find day_trippr. I just tested it by configuring the Door Switch but i still get LCD errors.. Damn!

I even made a I2C version, so no shift register and who would have thougt i still get the display errors (display gets garbled after some time).. So that leaves us to the arduino and the brewpi-avr code..

Sadly im also not very fond of programming you need to have special brain wiring for that..

DSC_0656.jpg


DSC_0657.jpg


DSC_0671.jpg
 
I replaced my relay board with a Teledyne SSR (SD24R50) and have been running for 6 days without any LCD issues.

I modified the BrewPi web interface on my development rig and added a (admittedly poor) photo of the LCD interface. The LCD photo is updated once every minute so I can continue to keep a close eye on things for the time being.


I'm powering my LCD shield via the RasbberryPi's USB port (with the USB cable shipped with the shield) - The USB camera & WiFi dongle are also powered directly from the RaspberryPi.

As you can see I'm running a Beer Profile intended to cause frequent cool-heat-cool cycles.

Crossing my fingers.....

Capture.JPG
 
Nice find day_trippr. I just tested it by configuring the Door Switch but i still get LCD errors.. Damn!

Nuts. I don't get LCD errors so I don't have any good way to test.
Oh well, on to the next phase of the pin survey.

I even made a I2C version, so no shift register and who would have thougt i still get the display errors (display gets garbled after some time).. So that leaves us to the arduino and the brewpi-avr code..

And power/gnd.

But that's great input (and thanks for the I2C LCD implementation link - that one actually looks like it works :D) as it eliminates the shift register and its ins and outs. Kind of surprising as I definitely thought the SR would be the most susceptible to noise.

I've noticed in some pictures of BrewPi shield assemblies that Elco put a chunky electrolytic cap across power/gnd right on the LCD display module. I don't have anything at all at that location, but I wonder if that's something worth trying? Maybe not the freakin' can he used, but something...

Cheers!
 
Don't believe him he posted a picture that said its only been running for 14 minutes....lol
 
Nuts. I don't get LCD errors so I don't have any good way to test.
Oh well, on to the next phase of the pin survey.


And power/gnd.

But that's great input (and thanks for the I2C LCD implementation link - that one actually looks like it works :D) as it eliminates the shift register and its ins and outs. Kind of surprising as I definitely thought the SR would be the most susceptible to noise.

I've noticed in some pictures of BrewPi shield assemblies that Elco put a chunky electrolytic cap across power/gnd right on the LCD display module. I don't have anything at all at that location, but I wonder if that's something worth trying? Maybe not the freakin' can he used, but something...

Cheers!

You are right, i cursed that shift register. If it is the Power source, what more can i do to optimise it?

Star Ground with a common GND point?
What about the 5V line is it ok if daisy chained?
0.1uF before and after the 7805?
10 - 1000uF right before or after the 7805?
Filter coils?
Switching power supply or transformer?
0.1uF caps right before the relay PWR and GND

I made another test by driving my shield with an uno, only 10,11,13 PWR and GND connected, same instability as with the mini. So i think we can savely rule out the pro mini as the culprit.

I have never seen a big cap on the shield, i thought its the buzzer on there?
 
Just wanted to pop in and thank everyone involved in this thread. I've done a couple of brews now using the diy brewpi, and for me has been solid.

Cheers guys and keep up the great work!
 
day_trppr, really appreciate all the help you've given the community on this. Shame that Elco has dropped brewpi completely and gone completely to the Spark platform, so think more and more we'll be relying on guys like you to keep the original Brewpi alive. Also love the look of the minions you've knocked together. Now that I've stumbled on this having been sick and tired of the swings of the STC-1000, I'll be modeling mine on yours.
 
Thanks for the kind words :mug:

Not so sure that Elco is abandoning the original BrewPi scheme, but time will tell. It wouldn't surprise me either way, but bottom line is the original does all of what I need, so I'll be sticking with it...

Cheers!
 
Support for arduino based brewpi installs has been promised and a new version of the firmware is in the works. No new boards have been made and the rev c are currently out of stock. No information has been given to whether of not they will continue to develop hardware for the arduino. But technically the arduino can handle everything the spark can but in a limited capacity (not as fast, not as much storage, etc. etc.). Perhaps they may even release a hardware package similar to the new spark design. I mean, the spark is similar in size to the mini/nano family of arduino boards, footprint wise. All the spark really offers over the arduino is the built in wireless.
 
I dunno. The fact that all hardware has been removed from sale (okay, understandable) but all links to the open source schematics he had on his site are now gone too. I would hope he'd at least continue to sell the shields for those who'd like to go that route (as you said, the "old" brewpi does everything I want, although the addition of real-time gravity readings talked about in the new Spark-based unit down the road are intriguing!). That said, it's all Elco's intellectual property, he's the one that put the work into it, so he can do what he wants, and good for him! :)

The new Spark is sexy and all, but can't justify the $200 or so it'd cost to buy and ship over, when I already have an Arduino and a B+ in the drawer. And now all the parts for your LCD shield are on the way, so will hopefully start work on my own minion when the stuff gets here.

Out of interest, what enclosures are you using there? And are you nibbling out the holes? Any time I take a dremel to anything, it looks like a drunken Stephen Hawking tried doing the work!
 
Please feel free to use anything I've posted on any of the HBT forums, you're more than welcome.
A fully-loaded double-sided Uno R3 shield solution should be a piece of cake.

But if you pay $10 a circuit, make sure you get kissed first ;)
If you get to where you're actually looking for a volume fab shop let me know.
The ~ 1" x 3.5" pcb below is for a 2TB SSD I designed for the current MacBook Pro and is 10 layers, scary tight geometries, controlled impedance, and costs about a buck and a half...

Cheers!

Piece of cake, you say? I'd be first in line for sure! :ban:

I know it SEEMS straightforward enough to DIY shields, following the awesome instructions, but deffo think there's enough brewers on here following this and the main thread on the Brewpi on the cheap, who have little to no soldering skills (and may not have the right kit to be able to do it) who'd love a more "off the shelf" solution. The Uno shield is what... 3x2 or thereabouts? Could get 100 of those put together for about $2 each?

If only we knew someone with circuit building experience... *hint* ;)
 
Play around with fritzing if you wanna make your own shield. You can get about 3 I imagine into a 5 x 15 sheet. That's about 20 bucks from oshpark
 
This reminds me - I should archive all of the Brewpi software at home, I'd hate to see it disappear and then need it. Maybe image my SD card too..
 
Or you can get 10 5x5 PCB for 15$ here:

http://dirtypcbs.com/

10 for $15 thats a fair bit cheaper than fritzing, i tried and failed to actually get a printable circuit with my fritzing design, but i think it's because i used an ardunio shield as the template that i guess is only 2 layers?

I can see why Elco doesn't want to give away the eagle files though, as no one would be the spark if they knew they could get a basic brewpi for less than $5.
 

Latest posts

Back
Top