• Please visit and share your knowledge at our sister communities:
  • If you have not, please join our official Homebrewing Facebook Group!

    Homebrewing Facebook Group

60qt. Ice Cube Mash Tun Build - $cheap and simple

Homebrew Talk

Help Support Homebrew Talk:

This site may earn a commission from merchant affiliate links, including eBay, Amazon, and others.
Here you go!

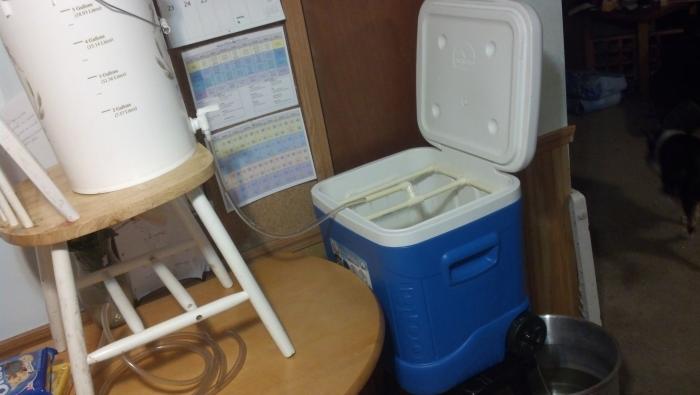
Overview of mash tun

1


The mashing manifold upside down, showing the slits which were cut with a hacksaw and "polished" with sandpaper

0


Showing the "neck" of the mashing manifold

4


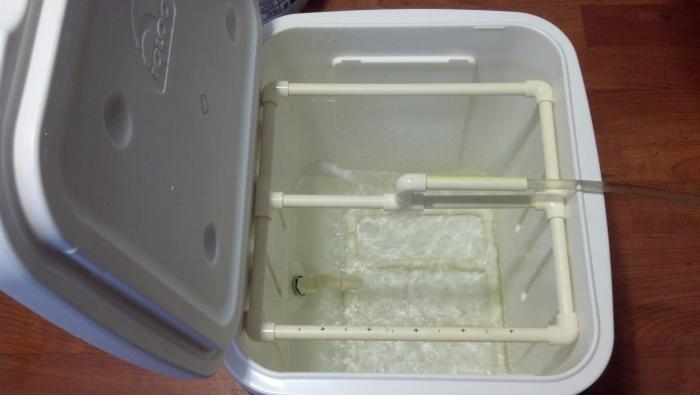
This is the fly sparging manifold which is mounted under the lid of the mash tun

5


Inside the mash tun, showing the connector from valve-manifold neck

3


Inside mash tun, manifold connected

2


Close-up of manifold neck connected to valve adapters

6


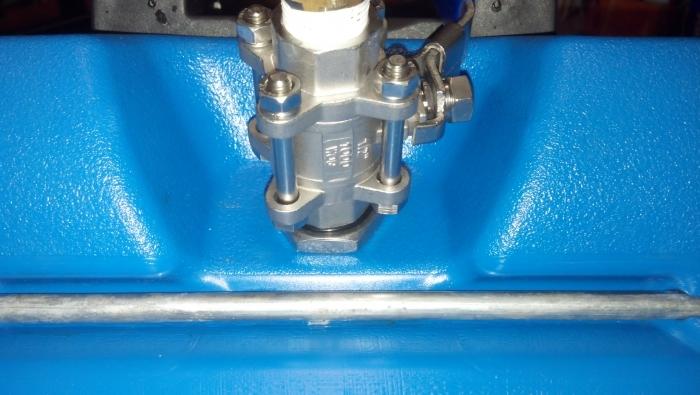
Outside valve

7


Close-up of outside, a mixture of rubber and metal washers

8


Hope that helps!
 
Here you go!

Overview of mash tun

http://ge.tt/4ZNBmEK1/v/1?c

1


The mashing manifold upside down, showing the slits which were cut with a hacksaw and "polished" with sandpaper

http://ge.tt/4ZNBmEK1/v/0?c

0


Showing the "neck" of the mashing manifold

http://ge.tt/4ZNBmEK1/v/4?c

4


This is the fly sparging manifold which is mounted under the lid of the mash tun

http://ge.tt/4ZNBmEK1/v/5?c

5


Inside the mash tun, showing the connector from valve-manifold neck

http://ge.tt/4ZNBmEK1/v/3?c

3


Inside mash tun, manifold connected

http://ge.tt/4ZNBmEK1/v/2?c

2


Close-up of manifold neck connected to valve adapters

http://ge.tt/4ZNBmEK1/v/6?c

6


Outside valve

http://ge.tt/4ZNBmEK1/v/7?c

7


Close-up of outside, a mixture of rubber and metal washers

http://ge.tt/4ZNBmEK1/v/8?c

8


Hope that helps!
 
That does help alot! Thank you for the very detailed pictures. I think I'm going to re-engineer my setup a little. Your pickup line to the drain is alot cleaner and looks like will solve my concern about knocking into it while stirring compared to what I have right now. Thank you for the pics man. I'll post mine when completed.

I also like your fly sparge arm setup. How did you mount that to the lid? I was originally going to make a 2nd manifold and just lay it onto those lips we have along the sides of the cooler, but that would keep the top propped open (not sure if that's an issue or not).
 
Hi again,

For the fly sparge manifold, I made a rectangle and added one "center tube". The holes were drilled with a small drill bit. I glued the rectangle together, since this one (unlike the bottom manifold) doesn't have to be taken apart for cleaning.

I then drilled a hole in the lid, and glued the tube that goes through the lid to the manifold itself and the top 90-degree connector. I used a CPVC cement as the glue. It smells a bit at first but goes away quickly.

The dimensions for the sparge manifold are here: http://ge.tt/4ZNBmEK1/v/9?c

The dimensions for the mash manifold are here: http://ge.tt/4ZNBmEK1/v/01?c

Best,
-e
 
Thanks aledawg. You inspired my new design, though I didn't feel too comfortable drilling a hole into the lid just yet. Here's some pics. A test run with water was a huge success. I have to think this will improve my product from the old setup. I switched out as much of my copper/brass as possible with the SS fittings I could find. Still need to find a SS barbed adapter for the valve outlet.

I drilled 3/32" holes every 2 inches in the sparge arm. Never fly sparged before, so this should be interesting. But the shower comes out real nice. The arm just sits snug over the lips of the cooler sides. No need to secure it.

manifold_v2_topview.jpg


manifold_v2_sideview.jpg


manifold_v2_bottomview.jpg


new_ss_valve.jpg


fly_sparge_arm.jpg
 
Very nice! I have the same results for left-over fluid, so it's very efficient.

One thing that bothered me for the first few runs: I had a "significant" temperature drop in the mash (5-6 degrees over an hour), so I put some insulation foam inside the lid. This helped a bit, so I now have about 2 degrees drop over 1 hour, which is about as good as I'm going to get it.

Good luck, and enjoy!
 
What I've done over the past couple years using this mash tun (when it had SS braid) was throw a heavy quilt over it. I too noticed that massive temp drop at first and this has helped me get by so far. Great suggestion with the foam though, I may do that in the future. Heck, when I'm ready to mess with the lid I can punch the sparge arm through there too. Thanks again for all your help man. This project was fun to do. Now to test it on some beer!

HEY! I just realized your location lol. Wow, you aren't far from here at all! I'm from Warminster.
 
So i have the same cooler that i'm ready to convert. One question i have is if
i batch sparge how much liquid will i be able to drain from the bottom of the manifold. I was concerned about the height of the drain plug and was considering drilling a new hole and relocating it lower on the side. I want to be able to get as much of the first runnings as i possibly can so i can achieve the best effeciency posssible.
 
I have one of these that I use with a C-PVC manifold. I only leave big one a pint or two or liquid. I drilled a hole in the front of the cooler for my ball valve. The siphon from the attached hose will drain it down to the bottom of the cooler.


Sent from my iPhone using Home Brew
 
So i have the same cooler that i'm ready to convert. One question i have is if
i batch sparge how much liquid will i be able to drain from the bottom of the manifold. I was concerned about the height of the drain plug and was considering drilling a new hole and relocating it lower on the side. I want to be able to get as much of the first runnings as i possibly can so i can achieve the best effeciency posssible.

When doing "dry runs" without the grains, there's no more than 1-2 cups left of fluid.

In a real world situation, the grains will hold on to lots of fluid which is more slowly "released", so more liquid will be left in the cooler.

But, in a batch sparge scenario, your first runnings will be mixed with the 2nd, and you'll still get the vast majority of the goodness out of the cooler and into your boil kettle
 
I recently built this mash tun and it's worked well for two batches, I did a little experimenting and thought I should share/contribute.

Going by the procedure outlined here: http://www.beersmith.com/forum/index.php?topic=9324.0
I came up with a specific heat for our ice cube cooler of 0.235 and a weight of 12.9 lbs.

I know most people are preheating their tun so this may not matter to you, but thought id share just in case some beersmith users wanted to check that "Adjust temp for equipment" check box.
 
What about drilling a hole in a different spot in this cooler so it is lower and drains better? I am getting the 70 qt version and am looking to see if others have drilled new holes.
Thanks


Sent from my iPad using Home Brew
 
What about drilling a hole in a different spot in this cooler so it is lower and drains better? I am getting the 70 qt version and am looking to see if others have drilled new holes.
Thanks


Sent from my iPad using Home Brew

You can if you want to. However, the manifold siphons all the liquid up from the bottom so it may not be necessary.
 
You can if you want to. However, the manifold siphons all the liquid up from the bottom so it may not be necessary.

Technically, it's the siphon (vacuum) itself that draws all the liquid down to the slots on the manifold, not the manifold itself. As long as the bottom of the siphon hose is lower (preferably significantly lower) than the bottom of the mash tun, the siphon will empty the mash tun. The other condition is that the siphon hose has no air in it and is not allowed to suck back air.

I use the same design.

MC
 
I bought this same cooler, a 1/2" ball valve, (2) 1/2" mpt to 3/8" barb fittings, hose gaskets, and a toilet supply hose....reused the two cooler parts as the OP did...

It works, but the ball valve keeps getting loose and the rubber hose gasket barely fit over the mpt and then when it did finally there wasn't enough thread to install the ball valve.

Thinking I need to convince swmbo that I need a 3" (or so) mpt nipple to thread through the cooler wall, various cooper for a manifold, and nuts for either side of the wall....I know with the elbow for the manifold on the inside and the ball valve outside I shouldn't need the nuts but figured they'd be extra insurance
 
Turns out I had this exact igloo cooler buried in my garage. I've been wanting to make the jump to AG and this looks like the route I'll take. At this point, I'll just need to buy the bulkhead and the CPVC parts. The only downside is my cooler was spray
painted and a lot of it is chipping off. I don't want any paint chips to be mashed in, so I'm scrubbing off the dried paint first (at least the sections that pose a threat to flaking into the mash).
 
Did you check to see how much wort your going to lose? I built a similar manifold for my 48 qt cooler and found that I lose almost 1/2 gal. :mad:

I'm thinking of making a copper false bottom and a custom fitting filter bag that I'll be able to remove after sparging.

Maybe I'm crazy

Bull

Should drain all wort until siphon "vacuum" is broken wherever air is allowed to enter system first as wort level falls. Might be tricky if vacuum is lost while sparging. Looks like the first point of air leakage will be either at the top of the slots or at the connection to the bulkhead valve assuming that's not sealed, whichever is highest.

But this looks like a nice clever and efficient design. Bravo!
 
With mine (water testing not full mash) and a rather chunky PEX manifold I lose precisely 900ml (2 pints).
 
Should drain all wort until siphon "vacuum" is broken wherever air is allowed to enter system first as wort level falls.!

Put this concept in mind is there a certain amount of the CPVC pipe that you want to cut the slots in? Is it half is it less than half is it creates just wondering what everyone else is doing?
 
What is everybody using two cutlass C

PVC pipes?


I haven't built mine yet, but I have a CPVC cutter (something like this http://www.amazon.com/dp/B000HSAPR8/?tag=skimlinks_replacement-20). It makes cutting the pipe super easy and clean. The only hard part will be finding it in my cluttered garage.

Also, is 1/2" CPVC the way to go? I already have lots of 3/4" pipe but that may be too big plus it's PVC. On that note, would a thinner pipe (1/4") create a better vacuum?
 
Last edited by a moderator:
I haven't built mine yet, but I have a CPVC cutter (something like this http://www.amazon.com/dp/B000HSAPR8/?tag=skimlinks_replacement-20). It makes cutting the pipe super easy and clean. The only hard part will be finding it in my cluttered garage.

Also, is 1/2" CPVC the way to go? I already have lots of 3/4" pipe but that may be too big plus it's PVC. On that note, would a thinner pipe (1/4") create a better vacuum?

I used a coping saw

I would not use pvc personally, high temps
 
Last edited by a moderator:
1/2 or 3/4 is good, just make sure it's Cpvc and not regular PVC, or you could use copper or stainless steel tubing $$$. I can't answer your question about the 1/4 pipe...
 
Back
Top