Ball-Lock Quick Disconnects: Exploded View

Homebrew Talk - Beer, Wine, Mead, & Cider Brewing Discussion Forum

Help Support Homebrew Talk - Beer, Wine, Mead, & Cider Brewing Discussion Forum:

This site may earn a commission from merchant affiliate links, including eBay, Amazon, and others.

Ace_Club

Well-Known Member
Joined
Sep 21, 2008
Messages
43,816
Reaction score
2,373
Location
Chicago, IL
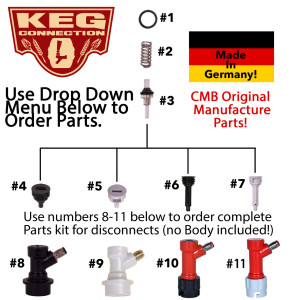
A question recently came up in another thread about how a quick disconnect was to be reassembled. I figure that the best method would be to have an illustrated guide. Here's an exploded view of the liquid disconnect. The gas disconnect will follow shortly.

IMG_2318.JPG


From left to right: Disconnect housing, valve "disc", spring, o-ring, top.

When reassembling, it is important to remember two things.

1) The valve "disc" should be inserted with the short end first. You can also remember this by making sure the integral gasket is facing down.

2) The o-ring is essential to ensuring that the disconnect doesn't leak. Often when disassembled, the o-ring is stuck to the top of the disconnect so that it is not obvious that it even exists. If this falls off while sanitizing or cleaning and you don't realize it, you will be unpleasantly surprised when attaching it to your keg.
 
This is good. Thanks. I wondered about the groove in the disconnect but was worried about taking it apart... just in case.

B
 
And when you wash the o-ring down the drain (and you will) any extra post o-rings will fit in there. The top will not screw down totally flush, as the post o-ring is thicker, but they seal as good as the original. I have 2 or 3 that have been changed for over a year.


_
 
What's the best way to get the top off of the disconnect? Also how often do folks clean the disconnect?
 
ne0t0ky0 said:
What's the best way to get the top off of the disconnect? Also how often do folks clean the disconnect?

A flat head screwdriver, as it just screws together.

I take mine apart and soak in PBW and then Star San every other keg or so.
 
The wrench that takes your taps off will also work, if a screwdriver isn't handy.


_
 
Thanks. I just goofed by putting the gas on the out post (not wearing my glasses, thought it said "in"). Of course the keg had yet to be tapped, and I got beer/trub in the line. This thread let me easily disassemble and clean the parts. Whew.
 
This is great. It should be featured on the front page too so it hits the Feed-burner. @austin ;-)

Maybe add a pic of the top being taken off as well, showing the screwdriver.
 
Hello,

I have recently got into kegging - this weekend I kegged my 3rd batch.

Everything goes fairly smooth, but I've having a heck of an issue with my liquid disconnect. I can take it apart to clean it, but when I try to put it back together I can never get the valve to be straight when fully tightened.

While I'm re-assembling the disconnect every time I turn the top part the valve twists, and once its tight the valve is never straight. This makes it impossible to connect to the keg :(

I've tried several different things, and even ended up breaking the valve on a disconnect by forcing it on the post when I did not realize it was crooked.

Are there any tips or tricks to re-assembling these things correctly? I don't want to have to keep buying more disconnects every time I keg.

Thanks!
 
Thanks, I'm going to double check the valve when I get home. I have a nagging feeling that I was putting it in the wrong way...
 
I've not yet even bothered taking mine apart. I run a half keg or so of warm Star San though my liquid line every kegging. Just assumed that was good enough.

Heck that's a big improvement over when I used to run commercial kegs, and only clean the sankey tap and lines about never.
 
I've wondered if its worth taking it apart. I do just because I like to be very sure everything is clean and sanitized, but is it really necessary?
 
I've wondered if its worth taking it apart. I do just because I like to be very sure everything is clean and sanitized, but is it really necessary?

Assuming you are pushing your sanitizer though your lines each time.....everything would be sanitized, no? Infection isn't even that great a concern for fully fermented beer anyway.

I guess I could see taking these apart and cleaning occasionally, but I keg to keep the work to a minimum. As long as you aren't noticing off flavors in your beer, I'm not going to bother. But each has different levels of OCD.
 
Just wanted to post an update - I went home at lunch and sure enough I was trying to put the valve in backwards. With the orientation corrected the disconnect is working perfectly again!

Thanks!
 
Speaking of putting the plunger in up-side-down, this image can be found on a multitude of on-line HBS's...
176212-ball-lock-disconnect-black-barb-b2_1.jpg


and

Disconnect_Parts_Diagram__83212.1429891543.1280.1280-300x300.jpg

Cheers!


So is the Oring supposed to be at the very bottom or the very top? Mine are at the top above the spring like in the OP's picture. I haven't had any leaks either.


For those who use a pump to recirculate cleaner/sanitizer, those stainless steel tea balls are great for the disconnects small internals.

41TJkdB9rbL.jpg


I just chuck the tea strainer into the kettle I use that holds the cleaner and pump.
 
The o-ring "sits" around the opening, so it doesn't matter when you put it in. It fits around the top of the disconnect, the part you take off with the screwdriver. Sometimes it sits inside the disconnect when you take it off.
 
Yup, that graphic is the way I was re-assembling the disconnect and having issues with the valve fitting properly. Major kudos to Ace for posting the correct way!
 
Another tid bit. That o-ring on the valve does come off for cleaning (yes!) or lubing and can be replaced. I pried it loose with my finger nail, going around the top groove, it then flopped over the ledge. There was quite a bit of deposit on it.

Also the easiest way to re-assemble is:
  1. Hold the screw top upside down
  2. Put the o-ring into the top's recess
  3. Stack the spring,
  4. then the valve, o-ring pointing up
  5. Slide the body over the whole stack and twist
  6. Screw the top tight with a screw driver
 
HELLooo People,

Are the parts of the ball lock made by stainless steal, can I leave the whole ball-lock in cleaning solution or it will get rusty?
Cheerio!
 
HELLooo People,

Are the parts of the ball lock made by stainless steal, can I leave the whole ball-lock in cleaning solution or it will get rusty?
Cheerio!

The inside spring and the barb are SS (Stainless Steel), so they are safe in most cleaning solutions and Starsan. However, the threads on MFL QDs are chrome plated brass, so the chrome plating will discolor and come off with extended exposure to most cleaning solutions and Starsan. Don't keep those exposed to them for longer than necessary. You could boil them in a PBW, though.

The MFL swivel nuts are also chrome plated brass, while the barbed stem is SS.
 
so it is better taking it apart, clean it, dry it and reassemble it, isn't it?

Cheerio
 
The inside spring and the barb are SS (Stainless Steel), so they are safe in most cleaning solutions and Starsan. However, the threads on MFL QDs are chrome plated brass, so the chrome plating will discolor and come off with extended exposure to most cleaning solutions and Starsan. Don't keep those exposed to them for longer than necessary. You could boil them in a PBW, though.

The MFL swivel nuts are also chrome plated brass, while the barbed stem is SS.
I left my sanke tap in a starsan bath and the plating came off. Wish I knew then!
 
so it is better taking it apart, clean it, dry it and reassemble it, isn't it?

Cheerio

Actually it's best to open them up, clean (use small brush, if needed), rinse and soak in Starsan (or another sanitizer) for a minute, then reassemble wet without drying. That way the inside remains sanitized and ready for your next use. Spray or mop the keg's posts with Starsan as well as the inside bottom of the QDs before pushing them on.

It's only the threaded MFL stub that's not stainless.
 
I left my sanke tap in a starsan bath and the plating came off. Wish I knew then!

Yeah, that really sucks!
But they should still be fine and operational. Just make sure to clean out the dissolved plating on the inside before tapping from it.

In my early brewdays I left a bunch of brass fittings attached to my plate chiller in Starsan a few days and they came out really shiny. Parts that had plating were also stripped clean. I've since switched to all stainless where I could.
 
Back
Top