Wort Chiller - Do I "need" it?

Homebrew Talk - Beer, Wine, Mead, & Cider Brewing Discussion Forum

Help Support Homebrew Talk - Beer, Wine, Mead, & Cider Brewing Discussion Forum:

This site may earn a commission from merchant affiliate links, including eBay, Amazon, and others.

THRobinson

Well-Known Member
Joined
Feb 24, 2010
Messages
135
Reaction score
1
Location
Zurich
Did a few of the can extracts kits, which I always found very sweet when done, which lead me to this site and where I learned it was better to avoid the can kits if I want to make a better brew because they usually have that sweet sugary taste.

Just about to order a 30qt pot, and a 'fat tire amber ale' kit from Austin Homebrew (cheaper than buying locally in Canada) and they suggested a Wort Chiller.

I have the basic brewing kit/supplies, buying the pot, one of their brew kits, heading powder and irish moss... is that all I really need to make a good brew? is the Wort Chiller needed, or just one of those 'nice to have' items that helps but can live without?
 
It will be needed when you/if you advance to all grain. Its pretty much neccesary for partial mashes too.

It is awesome to have for extracts though!
It will save you an hour on brew day!
 
Aw crud... this is where I wish I knew more, especially the terms. :)

Still a newbie...

http://www.austinhomebrew.com/product_info.php?cPath=178_452_43_250&products_id=1113

That's what I was looking at getting, however (and was about to post this question actually) there are 4 kit options and not sure what the differences are. I'm just trying to avoid the can-kits you get at the store because they never seem to taste right (read it has to do with the different sugars etc...)

Just hoping to make a batch that tastes like what you buy at the store (or as close to).

I see extract is there at no extra charge, as well as mini-mash, all grain and unmilled all grain. Is extract going to be the same as the can-kits? (ie Coopers)
 
PLus fast wort chilling does help to create a better beer by reducing the time in which your beer is at temperatures that react negatively with O2 and creating a strong cold break.

This ensures a fresh tasty beer that is clear and beautiful!
 
Aw crud... this is where I wish I knew more, especially the terms. :)

Still a newbie...

http://www.austinhomebrew.com/product_info.php?cPath=178_452_43_250&products_id=1113

That's what I was looking at getting, however (and was about to post this question actually) there are 4 kit options and not sure what the differences are. I'm just trying to avoid the can-kits you get at the store because they never seem to taste right (read it has to do with the different sugars etc...)

Just hoping to make a batch that tastes like what you buy at the store (or as close to).

I see extract is there at no extra charge, as well as mini-mash, all grain and unmilled all grain. Is extract going to be the same as the can-kits? (ie Coopers)

I doubt your canned kits came with specialty grains so no this is different. You will steep your grains and then add extract. You can make very good beer this way.
 
http://www.howtobrew.com/

Here is a free online book written by a legend in the hobby. Its easy to read and not very long.

You can skim it to get better acquainted. I must warn you though, stepping through that door makes you officially one of us....
 
Shinglejohn said:
It will be needed when you/if you advance to all grain. Its pretty much neccesary for partial mashes too.

It is awesome to have for extracts though!
It will save you an hour on brew day!

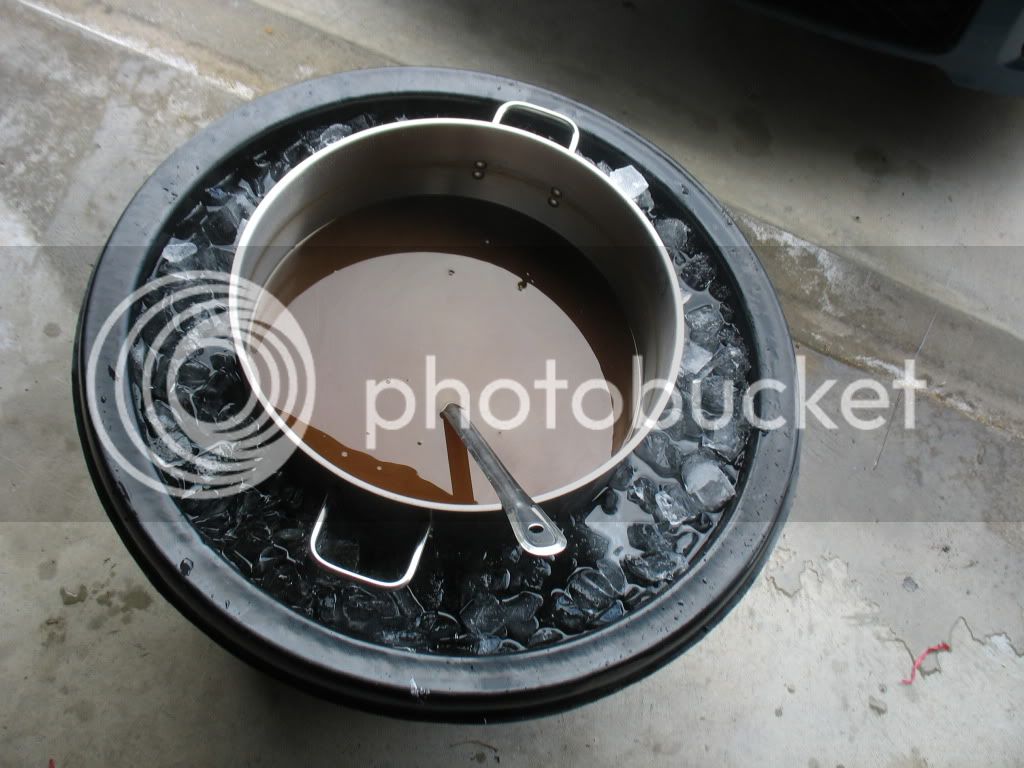
An hour?!? I actually got 5.75 gallons of boiling wort done to 65 degrees in 30 mins with an ice bath sitting outdoors
 
Just about to order a 30qt pot, and a 'fat tire amber ale' kit from Austin Homebrew (cheaper than buying locally in Canada) and they suggested a Wort Chiller.

I have the basic brewing kit/supplies, buying the pot, one of their brew kits, heading powder and irish moss... is that all I really need to make a good brew? is the Wort Chiller needed, or just one of those 'nice to have' items that helps but can live without?

I did my first two batches without a chiller and it didn't make sense to me. By that I mean I spent so much time and money buying ice, freezing plastic bottles, filling a tub with water, then switching out the bottles. All of that costs money, even your time is worth something. After spending $48 and building my own chiller, the whole operation of cooling the wort takes all of 20 minutes at the most and that includes time for unrolling and rolling the hose. IMO, its a no brainer.
It's like having a snowblower or a shovel. They both move snow....but
 
An hour?!? I actually got 5.75 gallons of boiling wort done to 65 degrees in 30 mins with an ice bath sitting outdoors

ditto-this set up gets it done in 20-30 minutes.thats a 33 quart pot with 5 gallons of wort.The only downside is it uses a ton of ice.

nwpics060.jpg
 
I doubt your canned kits came with specialty grains so no this is different. You will steep your grains and then add extract. You can make very good beer this way.

Ah gotcha... when I saw extract, I thought maybe they did all the work and boiled it down and stuck it into a can... so the extract is on top of the grains and such. Ok... when I clicked and saw the other 3 options and saw some were grains, that's what threw me off track.

Well, I think, given the cost involved... I'll try without the wort chiller, and if the brew comes out tasting better than those canned kits, then I'll upgrade to getting the wort chiller.

Having been let down with those can-kits, I'm hesitant to sink money into a hobby that I may/not continue with.

... on a side note, that last batch I made of Brewmakers Stout, <shiver> the taste still haunts my dreams. :eek:
 
PLus fast wort chilling does help to create a better beer by reducing the time in which your beer is at temperatures that react negatively with O2 and creating a strong cold break.

This ensures a fresh tasty beer that is clear and beautiful!

That are plenty of people that do a "no-chill" brewing process* and wind up with crystal clear beer that tastes great...

* - meaning, the take the boiling wort and seal it in a container that can handle the heat without deforming due to heat or changing pressure as the wort chills; then they pitch the yeast the next day after wort has cooled down on its own...
 
Ah luckily I'm in Canada surrounded by a tonne of snow... for now. Probably melt when I finally get the kit in the mail. :D

I'm perpetually bored (seriously) so the time doesn't matter to me much... the chances of contamination do but, for the first batch or two, I'll use the ice method.

I saw a few older posts saying 'for $50 it's worth the chiller' ... where are people buying them for that? At the Austin Homebrew, looks more like $200 plus the cost of the copper so another $60.
 
To answer the original question I would say it is definitely closer to a luxury than a necessity. I notice alot of people say it saves time, but I wonder how much extra cleaning is involved with the wort chiller after each brew?
I have never used one so I do not know the answer, but by pouring 3 gallons of icey water into my carboy I can get the wort down to around 80 degrees immediately and be within pitching range in about 30-40 minutes total.

For someone on a budget like me I just do not see the benefit of saving a little bit of extra time for the money right now. Of course PM and AG is a different story....
 
BTW..if you can swing it get a 10 gallon pot. It will save you from upgrading later!

I wish I could, but sadly, been looking for months around here and a 6gal costs $180CAD and couldn't find anything bigger. The 7.5gal one I am looking at is $84US, even after shipping it's way cheaper. Though see that the 8.3gal is only $5 more so maybe get that instead.

I doubt I'll brew more than 4 batches a year though... I'm a slow drinker. :D
 
I notice alot of people say it saves time, but I wonder how much extra cleaning is involved with the wort chiller after each brew?

For an immersion chiller, clean-up equals a 30-second spray with the hose while you're already spraying off other things - boil kettle, spoons, etc...
 
To answer the original question I would say it is definitely closer to a luxury than a necessity. I notice alot of people say it saves time, but I wonder how much extra cleaning is involved with the wort chiller after each brew?
I have never used one so I do not know the answer, but by pouring 3 gallons of icey water into my carboy I can get the wort down to around 80 degrees immediately and be within pitching range in about 30-40 minutes total.

For someone on a budget like me I just do not see the benefit of saving a little bit of extra time for the money right now. Of course PM and AG is a different story....

I'm on a budget as well, and being new I'm still learning anyway. But, I'm in the same frame of thinking... if the only real benefit is saved time, I'll take the money. Not like I have to sit there and watch it cool... I do have a TV to pass the time with while waiting. :D
 
To answer the original question I would say it is definitely closer to a luxury than a necessity. I notice alot of people say it saves time, but I wonder how much extra cleaning is involved with the wort chiller after each brew?

It takes only as long as it takes me to unhook the hose from the chiller, screw on the spray nozzle, turn the water back on and spray off the chiller and set it on the table to dry off.

I have never used one so I do not know the answer, but by pouring 3 gallons of icey water into my carboy I can get the wort down to around 80 degrees immediately and be within pitching range in about 30-40 minutes total.

That works fine for top-off batches but not for full boil batches.
 
I bought the stainless steel immersion chiller from Midwest for about 48 bucks if I remember right. It still is the absolute best 48 dollars I've spent on my beer.

The immersion chiller cuts at least an hour off my brew day, and it is already paid for by the savings on the bagged ice I was using. I brew near full volumes, and it was taking over an hour to cool in the ice-water bath.

On top off that, I haven't had a beer with chill haze since I 've been using the IC.

Finally, an immersion cooler is just a nifty piece of kit.

No, an immersion chiller is not mandatory at all, but for me it is the cheapest way to make a noticeable improvement on your brew day. It is what I always recommend to the new brewer looking to branch out from a basic starter kit.

Pez.
 
Whether you "need" it or not is really up to your time, your patience, your brew style, your storage space, and so on.

I suppose technically speaking I don't need mine, but gggeeeeezzzz it makes everything easier. Very very happy with mine.

Your beers might cool off quickly outside with an ice bath during the winter, but during the summer you might find it begins to take several hours. Whether it's a "must have" really depends on your situation.
 
Well, thanks everyone for the feedback... since it's winter, I'll cool it on my balcony with snow. Just ordered everything so, see how it goes... but given the praise of a chiller I'll keep an eye open for these $50 immersion chillers. Only one I have seen so far was over $200 which scared me off.

Though reading more now, I guess what I am looking at is some attachment that cools everything down in 5min. and the immersion ones for $50 hook up to a garden hose.
 
I just got an immersion chiller. well made it actually. My buddy and me did 2 partial mash batches at the same time and total time with the chiler was 15 min. 10gal chilled in 15 min how can you go wrong. Now granted it helps that i live in an old a$$ farm house whti water from the tap being 48 degrees in the winter. But the time it saved for me was invaluable.
 
I just got an immersion chiller. well made it actually. My buddy and me did 2 partial mash batches at the same time and total time with the chiler was 15 min. 10gal chilled in 15 min how can you go wrong. Now granted it helps that i live in an old a$$ farm house whti water from the tap being 48 degrees in the winter. But the time it saved for me was invaluable.

That would be helpful... I live in an apartment with no hose so, I'd have to rig up something to the kitchen sink... I'd also feel bad about wasting water. :S
 
That are plenty of people that do a "no-chill" brewing process* and wind up with crystal clear beer that tastes great...

* - meaning, the take the boiling wort and seal it in a container that can handle the heat without deforming due to heat or changing pressure as the wort chills; then they pitch the yeast the next day after wort has cooled down on its own...

I guess that could work in a keg, no?
 
I have never tried no chill - so I don't know...

But assuming you had an adequate seal, and a big enough keg, and then something to vent your CO2 during fermentation; I guess it's possible...

I just meant a good air tight chamber to let naturally cool, than pitch in a normal vessel once cooled. just hypothetically thinking along the lines of if a brew day were to be cut short for some reason
 
I just meant a good air tight chamber to let naturally cool, than pitch in a normal vessel once cooled. just hypothetically thinking along the lines of if a brew day were to be cut short for some reason

I see what you're thinking....

Of course that would require an additional racking (no big deal in my opinion).
 
With a 30 qt pot, I am assuming you are doing a full boil for a 5 gallon batch. I would recommend a chiller in that case. With a partial boil (3 gallons), ice works pretty well - I could use the ice from my ice maker plus a bit from a bag and the cold water from the tap and be good to go. With a full boil, however, it was a ***** to get it cooled down fast enough. So, I ended up buying a chiller from learntobrew.com - $73 shipped for a 50 foot copper immersion chiller with garden hose hookups. They also have a 25 footer for quite a bit less (I think it was around $48 shipped). I could not build it for this price with the local copper prices! They also have $8 flat rate shipping, so you can grab some other supplies if you need to save on overall shipping.
 
Back
Top