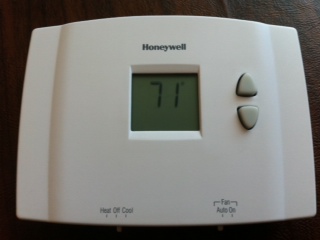
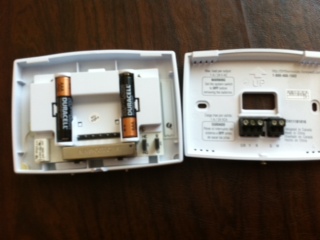
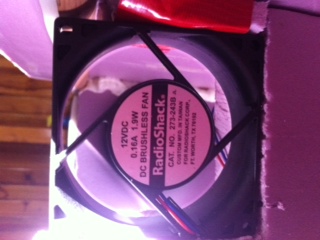
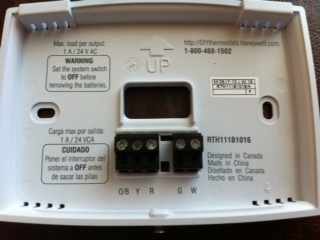
I have absolutely no electrical experience. I've built the cabinet and it works great. I got a fan and it runs perfect on the 12v adapter. It has 2 wires (blue and red) that plug into the adapter. The problem is how do I hook the fan and thermostat together? It is a Honeywell model RTH111. It says max output is 1A/24V AC. Can these be hooked together? If so, how? Do I need to buy some wire and if so what kind, etc.? I just really do not know where to go from here....
You are using an out of date browser. It may not display this or other websites correctly.
You should upgrade or use an alternative browser.
You should upgrade or use an alternative browser.
WIRING HELP for my son of fermentation chiller
- Thread starter DaveGEsq
- Start date

Help Support Homebrew Talk - Beer, Wine, Mead, & Cider Brewing Discussion Forum:
This site may earn a commission from merchant affiliate
links, including eBay, Amazon, and others.
Here are some photos. Hopefully they help. As you can see, the inside of the thermostat is pretty complicated. The "G" terminal is the fan terminal according to Honeywell's website. I just need to know if I can make this work and, if so, how. Thanks for ANY help.


If I understand this correctly you want the t-stat to run the fan to temp setting? I would wire the 12 volt adapter to t-stat and out to fan. That being said the wiring diagram is needed, but should be along the line of 12 volt supply to red and green.....one side of fan to green the other should be yellow for cooling.
Bensiff
Well-Known Member
- Joined
- Mar 13, 2008
- Messages
- 4,835
- Reaction score
- 411
If you are willing to be adventurous you can do it like I did a few years ago when I was doing something similar...got it all put together, plugged it in and then touched wires to the thermostat until I found the combination that resulted in the fan turning on. It didn't take more than a few minutes because there are not that many combinations.
If you are willing to be adventurous you can do it like I did a few years ago when I was doing something similar...got it all put together, plugged it in and then touched wires to the thermostat until I found the combination that resulted in the fan turning on. It didn't take more than a few minutes because there are not that many combinations.
I guess that's where I'm struggling. I don't know what it means to have it "all put together." The two fan wires plug straight into the adapter. So do I need to add extra wire and if so how?
honeywell.com perhaps?
-=Jason=-
But I know which of the terminals operates the fan. I just don't know how to hook it all up.
PT Ray
Well-Known Member
- Joined
- Aug 26, 2005
- Messages
- 1,386
- Reaction score
- 15
The positive lead from the adapter goes to Y (input) on the t-stat. R (output) from the t-stat goes to positive side on fan. Negative from power supply goes straight to fan.
Being it's DC I don't think it really matters if you use the t-stat to switch the -or+ side of the power.
Being it's DC I don't think it really matters if you use the t-stat to switch the -or+ side of the power.
declanhalpin
Well-Known Member
DaveGesq,
Like PT Ray said, you're only interrupting the positive leg of the fan with the thermostat. If you're familiar with how a light switch interrupts the circuit of a lightbulb, that's similar.
Like PT Ray said, you're only interrupting the positive leg of the fan with the thermostat. If you're familiar with how a light switch interrupts the circuit of a lightbulb, that's similar.
Where do I get the diagram?
Should have wiring diagram in with paper work but Y= yellow, W=white, G=green, R=red....R. needs to be one side of power supply Y. needs to be one side of fan then other 2 wires to the G should run fan to temp.
PT Ray
Well-Known Member
- Joined
- Aug 26, 2005
- Messages
- 1,386
- Reaction score
- 15
The positive lead from the adapter goes to Y (input) on the t-stat. R (output) from the t-stat goes to positive side on fan. Negative from power supply goes straight to fan.
Being it's DC I don't think it really matters if you use the t-stat to switch the -or+ side of the power.
CORRECTION! I was double checking the wiring and had it reversed. Hot from the transformer goes to R terminal of the t-stat, and Y terminal from the t-stat goes to the fan.
The G terminal is for the fan or blower on an a/c unit and is another way to go instead of using the Y terminal. This will allow you to click the t-stat to fan "on" and it will run your dc fan until you set it it back to fan "auto". If you're running off the Y terminal, which normally controls the compressor you won't have that option.
Normally t-stat wire is 20 gauge solid but stranded will be a little easier work with. Though it may help to tin the tip that goes in to the terminals on the t-stat. I think most people cut the tip off the dc adapter, run the hot wire to t-stat and use an 18 gauge piece of wire from t-stat to hot side on fan. The negative from the dc adapter gets wired straight to the negative on fan. You can tie the wires to the fan with wire nuts or butt end connectors.
ok before someone tells you more wrong info, the R terminal is the power in from the transformer, the y terminal is an out put for the temerature conrtol, put the lead going to the positive side of the fan there. then connect the negative side back to the transformer. the stat will need batteries to run the system. the stat can be used in either dc or ac applications. if you are trying to measure the temp of the air over your product then put the stat in the airstream but not where it will get damp. DO NOT TIN the tip of the wire, stats are made to work with copper wire and tinning it will cause problems. and before you spout I have been in the HVAC/Refrigeration industry for over 30 years
PT Ray
Well-Known Member
- Joined
- Aug 26, 2005
- Messages
- 1,386
- Reaction score
- 15
ok before someone tells you more wrong info, the R terminal is the power in from the transformer, the y terminal is an out put for the temerature conrtol, put the lead going to the positive side of the fan there. then connect the negative side back to the transformer. the stat will need batteries to run the system. the stat can be used in either dc or ac applications. if you are trying to measure the temp of the air over your product then put the stat in the airstream but not where it will get damp. DO NOT TIN the tip of the wire, stats are made to work with copper wire and tinning it will cause problems. and before you spout I have been in the HVAC/Refrigeration industry for over 30 years
I'll admit to originally giving "wrong" information in regards to the Y and R terminal. My apologies. Everything else may be subjective at best.
How can you say tinning the tip of stranded wire will cause problems and that a t-stat is made to work with copper? It will function as designed regardless if copper, thread or nothing is connect to the relay terminals. Tinning also doesn't change the fact the wire is still copper. The terminals on t-stats which are plated and not copper are designed for solid strand wire. Attempting to feed stranded wire to it can result in broken strands when the set screw is tightened and yield a poor connection.
Choosing to come off the Y or G terminal to run a low voltage dc fan is a personal preference. I would certainly not use the G terminal to feed a relay for an a/c compressor but this isn't the case. As mentioned before, the G terminal will allow you to run the dc fan at will by using the "on" mode.
Going from R to fan and Y to power has not worked. I think one of the terminals on the tstat is bad. I'm getting a replacement now. We had it working with the following connection: positive fan to G, positive DC adapter to R, negative fan to adapter. We set it on "Cool" and flipped it to "auto" and it worked for a second, then winked out. Again, I think it's a faulty terminal. What do you think, guys?
PT Ray
Well-Known Member
- Joined
- Aug 26, 2005
- Messages
- 1,386
- Reaction score
- 15
Going from R to fan and Y to power has not worked. I think one of the terminals on the tstat is bad. I'm getting a replacement now. We had it working with the following connection: positive fan to G, positive DC adapter to R, negative fan to adapter. We set it on "Cool" and flipped it to "auto" and it worked for a second, then winked out. Again, I think it's a faulty terminal. What do you think, guys?
+ from power tranny goes to R on t-stat. Y goes from t-stat to + on dc fan. It will only feed power if t-stat is turned on, in cool mode and set cooler then room temp. If coming off the G terminal on the t-stat instead of Y to the dc fan, you'll get power either in heat or cool mode but not both, depends on desired temp setting on the t-stat.
heeler
Well-Known Member
PT Ray said:+ from power tranny goes to R on t-stat. Y goes from t-stat to + on dc fan. It will only feed power if t-stat is turned on, in cool mode and set cooler then room temp. If coming off the G terminal on the t-stat instead of Y to the dc fan, you'll get power either in heat or cool mode but not both, depends on desired temp setting on the t-stat.
I made one of these also and for what it's worth mine used G and RH terminals? Although my t-stat is a Hunter they should all be similar cause your house a/c wires are all the same I think! Anyway hope you hot it made
I ran + from the fan to the "G" terminal of the stat; - from fan to power; + from "R" terminal to power. Set the "cool" temp to 50 (incidentally as low as this stat goes...bummer), switched to "cool" and "auto". Anything above 50 and the fan comes on (can take up to 5 minutes!).
fan + to Y and + from R to power did not work at all. The fan would not run.
Thanks everyone for all your help!
fan + to Y and + from R to power did not work at all. The fan would not run.
Thanks everyone for all your help!
PT Ray
Well-Known Member
- Joined
- Aug 26, 2005
- Messages
- 1,386
- Reaction score
- 15
fan + to Y and + from R to power did not work at all. The fan would not run.
If you're getting power off the G terminal when set to cool, Y should also work. It sounds like you're aware of the 5 minute compressor protection so assuming you weren't expecting it to come on as soon as you turn the t-stat on. But running off the G should serve you well. It should also work in heat mode if you need that for the winter.
heeler
Well-Known Member
DaveG....did you remove the thermister and add it to an extention wire or are you mounting the thermastat inside the chiller. I removed mine and added to a 30 inch piece of wire (2 strand 21 gauge wire) so I could leave the therm unit outside and keep an I on it. With digital you can do it either way. I made one for a buddy and he wanted his inside and the digital worked great. But removing and SEEING that little thermister is somewhat of a feat in itself. I burnt the first couple of boards trying to remove the thermister and then soldier the extention wire back on, but now I've mastered that -- of course I will never need to build another one but oh well. 

- Joined
- Nov 6, 2007
- Messages
- 62,016
- Reaction score
- 6,922
How is a 24V AC output running your 12V DC fan? 
heeler
Well-Known Member
I didnt use a converter, not sure what that would do. The thermastat is just an electricty break for the fan, which runs off 110 from a transformer (its a cellphone charger) plugged into the wall. The therm. runs off the batts (which are shown) and when the temp opens or closes the switch that turns on or turns off the fan. I didnt invent this and it really is a simple theory -- I sure am glad I found this cause its as cheap as it gets to build and run.


pquirk2
New Member
DaveG....did you remove the thermister and add it to an extention wire or are you mounting the thermastat inside the chiller. I removed mine and added to a 30 inch piece of wire (2 strand 21 gauge wire) so I could leave the therm unit outside and keep an I on it. With digital you can do it either way. I made one for a buddy and he wanted his inside and the digital worked great. But removing and SEEING that little thermister is somewhat of a feat in itself. I burnt the first couple of boards trying to remove the thermister and then soldier the extention wire back on, but now I've mastered that -- of course I will never need to build another one but oh well.
I'm using the same Honeywell TRH111 thermostat and wanted to add an extension for the thermistor but have no clue how to find it on the board. Do you know how I could find it? Thanks
heeler
Well-Known Member
pquirk2, I'm not sure about that thermistat unit. I found that some of them have a thermister that is a strip of plastic material and others have what looks like a two legged diode kindof a thingy. Which ever unit you use the thermister will be protected by some kind of plastic guard and you will have to remove the board from the frame to get to the thermister. It will be under the board you see when you open the unit. There are wires that will hold it together so be go slow. Once that is complete you can find it in a upper corner -- look for a guard. You will have to UN-SOLDIER it from the board so you can add your wire at the exact same place and then add your thermister to the other end. I used telephone wire. Its still goin so I must have done something right.
heeler
Well-Known Member
pquirk2, just remembered, go to Youtube and type in fermenter/chiller. Then scroll done to How To Modify A Thermastat for a Fermenter/Chiller. SteelJan is really easy to understand and she walks you right through it. I used the same unit she did (Hunter) but I tried several and found that others just wont work due to construction woes. Hope this helps.
Similar threads
- Replies
- 0
- Views
- 1K
- Replies
- 13
- Views
- 2K

