You are using an out of date browser. It may not display this or other websites correctly.
You should upgrade or use an alternative browser.
You should upgrade or use an alternative browser.
Weldless Triclover Element?
- Thread starter Bobby_M
- Start date

Help Support Homebrew Talk - Beer, Wine, Mead, & Cider Brewing Discussion Forum:
This site may earn a commission from merchant affiliate
links, including eBay, Amazon, and others.
vinylicious
Well-Known Member
Bobby,
How large of a hole will the solder flange accommodate? I have a 1-5/8" punch that I used to attached one of your welding spuds in a difference pot. Would this size work for the solder flange?
How large of a hole will the solder flange accommodate? I have a 1-5/8" punch that I used to attached one of your welding spuds in a difference pot. Would this size work for the solder flange?
The ID of the flange is 1-3/8 and the OD is 2". If you center the flange over a 1-5/8" hole, you'll have a contact ring 3/16" all around. It's a little less than ideal, but that's still more contact area than a pulled dimple and regular ferrule. I think it will be OK, extra bonus for feeding a little solder in from the interior of the pot.
OMJ
Well-Known Member
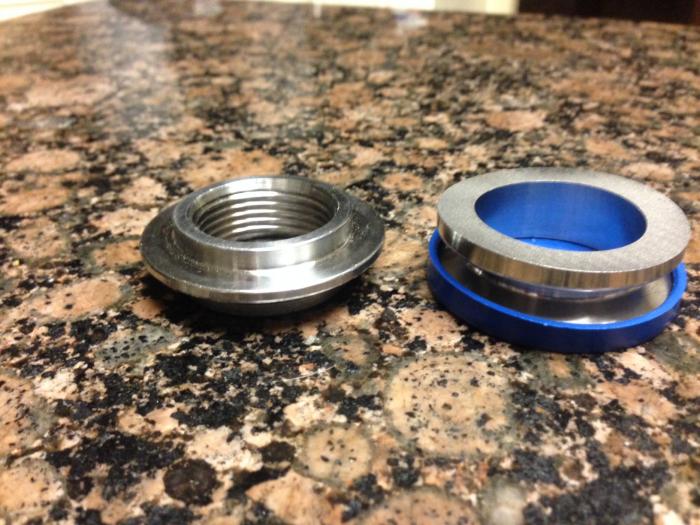
Ok, I finally got all the pictures taken care of and figured out all the different configurations that are practical to offer. Of course I welcome and appreciate any feedback you guys and gals may have. The Harris soldering kits are on order and should be here early next week.
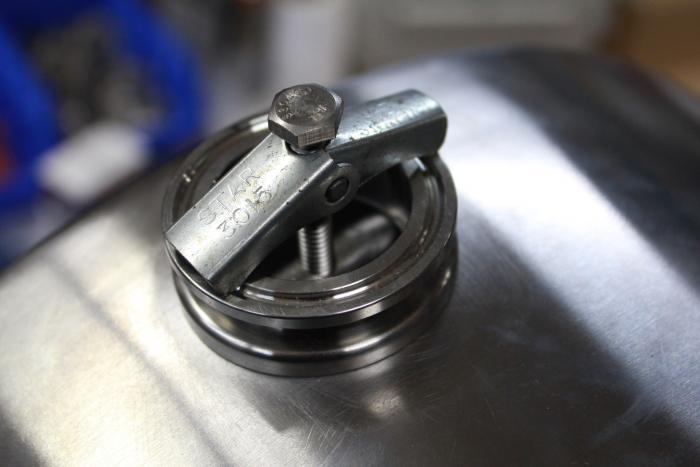
Here's what the solder-on assembly looks like all put together with a sample element installed. Of course, you'll get a lot more out of it once I finally get around to soldering one on in a video.
http://www.brewhardware.com/rimsherms-parts-93

Bobby you should add an option to purchase extra TC gaskets. I know I would have added a couple on my order had the option been there.
LandoLincoln
Well-Known Member
That's pretty awesome! Now to get one with a Neutrik Powercon 32a quick disconnect on the end...
On paper, the NAC3MP-HC will fit. I just need to get one to see if it's practical given 10g wire between the connector and element in a relatively small space.
Weezy
Well-Known Member
This is just awesome, Bobby. What a selection! I'll be ordering 3 setups (plus $100 of misc. hardware for a whole new two-pot setup).
MX1
Texas Ale Works
Bobby,
Just checked out the new site,and the weldless option for the element enclosure, OUTSTANDING!
I will be ordering sometime after I redeploy, cant wait, this will help keep the new pilot system looking sharp!
And I hope the Switchcraft Male Panel mount connectors will work in the end, if not I will just make a short Pigtail...
Thanks again
Tim
I have to agree with everyone else. Very nice setup at a great price. Can't wait to order some from you when I get to that point in my brewery conversion.
I'm not sure if anyone else would like this but a right angle cord grip would make power cable management a lot easier. Any chance of getting that option?
I'm not sure if anyone else would like this but a right angle cord grip would make power cable management a lot easier. Any chance of getting that option?
I have a few of the larger grips with the same stain relief found on my RIMS tubes and I suppose that would be the best way to have 10/3 SJ make a turn like that.
Just-a-sip
Well-Known Member
first let me say liking the redone site.. then let me say im so glad these are now available. i will be placing my order within the week.
OMJ
Well-Known Member
Got mine today....looks great.
ChocolateMaltyBalls
Well-Known Member
Got mine today....looks great.
Mind posting a pic when you get it installed?
OMJ
Well-Known Member
Mind posting a pic when you get it installed?
I will but I'm not sure when that will be.
This looks great! One question I have is the hole size. I've got a 1-1/4" hole in my kettle and was wondering if anybody has had luck enlarging a hole with the next size chassis punch?
We already know that 1-1/4" is big enough for the element to pass through so in theory you don't really need to enlarge the hole. You could solder the TC flange centered over the existing hole and it would work fine. If you're extra paranoid ,you could create a small "V" cut at the bottom so that it doesn't trap liquid in the adapter after cleaning.
Took me a little while to find it on the web site, But i got mine ordered. This is definitely something I have wanted to add to my setup since i first built it.
hio3791
Well-Known Member
I am probably a few months away from making the jump to electric brewing as I am still in the planning / learning phase but this solution is exactly what I have been looking for.
I've never welded or even soldered so I have a basic, dumb, question... if I solder the TC flange to my kettle, I presume that I am soldering from the outside of the kettle, how well would the solder get sipped into the kettle opening? In my mind, I think that if I looked from the inside of the kettle, that I would see a tiny rim around the opening, sealed with solder from the outside and I envision all kinds of nasties living in there and being nearly impossible to clean out. Am I misunderstanding something or does anyone have any pictures to help me illustrate?
I've never welded or even soldered so I have a basic, dumb, question... if I solder the TC flange to my kettle, I presume that I am soldering from the outside of the kettle, how well would the solder get sipped into the kettle opening? In my mind, I think that if I looked from the inside of the kettle, that I would see a tiny rim around the opening, sealed with solder from the outside and I envision all kinds of nasties living in there and being nearly impossible to clean out. Am I misunderstanding something or does anyone have any pictures to help me illustrate?
I am probably a few months away from making the jump to electric brewing as I am still in the planning / learning phase but this solution is exactly what I have been looking for.
I've never welded or even soldered so I have a basic, dumb, question... if I solder the TC flange to my kettle, I presume that I am soldering from the outside of the kettle, how well would the solder get sipped into the kettle opening? In my mind, I think that if I looked from the inside of the kettle, that I would see a tiny rim around the opening, sealed with solder from the outside and I envision all kinds of nasties living in there and being nearly impossible to clean out. Am I misunderstanding something or does anyone have any pictures to help me illustrate?
try and match your hole in the vessel to the ID of the Tri-Clover fitting that way you minimize the gap, but then again just remove the element and you can get it perfectly clean from the outside.
as Bobby said in an above post cutting a small "V" notch in the lower part of your hole to allow liquid to run back into the pot wouldn't be a bad idea if you aren't taking it apart and cleaning after each use.
-=Jason=-

I've never welded or even soldered so I have a basic, dumb, question... if I solder the TC flange to my kettle, I presume that I am soldering from the outside of the kettle, how well would the solder get sipped into the kettle opening? In my mind, I think that if I looked from the inside of the kettle, that I would see a tiny rim around the opening, sealed with solder from the outside and I envision all kinds of nasties living in there and being nearly impossible to clean out. Am I misunderstanding something or does anyone have any pictures to help me illustrate?
Solder wicks into joints amazingly well as long as the surface was meticulously cleaned and it's coated with flux.
Sure, there is definitely a chance of having a few pits here and there but we're talking about a boil kettle or HLT and both of these get plenty hot during a brew to destroy anything living in a small nook. It's important to clamp the ferrule to the pot pretty well to close any major gaps and to keep it placed over the hole, but you can also sneak a little solder to the interior joint if you'd like.
On the sanitary scale, this solution would be a little less sanitary than tig welding a ferrule (with good back gassing to prevent sugaring) and more sanitary than a weldless/locknut setup.
bucksnort999
Active Member
- Joined
- Mar 2, 2013
- Messages
- 41
- Reaction score
- 7
Deleted
hio3791
Well-Known Member
Jason, Bobby,
Thank you! Your explanations helped a lot.
Thank you! Your explanations helped a lot.
Weezy
Well-Known Member
Bobby,
I'm planning on 11.5" dia. pots and could use some guidance on my options? I'm not opposed to weldless/locknut, if they'll even seal on that narrow of a pot. I can also see modifying the radius on the solder piece. Metal work isn't foreign to me (I've got two project motorcycles in the garage shop now) but my welder is long deaf.
I'm planning on 11.5" dia. pots and could use some guidance on my options? I'm not opposed to weldless/locknut, if they'll even seal on that narrow of a pot. I can also see modifying the radius on the solder piece. Metal work isn't foreign to me (I've got two project motorcycles in the garage shop now) but my welder is long deaf.
I took a guess at the smallest diameter that you could solder the flange to simply because I haven't tried doing it and don't want to make claims I can't backup. It might work even without modification. The locknut system does have the advantage of being a mechanical squeeze, so that in itself would modify the pot radius when tightened, especially if you go an inch off the bottom.
ccbadd
Well-Known Member
I ordered and received the solder kit and I'm a little confused. I assumed that the solder type would a looked more like the welding spud with the groove that would allow the inside piece to fit into the pot and not move around but the triclover piece is completely flat on the side you solder to the pot. How do you keep it from moving around while soldering?


Weezy
Well-Known Member
I ordered and received the solder kit and I'm a little confused. I assumed that the solder type would a looked more like the welding spud with the groove that would allow the inside piece to fit into the pot and not move around but the triclover piece is completely flat on the side you solder to the pot. How do you keep it from moving around while soldering?
Small C clamp, through the hole, clamping the outermost edge of the solder piece to the inside of the pot (both points not being soldered).
Or you can use a piece of threadbar and some flat steel or aluminum to span over each outer edge, and two nuts to snug it all up.
Weezy has it right. I'm shooting video today of how I would do it, but that's the basic idea. If I had spec'd out the same design with a center boss like the spud, it would cost twice as much. Besides, clamping closes up any gaps due to radius differences.
ccbadd
Well-Known Member
Well, I ruined one pot! I guess Ill just get it TIG welded. maybe once I see the video I try again but I don't want to loose another pot. I think I got one spot to hot and it warped one side.
What? You actually heated the pot so hot that it's ruined? What kind of torch did you use?
ccbadd
Well-Known Member
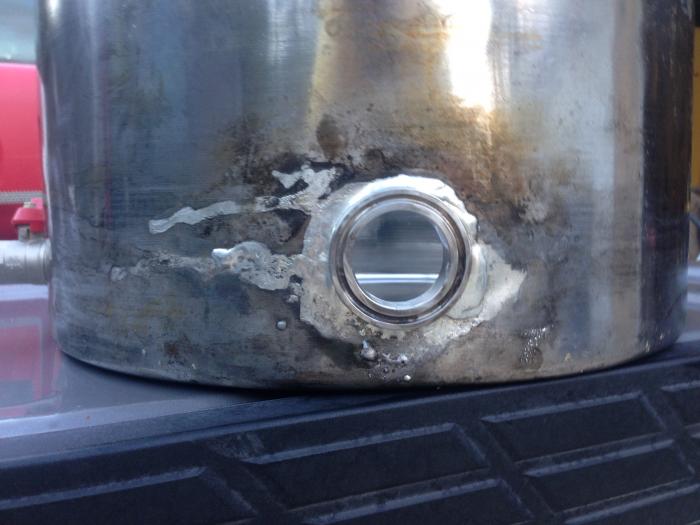
I used a MAPP gas torch. It's OK though because now I have something to practice with. It was my original pot and I had already switched to a BC 44 qt. I figured I didn't want to risk the BC. I looked like a small dent that cause a 1/8" gap on one side and I could not get enough solder to fill it and stick. The TC piece also had moved down a little less that 1/8" and I was trying to figure out how to move it without removing the whole this and starting over.
Edit:
After I stopped bruiting about the failure I decided to try to fix it and this is how it came out.

Edit:
After I stopped bruiting about the failure I decided to try to fix it and this is how it came out.

Practice is good. With clamping to close gaps, it can come out great.


This turned out to be a longer video than I planned, but I didn't want to make too many time warp cuts and lose some details.
[ame]http://youtu.be/_NkHlDql8EU[/ame]
[ame]http://youtu.be/_NkHlDql8EU[/ame]
ccbadd
Well-Known Member
Bobby_M, I'm getting an error on the video, says its private.
Ravenshead
Well-Known Member
I used a MAPP gas torch. It's OK though because now I have something to practice with. It was my original pot and I had already switched to a BC 44 qt. I figured I didn't want to risk the BC. I looked like a small dent that cause a 1/8" gap on one side and I could not get enough solder to fill it and stick. The TC piece also had moved down a little less that 1/8" and I was trying to figure out how to move it without removing the whole this and starting over.
Edit:
After I stopped bruiting about the failure I decided to try to fix it and this is how it came out.
That doesn't look too much worse than my fittings, does it hold water?
Bobby_M, I'm getting an error on the video, says its private.
Sorry, it should work now.
ccbadd
Well-Known Member
That doesn't look too much worse than my fittings, does it hold water?
I did a water test with hot tap water and it holds fine. I need to try with the element next. That was the first time I have done any silver soldering so I need some practice. Bobby's really looks great, that is what I want to achieve.
LandoLincoln
Well-Known Member
This turned out to be a longer video than I planned, but I didn't want to make too many time warp cuts and lose some details.
I don't know, Bobby...without at least SOME swearing, it doesn't seem like a real soldering job to me. At least in my experience.
Really good video, though. Makes me want to take out my weldless fittings and redo them.
Weezy
Well-Known Member
This turned out to be a longer video than I planned, but I didn't want to make too many time warp cuts and lose some details.
http://youtu.be/_NkHlDql8EU
nice....so when is the 3/4" version coming out
You mean for like drain bulkheads and such? Ehhh, I'm just not ready for stocking that many more TC parts, valves, etc...
Similar threads
- Replies
- 14
- Views
- 689
- Replies
- 4
- Views
- 900
- Replies
- 264
- Views
- 10K

