Weldless brew stand.

Homebrew Talk - Beer, Wine, Mead, & Cider Brewing Discussion Forum

Help Support Homebrew Talk - Beer, Wine, Mead, & Cider Brewing Discussion Forum:

This site may earn a commission from merchant affiliate links, including eBay, Amazon, and others.
looks good to me. How much higher did you make your legs in order to put the kegs under there? you think the controls on the back side and low are going to be an issue for adjustments? Damn, I sure like this non-welding structure... I'm so confused...

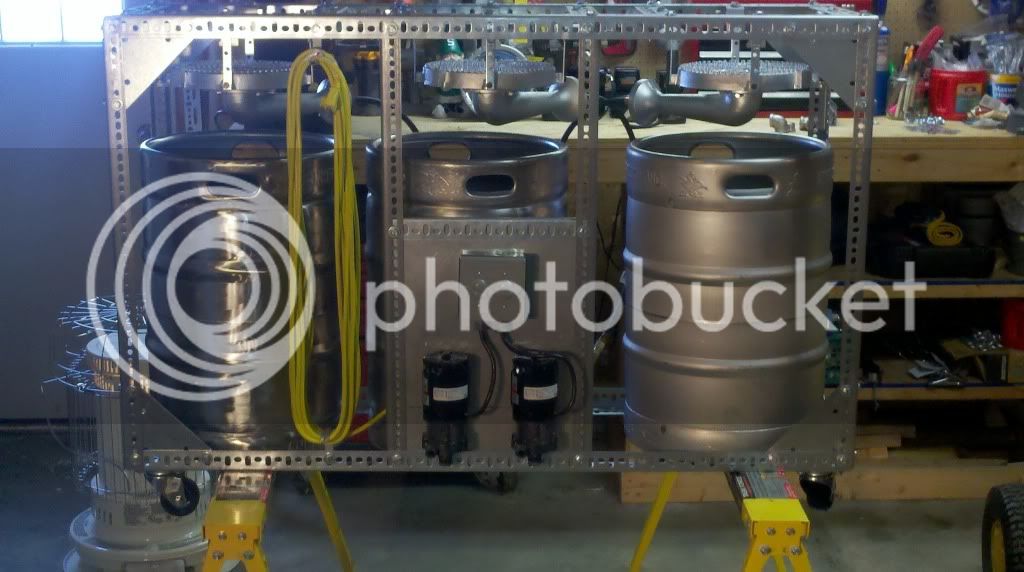
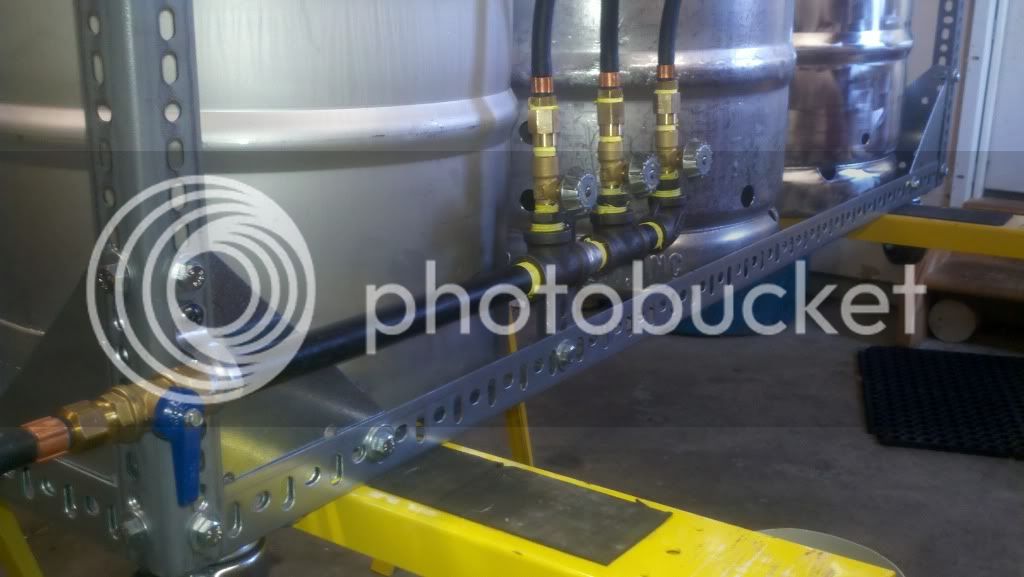
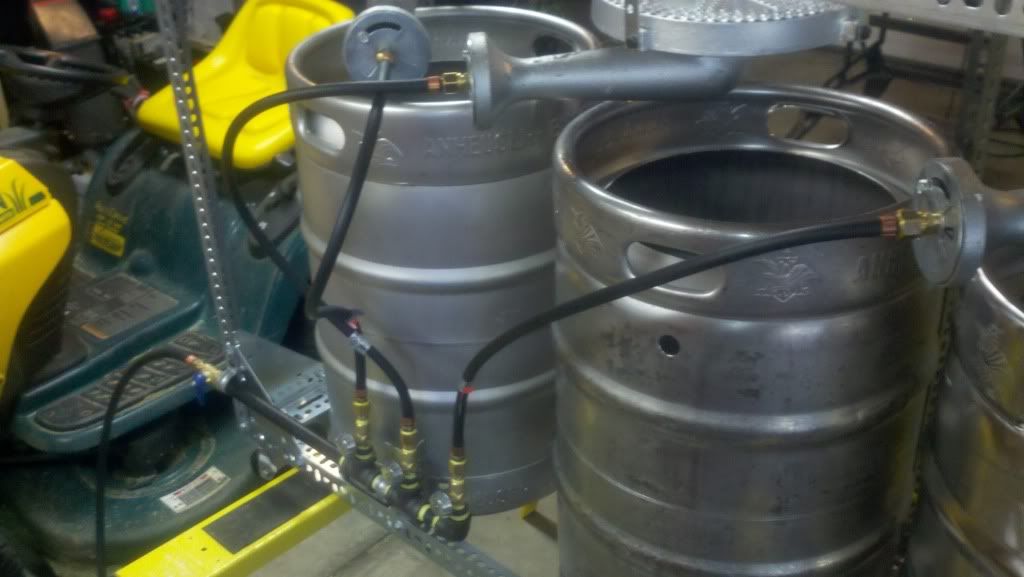
The original design specifies 21" legs, I had to cut mine to 33" to account for the height of the keg + thickness of the entire burner + 4" clearance from top of burner to the bottom of the keggles + an extra inch or so of room to jimmy the keggles underneath for storage. The pic above is actually of the back of the brew rig... I didn't want to put the manifold on the front of the stand... aesthetic purposes I guess. Here is a pic of the front of my rig... all that's left to do is mount my drain valves, thermos, and sight tubes onto the 3 keggles.

2-5-2011a.jpg
 
Strongbad, thanks for the great detail. I am about to order all the stuff for this build. Any chance you could post a final version? I am specifically interested in the gas line placement and routing, as well as burner mounts. I am thinking of using the same burners.

Thanks again,

JM

 
Question about your gas line. Can you give a parts lit for it? I am about to build this and this is the only area that I am lost on. Specifically, what kind of rigid pipe are you using and where did you get the parts?

Any help you could give would be great. I am thinking of using a similar design. I might have it run all the way across the bottom.

Thanks in advance,

JM

Got my propane manifold built, pressure tested, and then fired up all 3 burners successfully.

2-13-2011a.jpg


2-13-2011b.jpg
 
Question about your gas line. Can you give a parts lit for it? I am about to build this and this is the only area that I am lost on. Specifically, what kind of rigid pipe are you using and where did you get the parts?

Any help you could give would be great. I am thinking of using a similar design. I might have it run all the way across the bottom.

Thanks in advance,

JM

Sure... the rigid pipe is all 1/2" black pipe and all these parts except for the 3 hoses and needle valves were all from lowes:

Brass valve 1/2" F npt on one end and 3/8" M flare on the other (x1)
12" black pipe nipple (x1)
2" black pipe nipple (x2)
1/2" black pipe tee (x2)
1/2" black pipe 90* (x1)
1/2" x 1/4" black pipe reducing bushing (x3)
1/4" needle valves (x3) that I got online
1/4" brass close nipple (x3)
1/4" F x 3/8" F coupler (x3)
And then the hoses I got online from some RV parts dealer

I didn't see the need to run it all the way across the stand... I wanted to allow room for me to get my keggles under the rig from the back side for storage, and if I had run the manifold all the way across, it would have just been one more thing to maneuver around, plus why spend the extra on longer pipe?

Hope that helps!

:mug:

That is kind of starting from where the tank regulator hooks up, and working my way up to the burner hookup.
 
That is kind of starting from where the tank regulator hooks up, and working my way up to the burner hookup.

Thanks! That will do. I appreciate it. The only reason I was thinking about running it all the way across was bc I have a thing about symmetry (OCD, Much!), and I like the clean look of it going all the way across. I dont plan on making mine as tall as yours, but I will be using the lower level for storage.

I am thinking about adding some little mounts on the top to help hold the keggles in place and that way there is very little chance of them sliding around even when empty. Just taking some spare scrap from the stand and making 2-4" pieces and adding them around the top to help stabilize the burners.

But the gas line is the only thing that confuses me. I think everything else is pretty intuitive and can be adjusted based on preference.

Thanks again,

JM
 
Looking very nice. I am still torn on if I want to do this weldless stand or try and find some steel and someone with a welder...
 
I'm looking to do something very similar and the only thing that concerns me with this type of slotted angle iron is thermal stress over time due to the high heat being applied directly to it, and the potential to crack or break down over time. How many batches have you pulled off on your rig, and do you see any type of degradation of the material due to heat? I know in the earlier pics the charred look was from the galvanized coating burning off, but even so it seems like fairly low end material that could weaken over time.
 
I worked on the gas and the electrical today, and here is what I've got.

You stand is looking good. Mine looks very similar, except I went with the 70,000 but burners instead.

Your wiring looks good too. I was trying to see if you ran a ground wire to your stand as well. With all electrical and water in the same area, I would definitely recommend connecting the stand to your incoming ground, if you didn't do so.

BrewerRick
The ground wires for both pumps are tied together with the ground wire in the extension cord. The extension cord is also being plugged into a GFCI outlet.
 
I worked on the gas and the electrical today, and here is what I've got.

Ok, I finally got around to firing up the burners today. I am almost at my breaking point because I can't figure out why it isn't working. I wasted a lot of time because the first propane tank I tried wasn't working right. Got another tank, works with the tank hooked straight up to a single burner, but when I hook it up to my pipe i can barely get a single burner to light, let alone two or three at a time. I reapplied teflon tape to all the threads and screwed everything down tight. I am using a standard size 15lb propane tank with a Bayou classic 30psi regulator. What the heck am I doing wrong?
 
WOW! I haven't checked here in a while... You guys have put together some kick ass stands.

Ok, I finally got around to firing up the burners today. I am almost at my breaking point because I can't figure out why it isn't working. I wasted a lot of time because the first propane tank I tried wasn't working right. Got another tank, works with the tank hooked straight up to a single burner, but when I hook it up to my pipe i can barely get a single burner to light, let alone two or three at a time. I reapplied teflon tape to all the threads and screwed everything down tight. I am using a standard size 15lb propane tank with a Bayou classic 30psi regulator. What the heck am I doing wrong?

Ox, it may be the check valve on the tank. I'm guessing here but I think if you open the tank too quickly, gas will rush into your plumbing and trip that check valve. Close the valves on everything and disconnect the tank. Reattach the tank (again making sure all valves are closed) and slowly open the tank valve so that the gas can pressurize your stand's plumbing. When you hear the gas stop flowing through the regulator, open the tank's valve all the way. Now that you've got gas in your stand's piping, it's time to light it up...

I noticed that you used ball valves to control the flow of gas to your burners. Ball valves should really only be used for on or off; while they work fine for controlling the flow of viscous liquids through something like a march pump, you'll have a very hard time adjusting gas flow with them. As you light your burner you'll have to open that ball valve just a crack. If you open it too much, the same thing will happen; gas will rush from the tank and trip the check valve. If you continue to have problems I would consider replacing the ball valves with needle valves.
 
Ok, I finally got around to firing up the burners today. I am almost at my breaking point because I can't figure out why it isn't working. I wasted a lot of time because the first propane tank I tried wasn't working right. Got another tank, works with the tank hooked straight up to a single burner, but when I hook it up to my pipe i can barely get a single burner to light, let alone two or three at a time. I reapplied teflon tape to all the threads and screwed everything down tight. I am using a standard size 15lb propane tank with a Bayou classic 30psi regulator. What the heck am I doing wrong?

The sudden rush of gas as it fills up the empty gas rail and supply hose is likely tripping the safety surge valve in the tank connector. Try starting over and just barely crack the tank valve until the gas rail is fully pressurized, then open it all the way up. The other problem may be that initially, only air or mostly air and no gas will reach the burners until all of the air is first purged from the gas rail and supply hose. This may take some time if only the pilot burners are getting gas with the main burner valves closed because the pilots use so little fuel. That's my best guess anyway.
 
Yeah that was definitely an issue. I let the pipe completely fill up first and then lit the first burner. I was able to get all three lit at the same time...however when i open the valve on any of the three burners it shuts down. Do you guys think this is because I am using ball valves and not needle?
 
Yeah that was definitely an issue. I let the pipe completely fill up first and then lit the first burner. I was able to get all three lit at the same time...however when i open the valve on any of the three burners it shuts down. Do you guys think this is because I am using ball valves and not needle?

I suspect that the big Banjo burners demand more gas than your tank/regulator can continuously supply. Those things use a lot of fuel. Running them simultaneously may be chilling the tanks so much that the vapor pressure is dropping so low that the liquid gas in the tank cannot evaporate fast enough to keep up with the demand. You could try placing the tank in a tub of warm water and try it again. If that fixes the problem then the solution might be to use a larger tank for multiple tanks. OTOH, if it's not a problem with the tanks icing up, it may be that the supply hose is too small/too long to supply enough fuel to all three burners at the same time. I'm guessing at this, but those are the likely suspects IMO.
 
I suspect that the big Banjo burners demand more gas than your tank/regulator can continuously supply. Those things use a lot of fuel. Running them simultaneously may be chilling the tanks so much that the vapor pressure is dropping so low that the liquid gas in the tank cannot evaporate fast enough to keep up with the demand. You could try placing the tank in a tub of warm water and try it again. If that fixes the problem then the solution might be to use a larger tank for multiple tanks. OTOH, if it's not a problem with the tanks icing up, it may be that the supply hose is too small/too long to supply enough fuel to all three burners at the same time. I'm guessing at this, but those are the likely suspects IMO.

There is actually a little safety valve in the acme nut that connects to the propane tank. The tank should supply a maximum of about 200 cf/hour. If you approach that limit, there is a valve in the nut that shuts and restricts flow to about 10 cf/hour. When pressures equalize across the valve it opens back up to allow 200 cf/hour. It is meant to detect leaks, and prevent spewing lots of propane.

I've been fighting with this a bit on my rig, thinking it was a faulty regulator. And I have needle valves :-/

Yes, that certainly could be the problem. You can buy higher capacity connectors. IIRC, they are color coded according to capacity. Black is the lowest, Green the next higher and Red is Max. Here's a source:

http://www.tejassmokers.com/index.html

http://www.tejassmokers.com/images/IMG_1194.JPG
 
Wow, I had no idea they were available in 500,000 btu (red). Mine is green. Looks like I'm replacing with red.
 
Yeah that was definitely an issue. I let the pipe completely fill up first and then lit the first burner. I was able to get all three lit at the same time...however when i open the valve on any of the three burners it shuts down. Do you guys think this is because I am using ball valves and not needle?

When you open the valve on one, the rush of gas might actually create a venturi effect and pull air/gas back from the other two burners. Try lighting one and get a medium flame going. Then slowly light the next burner.

I hardly ever have all three going at once. If I do, they are very low flames. I find myself adjusting the height of the flame quite a bit, especially under my mash tun (less so on the boil kettle and even less on the HLT). I think you'll see a huge improvement with needle valves.
 
sorry for the poor lighting... temp was 35F in my garage when I fired up the burners.

 
Last edited by a moderator:
Does anyone have a good link for gas needle valves? I am having trouble finding them. How high is your blue flame on the burners? I was getting around 1/2" today with the ball valves.
 
I need a 1/2" fpt to 3/8" male flare.

You have two possible options. Adapters are readily available to get from pipe thread to flare or vice versa in almost any size imaginable. The other possibility would be to give them a call and see what else they may have available. Sometimes they don't list everything they have on the web site.
 
I worked on the gas and the electrical today, and here is what I've got.

IMG_0436 by WaylitJim, on Flickr

This thread is awesome! Thanks for the inspiration

Could a brew stand like the one above run on Natural Gas? I know Williams make a special NG valve for the Hurricane Burners. Ox, what brand of paint did you use, and where did you get the yellow gas lines?
 
Just ordered the frame materials and burners for my weldless stand. Going to make mine shorter and broader than the original, to accommodate my 25gal kettles.

I bought my gas needle valves from [url http://www.homebrewing.org/Needle-Valve-For-Propane_p_1726.html] and they look just like those that dannedry has on his rig. I'm not planning on using ball valves in addition to these needle valves, but just the valve on the regulator. I got a 0-20psi regulator since I'm not sure how much I'll need for my burners. I picked up 2 BG14's for the HLT and BK, and going with a smaller BG12 for the MLT.

I'll start posting pics of the build when it starts happening!
 
How are people attaching the burners to the frame. I've read through this and maybe I missed it. Are you using some parts not listed in the original list?
 
How are people attaching the burners to the frame. I've read through this and maybe I missed it. Are you using some parts not listed in the original list?

This is how I attached mine. I got the 70,000 btu burners from agrisupply.com. It required an extra piece of the slotted angle iron.

IMG_6467.jpg
 
hlumbard said:
How are people attaching the burners to the frame. I've read through this and maybe I missed it. Are you using some parts not listed in the original list?

I used a piece of the flat slotted iron and bent it into a L and attached it to the frame and burner. Should be able to see it on my earlier pics.
 
Mike_A said:
Just ordered the frame materials and burners for my weldless stand. Going to make mine shorter and broader than the original, to accommodate my 25gal kettles.

I bought my gas needle valves from [url http://www.homebrewing.org/Needle-Valve-For-Propane_p_1726.html] and they look just like those that dannedry has on his rig. I'm not planning on using ball valves in addition to these needle valves, but just the valve on the regulator. I got a 0-20psi regulator since I'm not sure how much I'll need for my burners. I picked up 2 BG14's for the HLT and BK, and going with a smaller BG12 for the MLT.

I'll start posting pics of the build when it starts happening!

I can't tell on the website what kind of connection those valves are. Is the female side 1/2" as well as the male? If the male is 1/2", I guess they make an adapter from that to a 3/8" female flare.
 
Everyone's build looks great. My inventory has been sitting in the garage waiting for me to finish other projects. Hopefully I'll be able to get started on it next week.

Thank you all for sharing.

Cheers,
Brad
 
The valves I linked are 1/4" NPT - female on the outlet side, male on the inlet side. In hindsight I wish I'd gone with a valve that had 3/8" male flare on both ends, since it required special hoses to connect to the manifold as well as a few fittings to adapt to my burners' 3/8" male flare fittings on the orifices.

I've actually got the frame entirely built and the burners mounted now. Next up, I'll be ordering pumps and hoses and fittings for liquid transfer. I need to start a free picture hosting account so I can start a build thread and post some pics but I have spent the time working on the stand rather than bragging about it.
 
hlumbard,

Here is a pic of how I attached my burners to my rig... basically just a short piece of the weld-less frame stock, and 4" long steel brackets that I got from Lowes. They came like 4 to a pack, and have 4 holes pre-drilled in them... pretty cheap too. I did have to drill the top hole a little larger, so I could bolt the bracket to the stand using the same bolts as everything else.

3-6-2011.jpg
 
Question for you guys on the hardware packs. It says I must buy packs of 50 at $6.45 per pack. Does that mean there are 50 bolts in a pack for $6.45 or does that mean I have to buy 50 packs at $6.45. I am thinking it means the former since I can just put a pack in my cart at $6.45. However, I just wanted clarification since the current price seems cheaper than the $12.89 shown on the Wallace inventory sheet and that doesn't seem right to me.

Also, Would you recommend buying 2 packs of this hardware?

Thanks for the help!
 
Back
Top