Web-Accessible Temperature Logger for Raspberry Pi

Homebrew Talk - Beer, Wine, Mead, & Cider Brewing Discussion Forum

Help Support Homebrew Talk - Beer, Wine, Mead, & Cider Brewing Discussion Forum:

This site may earn a commission from merchant affiliate links, including eBay, Amazon, and others.
I have modified the code and would be happy to contribute it back to the original author or others if desired? I have modified it so that it will automatically deal with 1 to 8 temperature sensors with relatively minor changes to the code. Plug another sensor in and you only need to add the sensor ID to the monitor code for it to start logging and add a user friendly name to the webui code for it to display it (it will display immediately, but without a user-friendly name). I also tidied up the tabular data HTML at the bottom, using style sheets instead of the nbsp padding. Example of the table data is in the image attached. If you add a new sensor, it will automatically display in a new column to the right of the three columns n that screen shot.

I changed it to Celcius, but you only need to set a variable in the monitor code file, and the webui code to change between Fahrenheit and Celcius.

I just did it today so the code is not super polished and tested yet.

Greetings, @Megapint ! And welcome to the forum!
I had missed your earlier posts, but having read them now I'm quite amazed and pleased that someone would even deal with that rats nest of mine.
Clearly, I'm not a coder :D

When you're happy with your changes if you could put the files somewhere I could pull from, that would be most excellent!

Cheers! :mug:
Thanks for the welcome day_tripper.

I will do that. It's getting closer to ready. Handling the appearance and disappearance of the sensors in a sensible way is taking a bit of effort. You did a great job. Functionality wise, it is all there. Prettying up the HTML and CSS was easy for me, but learning Python is a struggle. Yet another language to add to my collection. Where's my curley brackets! :)

I had no idea that these DS18B20 sensors had such a wide margin of error. I got 6 of them from ebay, so figure they are all counterfeit. Using your adjustments today, they range from +1.1 to -1.0 Celcius. After the adjustment value they seem to be tracking within 0.2 degrees, so happy with that. I am using a beer thermometer to calibrate, I hope that one is correct! :) It is what I have used for the last 2 years, so at least I know the new measurements are consistent with what I am used to. The 6 sensors from ebay cost the same as one from a trusted supplier with the legitimate sensor.
 
For day_tripper and anyone else interested in a new version of the original code.

Here is a modified copy of day_tripper's code. Only the web ui, and the monitor python files. Instructions below are how to set up assuming you have already followed day_tripper's instructions.

Grab code from here: It will only be there for 10 days.
https://we.tl/t-lJM0mU9gPY
1) Place the two files in the folder where you already have the Original versions, and rename from *.txt to *.py. Note, for security reasons, you should always read the code you get from strangers and understand what it is doing before you execute it....
2) Set the execution permissions as per original instructions.
3) Open the monitor_sensors.py file
a) Specify path to database (i recommend you put a db file that does not exist, and it
will create that database file and configure it as needed, allowing for side-0by-side execution of original and new.)
b) specify C or F as temperature unit
c) Specify up to 8 device files. Comments shows how to list your available sensors
d) Specify the adjustment number for those sensors (in your chosen temp unit)
5) Add a cron entry for this monitor_sensors.py
4) Open the webgui.py, and change the global variables section
a) Specify the database file above
b) Name your sensors (fup to 8 total)
c) Specify C or F for units

Note that I changed the graph to use the new Google material graph. Hover over the lines in the graph or the items in the legend, and it will do a better job of highlighting the selected line in the graph if they are really close. You can add or remove sensors as you need, just add them to both files, and they will be recorded and appear in the webgui.

Thanks and credit to day_tripper for the original code.

Enjoy.

[edit] The file share site deleted my first upload, plikely because of the security risk that py files present. renamed to txt files. If that does not work, I will try something different.
 
Last edited:
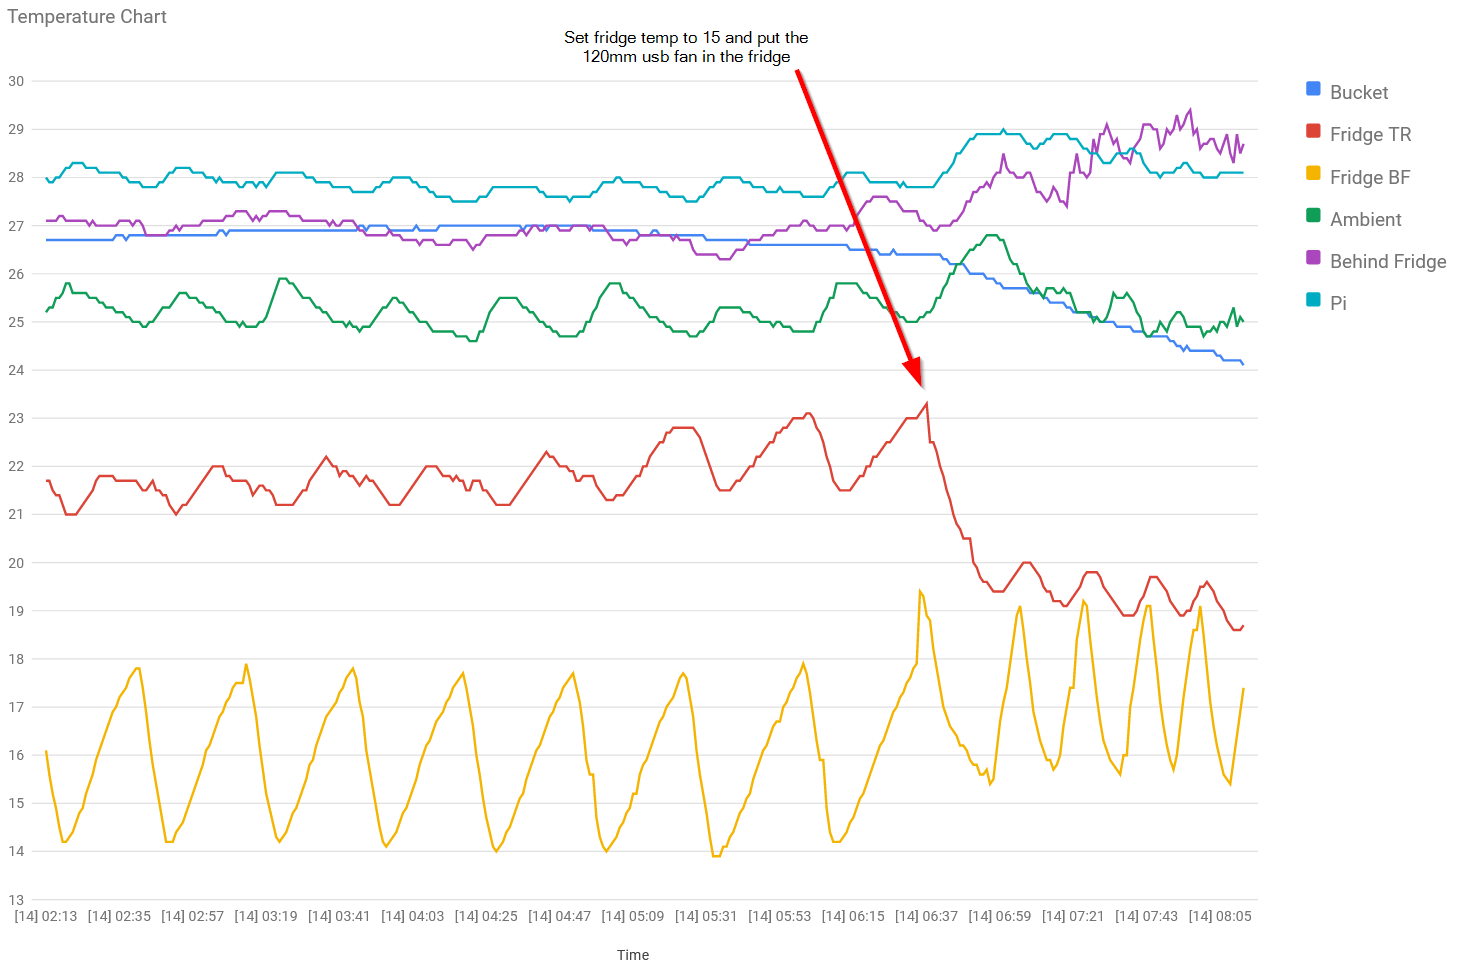
I have been playing around with the temperature probes placed in different locations in the fridge. I noticed that the temperature from "Fridge Top Rear" to "Fridge Bottom Front" varied a LOT. At the arrow, I set the fridge temperature from 18 degrees down to 15 degrees celcius, and I placed a 120MM USB fan in the fridge. Prior to this, you can see that the fridge and bucket temps had been slowly edging upwards. The fan was the biggest change, and has made a massive difference, bringing all three temperatures closer together in a short time. In just 20 minutes, the top of the fridge went from 23.3 to 19.4 degrees celcius. The ideal brew temperature for this brew is 15 to 24 celcius.

I am brewing in a SS Brewtech brew bucket that is in a wine cooler fridge that only just fits the brew bucket, with almost no free space at the top, and barely fits the brew bucket lid side to side and front to back. The brew bucket takes up aboout 85% of the fridge space, and the fridge has no air circulation built in.

If brewing in a fridge, it is worth checking if there is a large temperature range from bottom to top, and maybe chuck a USB fan in there. I am running my fan off a USB battery brick for now.

2022-11-14 08_12_31-Temperature Logger.png
 
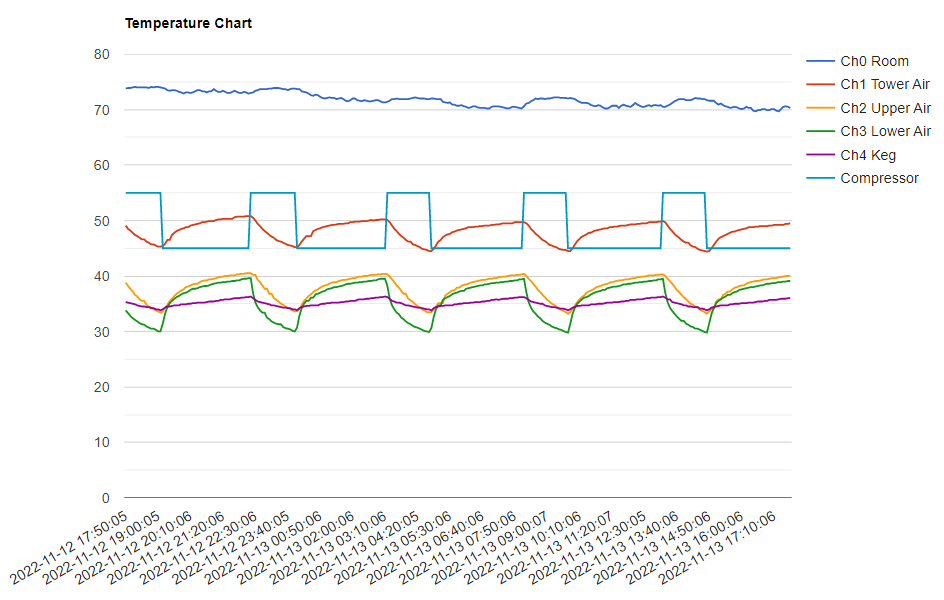
I built my latest keezer using a 14cf chest freezer. That's a lot of space to keep equalized.
If I didn't have a 200mm fan in there running 24/7 I'm sure this plot would look quite different.
The "upper" probe is attached to the lid while the "lower" probe sits a couple of inches above the floor.

But I'm really only interested in the beer temperature and the cycle time.
My system uses the keg probe reading to control the compressor...

Cheers!

1668379639699.png
 
I like the probe on the compressor idea. I just threw one behind the fridge, but from the graph, it is picking up the freezer (beside the fridge) cycle more than the brew fridge.

Here is my latest chart. Settled in very nicely after I added the fan! Fantastic having the multiple probes to understand the impact of changes across the entire brew. At this point I leave my fridge at 18 celcius, settable on the fridge, as it is just about perfect. I did purchase a meross wifi controllable device that can switch on/off 240vappliances, and wrote some Python to turn it off and on, and more importantly, download the daily power usage which is readable from that device. At some point, I might look at controlling the fridge with that if needed.

Without the fan, there was a 23 degree Fahrenheit difference between the probe inside the wart, and the bottom of the freezer at the coldest time. Now, it's down to 7 degrees Fahrenheit difference, and still improving.

1668402497799.png
 
The controller kicks on at 36°F and off at 34°F, using the keg probe.
I don't actually have a probe on the compressor, I read and store the value of the circuit connected to the relay that controls the compressor.
You'll find the references in my craptastic original code below :D

Cheers!

Code:
#!/usr/bin/env python

import sqlite3

import os
import time
import glob
import RPi.GPIO as GPIO

GPIO.setmode(GPIO.BCM)
comp_pin=25
GPIO.setup(comp_pin, GPIO.IN, pull_up_down=GPIO.PUD_DOWN)

#-------------------------------------------------------------------------------------------------------
# global variables
speriod=(15*60)-1
#speriod=(5*60)-1
dbname='/var/www/tempdata.db'

# adjustments for probes. values can be positive or negative.
adjch0=-1.1
adjch1=0
adjch2=0
adjch3=-1.3
adjch4=-1.3

# read bounds for probes, probe readings not within bounds will be retried
hibound=100
lobound=20

# high and low temperature values for plotting compressor state
comp_high=55
comp_low=45
comp=45
comp_state=0
compressor=45

#-------------------------------------------------------------------------------------------------------
# store the temperature in the database
def log_temperature(temp0,temp1,temp2,temp3,temp4,comp):

    conn=sqlite3.connect(dbname)
    curs=conn.cursor()

    curs.execute("INSERT INTO temps values(datetime('now','localtime'), (?), (?), (?), (?), (?), (?))", (temp0,temp1,temp2,temp3,temp4,comp))

    # commit the changes
    conn.commit()

    conn.close()

#-------------------------------------------------------------------------------------------------------
# display the contents of the database
def display_data():

    conn=sqlite3.connect(dbname)
    curs=conn.cursor()

    for row in curs.execute("SELECT * FROM temps"):
        print str(row[0])+"    "+str(row[1])+"    "+str(row[2])+"    "+str(row[3])+"    "+str(row[4])+"    "+str(row[5])+"    "+str(row[6])

    conn.close()

#-------------------------------------------------------------------------------------------------------
# get status of compressor
# translate on/off to temperature values for charting

comp_state = GPIO.input(comp_pin)
if comp_state == 1:
    compressor = comp_high
else:
    compressor = comp_low

#-------------------------------------------------------------------------------------------------------
# get temperature
# returns None on error, or the temperature as a float
def get_temp(devicefile):

    try:
        fileobj = open(devicefile,'r')
        lines = fileobj.readlines()
        fileobj.close()
    except:
        return None

    # get the status from the end of line 1 
    status = lines[0][-4:-1]

# Commented out this section and replaced with next section

    # is the status is ok, get the temperature from line 2
    #if status=="YES":
    #    print status
    #    tempstr= lines[1][-6:-1]
    #    tempvalue=float(tempstr)/1000
    #    print tempvalue
    #    return tempvalue
    
    equals_pos = lines[1].find('t=')
    if equals_pos != -1: 
        tempstr = lines[1][equals_pos+2:]
        print tempstr
        tempvalue_c=float(tempstr)/1000.0
        print tempvalue_c
        tempvalue_f = tempvalue_c * 9.0 / 5.0 + 32.0
        print tempvalue_f
        tempvalue = round(tempvalue_f,1)
        print tempvalue
        return tempvalue
        
    else:
        print "There was an error."
        return None


#-------------------------------------------------------------------------------------------------------
# main function
# This is where the program starts 
def main():

    # enable kernel modules
    os.system('sudo modprobe w1-gpio')
    os.system('sudo modprobe w1-therm')

    # search for a device file that starts with 28
    devicelist = glob.glob('/sys/bus/w1/devices/28*')
    if devicelist=='':
        return None
    else:
        # append /w1slave to the device file
        w1devicefile0 = devicelist[0] + '/w1_slave'
        w1devicefile1 = devicelist[1] + '/w1_slave'
        w1devicefile2 = devicelist[2] + '/w1_slave'
        w1devicefile3 = devicelist[3] + '/w1_slave'
        w1devicefile4 = devicelist[4] + '/w1_slave'

#    while True:

    # get the first temperature from the first device file
    temperature0 = get_temp(w1devicefile0)+adjch0
    if temperature0 != None and temperature0 > lobound and temperature0 < hibound:
        print "temperature0="+str(temperature0)
    else:
        # Sometimes reads fail on the first attempt
        # so we need to retry
        temperature0 = get_temp(w1devicefile0)+adjch0
        print "temperature0="+str(temperature0)

    # get the second temperature from the second device file
    temperature1 = get_temp(w1devicefile1)+adjch1
    if temperature1 != None and temperature1 > lobound and temperature1 < hibound:
        print "temperature1="+str(temperature1)
    else:
        # Sometimes reads fail on the first attempt
        # so we need to retry
        temperature1 = get_temp(w1devicefile1)+adjch1
        print "temperature1="+str(temperature1)

    # get the third temperature from the third device file
    temperature2 = get_temp(w1devicefile2)+adjch2
    if temperature2 != None and temperature2 > lobound and temperature2 < hibound:
        print "temperature2="+str(temperature2)
    else:
        # Sometimes reads fail on the first attempt
        # so we need to retry
        temperature2 = get_temp(w1devicefile2)+adjch2
        print "temperature2="+str(temperature2)

    # get the fourth temperature from the fourth device file
    temperature3 = get_temp(w1devicefile3)+adjch3
    if temperature3 != None and temperature3 > lobound and temperature3 < hibound:
        print "temperature3="+str(temperature3)
    else:
        # Sometimes reads fail on the first attempt
        # so we need to retry
        temperature3 = get_temp(w1devicefile3)+adjch3
        print "temperature3="+str(temperature3)

    # get the fifth temperature from the fifth device file
    temperature4 = get_temp(w1devicefile4)+adjch4
    if temperature4 != None and temperature4 > lobound and temperature4 < hibound:
        print "temperature4="+str(temperature4)
    else:
        # Sometimes reads fail on the first attempt
        # so we need to retry
        temperature4 = get_temp(w1devicefile4)+adjch4
        print "temperature4="+str(temperature4)


        # Store the five temperatures in the database
    log_temperature(temperature0,temperature1,temperature2,temperature3,temperature4,compressor)


            # display the contents of the database
#    display_data()

#        time.sleep(speriod)


if __name__=="__main__":
    main()
 
Back
Top