Also, my rollers weren't parallel. I took the end covers off and noticed that the fixed roller (not the one that adjusts the spacing) was simply placed in a hole stamped into the stanchion leg. I gave the roller mounting pin that sticks through the mounting hole several good whacks with my hammer till the rollers were finally parallel. Worked like a charm but I would never have done that if it wasn't a $15 piece of equipment.
You are using an out of date browser. It may not display this or other websites correctly.
You should upgrade or use an alternative browser.
You should upgrade or use an alternative browser.
Using a pasta maker to mill grain.
- Thread starter Nostrildamus
- Start date

Help Support Homebrew Talk - Beer, Wine, Mead, & Cider Brewing Discussion Forum:
This site may earn a commission from merchant affiliate
links, including eBay, Amazon, and others.
I'm planning on using my pasta grain mill for another 2 or 3 batches (so that'd be a total of 7 or 8) before buying a barebones MaltMill next month. I like the pasta mill a lot, and it works better than I expected it to, but I'll have another $100 to spend on homebrewing goodies next month, and it'd be nice to have something that works a little faster. I'll probably donate the pasta mill to someone doing PM's or small bills, this thing has a lot of life left in it.
ytsejam
Well-Known Member
I had some trouble with my gap at first.
The adjuster knob was a bit bent right where it fits onto the shaft and allowed my gap to open as I milled.
I just took the knob off, grabbed the shaft with vise grips, let them rest on the frame.
Gap was right about .025".
I got 88% efficiency!
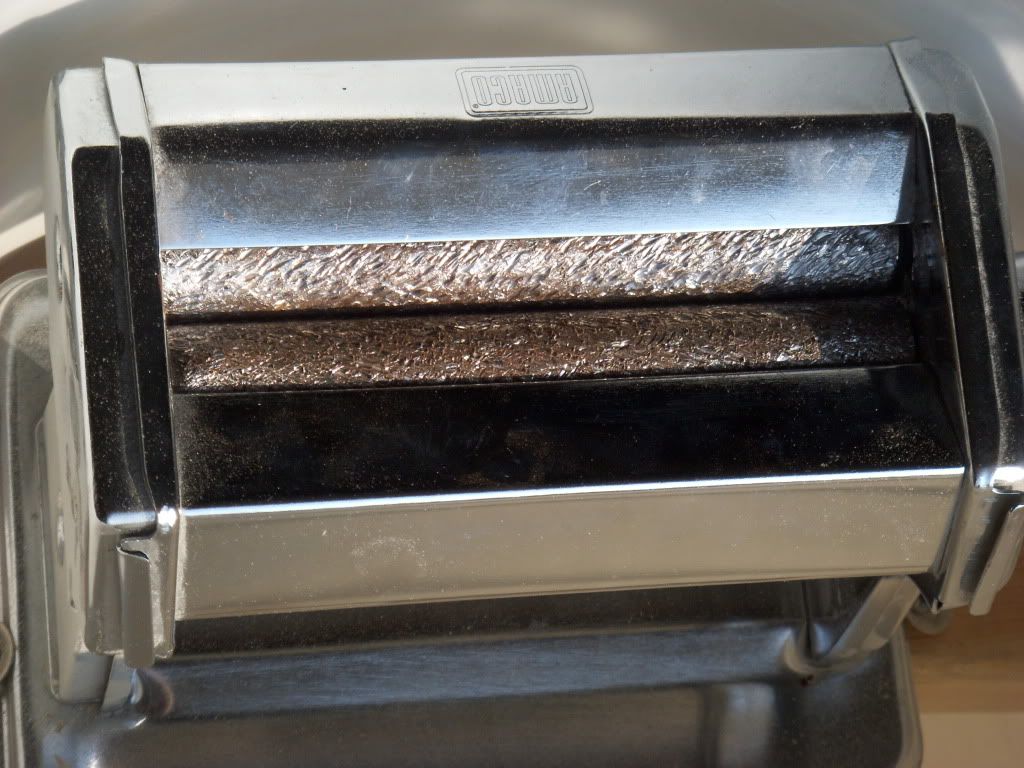
Oh, and I do have a really kick ass knurl on the rollers.
It's not a heavy knurl but it's got plenty of grip.
I would suggest getting the rollers knurled, and if/when the thing dies, you can get another one for cheap and reuse the rollers.
The adjuster knob was a bit bent right where it fits onto the shaft and allowed my gap to open as I milled.
I just took the knob off, grabbed the shaft with vise grips, let them rest on the frame.
Gap was right about .025".
I got 88% efficiency!
Oh, and I do have a really kick ass knurl on the rollers.
It's not a heavy knurl but it's got plenty of grip.
I would suggest getting the rollers knurled, and if/when the thing dies, you can get another one for cheap and reuse the rollers.
Kronin
Well-Known Member
That's what I did...took the end covers off so I could get to the nuts on the base bolts, then just mounted it to a board with a hole cut in it. Here's the board (sitting on the cover to a Homer bucket).
And here's the completed mill
Use 8-32x1" screws for this and you won't have to enlarge the holes in the uprights like I did with my 10-32 screws.
The board is a plastic composite thing that I got on a jobsite thinking I'd use it in my camper project...way handier in the brewery!
Gonefishing.... I bought this and am trying to get the rollers out for knurling ... HOW did you get the one part off on the end, that thing for dialing the space? I got it all apart but the rollers are still attached to the inside of that one end, held together by that dial, and I cant see a way to get it off.
Cheers,
Ridemywideglide
Well-Known Member
The knob is 2 parts. Outside pressed into the inside. Pry out the top and you'll find the nut holding it all together.
Pickngrin
Well-Known Member
I finally got around to creating a temporary base and hopper - used wood for the base and an inverted 3 liter plastic water bottle for the hopper. I am not sure about the quality of the crush that I get. I noticed that some whole kernels were passing through, but then saw that some of them were sliding out between the wood and the mill (ie, not hitting the rollers). I copied someone else's suggestion of using weatherstripping to prevent that.
Is it normal to see some intact kernels in the crush?
Here are a few pics:


Is it normal to see some intact kernels in the crush?
Here are a few pics:
hey...looks to me like you need more crush...lots more crush...no fear! No intact grain! Every little bit crushed! No big deal...tighten up and make another pass... keep feeding it through till it is fully destroyed, and free of its husk!
no intact kernals...very bad! Send it through again.
no intact kernals...very bad! Send it through again.
Pickngrin
Well-Known Member
Thanks, Wilser. I wound up crushing it further as you suggested. Turned out I needed to rough up the rollers even more, as the milling got really slow because the rollers weren't gripping the kernels very well.
I was VERY pleased with the end result. I got about 75% efficiency on the ordinary bitter I brewed today. This is the first time that I batch sparged, and I think this helped a lot. I think that my fly sparging (w/ Phil's sparge arm) has left something to be desired in the past, as I didn't typically hit my target gravities. Today I did! And Beersmith was a huge help.
Thanks again for the clever brewers who thought of using the pasta maker and who shared the idea with us,
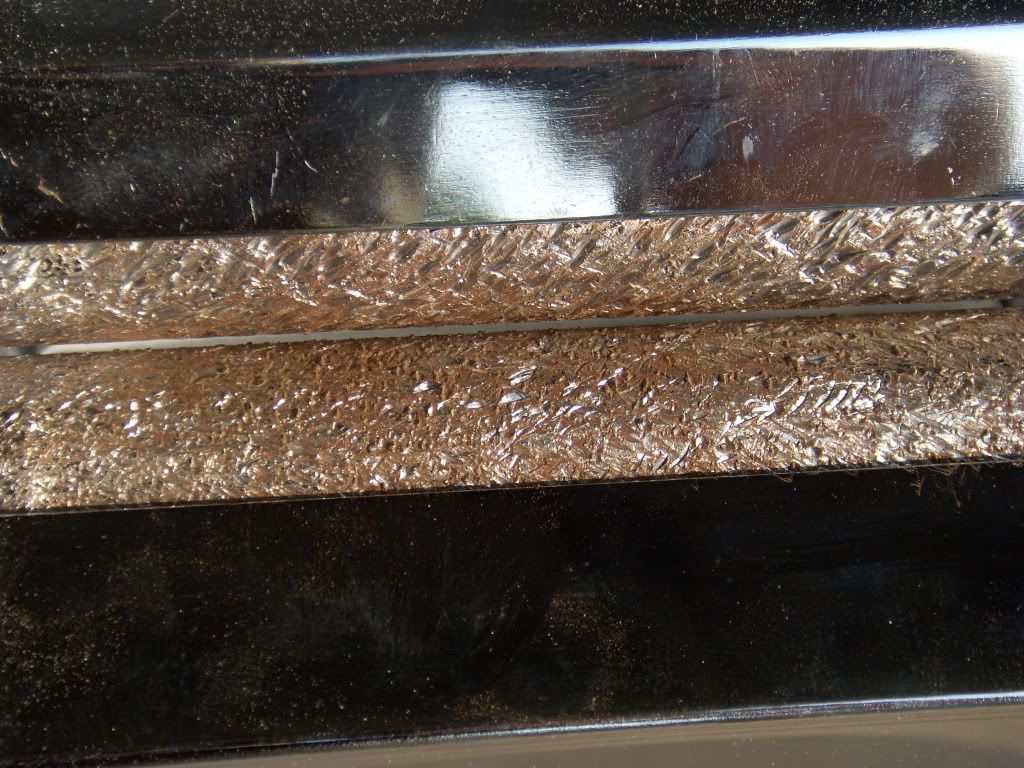
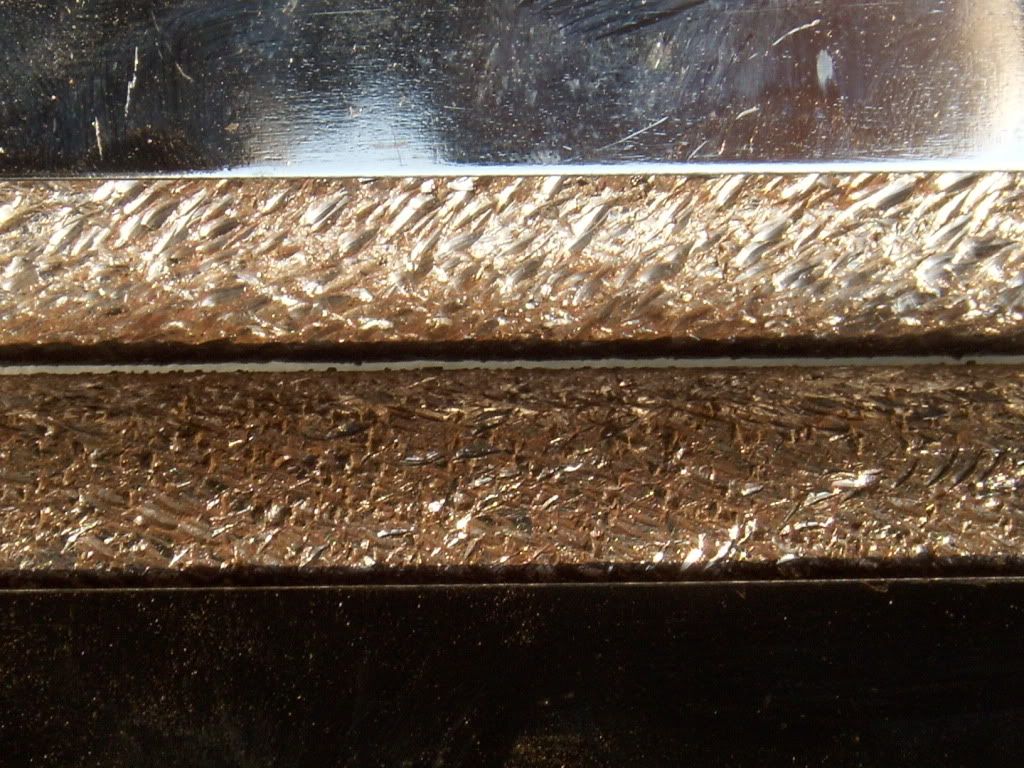
I snapped a few pics of the rollers on my mill to illustrate what I feel is needed to pull the grain through given the small rollers on the pasta mill. Yea, I know they look like the dog was chewing on them all afternoon.
Wow, those are really roughed up. What was your method?
I just used a sharp 3/16 of 1/4" drill bit at angle b/w the two rollers. Crank the mill w/ one hand w/ the drill in the other. Start off easy at first, after a while you get a feel for how much pressure to put on the drill. The drill bit will try and grab the roller and put a pretty good nick or gouge in it. Just keep going until you have the entire roller fully textured and gouged.
conpewter
Well-Known Member
What's the highest efficiency someone has gotten with these mills? Mine was not great the first couple times I used it. Trying to decide on getting another one for ~15 and using a drill bit, getting the rollers knurled, or buying a monster mill.
I'm usually around 65%-72% I think. Haven't brewed in a month now 
I think if I went for a finer crush I could easily surpass the low 70's.
I think if I went for a finer crush I could easily surpass the low 70's.
ytsejam
Well-Known Member
What's the highest efficiency someone has gotten with these mills? Mine was not great the first couple times I used it. Trying to decide on getting another one for ~15 and using a drill bit, getting the rollers nurled, or buying a monster mill.
Only used it once so far, but I got 88% with a 0.25" gap and a good knurl.
Once again, I highly recommend knurling.
brown_dog_us
Well-Known Member
I'm getting in the low 80's with a fairly fine crush and batch sparging one time.
conpewter
Well-Known Member
Great! Well I'll have to try a second one, this time with a slower motor on it.
Kronin
Well-Known Member
I did this and it works really well for a grain crusher. This is what i did with them rollers.
I clamped them in the smallish vice grip (not really tight, actually a bit loose) and twisted hard. Did this all up and down the roller.
Then I clamped it onto my bench and just put X's all up and down the sides with a cheap-o hacksaw... took about 15 minutes for both rollers and all good.
I clamped them in the smallish vice grip (not really tight, actually a bit loose) and twisted hard. Did this all up and down the roller.
Then I clamped it onto my bench and just put X's all up and down the sides with a cheap-o hacksaw... took about 15 minutes for both rollers and all good.
conpewter, haven't forgotten about you. I was quite busy this weekend, still need to get out and buy one for you.
I can't wait. The other day I was discussing brewing with my boss and I mentioned the pasta maker used as a grain mill and he says "I have one of those pasta makers in my van right now, I'm going to drop it off at purple hart, do you want it.".
I said sure I'll take it. I got it today. now I just have to take it a part and bring the rollers into work so I can have them knurled.
I said sure I'll take it. I got it today. now I just have to take it a part and bring the rollers into work so I can have them knurled.
craigbrew...make it a heavy knurl...my experience is that these things need to be pretty rough.
conpewter
Well-Known Member
conpewter, haven't forgotten about you. I was quite busy this weekend, still need to get out and buy one for you.
Great! I'm busy with other projects at the moment (Haven't even brewed for 3 weeks or so). So it is no hurry.
Conpewter, did you want me to ship a motor to you? I sent a PM, but haven't heard back.
conpewter
Well-Known Member
Yes that'd be great. I thought you were going to get back to me on the final shipping price so I could pay before you ship. Paypal good for you?
Yes that'd be great. I thought you were going to get back to me on the final shipping price so I could pay before you ship. Paypal good for you?
Oh, yes you are right. I did say that. I'll weight one at lunch and see if I can get an accurate shipping cost from my shipping person.
Pickngrin
Well-Known Member
For those who are looking to pick up a pasta maker, here's a new 50% off coupon for
Michael's (expires today - sorry, just found it)
http://img.dealspl.us/images/coupon/1245779278_9477.jpg
Michael's (expires today - sorry, just found it)
http://img.dealspl.us/images/coupon/1245779278_9477.jpg
Wow. I am definitely going to try this. Here's a coupon that's good through 7/11. http://dealspl.us/imageview.php?f=57293
I just gave mine a spin and it did not go very well. I used a drill bit to rough up the rollers and they are just not course enough to pull the grain through. I can get it through but I need to open the rollers up so far that it is only crushing about 50% of the individual grains. I do have a cousin that is a machinist and I thought I might ask him to do it for me. All it will cost is a couple of six packs.
Has anyone over come this issue and if so how? Thanks. Nick
Has anyone over come this issue and if so how? Thanks. Nick
chefmike
Well-Known Member
I used a 1/4 bit, IIRC. I pressed the drill in their with the rollers closed as far as they could. I may have had the drill in reverse, one direction the drill bit would turn the rollers. Then I just went at it. I used it a couple times and then decided to rough it some more. I went at it without fear, metal fillings piling up the whole time.
I am home today and tomorrow if you are up this way and want to swing by and see it. I am right off 515.
I am home today and tomorrow if you are up this way and want to swing by and see it. I am right off 515.
I can't get up today. I'm mr mom today. I will take another wack at it this afternoon. I did talk to my cousin and he said he would do it if I can't get it to work. Maybe I'll take a few pictures and post them too. Thanks.
Here is a pic for you of my rollers marred w/ a drill. IMO these small rollers really need to be rough to feed the mill at a tight enough setting.
After my failed attempt at milling grain I took the attitude that I have $15 invested in this and the worst thing I can do to it is destroy it. So I got the drill out and went to town. Previously I had been running the drill at about a 45 degree angle to insure that it wouldn't grab the rollers and destroy them. I increased that to 90 degrees and the bit actually turned the rollers as I ran it back and forth. The out come was lots of metal shavings and two rollers that are pretty chewed up. But the best part of all of this is it works like a champ now. It pulls the grain right through and with the drill doing all the work it milled about 4 pounds in just a minute or two. Now the question is what should I do with all the money I saved?
vitoma
Well-Known Member
Now the question is what should I do with all the money I saved?
Buy another fermentor and make more beer! (or give it to me)
Pickngrin
Well-Known Member
I wanted to post a few pics of the revised hopper/base that I just made.
Last weekend I used the pasta maker for the 2nd time and was again very pleased with the results. It seems to me that having a hopper the width of the rollers (as opposed to a narrow, round neck of a plastic bottle) leads to much quicker milling.
Thanks again to all who have contributed to this thread and idea.
bmorris1
Well-Known Member
hey Wilserbrewer, thanks for the pic of the rollers. I set mine up 3 batches ago, and thought I had it set well enough. I've run it the grain thru twice, but the first two batches were much smaller.
I just made a golden strong with 16+ lbs and it took f-o-r-e-v-e-r... Guess I'll head back to the shed and really go at the rollers again
I just made a golden strong with 16+ lbs and it took f-o-r-e-v-e-r... Guess I'll head back to the shed and really go at the rollers again
Something that can really help you guys that are having slow milling times is to actually PUSH the grain through the rollers. I do this with my fist, just lean heavily on it, and the drill motor will start to bog, but you can hear the grain getting crushed much faster.
rcm_rx7
Well-Known Member
Here is a quick video I made of my pasta roller in action. Nothing too exciting.
[ame=http://www.youtube.com/watch?v=Mq_3EKCeLAA]YouTube - Pasta Roller Grain Mill on the cheap![/ame]
I tried the "push the grain" method at first. I finally decided I would just run the grain through a few more times instead. It's easier on the drill, and should be easier on the mill (not that it won't hold up). I usually get around 70-75% efficiency this way. I tried running it through four times in this video to see if it changes my efficiency at all. It could be my crush, or it could be other equipment.
Anyways, I'm still very happy with this setup and highly recommend it to anyone on a budget. It may take a bit more time than a barley crusher (took me ~20 minutes for my last 12lb batch), but it's also saving me lots of $$$$.
Here is a pic of my crush after running it through the fourth time
I just picked up an Amaco pasta mill yesterday. I used a 50% off coupon for Michaels that I found at retailmenot.com. $13 and change out the door.
Now I'm working on hopper ideas. I would like to fabricate something that makes use of the little "ears" on the frame of the mill for securing it so it would be easily removed for storage. If I can come up with something useful I'll post some pics. In the mean time, keep the hopper pics coming. There are some great ideas here.
My first few test handfuls of grain already show a better crush than what I have been getting at my local store. For 1/10th the cost of a dedicated roller grain mill, this is just awesome!
dutch-brew
Well-Known Member
I have done 5 or 6 10+ lb. batches now of both barley and last week wheat.
The mill works like a charm, great crush in one pass.. Anyone still wondering about these mills, great price, great results..
Last weeks crush of 2 batches (22 lb.) total took a little over 20 mins and that is going easy on the cordless drill.
Make sure to get the rollers rough enough, you don't have to push the grain through.
Now i just need to find another project to work on..
PintOfBitter
Well-Known Member
I never did have a good brewing experience with my pasta mill - took a really long time and broke in several different ways... I kept having to make new parts for it. I just got a Barley Crusher, and couldn't be happier.
It was a fun project and a good exercise, but in the long run I decided to splash out for a product that works great every time and will last forever.
I'm the kind of guy who will build rather than buy, but there are those who have done the work to develop a great product, and sometimes my time is worth more than my money.
Similar threads
- Replies
- 5
- Views
- 1K
