Tiny Brew House. Ultimate BIAB 110v System Build

Homebrew Talk - Beer, Wine, Mead, & Cider Brewing Discussion Forum

Help Support Homebrew Talk - Beer, Wine, Mead, & Cider Brewing Discussion Forum:

This site may earn a commission from merchant affiliate links, including eBay, Amazon, and others.

poptarts

Well-Known Member
Joined
Mar 29, 2013
Messages
2,043
Reaction score
477
Location
Charlotte
Welcome to my second build thread on this site. I didn't really plan on making another one of these since I was truly happy with my old brew system, however changes in my life have forced me to part ways with it and downsize. This was my old system Build thread located here if you want to see how it was working. I will soon be living in a tiny house (yes like the show on wheels etc) so the new system will need to meet several new requirements and since I just parted out my old system we have a decent brewing budget to make what I think will be "The Ultimate BIAB system..." whatever that means.

Requirements for the new system are as follows
  • Bling Bling Fancy
  • Run on 110v 15amp circuit Decided to go 220v
  • Make 5 gallon High gravity batches
  • Make no steam
  • Not smell up the house (wife requirement)
  • Easy to clean
  • Low O2 brewing
  • Easy to use
  • PID mash and boil control.
  • Temp Logging / Web Interface
  • Boil controller double as ferm controller

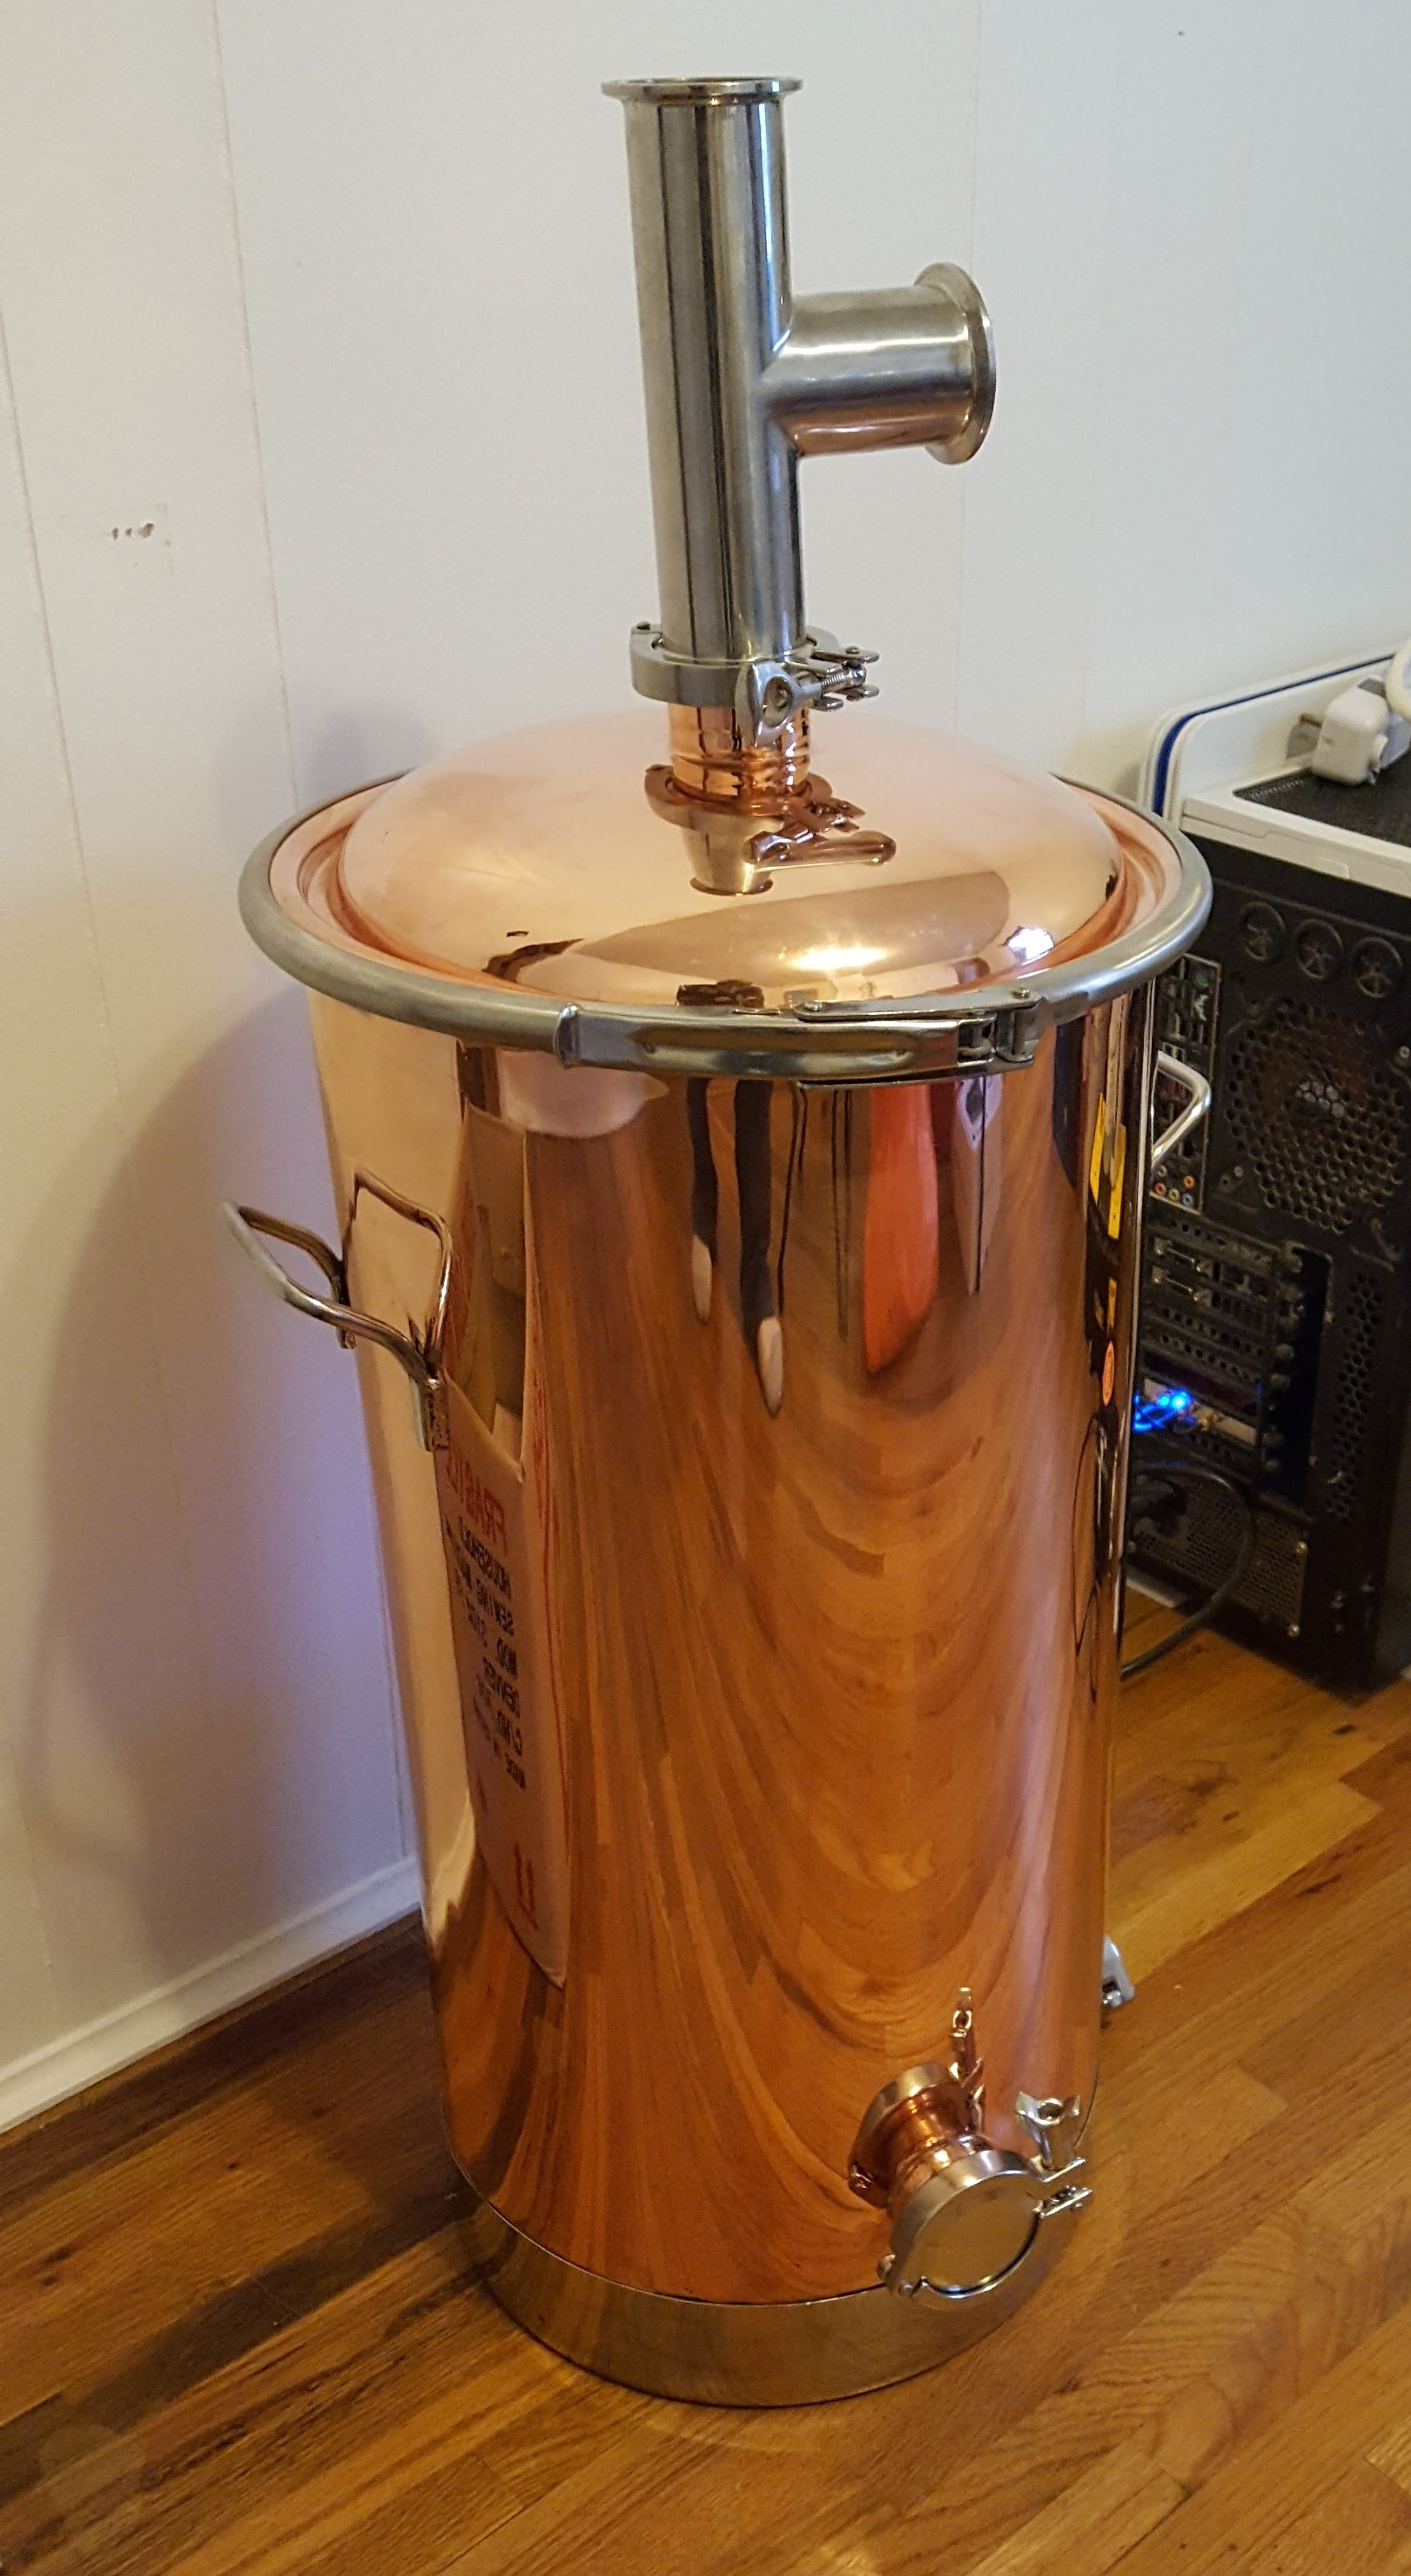
I have placed an order for my kettle already and it should be here this week. (bling bling)
copper-boiler-13g.jpg


These are my current plans, that will probably change so feel free to toss in your experience, questions and awesome sauce ideas.

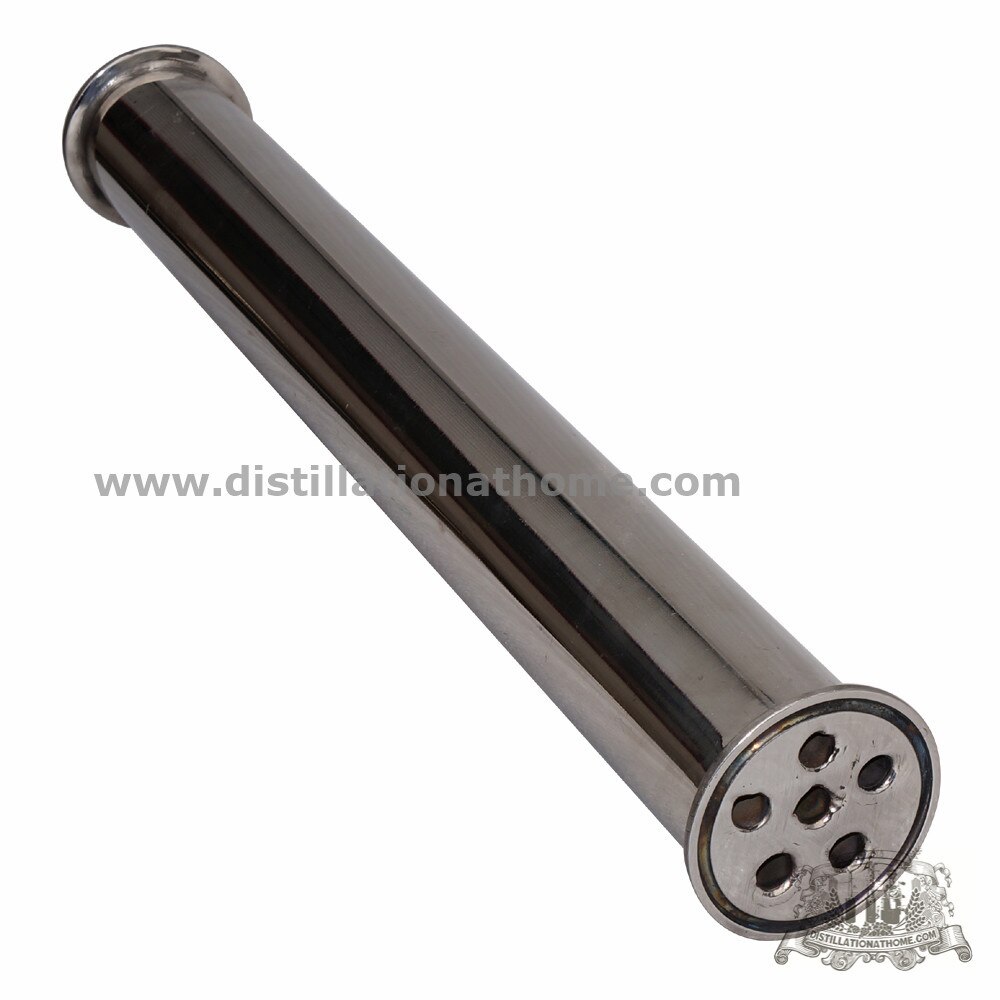
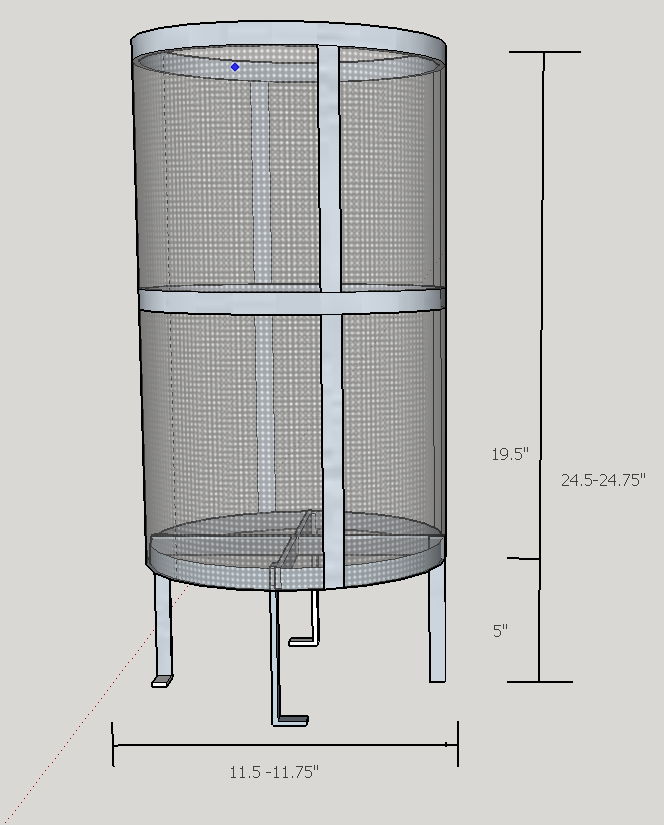
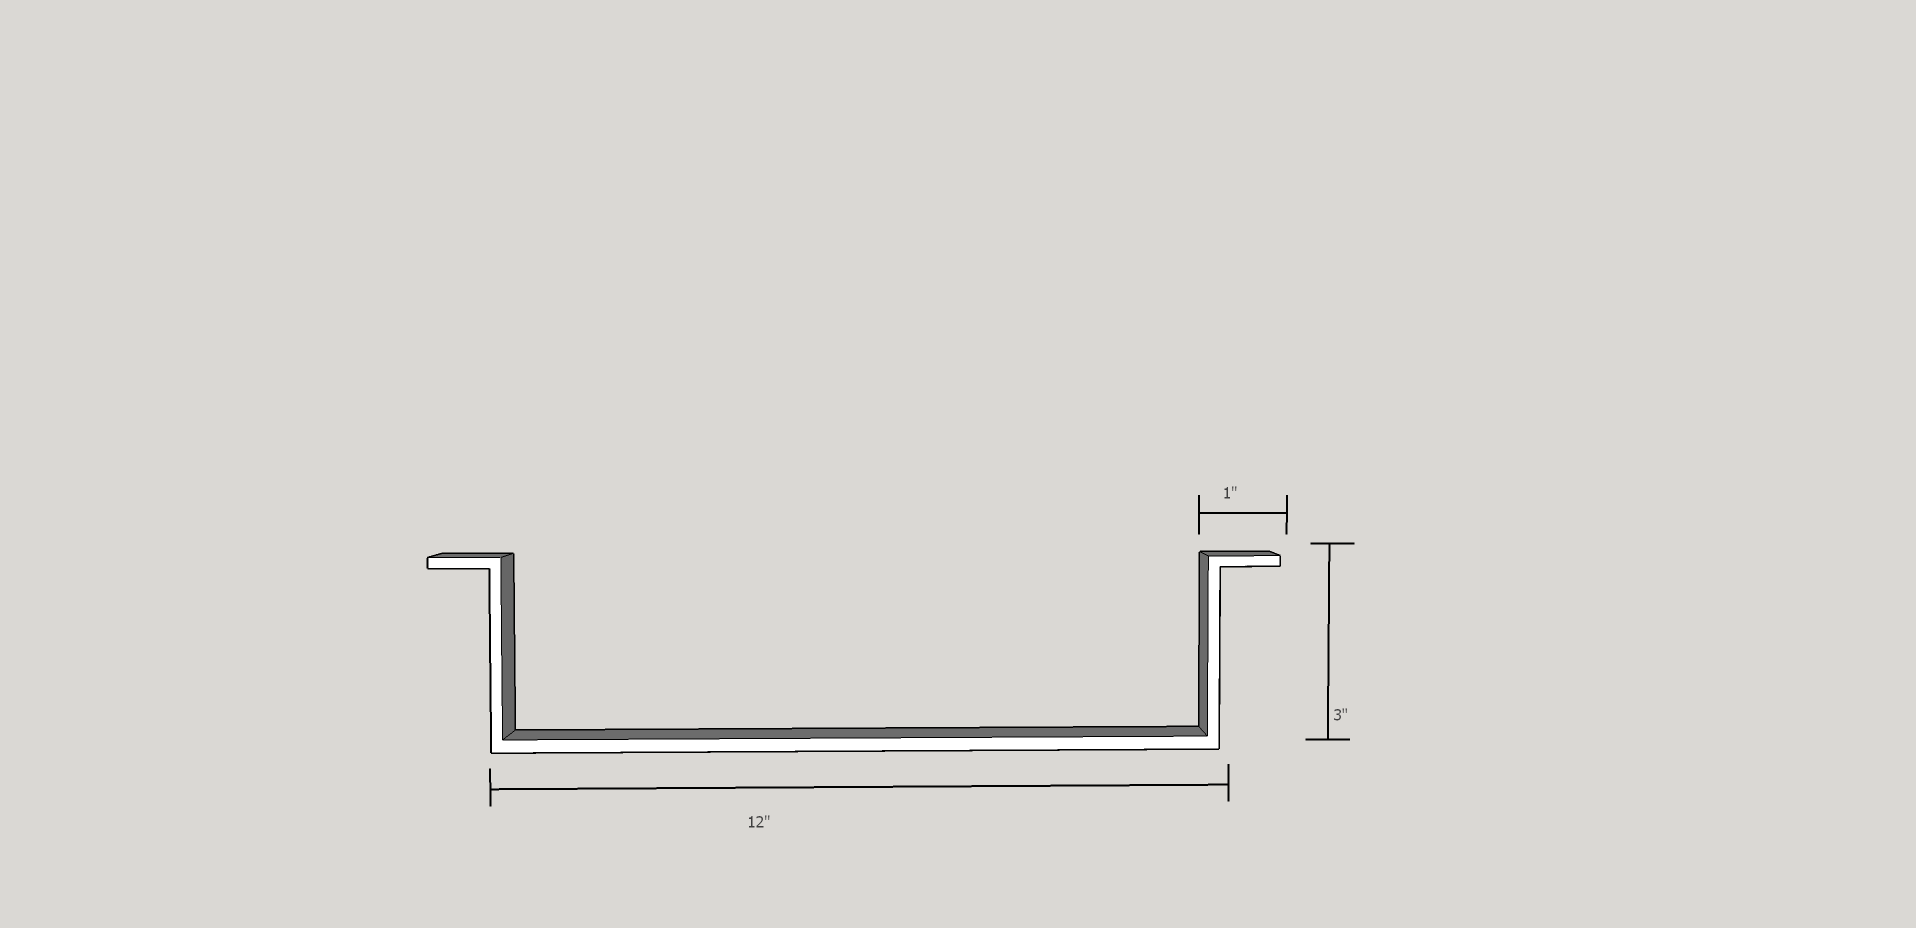
For the mash, nothing super magic. Basket with element underneath, recirc to maintain even temps. The system will have a spray head and will be able to be purged with CO2 to eliminate any concern of HSA from spray head.
08wMDR0.png


After the mash, we will remove the basket and this is where the magic happens. The plan is to use a condenser unit for the steam. *mind blown* ... Seriously though this is going to be baller. This takes care of the not making a ton of steam in the house and should eliminate most the smells on brew day from the boil. I thought using a condenser was a cool invention of mine but it turns out plenty of breweries do this already. Example
attachment.php

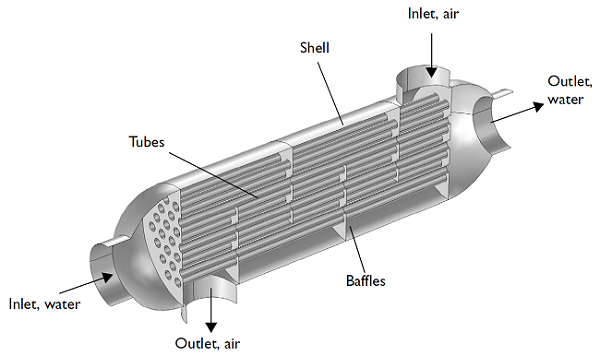
However, we are going to take it one step further and use the condenser as the wort chiller at the end of the boil too. I think a pool heat exchanger will work awesome for this. Honestly not sure why these are not more common in general as counterflow wort chillers considering you can get a stainless unit for around $100
Shell-and-tube-heat-exchanger.png

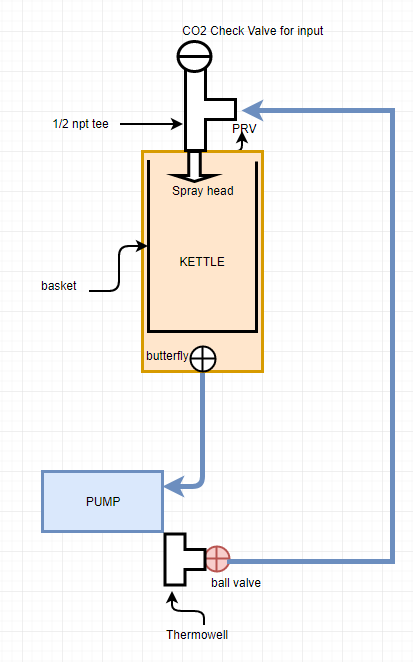
So this is what I'm thinking the boil / cooling loop will look like.
1IjReJR.png

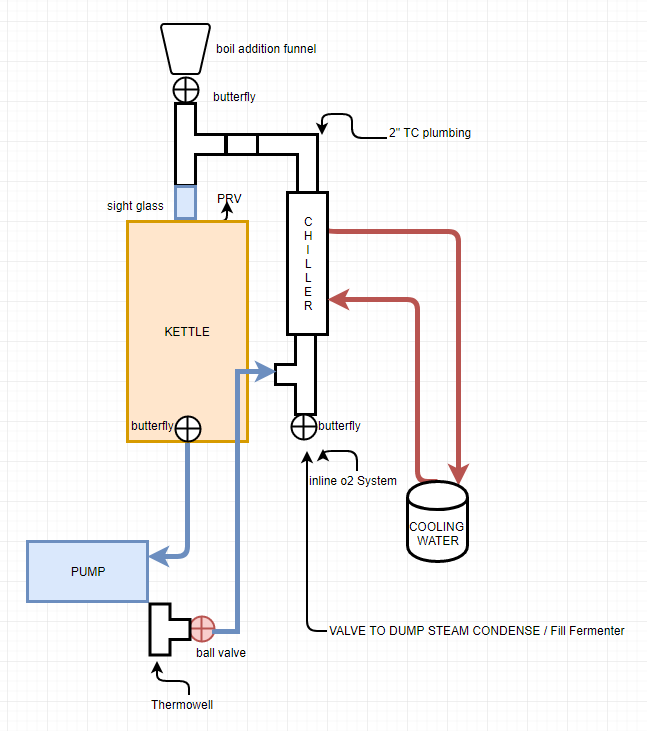
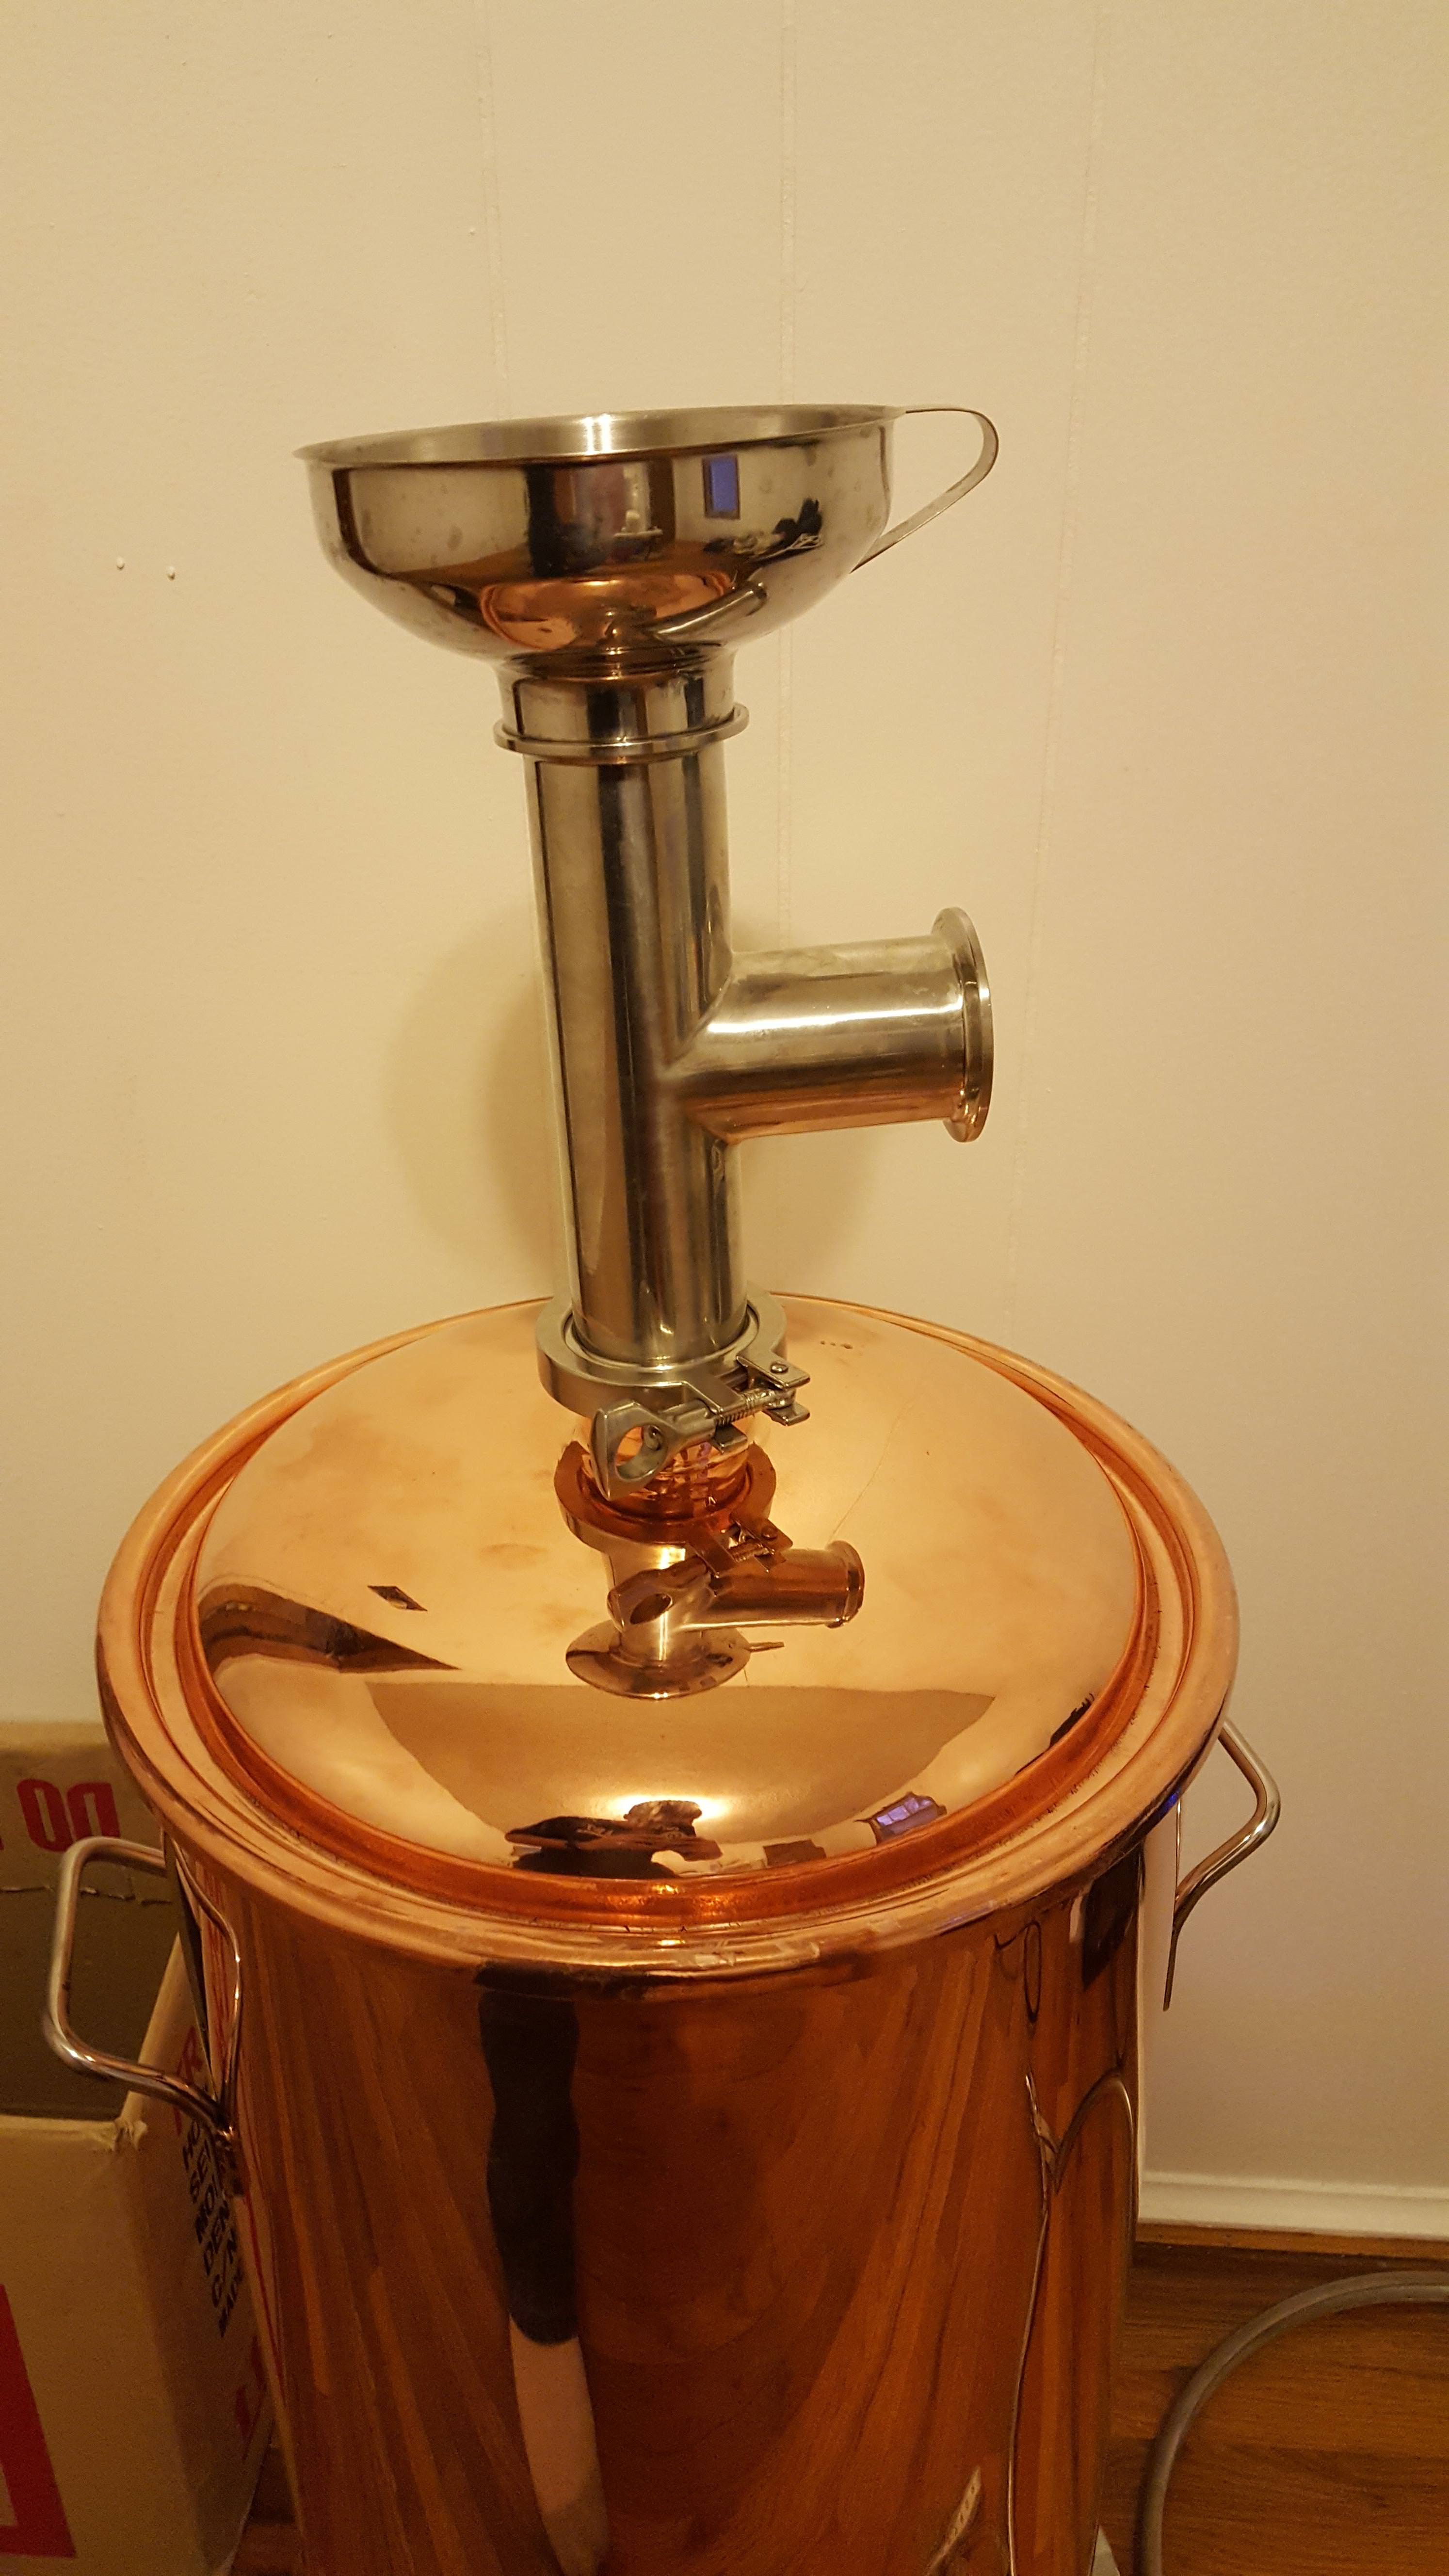
The system will have the bottom butterfly open to let the distillate drop out into the sink or w/e i drain it. when hop additions are ready. there will be a drop funnel with butterfly valve on top I can swing open then close. This system also gives me the ability to basically boil with the lid on, so I should be able to hold a decently strong boil with a 1650w element. I will most likely be making my own brewery controller from an RPI this time around. The BCS was pretty awesome but I think I can do the same thing for a lot cheaper myself. Anyway I look forward to logging this thing with everyone and sharing ideas. :mug:
 
I'll be very interested in your progress.

You might be interested in @BrunDog's boil kettle condenser thread: https://www.homebrewtalk.com/showthread.php?t=636955

Any concerns at all about food safety in regard to the pool equipment?

Are you going to have means to flush the hex to wash out any accumulated dms before circulating wort through it?

Awesome glad some others are experimenting with getting rid of steam without giant ducting and vent hoods. Not sure I will have to verify there is no lead solder in the chiller but it states its all stainless so I dont think there will be an issue. I can always just get a shotgun condenser unit made for stills since thats what im using it for anyway. Wasnt planning on flushing before recirc at end of boil. I assume it should self flush itself from all the vapor but maybe I should add the ability for that with a tee fitting at the top.
 
[*]Low O2 brewing

Oh man, LowO2 in a copper pot, this thread could get interesting quickly :D

You might be interested in @BrunDog's boil kettle condenser thread: https://www.homebrewtalk.com/showthread.php?t=636955

You beat me to that link Kraken. I don't think I've ever seen anyone do it, but I don't know of a reason you couldn't use your Counter-Flow Chiller for this purpose too.

Either way Poptarts, don't forget that there is a commonly used device for the condensation of vapor into liquid, and that device has several other appealing uses ;)
https://moonshinedistiller.com/copper-pot-still-head-2-inch
 
Yea the more I shop for parts I end up on those sites lol, they seem to know how to trap and condense steam haha, but we wont talk about that in this thread since this site has a no talky about it policy lol. Is there really going to be an issue with low O2 and copper cause I honestly dont see one? I mean copper does oxidize but I plan on cleaning my stuff I cant imagine there will be that much on the kettle.
 
Yea the more I shop for parts I end up on those sites lol, they seem to know how to trap and condense steam haha, but we wont talk about that in this thread since this site has a no talky about it policy lol. Is there really going to be an issue with low O2 and copper cause I honestly dont see one? I mean copper does oxidize but I plan on cleaning my stuff I cant imagine there will be that much on the kettle.

I am no expert but my understanding is that fenton reactions with copper make dissolved oxygen in the wort highly reactive so it becomes a "super" oxidizer.
 
ok yea just went into the low O2 thead, some crazy fun stuff going on in there. Im going for "lower O2" how does that sound haha
 
Very interested to see how this turns out. I have many of the same requirements and went the custom route (not quite the same level of bling - no shiny copper) ... the last of my parts arrived today (custom semi-mesh basket) and I am piecing my system together.

I’m also considering a condenser attached to the TC port in my lid after reading BrunDog’s thread.

A few pics below. If you have any questions give a shout. Potentially a build thread of my own at some point...

View attachment IMG_0004.jpg

View attachment IMG_0005.jpg

View attachment IMG_0007.jpg

View attachment IMG_0015.jpg

View attachment IMG_0009.jpg

View attachment IMG_0008.jpg

View attachment IMG_0017.jpg

View attachment IMG_0012.jpg
 
Who made your basket? that thing is awesome? I'm definitely needing a custom one made. What size element is that and how does it do on boil? Love the direct drive mini pump, has me thinking my chugger might be way overkill.
 
Who made your basket? that thing is awesome? I'm definitely needing a custom one made. What size element is that and how does it do on boil? Love the direct drive mini pump, has me thinking my chugger might be way overkill.


Basket was made by Arborfab

The element is 2250W (20amp circuit req) and 9in long. I haven’t done a boil test yet. I wired up the temp probe yesterday and will have the rig run by my CraftBeerPi controller that I previously used for my 3V HERMS.

I have a couple chugger pumps but needed to make this as mobile as possible and wanted to mount directly to the pot. We’ll see how well the solar pump holds up but there was plenty of flow when I tested it.

Few pending updates:

- will have a 6mm neoprene sleeve stitched together by my local tailor (just ordered the fabric) to provide a fitted insulation around the pot. I used reflectix on my HERMS but want something that looks cleaner

- searching for a small sprayer head that will fit through the 1.5TC port in the lid to replace the locline. Some pieces of the locline can’t be pulled through. I’d like to be able to swap out the Recirc fitting after the mash and replace with a whirlpool fitting (bent tubing that drops from the lid into the wort with an angle at the end to force the whirlpool)

- I don’t like the U bar I have for draining my the basket. Too much finesse required to position the U bar while holding a heavy basket. I am either going to use J hooks or build small supports that hang from the pot handles and swing up to form a support on which the draining hooks on the basket can rest (hard to describe but I’ll draw something out and post it). This way I can pull the basket out and just flip up the supports on both sides with a quick flick of my finger

- Toying with the condenser idea
 
- will have a 6mm neoprene sleeve stitched together by my local tailor (just ordered the fabric) to provide a fitted insulation around the pot. I used reflectix on my HERMS but want something that looks cleaner

I'm going to have to go ahead say you need your self a build thread. Where'd you get the neoprene? How much did it cost? How much does the tailor cost? Is it easily removable? How'd you lay it out around the all the fittings? Etc.
 
Good to know about the U bar, Ill make sure to just go J hooks right off the bat then. I will do the neoprene sleeve as well if needed but I wanted to see how this thing does without it first. Would hate to have to cover up the copper pot on brew day haha. I think since I will be able to boil with lid on that I might be able to get away without it.
Im thinking about trying the spray head. Its cheap and wouldn't clog with any grain bits that make it out of the basket for w/e reason.
https://www.aliexpress.com/item/New...2.html?spm=a2g0s.13010208.99999999.343.GmKrPi


With active recirculation and the heating element running, the insulation isn’t necessary for the mash. However, running 110V and a relatively lower power element means longer time to heat to strike and boil temps. I’m not sure how much it’ll help that, but I’ll take whatever I can get to shorten the brew day.
 
Yea for sure. Im coming from a 5500w system so I know its going to a lot slower but if it can get to and maintain a boil ill be happy enough since this thing can just sit in the kitchen and brew. Those 2250w elements you have from brewhardware though are pretty slick all built into one thing like that though. I didnt want to be stuck on a 20a circuit even though in all reality I probably will never travel and brew with this thing so its probably silly.
 
Emailed Badger pipes to see if their pool heater is solid stainless or if it had leaded solder in it. Found a stainless shotgun condenser unit with TC fittings already on it though that I'm considering instead. I would imagine its a little less efficient but might weight a decent bit less and total length is 450mm so it should perform similar to a 10ft ss counterflow chiller. Its also $75 shipped so that would save $35 plus the extra ~$40 in TC fittings to get the badger system to hook up.
2-OD64-Stainless-steel-304-condenser-Length-450mm-6pipes-ID8mm.jpg
 
Badger emailed back "100% Stainless" so now I just need to fully decide on what one I want to use.... I assume they will both get the job done, but I would imagine the badger pool heater works a bit better since it has all the tiny tubes.
 
Good to know about the U bar, Ill make sure to just go J hooks right off the bat then. I will do the neoprene sleeve as well if needed but I wanted to see how this thing does without it first. Would hate to have to cover up the copper pot on brew day haha. I think since I will be able to boil with lid on that I might be able to get away without it.
Im thinking about trying the spray head. Its cheap and wouldn't clog with any grain bits that make it out of the basket for w/e reason.
https://www.aliexpress.com/item/New...2.html?spm=a2g0s.13010208.99999999.343.GmKrPi


Do you have experience with this spray head? It looks like what I need, but I recall seeing mixed reviews on how well it works from another thread. I can’t find the thread at the moment.

While the solar pump has enough flow for recirc, I’m wondering if it is enough for this type of spray head to work properly. I’m sure the chugger would work just fine.

No I dont but I'm going to go ahead and order it with my other crap from china so I will be able to test it and give results here with a chugger pump at least. for $3 it looks like an awesome solution but yea, not sure how how much PSI will make it work enough for my needs. I dont need mist I just need it to spread out the wort ya know.
 
I just wanted to mention since you've mentioned lodo that I doubt lodo guys would approve of that for wort return.
 
If arbor fabricating doesn't have what you want, you could also try Utah Biodiesel Supply, they have lots of brewing related stainless steel baskets, hop spiders, etc.
 
If arbor fabricating doesn't have what you want, you could also try Utah Biodiesel Supply, they have lots of brewing related stainless steel baskets, hop spiders, etc.

Yea both those places are on my radar. My pot just showed up so going to hit them up for quotes on what I want. :mug:
 
Crude but this is pretty much my basket plan with some cross braces that will go under the basket on the pot rim to support it to help it drain
cFb0eQl.png

nUuFIbw.png
 
Sexy kettle, man!

Dont think I saw you mention it, but how come you didnt go with 2x 120v circuits? Could just run an extension cord for a 1500w element to heat strike and come to a boil. Shorten your brew day by an hour or more and be able to do larger boils.
 
Sexy kettle, man!

Dont think I saw you mention it, but how come you didnt go with 2x 120v circuits? Could just run an extension cord for a 1500w element to heat strike and come to a boil. Shorten your brew day by an hour or more and be able to do larger boils.

idk... something inside me says I should do this with 110v so if I can bring it over to a friends and do a brew or something but I mean... That has happened like once in my brewing career and it was like 4 years ago so honestly i'm leaning toward just rolling 220v. Im having my house built so it wont be an issue to get the hookups on GFCI wherever I want.... maybe I should just do that lol...
 
idk... something inside me says I should do this with 110v so if I can bring it over to a friends and do a brew or something but I mean... That has happened like once in my brewing career and it was like 4 years ago so honestly i'm leaning toward just rolling 220v. Im having my house built so it wont be an issue to get the hookups on GFCI wherever I want.... maybe I should just do that lol...

I'm saying if you want to keep it 120v just run one of the heaters on a separate circuit. I did that on a previous brewrig and it worked well. In any kitchen you're pretty much guaranteed to have two circuits. Otherwise you can run a 20ft extension cord to another room. Too late for that already I guess with your custom pot. Unless you wanted to do a heatstick but you're too blingy for that I reckon. So yeah, go 220v lol.
 
Yea i'm not going 2 elements haha, Ill just make sure to have them install a couple of GFCI 220v circuits for me inside and outside to future proof myself a little and roll a single 110v element for now and go from there. Worst case I get a new element and beef up some wire in the panel and go 220 in the future if I get tired of being slow.
 
Crude but this is pretty much my basket plan with some cross braces that will go under the basket on the pot rim to support it to help it drain

You're going to have ~2.5 gallons of liquid below your basket in that design. This may not be a problem, but it's something you should consider.
 
Back to business.
  • Order placed with Arbor for basket.
  • They wanted $50 for the support hooks so i'm going to just make my own out of copper pipe or buy some SS bar stock and bend my own.
  • Badger Pipes wont make me a custom pool heater with TC fittings so just going to roll with the china condenser and see how that goes. My system is going to heat slow it might as well cool slow ;)
  • Going to place an order from Aliexpress for most of my parts once I get it all ironed out so those should be here by next year...
 
You're going to have ~2.5 gallons of liquid below your basket in that design. This may not be a problem, but it's something you should consider.

Yea already did the math on that too :/ My old system had roughly the same deadspace and it wasn't an issue. I plan on mashing at full volume and doing recirc during the mash so I dont expect any problems.
 
Sorry to the OP for this.....but trying to help Metzen

- searching for a small sprayer head that will fit through the 1.5TC port in the lid to replace the locline. Some pieces of the locline can’t be pulled through. I’d like to be able to swap out the Recirc fitting after the mash and replace with a whirlpool fitting (bent tubing that drops from the lid into the wort with an angle at the end to force the whirlpool)

Put a female QD on the TC fitting on your lid with a TC to 1/2" NPT hole http://www.beveragefactory.com/homebrew/pre-fermentation-equipment/brewing-pump/tc105-cap-12-npt.html w/ a 1/2" NPT nipple. Then put 1 male QD on to the line loc (or sprayhead) and another to your whirlpool fitting, then you can easily switch from one to the other from the bottom side of your lid and not have to thread anything through the TC port.

Similar to what I did in pics below.

Also, if you need more flow from your pump, angle the pick up tube some, on mine the flow was greatly reduced until I turned it 45degrees to allow the pick up some more "breathing room"

IMG_5696.jpg


IMG_5699.jpg


IMG_5700.jpg
 
Back
Top