SVEBS Build

Homebrew Talk - Beer, Wine, Mead, & Cider Brewing Discussion Forum

Help Support Homebrew Talk - Beer, Wine, Mead, & Cider Brewing Discussion Forum:

This site may earn a commission from merchant affiliate links, including eBay, Amazon, and others.
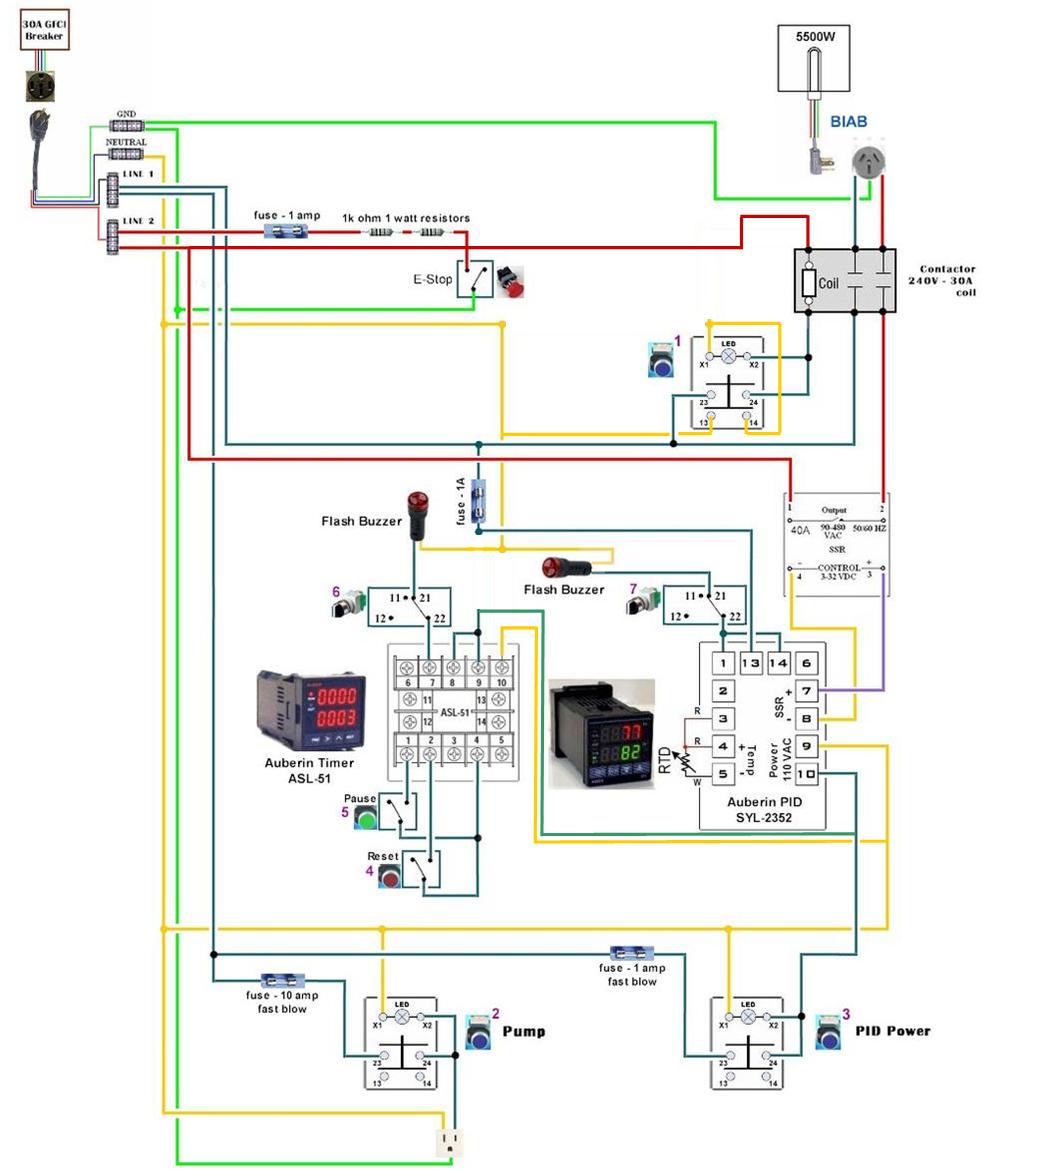
Augiedoggy, the contactor rewiring worked for the element, however, the switch light was always on. So I disconnected the neutral wire going into X1 on the element switch and then it didn't light at all. A little perplexed as to how to wire that switch so it will come on when the element is on and in the on position?
 
Where does the end of your tubing go? Do you have a fitting in the kettle or in the lid?

Since I am still pre successful water test, I haven't fitted the return tube yet. I was going add a weldless on the lid with a trip-clamp fitting and a length of tube to submerse in the basket but not sure I want a lid on mash. I like boil off so I am looking for ideas to just recirculate to wort but more fixed and secure than just a tube.
 
Yes Exactly, this would function correctly.

I'm not familiar with that switch from auber and assume you need the nuetral to go to the switch still to power the led if its 120v...
Augiedoggy, the contactor rewiring worked for the element, however, the switch light was always on. So I disconnected the neutral wire going into X1 on the element switch and then it didn't light at all. A little perplexed as to how to wire that switch so it will come on when the element is on and in the on position?
 
Augiedoggy, the contactor rewiring worked for the element, however, the switch light was always on. So I disconnected the neutral wire going into X1 on the element switch and then it didn't light at all. A little perplexed as to how to wire that switch so it will come on when the element is on and in the on position?

run the yellow wire to contact# 13 then run a jumper wire from #14 to x1.... that should make the led come on and off with the switch mechanism...
 
Augiedoggy, the contactor rewiring worked for the element, however, the switch light was always on. So I disconnected the neutral wire going into X1 on the element switch and then it didn't light at all. A little perplexed as to how to wire that switch so it will come on when the element is on and in the on position?

Honestly that shouldnt be happening if you power is really being killed to the coil the power should also be removed to the led since its coming across the same switch contacts right? but if run the yellow wire to contact# 13 then run a jumper wire from #14 to x1.... that should make the led come on and off with the switch mechanism by cutting the neutral when its off. ...
 
Honestly that shouldnt be happening if you power is really being killed to the coil the power should also be removed to the led since its coming across the same switch contacts right? but if run the yellow wire to contact# 13 then run a jumper wire from #14 to x1.... that should make the led come on and off with the switch mechanism by cutting the neutral when its off. ...

That worked! Thanks. So the rewire for using a 240v coil contractor with this schematic is as follows:
- Disconnect the neutral wire (yellow) from coil terminal
- Move the neutral wire on the element switch from terminal X1 to terminal 13.
- Add a neutral jumper from terminal 14 to terminal X1 in the element switch
- Add a jumper from the L2 (red) terminal block to the previous neutral coil terminal on the contractor.

Great help Augiedoggy!
 
But there is power to one of the alarm terminals, even when the PID is off, unless I'm missing something. Any reason not to put the timer on the same switch as the PID, and switch both alarm powers thru that switch as well?

Brew on :mug:

I just changed the wiring so both the timer and the pid turn on with the center SW1 blue switch. Didn't change anything on the buzzers or there switches and they work independant and properly.
 
ImageUploadedByHome Brew1415833302.826814.jpg

One final addition to the box. Since this is a table top design, I mounted the non-skid feet on what will be the bottom to keep it from slipping while in use on the metal table. Water test tonight!


Sent from my iPhone using Home Brew
 
ImageUploadedByHome Brew1415840158.732991.jpg

Success. Tested with 5 gals of water at 58 degrees.

05 mins - 94 (incr of 36 degrees)
10 mins - 137 (incr of 43 degrees)
15 mins - 185 (incr of 38 degrees)

That's a projected boil time of less than 20 mins. Happy with results. Thanks to all who provided input and questions.


Sent from my iPhone using Home Brew
 
View attachment 235535

Success. Tested with 5 gals of water at 58 degrees.

05 mins - 94 (incr of 36 degrees)
10 mins - 137 (incr of 43 degrees)
15 mins - 185 (incr of 38 degrees)

That's a projected boil time of less than 20 mins. Happy with results. Thanks to all who provided input and questions.


Sent from my iPhone using Home Brew

Congrats. Looking good. Now let's see some wort in it! :ban:

Brew on :mug:
 
This is just my documentation of the wiring changes I had to make to address the two issues, the timer power being always on and the modification to use the 240v coil contactor (thanks to augiedoggy, bsperr and doug293cz). This is NOT the original schematic I started with, just the end result for anyone who runs into a similar issues. Will update for the first brew

Controller Rewire.jpg
 
This is just my documentation of the wiring changes I had to make to address the two issues, the timer power being always on and the modification to use the 240v coil contactor (thanks to augiedoggy, bsperr and doug293cz). This is NOT the original schematic I started with, just the end result for anyone who runs into a similar issues. Will update for the first brew

What tool are you using to create and edit the schematics? It's time for me to plan out my own panel.

Brew on :mug:
 
I just took the the JPG and imported it into MS Publisher and used the drawing tool. Saved it as a JPG as well not a publisher file or PDF


Sent from my iPhone using Home Brew
 
View attachment ImageUploadedByHome Brew1416747226.737520.jpg

Well, it works and I was able to successfully able to brew Kolsch but a couple glitches I need to work out. One of those is not being able to get the PID to go into manual mode. Brewing on automatic mode at 100% power is not effective for maintaining a controlled boil. Also, hind sight 20/20, I wouldn't have installed a timer. Using BeerSmith I haven't used it and probably won't. Also, I noticed the heating element block that holds the coil inside the kettle had a rust film on the face after the water test. Might be changing that to something with a stainless block.


Sent from my iPhone using Home Brew
 
View attachment 237706

Well, it works and I was able to successfully able to brew Kolsch but a couple glitches I need to work out. One of those is not being able to get the PID to go into manual mode. Brewing on automatic mode at 100% power is not effective for maintaining a controlled boil. Also, hind sight 20/20, I wouldn't have installed a timer. Using BeerSmith I haven't used it and probably won't. Also, I noticed the heating element block that holds the coil inside the kettle had a rust film on the face after the water test. Might be changing that to something with a stainless block.


Sent from my iPhone using Home Brew
a little olive oil on the element base stopped the rusting for me but some use silicone... I'm not sure if anyone makes a stainless based ULWD element lots of lwd ones available but they are not ideal for BK use...
also not sure about manual mode with that pid.... on my "mypin" you just hold the M/AT button for 3 seconds then enter the manual % number you want and hit "set".
 
Back
Top