Stc-1000+

Homebrew Talk - Beer, Wine, Mead, & Cider Brewing Discussion Forum

Help Support Homebrew Talk - Beer, Wine, Mead, & Cider Brewing Discussion Forum:

This site may earn a commission from merchant affiliate links, including eBay, Amazon, and others.
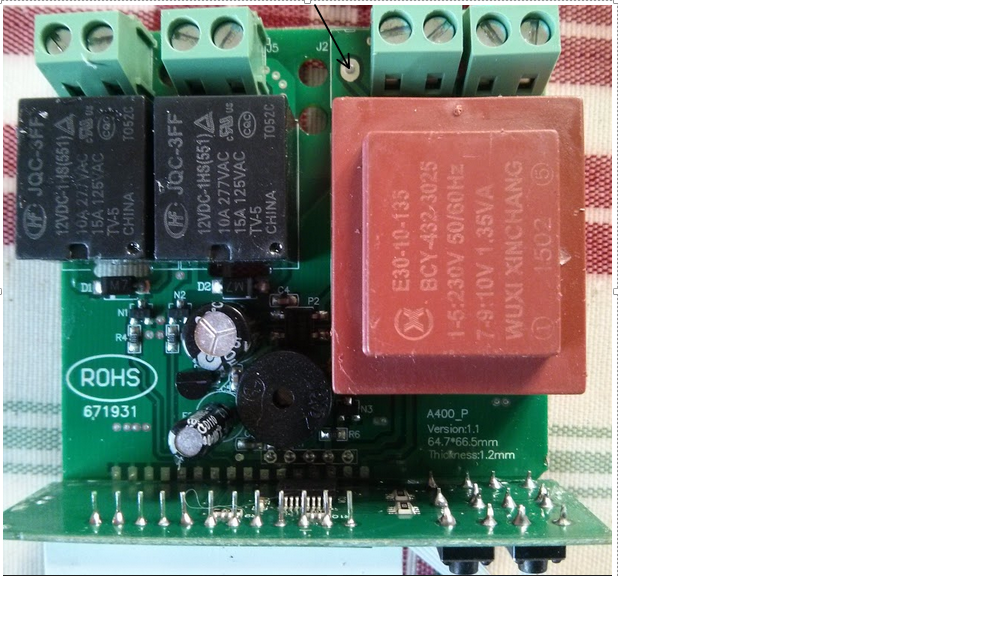
Hi, I have v A400_P version 1.1. It has the five programming pads, brown transformer, and two of the green screw terminals very close together. Looks very much like photo's of version 1.0 I have seen posted here. Anyone had success flashing this one?

ps I bought it here: http://www.ebay.co.uk/itm/221396569456
 
I think I've might have bricked one of mine. It died during flashing (prolly lost contact on one of the pins) and now it stays black even with 230v. Is it trash?
 
But doesnt it need to power up? The display is blank

I flash batches of 50 at a time and I Just hold the programming connector and every few this happens to me, no big deal. Set the sketch to autoflash instead of having to use serial monitor, push the reset button on adruino once you are connected and it will flash
 
I flash batches of 50 at a time and I Just hold the programming connector and every few this happens to me, no big deal. Set the sketch to autoflash instead of having to use serial monitor, push the reset button on adruino once you are connected and it will flash

I just went ahead and it suddenly made a sound so I guess only the display of the stc was bugged, so I got it flashed, thanks :)
 
The link to the manual at BrewsBySmith.com is broken - I think the document name was changed to Readme.md and possibly relocated also.

I'd sure like some STC-1000+ documentation that is complete and fully explanatory. The options, buttons, and lights still confuse me at times. I have a fermentation chamber running off the STC-1000+ and I can't seem to get a profile fully debugged and running properly. The various manuals I've found so far are lacking. (I'm a career Software Developer so I know what I'm doing.) I may just take one of the manuals and update/improve it ... once I figure out what everything means and how it works.

Sorry for the Rant. Love this thing but want to understand it better.

Bill

thanks for the heads up, I just fixed the links to the new address.

I do have a videos page with the couple of videos that wilconrad put together as well as the video I made of the pro controller which shows some of the dual sensor features, using web editor etc.

http://www.boostbysmith.com/beervideos.html

Greg
 
The link to the manual at BrewsBySmith.com is broken - I think the document name was changed to Readme.md and possibly relocated also.

I'd sure like some STC-1000+ documentation that is complete and fully explanatory. The options, buttons, and lights still confuse me at times. I have a fermentation chamber running off the STC-1000+ and I can't seem to get a profile fully debugged and running properly. The various manuals I've found so far are lacking. (I'm a career Software Developer so I know what I'm doing.) I may just take one of the manuals and update/improve it ... once I figure out what everything means and how it works.

Sorry for the Rant. Love this thing but want to understand it better.

Bill

Ok, lets rant :)
As a fellow software developer, you should already know this, but writing instructions for humans, is not really something that we tend to think of as 'fun'. Especially in our spare time. For free.
The 'official' documentation is located on the project page on github, I want to believe you checked there first...
Lastly, anyone can improve upon the documentation (or any other part of the stc-1000+ project for that matter, but improving documentation might be more reasonable for non developers), for the benefit of others. Just create a github user (if you don't have one), fork the project, make some sweet, sweet changes and send me a pull request.
Let me tell you how many pull requests I have received this far. One. And that was 2 days ago... So don't be afraid I might miss it.
Though of course, I do reserve the right to reject any pull request, that I believe is not 100%.
Rant off :)

AlphaOmega, no disrespect intended! What you've done with the firmware for the STC-1000 is spectacular and many fermentation chambers thank you.

I WILL be updating the User Documentation. Not withstanding my poorly worded earlier post, I am pretty good with words (for a Developer). But I'm going to wait till the end of the month - till I free up my STC-1000+; at which time I'll be able to spend some time pressing every button in every way possible. Stay tuned!

Bill

It's cool man. I'm not butthurt :) That's why I added a few smileys :)

Please do update the documentation, I appreciate all the help I can get.
Do read the existing documentation first, experiment all you want, feel free to contact me if you have any questions (send me a PM) and I'll try to answer.
 
Just to let you know that I flashed this one successfully this evening. :mug:

Hi, I have v A400_P version 1.1. It has the five programming pads, brown transformer, and two of the green screw terminals very close together. Looks very much like photo's of version 1.0 I have seen posted here. Anyone had success flashing this one?

ps I bought it here: http://www.ebay.co.uk/itm/221396569456
;

Here's a pic that was asked for

stc1000A400P11.png
 
That's really interesting. I didn't think the 1.1 could be flashed. Can you upload a few photos of the board/other interesting insides?

Yes, both the A400_P v1.0 and v1.1 are flashable.

There is, however, another "v1.1" board out there that is NOT an A400_P. That board is not flashable.

Edit: Alpha beat me to it :D
 
That's really interesting. I didn't think the 1.1 could be flashed. Can you upload a few photos of the board/other interesting insides?

I think the key is that it's a newer version of the board that is already flashable. As disney7 showed, the original flashable version was A400_P v1.0. The versions that were 1.1 that were NOT flashable were "S1000-Power_V1.1". Looks like whatever changes they made to the A400_P board to role from 1.0 to 1.1 did not affect the flashability. That's pretty awesome!

EDIT: looks like I need to update my browser more frequently! Everyone beat me to that! :mug:
 
I don't really have a whole lot of time to do some good searching, and this is slightly off topic, but those of you that have this wired to a refrigerator, would this relay work?

http://amzn.com/B005T671W0

Thanks!

If you wire it to a socket, you can just plug the refrigerator into the socket(with the refrigerator turned to its coldest setting) and it works fine without a relay. If you are bypassing the thermostat in the refrigerator... well, I dont know.
 
If you wire it to a socket, you can just plug the refrigerator into the socket(with the refrigerator turned to its coldest setting) and it works fine without a relay. If you are bypassing the thermostat in the refrigerator... well, I dont know.

The contacts are rated for 10 amps and I saw a couple places where the compressor kicking on could spike to higher than that... Just don't want to fry the controller :)
 
The contacts are rated for 10 amps and I saw a couple places where the compressor kicking on could spike to higher than that... Just don't want to fry the controller :)

If it helps, I have had two chest freezers and an old 1970s era refrigerator on STC-1000s for the past 3 years now wired up straight to sockets without blowing any controllers out. Just personal experience, but unless it really draws a lot of juice or is miswired, you should be safe from blowing out your controller. This can also be evidenced by the sheer amount of How to wire a STC-1000 threads on here.

Then again YMMV.
 
I've used stc-1000s wired in directly replacing the thermostat relay in a couple different sized fridges. To be honest the relay rating is probably an average safe number. And the rating is for running use not spike voltage. Since most motors can draw up to 600% more amperage at startup for milliseconds there really isn't a reason to worry. Unless you are using some industrial grade freezer you should be ok. This is why many electric motors have a starting capacitor.
 
Hi guys!

So I've put up a new branch of STC-1000+ (very imaginatively called 'test', as it started out as a test, but seemed to work out quite well...). I'm thinking this might actually end up in the master branch some time, but there are a few issues to iron out first.
So, what's up?
Well, from early on people have been bugging me about being able to read temperature and stuff from the STC from their computer or whatever...
I (think) I've always responded, 'it might be possible, but is beyond the scope and will be tricky'. Now, I've gotten tricky, and have after a lot of hair pulling and learning the ropes with my new scope, actually managed to get a simple one wire communication working.
So you can, from an arduino, read and write to the eeprom + get the current temperature.

Now this, comes at the expense of probe 2 (you can't use probe 2 anyway, as this is the data line that needs to be used + I need to 'steal' code space from somewhere, I'm kind of amazed it actually works out anyway...)

Documentation is so far lacking, it is still work in progress, but if you want to try it out you can find it here. There is a sketch called com.ino, that has the required code to run on the arduino + some basic examples (read temperature and setpoint).
In order for it to work, you need a pull-down resistor on ICSPCLK (or probe 2 input) to ground. 10k is fine, which incidentally (well, not really, pretty deliberately actually) is what will already be there if you are setup to use probe 2. You will need another resistor as well, about 1k, that is put in series with the ICSPDAT line from the arduino. The same pinout is used as for the programmer, so if you already have got a programmer (that is an arduino wired to program the STC), all you need is to add this resistor. You'll need it because the data line is bidirectional, and if timing or communication is a bit off both the STC and the arduino might try to drive the line in opposite directions ant might fry either of them, unless current is limited. I've tried to write 'safe' code, and maybe in time the resistor can be omitted, but for now just use it (practice safe HEX!!!).

I've prolly forgotten some vital information here, but check it out :) I'm kind of excited that it works :)

Edit: Oh yeah... If you have the programmer, and add the 1k resistor in series, it will still work fine as a programmer, so it is sort of 'transparent'. You just 'mod' your programmer a bit, and it will work for both purposes. You could probably add a say 47k resistor from ICSPDAT line to ground on the programmer as well, so it will work even if the STC is not 'dual probe' version (that has the 10k resistor in place).

Cheers!
//mats
 
I don't remember if this was discussed, but is it possible to include a modifier for a profile setpoint where you can select whether heating is enabled or disabled.

For example, let's say you want to let the yeast free rise to a maximum of 80°F. You could enter 80 into the setpoint for 72 hour duration and only if the temp reaches over 80+Hy will the controller attempt to cool. In the meantime regardless of how low the temp is the controller will not try to heat.

Thoughts?
 
It has been discussed and while it probably could be done somehow (the main problem would be how to enter and store that info, no free eeprom), but i think this is kind of the opposite of what we want, which is control.
Why freerise? It will be dependent on ambient and stuff... Just use the ramp you want and a low wattage heater...
Now please, get exited about the prospect of being able to 'talk' to the STC from your computer instead! :)
 
I don't remember if this was discussed, but is it possible to include a modifier for a profile setpoint where you can select whether heating is enabled or disabled.

For example, let's say you want to let the yeast free rise to a maximum of 80°F. You could enter 80 into the setpoint for 72 hour duration and only if the temp reaches over 80+Hy will the controller attempt to cool. In the meantime regardless of how low the temp is the controller will not try to heat.

Thoughts?

Easy peasy, get yourself some switches and wire them up after the relays. I like using 22mm latching switches a la electric brewery style (http://www.ebay.com/itm/22mm-Rotary-Selector-Switch-2-Position-NC-NO-Latching-Self-Locking-10A-/111051428273?pt=LH_DefaultDomain_0&hash=item19db2e51b1). I even wired in color coded indicator lights after the switch so I can easily tell from a distance what is going on. First get your wort to 72, then you could set your temp at 80 and disable heating. The stc will think and try to heat, but you are overiding what it is trying to do and it would allow you to free rise. If it tries to go over 80 cooling will kick on. One of the best parts about this is you can switch stuff on an off on the fly. When I crash cool with glycol, some times it will under shoot the temp, and I certainly don't want the heat to kick on then if it does.

As for the relay amperage, I've been running a 5000 btu window ac on mine and it works like a champ. I'm also pretty sure all of mine say that they are 15a @ 120v, 10a @ 240 (or something weird like 15A 115v, 10a 230v). My window ac/glycol chiller is the only think with substantial power draws however. The rest is small pond pumps and heat wrap. (a full build write up and thread is on my bucket list!)

alphaomega, you continue to astonish us with what you can pull out of these units. Better watch out or those chinese manufacturers just might offer you a job, that way they could charge 10x the cost they are selling these at now. One question, I have multiple units in one case. I know it isn't possible currently, but would an arduino have the capability to read temps of more than one stc simultaniously? I don't have much experience with them outside of flashing stc's.
 
I'll also recommend putting in switches. I use 6 Pin SPST Red Green Neon Light On/Off Rocker Switch AC 250V/15A 125V/20A. They light up when powered and having two colors makes it easier to remember which is which.
 
Sorry for the redundancy of my question, but after browsing this huge thread I still have a few questions regarding a fermentation chamber build in a chest freezer. My basement is currently too cool, what is the best heat source inside the freezer? Where should my temp probe be located? I've heard securing it to side of bucket with some insulating material between it and open air inside freezer.
 
Sorry for the redundancy of my question, but after browsing this huge thread I still have a few questions regarding a fermentation chamber build in a chest freezer. My basement is currently too cool, what is the best heat source inside the freezer? Where should my temp probe be located? I've heard securing it to side of bucket with some insulating material between it and open air inside freezer.

I use a light bulb in a paint can. Others use a fermwrap type of thing, or a seed germination mat or a electric blanket.

Yes, either a thermowell with probe in it for the beer, or insulated to the side of the fermenter works great for probe placement.
 
I use a light bulb in a paint can. Others use a fermwrap type of thing, or a seed germination mat or a electric blanket.


Yes, either a thermowell with probe in it for the beer, or insulated to the side of the fermenter works great for probe placement.


Does having a light source inside the chamber introduce uv Rays which could affect taste?
 
Sorry for the redundancy of my question, but after browsing this huge thread I still have a few questions regarding a fermentation chamber build in a chest freezer. My basement is currently too cool, what is the best heat source inside the freezer? Where should my temp probe be located? I've heard securing it to side of bucket with some insulating material between it and open air inside freezer.

I'll quote myself from an earlier post:

Very timely. I literally just finished constructing three DIY "fermwrap" setups sized to fit individual bucket/carboy fermenters. The cost of each unit was $14 and was a snap to construct - but I did have to borrow my wife's "cropadile" gadget for smooshing the eyelets together. If you have ReptileBasics connect it for you then it's an added dollar - probably worth it.

For two 6.5 gallon carboys side-by-side you would want 5 feet of 12" heat tape plus the connection kit (plus having them connect it) and shipping brings the cost to ~$25 delivered and ready to use.

12" heat tape: http://www.reptilebasics.com/12-heat-tape (5 feet should be plenty)
connection kit: http://www.reptilebasics.com/thg-amp-wireset (add the 'Reptile Basics Connect for me' fee)

I believe this is the safest method of heating your fermentation and these are the reasons:
-The source of heat is designed for it's intended purpose (to heat objects/animals)
-It's very low wattage
-To touch, it only gets warm, not hot
-It directly heats your fermenter, as opposed the airspace around your fermenter
-It's relatively inexpensive compared to some other options
-(Opinion) I suspect it's less prone to major catastrophe that other methods

Now we just gotta avoid SingleTrack's prying eye and tongue lashings :D
single_track said:
I assume we have exhausted all interesting discussion of the actual topic of this thread? If so, let the side topics continue.

My probe hates getting shaved, by the way.
 
Sorry for the redundancy of my question, but after browsing this huge thread I still have a few questions regarding a fermentation chamber build in a chest freezer. My basement is currently too cool, what is the best heat source inside the freezer?

Get one of these.
I'd say 2 or 5 meters. Tape it to the outside of the fermenter, without making any overlaps.

Where should my temp probe be located? I've heard securing it to side of bucket with some insulating material between it and open air inside freezer.

That is a good plan.

Edit: Now you beat me to it St. Pug :)
And yeah, now back to the original program... With all the people that has been nagging me for computer connectivity, am I really the only one being stoked about being able to communicate with the STC using the same hardware as for programming it?
 
I haven't progressed any further than opening up the back cover of my unit, but I'm excited about the possibility. Now I just need some free time.
 
With all the people that has been nagging me for computer connectivity, am I really the only one being stoked about being able to communicate with the STC using the same hardware as for programming it?

I'm nearly as stoked as you.... I've just got to wrap my head around logistics and figure out if it's something I can implement on my own. I'm not as technologically savvy as many folks out there, but I am resourceful and driven :D. Right now I'm battling with a mikrotik - I believe there's a gap in the logic in my brain.
 
I'm excited to give it a try, probably not until this weekend, this has been a crazy week at work. Nice stuff as always alpha!
 
Its great that we can drive out the temp now. I was about to ask if there was a way to
show the elapsed time of the heat/cooling on. Now I need to get a display and logging
shield to make the graphs.
 
I'm nearly as stoked as you.... I've just got to wrap my head around logistics and figure out if it's something I can implement on my own. I'm not as technologically savvy as many folks out there, but I am resourceful and driven :D. Right now I'm battling with a mikrotik - I believe there's a gap in the logic in my brain.

I just have to say I needed to google 'mikrotik'. I guess it is a network router? Yes, it was in the context of technology, but it really sounded like it was a type of infection or something :)

I'm excited to give it a try, probably not until this weekend, this has been a crazy week at work. Nice stuff as always alpha!

Its great that we can drive out the temp now. I was about to ask if there was a way to
show the elapsed time of the heat/cooling on. Now I need to get a display and logging
shield to make the graphs.

It is cool to hear there is some interest at least. It really was a pain to get it working.
I don't really know where to go with it yet... I guess I should try to add reading the state of the relays as well. Maybe I should work on the sketch a bit (add proper parsing) so reading and writing the eeprom is simple/intuitive.
 
Back
Top