Thanks, will have to locate where the leak is exactly, but will keep that in mind as a possible easier fix. Hope I can fix it as everything else is working well and it is kinda of a cool set up for pop and beer.
You are using an out of date browser. It may not display this or other websites correctly.
You should upgrade or use an alternative browser.
You should upgrade or use an alternative browser.
Soldering Stainless steel
- Thread starter BargainFittings
- Start date

Help Support Homebrew Talk - Beer, Wine, Mead, & Cider Brewing Discussion Forum:
This site may earn a commission from merchant affiliate
links, including eBay, Amazon, and others.
nate456789
Well-Known Member
Way easier than using the Tig on it.
Takes less than half the time too. I don't have to worry about back gassing or cleaning up any burnt flux with a grinder. I am sold on it.
I position the piece after I punch and dimple. Wrap two pieces of silver solder on it and hit it with heat. Done. On to the next one.


Takes less than half the time too. I don't have to worry about back gassing or cleaning up any burnt flux with a grinder. I am sold on it.
I position the piece after I punch and dimple. Wrap two pieces of silver solder on it and hit it with heat. Done. On to the next one.
In case the links don't work, part #'s
45605K711 Std-wall 304/304l Ss Butt-weld Pipe Fitting, Unthrd, 3/4" X 1/2" Pipe, 1-1/2"l, Reducer, Sch 40
4335T64 Unthrd, Low-pressure 304 Ss Sckt-weld Fitting, 1" Pipe Size, Coupling, 150 Psi
92620A810 Grade 8 Alloy Steel Hex Head Cap Screw, Zinc Yellow Pltd, 5/8"-11 Thrd, 4-1/2"l,fully Thrd
-Joe
Just got the parts from McMaster, and the 5/8" bolt is just slightly too large for the reducer. Several minutes with my dremel and a grindstone were to no avail.

Update
Well after two hours and two dremel grinder wheels, it now fits.

klyph
Well-Known Member
I had to go at mine with a rat tail file for some time before the bolt would go through. The casting was a bit uneven.
wyzazz
Well-Known Member
I just used a 1/2" bolt from Lowe's.
Gave it a try today, soldered a 1" Tri-Clamp ferrule to a keg I'm Converting to a HLT / Keggle. Only mishap was I opened up the dimple a slight bit too much (first try), so I used a small hammer to reduce the dimple enough to securely hold the ferrule in place. Sanded the crap out of it, applied flux, solder and heat, and it worked flawlessly. I filled it with 15 gal of water, and it's as watertight as a bullfrog's butt.

Update 04/13/2012 - 14:41 PDT
Added a second TC, Easy Peasey!!

Thanks to all who contributed to this thread!!
Update 04/13/2012 - 14:41 PDT
Added a second TC, Easy Peasey!!
Thanks to all who contributed to this thread!!
EarthBound
Well-Known Member
I went the solder-a-fitting-on route. It worked perfectly and was very easy. Steps I took:
- Drilled a hole in the side of the kettle so the element would go through (I think 1 1/16" or 1 1/8").
- Sanded and cleaned the outside of the kettle.
- Sanded and cleaned the 1" NPT locknut.
- Fluxed the outside of the kettle around the hole.
- Put two rounds of 1/16" solder around the hole.
- Fluxed the bottom of the locknut and sat it on top of the solder.
- Heated the locknut (which by proxy heated the kettle) until the solder flowed.
- Let it cool without touching it.
- Profit!
*removed image*
-Joe
Your posts and video have made me a happy guy. I know I speak for many others when I say, "THANK YOU!"
starman
Well-Known Member
Scut_Monkey said:I have noticed that the 1/2" couplings from mcmaster-carr have the perfect diameter to go with the reducer for the flaring tool (also from mcmaster-carr). However, the 1/2" couplings from bargain fittings are slightly too small while the coupling from austinhomebrew that I have is much too large. Like Flomaster advised, if the fitting is slightly smaller don't pull the reducer completely through.
I just got the McMC fittings for a keg tool and some practice 1/2" couplings

The problem is the couplings are a good 3/32" + bigger than the flare. Did something change or did I order the wrong couplings? They look proportionally much thicker than everyone's photos.

My order from Bobby M is on the way so hopefully that 1/2" coupling will be pull able.
StainlessBrewing
Well-Known Member
There are a bunch of manufacturers that make a few different styles. There are typically 3 different styles one being the cheapest made from pipe, the traditional and most common in the middle and a heavy casting. Depends on which one the supplier carries. All rated normally at #150 but whatever pleases the customer for their application.
To all the contributors, thanks for the fantastic thread!
What I did was skip the reducer fitting and took a 1/2 coupling to the bench grinder to give it a similar taper.
For the rest of the tool, I just took some 3/8-16 threaded rod, a cpvc reducer bushing 1.5" x 1" and some stainless washers. Was able to do around 12 couplings without any issues.
For the solder, I went with this stuff:
Sil-Pure Lead Free (http://www.canmet.com/content/products_services/construction-industrial/solders.htm)
and for flux: HARRIS STAY-CLEAN LIQUID FLUX - 4oz bottle
Who ever came up with the "ring" of solder is a stroke of genius! brilliant!
SmokingDog
Well-Known Member
What size punch should be used for a 1/2" fitting?
1" fitting?
1" fitting?
nate456789
Well-Known Member
What size punch should be used for a 1/2" fitting?
1" fitting?
1/2" fitting I use 7/8 punch
1" Fitting I use 1 11/32 punch - Depends on what fitting you have.
Those are the actual hole sizes. I have conduit punches so they are marked 1/2 conduit and 1" Conduit.
I use 2 sizes up die after the hole is made to make the dimple.
latencymachine
Member
I just got the McMC fittings for a keg tool and some practice 1/2" couplings
The problem is the couplings are a good 3/32" + bigger than the flare. Did something change or did I order the wrong couplings? They look proportionally much thicker than everyone's photos.
I've got the exact same situation. The reducer fitting (the die) OD is 1.06" and the OD of the couplers are 1.20" (4464K473). I agree with you that these couplers are very thick walled compared to pics of others. These are rough cast vs my other weldless kit couplers that have been turned on the OD (smooth and shiny). The inking reads "SP-114 CHINA MB 1/2" 304 150"
So for this trick to work I guess we need to find couplers with a compatible OD. Does anyone have a recommendation?
nate456789,Way easier than using the Tig on it.
Takes less than half the time too. I don't have to worry about back gassing or cleaning up any burnt flux with a grinder. I am sold on it.
I position the piece after I punch and dimple. Wrap two pieces of silver solder on it and hit it with heat. Done. On to the next one.
Looks like you're just positioning the coupling on the dimple rather than pulling it partly through it. Looks like that works fine. Might be less secure mechanically.
nate456789,
Looks like you're just positioning the coupling on the dimple rather than pulling it partly through it. Looks like that works fine. Might be less secure mechanically.
Looks pulled through and flush on the inside. Ideal in my opinion.
nate456789
Well-Known Member
nate456789,
Looks like you're just positioning the coupling on the dimple rather than pulling it partly through it. Looks like that works fine. Might be less secure mechanically.
They are pulled thru. I use a small hammer to tap them into the correct position / angle.
Add that with the 1/4" or so Silver solder puddle and they are not going anywhere.
I prefer the flush position on the inside. Seems sanitary and easy to keeps clean to me.
I've got the exact same situation. The reducer fitting (the die) OD is 1.06" and the OD of the couplers are 1.20" (4464K473). I agree with you that these couplers are very thick walled compared to pics of others. These are rough cast vs my other weldless kit couplers that have been turned on the OD (smooth and shiny). The inking reads "SP-114 CHINA MB 1/2" 304 150"
So for this trick to work I guess we need to find couplers with a compatible OD. Does anyone have a recommendation?
If you're interested, I can throw a caliper on the couplings I have.
starman
Well-Known Member
Bobby the 1/2" coupler you sent Saturday looks good. Its a RCH under the size of the McMC tool but should work using the usual tricks.
I wonder if there would be any appreciable advantage in turning the oversized fittings down on a lathe but leaving a 3/32" lip at one end. The thought being it could provide extra surface area for solder bonding and mechanically prevent pull thru.
...or more likely just order a good one from you.
I wonder if there would be any appreciable advantage in turning the oversized fittings down on a lathe but leaving a 3/32" lip at one end. The thought being it could provide extra surface area for solder bonding and mechanically prevent pull thru.
...or more likely just order a good one from you.
nate456789
Well-Known Member
Bobby the 1/2" coupler you sent Saturday looks good. Its a RCH under the size of the McMC tool but should work using the usual tricks.
I wonder if there would be any appreciable advantage in turning the oversized fittings down on a lathe but leaving a 3/32" lip at one end. The thought being it could provide extra surface area for solder bonding and mechanically prevent pull thru.
...or more likely just order a good one from you.
I use and prefer the unfinished ones. I quickly turn them down on my vertical sanding belt to the size I want. I get a good tight fit that way.
Just Personal preference.
I'm looking at adding a bottom drain to my kettle. I'd prefer not use a coupling since I don't want gunk building up in the threads, and I'm not sure if I want to go all the way to Triclovers, has anyone soldered a pipe nipple to the base?

McMaster sells them in 1" lengths and many different thread sizes. That way you could thread a ball valve on the nipple, but have less of a concern about buildup in the threads.
McMaster sells them in 1" lengths and many different thread sizes. That way you could thread a ball valve on the nipple, but have less of a concern about buildup in the threads.
Huaco
Well-Known Member
If you're interested, I can throw a caliper on the couplings I have.
BobbyM... what was the O.D. on your couplers?
starman
Well-Known Member
The 1/2" coupler I got from Bobby recently was 1.032. The McMC 1/2x3/4 reducer everyone uses for a keg tool measured 1.046. It worked fine just don't pull all the way thru.
View attachment 61597
The McMC couplers I got last week were 1.218. Being impatient, I threw the half coupler on a 1/2" to 1/4" bushing on an old bench grinder spindle and used it as a crude lathe up against a grinder. I left a flare on the end and it actually fit fairly well in the divot from the keg tool.

The inside is flush, but could be better with the stay bright. It was done using standard Oatey plumbers silver solder and liquid flux. I'm not sure it wicked thru the joint like I'd expect on copper.
Dry fit of flared 1/2 coupling

Post solder outside

SmokingDog
Well-Known Member
First attempt. Don't know what I was worried about. Other than trashing a perfrectly good kettle.
Really though, it was easy. And good flow of solder to the outside.


Really though, it was easy. And good flow of solder to the outside.
I'd really appreciate a few opinions on this one.
I silver soldered a few locknuts to my keggle a few weeks back. Brewed like 4 batches on them. Today I noticed this.

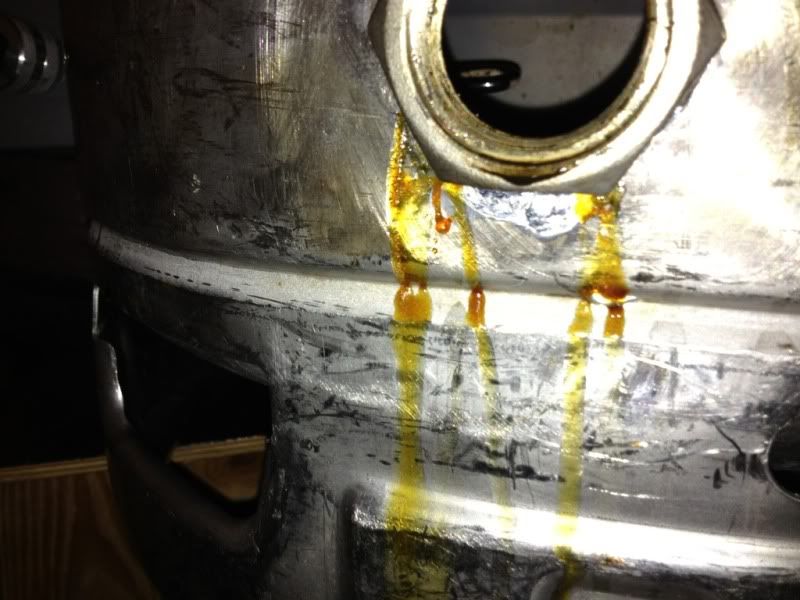
Looks like an extremely slow leak of some kind. What you see on the keggle is all there is. Maybe a drop or two on the stand with that element locknut. Seems like the leak is slow enough that it more or less carmelizes on the keggle.
I gave her a pretty thorough leak test before hand, at least with just water sitting in it. Left water in it all afternoon and didn't see a drop of leakage.
Just a slow leak or some kind of slow degeneration?
Not sure how to proceed. Thanks for the advice.
I silver soldered a few locknuts to my keggle a few weeks back. Brewed like 4 batches on them. Today I noticed this.
Looks like an extremely slow leak of some kind. What you see on the keggle is all there is. Maybe a drop or two on the stand with that element locknut. Seems like the leak is slow enough that it more or less carmelizes on the keggle.
I gave her a pretty thorough leak test before hand, at least with just water sitting in it. Left water in it all afternoon and didn't see a drop of leakage.
Just a slow leak or some kind of slow degeneration?
Not sure how to proceed. Thanks for the advice.
Does it seem to be originating from the solder joint or from the element threads? Sometimes slow leaks with water can be hard to track because water can evaporate without a trace. In your case I would probably just douse the area with flux and reflow for a few seconds. That's fixed any of my leaks.
StainlessBrewing
Well-Known Member
At first I thought it would be leaking because a lot of locknuts used here are straight thread and not tapered. It's obvious in the picture that it's not leaking from there though. Just my opinion and what I would do is just clean the joint real well, make hex ring of solder around the nut, heat it up and try again. Just curious, why did you use a lock nut?
At first I thought it would be leaking because a lot of locknuts used here are straight thread and not tapered. It's obvious in the picture that it's not leaking from there though. Just my opinion and what I would do is just clean the joint real well, make hex ring of solder around the nut, heat it up and try again. Just curious, why did you use a lock nut?
I guess I could have used a 1" coupling, but I already had the NPS locknut. I actually had a welder do some on my HLT a while back and I was very happy with the setup. Figured I try out silver soldering, this time.
Making a ring around the lock nuts didn't work well for me. It never flowed, just kind of melted. I just squirted on the liquid flux, then heated up the locknut and area, keeping the torch moving until I could get the silver solder to "wick" up. Seemed to work quite well, although now this one appears to have a slow leak.
nate456789
Well-Known Member
Looks like you scuffed the kettle good.
If you didn't get the nut good and scuffed it will leak there. The solder won't bond.
If you didn't get the nut good and scuffed it will leak there. The solder won't bond.
I redid the joints. Filled the keg with water and left it overnight. Appears to be leak free.
Thanks for the advice. Judicious use of flux, even when solder was flowing seemed to help.
Gonna make a nice dark lager this weekend.
Thanks for the advice. Judicious use of flux, even when solder was flowing seemed to help.
Gonna make a nice dark lager this weekend.
Brew Runner
Well-Known Member
The viscosity of water changes a bit more than 600% between boiling and freezing, so I can see why it would weep during use and not at room temperature. At operating temperature, all the system components have also expanded, so possible "pinhole" leaks can open enough to be seen.
I guess I used a slightly too short close nipple on my sight glass assembly. I noticed a leak in the threads and the fitting was just about snug with the silver soldered locknut. I just wanted to see if I could crank it down a touch more.
Well, after applying a good amount of force with a wrench, the locknut popped off!
I guess the silver solder doesn't hold up as well to torsional stress. I had quite a lot of leverage as I was turning a fitting with a sizable wrench. But still, me no likey.
Wound up making that one weldless. I just have the locknuts for the heating elements silver soldered now.
Any comments on this?
StainlessBrewing
Well-Known Member
What size hole did you drill? Maybe you can remove the lock nuts and add a half or full coupling?
What size hole did you drill? Maybe you can remove the lock nuts and add a half or full coupling?
I don't think it's really an issue, although I do have to tighten down the elements, they have a gasket so they're not getting the kind of torque I gave the sight glass locknut.
But it doesn't make me happy.
How would a coupling be any different, really?
Well, after applying a good amount of force with a wrench, the locknut popped off!
I guess the silver solder doesn't hold up as well to torsional stress. I had quite a lot of leverage as I was turning a fitting with a sizable wrench. But still, me no likey.
Any comments on this?
While not as strong as a weld, if a fitting is used w/ a decent shoulder so the solder has ample surface area to bond...a properly soldered coupling should be very strong IMO.
My guess is that your fitting was not seated w/ amlpe bonding area, or the solder did not bond properly for some reason? Fly in ointment somewhere in the process.
Was the close nipple somehow bottoming out, and therefore pushing the lock nut off the vessel. I really like the look of the spuds Bobby M sells with a large surface area available to solder...that ain't commin off!
If you post some good photos of the failed joint, I am sure someone here can do some forensics.
StainlessBrewing
Well-Known Member
I don't think it's really an issue, although I do have to tighten down the elements, they have a gasket so they're not getting the kind of torque I gave the sight glass locknut.
But it doesn't make me happy.
How would a coupling be any different, really?
The only difference is that most lock nuts are straight thread and the coupling would be tapered. If you're not getting any leaks even though the fitting is bottoming out I guess there really is no difference.
Huaco
Well-Known Member
I torqued off one of my sight glass couplers just the other night. Ticked me off. I soldered it just like in the youtube video. Step-by-Step. I was turning it with a LARGE adjustable wrench. I just did not remember I was torquing against a soldered joint. I had 1" automotive/structural bolt in mind. After I took it out, cleaned it up and re-soldered it, I counter-torqued the fitting inside the keggle with some channel locks. No problem... got it nice and tight this time and did not break the joint again! haha!

I torqued off one of my sight glass couplers just the other night. Ticked me off. I soldered it just like in the youtube video. Step-by-Step. I was turning it with a LARGE adjustable wrench. I just did not remember I was torquing against a soldered joint. I had 1" automotive/structural bolt in mind. After I took it out, cleaned it up and re-soldered it, I counter-torqued the fitting inside the keggle with some channel locks. No problem... got it nice and tight this time and did not break the joint again! haha!
I'm glad to hear that it wasn't just me. I don't have any leaks, but torquing that joint apart made me concerned. Sounds like it happens if you don't take precautions when torquing a soldered joint.
Well, no leaks right now. Gonna brew later this week.
Would this solder work as long as you use the proper harris liquid flux?
http://www.radioshack.com/product/index.jsp?productId=2062725
http://www.radioshack.com/product/index.jsp?productId=2062725
Similar threads
- Replies
- 41
- Views
- 2K
- Replies
- 0
- Views
- 666
- Replies
- 0
- Views
- 608
- Replies
- 0
- Views
- 421
