Soldering Stainless steel

Homebrew Talk - Beer, Wine, Mead, & Cider Brewing Discussion Forum

Help Support Homebrew Talk - Beer, Wine, Mead, & Cider Brewing Discussion Forum:

This site may earn a commission from merchant affiliate links, including eBay, Amazon, and others.
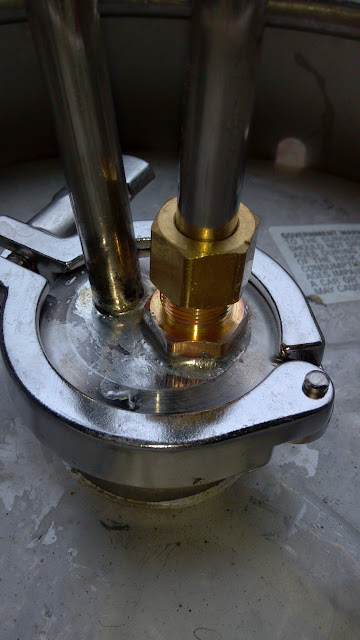
I just tried a heat gun for soldering:
View attachment 249221
Seems easier to control the heat than using the torch. It's easier not to burn off all the flux, which seems to be one of the biggest problems, IMHO.

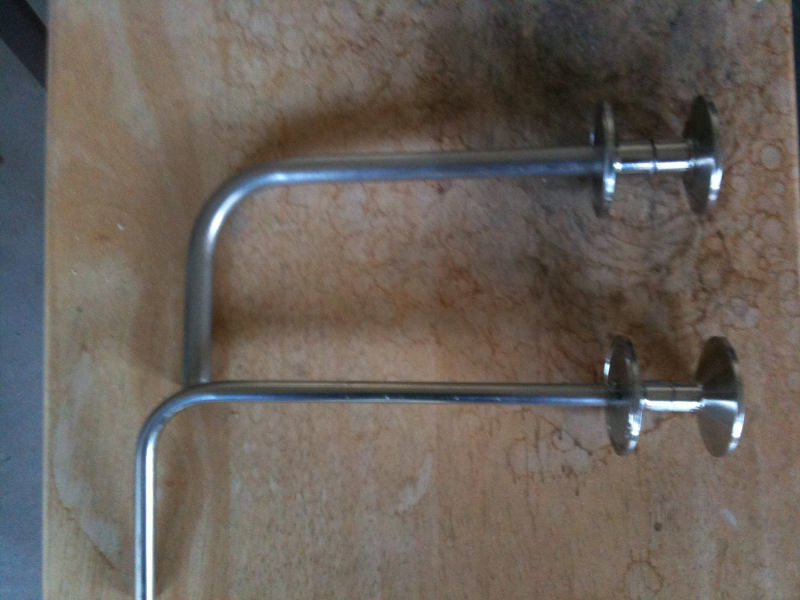
And...... how did it come out? How long did it take to get everything hot enough? Where's the pic of the finished product?
 
View attachment ImageUploadedByHome Brew1421532156.753016.jpg
I had first used a torch(propane), but had a side that looked sketchy. So i cleaned it up, added more flux, then put the solder on once it began to flow.

Note this was not a good test. This was my first time soldering stainless so I didn't have the technique down. I think it took slightly longer to melt with the heat gun, but not much, if at all.

Google turned up someone that recommended this way to control the heat better, which is why I tried it.

Out of curiosity, I put a thermocouple in front of the gun and got it well past 425 C very quickly. I think Stay-Brite and flux is more like 400F, so there is no problem getting things hot enough. This particular gun has adjustable heat, which helps preheat evenly.
 
Tried the heat gun method. Used Oatey Safe-Flo solder and Goot Super Soldering Flux. Installed a 1.5" TC fitting from Bobby (awesome service and sweet parts) - Thanks!!

I used the flux and solder because that's what I had. I have done tons of copper sweating and have several MAPP and propane torches but I wanted to try the heat gun for kicks. This was my first large stainless/stainless connection so it was a bit of a **** show at times but it is solid as hell and leak free. Not going to win any beauty contests but I'm sure I could get much better over time if I had the need to practice.

20150314_195158.jpg
 
I accidentally threw myself a curveball. On my boil kettle (converted sanke) I had a 1/2" nipple with nuts on each side, a gasket on the outside and teflon tape on the threads. I used a ball valve to control flow to the CF chiller. Basically a DIY bulkhead fitting. I use a false bottom screen (hop filter) with a curved drawtube that penetrated the centre of the false bottom to draw from beneath it.

I hope this makes sense so far.

Well, as a "upgrade" I soldered a spud on the outside...
Spud-1.jpg

and threaded in a nipple and ball valve and then realized I had no means of connecting the draw tube on the inside. I don't think I can crank the nipple in far enough to have enough threads on the inside. I'm sure there's a solution for this I just can't think of it. I don't think there's enough threads inside the spud to thread two nipples (one from each side).

??
 
Last edited:
Nipples can be varying degrees of thin and can be a pain to solder for most people. It's takes a bit of experience to be able to solder a threaded piece without screwing it up royally.
 
Tried the heat gun method. Used Oatey Safe-Flo solder and Goot Super Soldering Flux. Installed a 1.5" TC fitting from Bobby (awesome service and sweet parts) - Thanks!!

I used the flux and solder because that's what I had. I have done tons of copper sweating and have several MAPP and propane torches but I wanted to try the heat gun for kicks. This was my first large stainless/stainless connection so it was a bit of a **** show at times but it is solid as hell and leak free. Not going to win any beauty contests but I'm sure I could get much better over time if I had the need to practice.

Is there a thread or post on using a heat gun???
and cold it be adapted for copper, I have a CF Chiller I need to mend.
 
Is there a thread or post on using a heat gun???
and cold it be adapted for copper, I have a CF Chiller I need to mend.

Go back a couple pages, not a lot of detail on the heat gun, but everything in this thread applies except the heat source. I'm going to give this a try as well. I've got a leaking joint that I need to repair, this ought to be perfect.

I would think it should work equally well with copper. The biggest challenge will be heat dissipation down the pipes/fittings. The heat gun may not be able to keep up with the losses.
 
I just realized I have the gun and probes handy...

Ace Heat gun, 1200 watts, with high and low. On low I got my probe to 400F, no problem, and on high it was 800F, and still rising.

I held a pc of .030 stainless over the gun on high and it took a good 5 min to reach a straw color, which starts around 400F, but it was only 1" wide. I guess I'll find out how it works when I try to reflow my fitting.
 
Ahh... Thanks. I simply overlooked them on the website.

Though it's important to note that my manufacturer misunderstood my specs on the 2" version and the solder side of it is still only 1-3/8" ID.

Though this is something I have to repeat over and over, there is absolutely no fit problems with ripple elements on the 1.5" TC versions.
 
I can confirm that you can silver solder stainless with a heat gun.

I put the gun inside the pot, and in about 10 minutes I was able to lift the fitting off and shake it clean of solder. A brush cleaned off the majority on the pot. The end of the gun was about 3" from the pot/fitting.

I sanded the pot clean and filed the fitting smooth. I then heated the fitting until the flux began to bubble, and just as it starts to turn black the solder flowed out and created a nice fillet around the whole fitting.

I then put the gun back in the pot, but with the bigger hole too much heat was coming through the hole, so I held it closer and worked my way around the hole flowing the solder all the way around. The I set the fitting in place and put the gun 'down' in the pot, and in about 5 min the solder began to melt. I pressed the fitting flat, and ran the solder around to fill in and build a small fillet. Heat off, cleaned, reattached valve, and done in under an hour.

The whole process may have been a bit slower, but the lower heat level actually made it much easier and neater.

20150316_185537.jpg


20150316_185025.jpg


20150316_185012.jpg


20150316_190012.jpg
 
This will test how good my soldering skills are with my fermentation vessel triclover setup.

2012-02-09_09-54-09_353.jpg

How does one drill holes in tri clamp caps ? They are pretty thick, especially the 4" models.

Did you solder that Triclover on to the keg ? How is the technique different from doing a small fitting ? Do you still just heat the fitting ? All the way around at once ? Or do you have to heat the keg too ?

Did you cut the hole the OD of the fitting or the ID ?

Thanks !
 
To drill holes in stainless you will need to go to the hardware store and find a drillbit. Preferably one that says its for metal. Low speed is a priority and a bit of lubrication can't hurt. And if you are wondering if you should drill the hole according to the inside diameter or the outside diameter of a fitting, well that one should explain itself. It'll be kinda hard to fit a pipe through a hole that's only as large as the hole in the pipe. Yes you can use a standard hole saw. Yes it's faster and easier to use a punch but you still have to drill a hole to use a punch.
 
To drill holes in stainless you will need to go to the hardware store and find a drillbit. Preferably one that says its for metal.
You obviously know very little about drilling SS, especially thick SS. Its one thing to drill a hole in thin vessels, another totally different thing to tackle those caps.

Low speed is a priority and a bit of lubrication can't hurt. And if you are wondering if you should drill the hole according to the inside diameter or the outside diameter of a fitting, well that one should explain itself. It'll be kinda hard to fit a pipe through a hole that's only as large as the hole in the pipe.
You have two options putting a large triclover fitting on a keg lid.

1) drill the hole the same size as the ID of the fitting, which would allow the fitting to sit on top of the keg lid. This would make a horizontal joint between the fitting and the keg.

2) drill the hole the same size as the OD of the fitting, which would allow the fitting to slip through the top of the keg lid. It would have to be held in place to solder. This would make a vertical joint between the fitting and the keg.

Yes you can use a standard hole saw.
No, you cannot. It will have to be bimetal at the very least. Some come carbide tipped. Thus my question.

Yes it's faster and easier to use a punch but you still have to drill a hole to use a punch.
By punch I assume you mean a punch and die. How practical do you think it would be to buy a punch and die for a 4" Triclover fitting ? Not very.
 
Use a bimetal hole saw indicated for drilling metal. I recommend getting a slightly undersized hole saw and opening the hole up with a round file and dremel. Hole saws are not very precise.

If you can't fit the stainless vessel under your drill press, it's possible to use a low speed high-torque drill. I have the 1/2 in. Heavy Duty Low Speed Variable Speed Reversible Drill from harbor freight I'm very happy with that I also use to power my grain mill. First use the hole saw to make a clean perpendicular hole through a 2x4, preferably with a drill press. You can then use this 2x4 clamped to the pot to guide the hole saw, preventing it from walking and perpendicular to the wall. Make sure you clamp the pot down well as the torquey drill can throw the pot around if the hole saw catches.
 
Bobby @ brewhardware.com sales a sanke fermenter conversion kit that would eliminate having to do all of this yourself..

Very reasonably priced I might add. $34.00

https://www.brewhardware.com/product_p/sankefermenterkit.htm

I want a 4" port on my fermenters, for adding fruit, dry hopping, ease of cleaning and for immersing a chilling coil right into the beer.

FWIW, it doesn't cost much more for a 4" ferrule, cap and clamp. The only downside is you have to cut the cut and solder or weld it on. I've been dreaming of using Sanke kegs with a 4" triclover on them for fermenting forever. Can't wait to see how it turns out.

FWIW, I got my solder and flux today.
 
I would remove the spud and solder the nipple with two nuts in place. A spud does not permit an interior connection.

After thinking about it for a few days I had to suck it up and realize you are/were right. I reused the lock nut and the stainless close nipple and soldered in place. Works awesome and now I don't have those annoying shortcomings of the weldless bulkheads - rotating the entire fitting while trying to tighten one side, cutting the gasket and creating a leak at the most inopportune times.

Another ugly but strong and leakfree job! Love this soldering solution.

And a pic of my updated HLT thanks to Bobby's gear.

20150321_213016.jpg


20150315_141852.jpg
 
Last edited:
After thinking about it for a few days I had to suck it up and realize you are/were right. I reused the lock nut and the stainless close nipple and soldered in place. Works awesome and now I don't have those annoying shortcomings of the weldless bulkheads - rotating the entire fitting while trying to tighten one side, cutting the gasket and creating a leak at the most inopportune times.

Another ugly but strong and leakfree job! Love this soldering solution.

And a pic of my updated HLT thanks to Bobby's gear.

It is not beautiful but looks very solid. I get some pock marks in my seams that eventually leak slightly. I have seen the same thing in most pictures posted. It must be technique. What did you do to get yours looking so solid?
 
It is not beautiful but looks very solid. I get some pock marks in my seams that eventually leak slightly. I have seen the same thing in most pictures posted. It must be technique. What did you do to get yours looking so solid?


If you're getting leaks and pock marks you need to sand and clean more thoroughly.
 
If you're getting leaks and pock marks you need to sand and clean more thoroughly.

I went all out on cleaning and sanding (I understand the principals of soldering). I think the pock marks are left from boiling flux. None of the joints I have soldered really leak. Some (with the pock marks) have developed a slow seepage over time. I now recognize those little bubbly pock marks as a flaw in the joint and will not have them.
 
You can always add flux after you apply solder if it's getting a little dingy along the way. Sometimes all it takes is to push the pock marks out with a little extra solder. Acetone helps a lot with the prep work.
 
It is not beautiful but looks very solid. I get some pock marks in my seams that eventually leak slightly. I have seen the same thing in most pictures posted. It must be technique. What did you do to get yours looking so solid?

I used a sanding flap disc on a grinder to scuff up around the hole in the keg as well as the backside and edges of the locknut. As you can see, the integrated "washer" of the locknut is in most cases embedded in the solder - it's a thick, strong joint. I did brush more flux after I believed I had the joint heated to where I thought it needed to be.

For me, what appears to be super strong is simple. Now getting a truly strong joint that is beautiful, that is the art. I prefer to error on the strong ugly side. Well, except for my wife.
 
Does anyone have ideas on pulling a flange for a 4" triclover ferrule on a Sanke keg to make it a fermentor ? You can't put a tapered fitting on the inside like you can on a kettle.

I'm putting the 4" triclover ferrule on the bottom of the keg, using it upside down. I'll cap the filler port with a 2" triclover cap and use it for draining when cleaning in place, etc.

Could I create an internal flange by pulling a tapered fitting right through the keg by pulling it with a piece of threaded rod going through the filler port ?
 
So I tried my hand at this today. The first coupler went very well, the 2nd not so much...

I wasn't thinking when I pulled my dimple through, and I put the nut on the inside. I was pushing my ratchet in the same direction and it pulled the dimple tool through crooked. I tried the fitting and the solder just fell through the tear in the stainless...
Any suggestions on fixing this? I considered maybe putting in a 3/4" coupling, but this is right at the bottom for a sight glass so there isn't much room to spare. Is there something I could put there to make the solder fill the gap instead of running through?

edit; I was thinking of trying to somehow close the hole a bit (un-dimple) with something a bit bigger than the current hole, and hopefully that would close the gap to a more manageable size. Then drill it out a bit with a step bit and hopefully try again. Is this a recipe for disaster or what?

IMAG0065.jpg


IMAG0064.jpg
 
Last edited:
Is this after pulling the coupling?

You can probably bridge the gap with a bit of copper to get the solder to fill in properly.

I split one like that and ended up hammering it back down and soldering on a hex nipple.
 
Can you massage it closed slightly with a hammer. Then try bending the flare straight by attaching something to the coupling? Or hammer it closed and re pull the dimple straight. You should be able to rework it, and the solder will repair the tear in the stainless.
 
I tried bending it back with a hammer. The split part would go back together but there was no way I would be able to 'undimple' this hole without causing more damage, it ended up just pushing in around the hole. I ended up just soldering a nut on there. Not the nicest solution but it is still pretty strong, I plugged it to leak tested it and put a lot of force into it, it's definitely stronger than it need to be. I'll probably end up doing the elements the same way. Here's a pic with it fixed, and the 3rd hole also done. Now for the bottom drain!

View attachment 1427414282161.jpg
 
I had the same problem and ended up soldering a stainless washer on the inside of the kettle drilling a hole large enough to push the fitting through and resoldered on the outside.
 

Latest posts

Back
Top