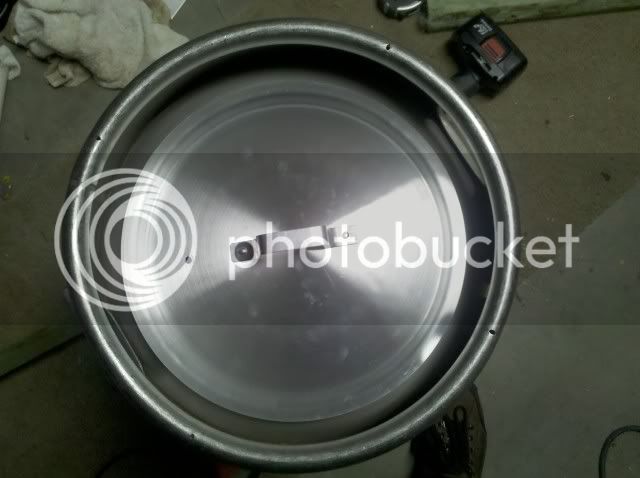
I just cut two kegs using Bobby's style jig. I used two Dewalt cutoff discs ($4) and about 1 hour of effort (from building the jig to filing down the edge). Easy squeezy! Thanks, Bobby for creating the Keggle Cutting wiki!
You are using an out of date browser. It may not display this or other websites correctly.
You should upgrade or use an alternative browser.
You should upgrade or use an alternative browser.
Simplest (?) Keggle Cutting Jig
- Thread starter passedpawn
- Start date

Help Support Homebrew Talk - Beer, Wine, Mead, & Cider Brewing Discussion Forum:
This site may earn a commission from merchant affiliate
links, including eBay, Amazon, and others.
Oh, and no injuries either! ")
OP
OP
Thanks passedpawn for the jig design. It worked fantastically and flawlessly.
Great!
TriangleIL
Well-Known Member
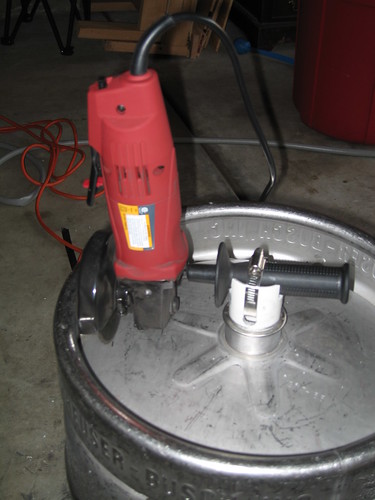
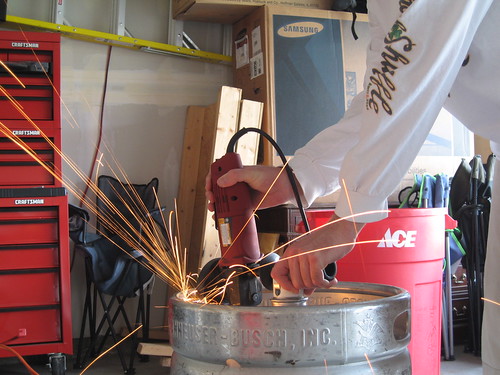
I used this method too (Thanks PassedPawn!). It worked great, here are some pics.
Setup
Action
Setup
Action
Passedpawn's jig is definitely simpler! Wish I saw that prior to building the other. Oh well, the cat got skinned either way. Can't wait to brew in the new keggle.
I would have used a method similar to passedpawn's design if my grinder had a back handle port. I don't know why, but my Hitachi only has then on either side, not the back.
Before...

After... (sold two...)

After... (sold two...)
I would have used a method similar to passedpawn's design if my grinder had a back handle port. I don't know why, but my Hitachi only has then on either side, not the back.
I think the issue with handle placement is the size of the grinder? 4 inches do not have the ability to screw the handle into the back, while 4 1/2 do???
Also Home Depot has a ryobi 4 1/2 for $40.00 that worked out just fine, It came with everything except the cutoff wheel...
Nope, mine is labeled as a 4.5".
DannyW
Well-Known Member
Very simple! I like it.
ultravista
Well-Known Member
Great work guys, can't wait to tear into my get this weekend or next.
To confirm, measure a 12 inch hole and cut on the inside of the line? How do you align the jog to get exactly to the mark?
To confirm, measure a 12 inch hole and cut on the inside of the line? How do you align the jog to get exactly to the mark?
klyph
Well-Known Member
Great work guys, can't wait to tear into my get this weekend or next.
To confirm, measure a 12 inch hole and cut on the inside of the line? How do you align the jog to get exactly to the mark?
Place the hole saw, arbor, spear, whatever you use for the center pivot 12" away from the cutting disk.
Or build an adjustable one.
To confirm, measure a 12 inch hole and cut on the inside of the line? How do you align the jog to get exactly to the mark?
IMO, it's best to obtain the actual lid you plan to use with the kettle before you cut the hole. Sometimes a 12" lid will require a slightly larger hole. Mine does and I cut a 12-1/4" hole for it. Setting up a an offset grinder jig requires careful measurements, but it's not too bad and that's the way I did it. IMO, it's good practice to mark the cut line with a Sharpie whether or not you use a jig to cut the hole.
One thing you can observe about all the cutting jigs over the last few years is that the design is going to be highly dependent on the type of angle grinder you have. Some of them have aux. handle ports on all three sides and some have none. Some have a nice flat back that you can clamp to a board, some are rounded. The way to start is to put that 2" diameter center pivot device, whether it's a hole saw bit, the original keg insert, or a piece of PVC, and then hold your grinder in position. Connecting the two has to be visualized.
Then there's the camp that says F-it and just freehands it.
Then there's the camp that says F-it and just freehands it.
Then there's the camp that says F-it and just freehands it.
You mean like BierMuncher?
(I never get sick of that picture)
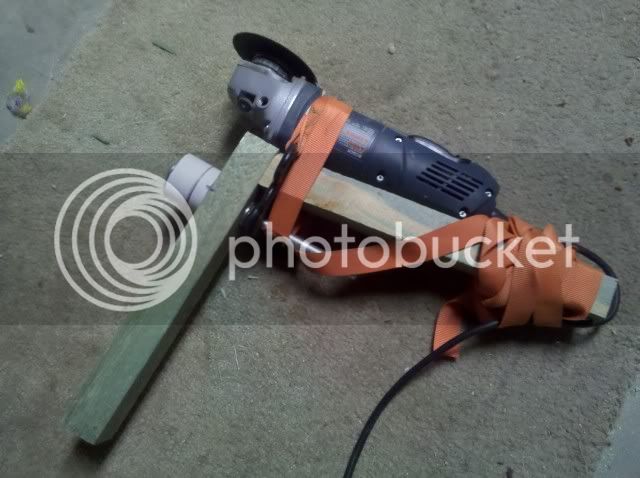
I was one of the one who was not fortunate to have a grinder with the handle on the backside only the sides. My grinder was not straight but at an angle so my jig had to reflect that to get my blade as close to vertical as possible.
here is my jig and cuts I made. there is NO way I would have been able to do it with out a jig.
https://www.homebrewtalk.com/f51/cu...g-angle-grinder-88907/index2.html#post2430666
-=Jason=-
here is my jig and cuts I made. there is NO way I would have been able to do it with out a jig.
https://www.homebrewtalk.com/f51/cu...g-angle-grinder-88907/index2.html#post2430666
-=Jason=-
See, I'm not the world's most talented toolsman, or the most patient guy, but I freehanded my keg and it came out pretty damn good. There's one spot that's a little more flat than round, but you'd never look twice at it. I mean, these jigs are simple enough where there isn't really much reason NOT to do one, but if you go fairly slow, know that it's going to take a couple passes, let the tool do the work, etc.... the jig's nice but not REALLY necessary.
I agree with you. I freehanded my first one and it was passable. I've used the grinder a billion times since then and probably have much more confidence than before. I could freehand another keg but it would take me 3x as long as the jig cut. Still, if you're going to do more than one keg, build the jig and knock-em out. Of course the downside is that you'll be known as "the guy with the keg cutting jig" in your brew club and that has a whole bunch of implications.
I agree with you. I freehanded my first one and it was passable. I've used the grinder a billion times since then and probably have much more confidence than before. I could freehand another keg but it would take me 3x as long as the jig cut. Still, if you're going to do more than one keg, build the jig and knock-em out. Of course the downside is that you'll be known as "the guy with the keg cutting jig" in your brew club and that has a whole bunch of implications.
Bobby, thats not a bad thing sixer of beer for cutting the hole *wink wink*
I've used my grinder a lot and can cut a fairly straight line with it, but doing a circle is completely different.
-=Jason=-
BrewBeemer
Well-Known Member
Place the hole saw, arbor, spear, whatever you use for the center pivot 12" away from the cutting disk.
klyph, i'm having a problem locating kegs large enough to allow a 24" diameter cut opening by your "center pivot 12" away from the cutting disk".
You meant a 6" radius for 12" diameter cut openings by chance?
OP
OP
Before I made my simple jig, I tried to freehand it. Within about 5 seconds the grinder wheel dug into the metal and shattered (hurray for protective eyewear). That's when I ran to the garage and scrounged the PVC parts for my jig.
Before I made my simple jig, I tried to freehand it. Within about 5 seconds the grinder wheel dug into the metal and shattered (hurray for protective eyewear). That's when I ran to the garage and scrounged the PVC parts for my jig.
See, sounds like you were trying to cut through the whole thing in one pass. If you freehand, you basically want to score the line the first time around, you're just going in a millimeter or so. Once you get the line scored all the way around, the cutting wheel wants to stay in that line. Walk it around three or four times, don't cut too much metal at once.
OP
OP
See, sounds like you were trying to cut through the whole thing in one pass. If you freehand, you basically want to score the line the first time around, you're just going in a millimeter or so. Once you get the line scored all the way around, the cutting wheel wants to stay in that line. Walk it around three or four times, don't cut too much metal at once.
Yea, that's what happened - I wasn't sure what I was doing. I figured it out pretty friggin fast after that though.
See, sounds like you were trying to cut through the whole thing in one pass. If you freehand, you basically want to score the line the first time around, you're just going in a millimeter or so. Once you get the line scored all the way around, the cutting wheel wants to stay in that line. Walk it around three or four times, don't cut too much metal at once.
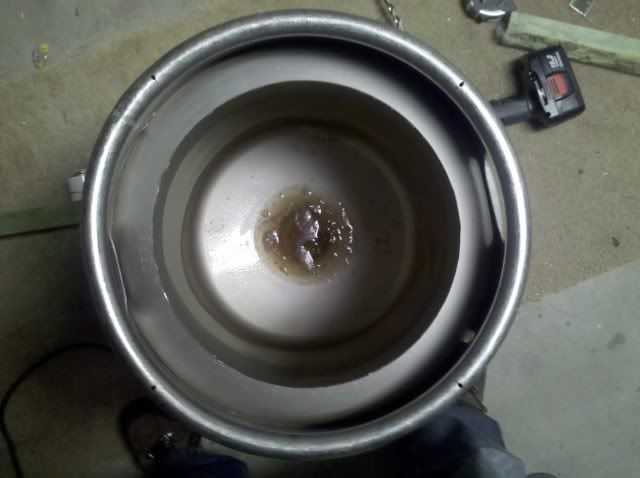
thats how I did it with my jig, just used the weight of the grinder to score a little bit each go around, but it was about 5-7 minutes a keg and it was cut.
my first cut I was a little to heave and my cut wasn't as nice, my second cut was a light touch and perfect.
-=Jason=-
ggltd
Active Member
Damn... I wished I had seen this before my kegs were cut....Genius!
klyph
Well-Known Member
klyph, i'm having a problem locating kegs large enough to allow a 24" diameter cut opening by your "center pivot 12" away from the cutting disk".
You ment a 6" radius for 12" diameter cut openings by chance?
Everything's bigger in Alaska
BrewBeemer
Well-Known Member
Just giving ya a bad time your far away besides the wife hits too hard.
That last cold front has us down below into the 20's and 30's,
stop it. Cheers bro.
That last cold front has us down below into the 20's and 30's,
stop it. Cheers bro.
Chenslee
Well-Known Member
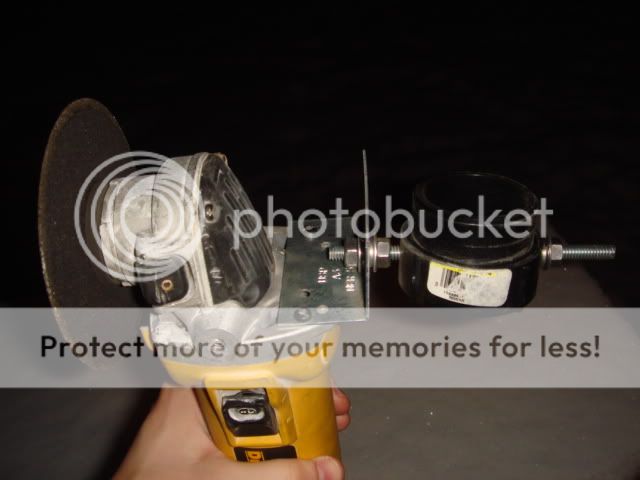
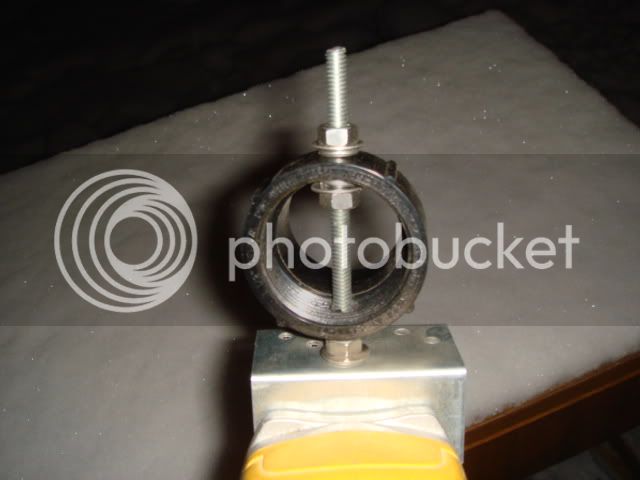
I used a piece of 1.5" pvc, a 5/16" bolt, and a Milwaukee grinder. I just bolted the grinder through a hole in the PVC. I used washers between the head of the bolt and the PVC to adjust the radius. Very similar to OP, but with a bolt instead of the handle. Worked great.
nu2brewing
Well-Known Member
I forgot I don't have privileges to attach photos. You can find them on Facebook if you'd like to see. (Chris Holderness)
WrongCoastBrewery
Well-Known Member
Just used this method to cut my keggle. Had to slightly modify the jig since my grinder's handle only attaches to the left or right of the wheel. Either way about 4-5 minutes later, I had an opening in the top that was perfectly round.
twardnw
Well-Known Member
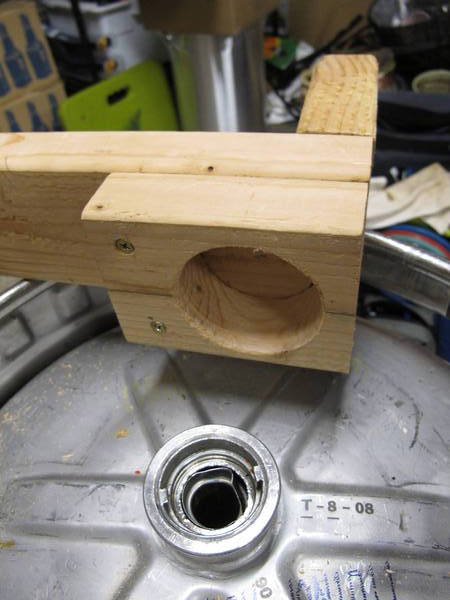
I used a 4x6 joist hanger (could have gotten away with a 4x4) and cut it down to not get in the way of the guard on the grinder. Drilled some holes in it for large bolts to thread into the grinder, used a double-nut on one side to securely hold the grinder upright, and a PVC spacer on the other to snug things up. This was fastened to a 1.25" PVC coupler by a length of all-thread (nuts on either side of the joist hanger to secure it). The only change that's hard to see is I used a double-nut setup on the 'back' side of the coupler after discovering how much the vibration loosened things up.


I touched up the edges of the grind with a 60-grit flapper disc on the grinder till I can run my finger around the whole thing and not find any sharp places.
I touched up the edges of the grind with a 60-grit flapper disc on the grinder till I can run my finger around the whole thing and not find any sharp places.
ultravista
Well-Known Member
... you got a purdy nice looking hole twardnw
Cold Country Brewery
Well-Known Member
Just in time, buddy and I are going to convert a half dozen kegs this week.
PROST!
Converting half a dozen? Where is everyone getting these kegs??!? I had to beg borrow and steal to find ONE!
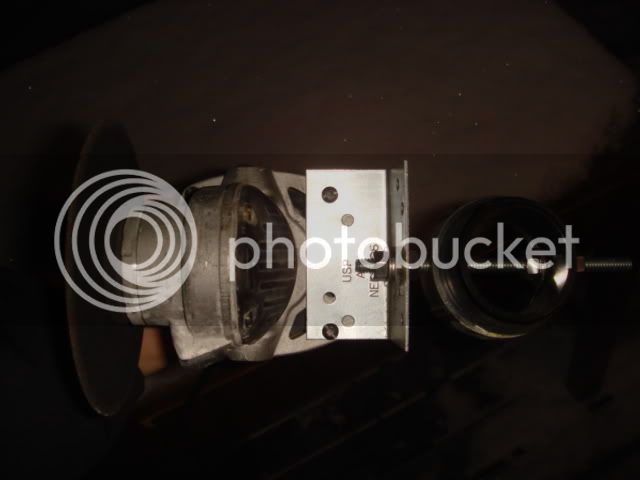
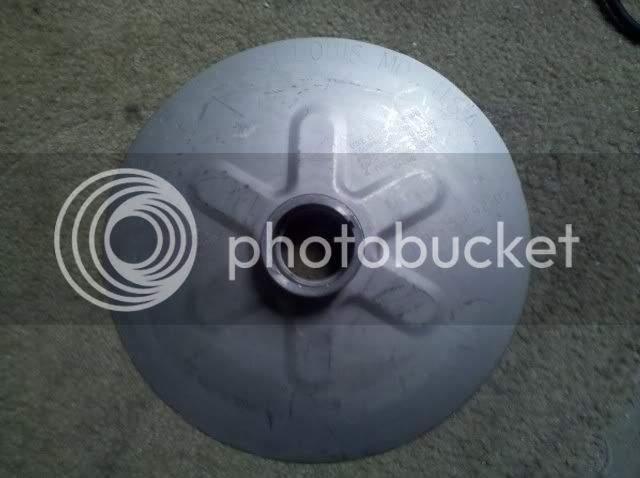
I posted my jig in another thread, but since this thread is a nice collection of jigs, I thought I'd post it here too. I was having MAJOR issues getting the stem out of my keg and couldn't use the inside of the opening for my pivot, so I went outside...
RobbyBeers
Well-Known Member
- Joined
- Jan 16, 2009
- Messages
- 163
- Reaction score
- 4
Anyone have any tips/pics for using this setup with a dremel?
I'm going to have to buy a cutting tool, and I think I'd rather have a dremel around the house than an angle grinder. (Or maybe I'm wrong even on that assumption...?)
-R
I'm going to have to buy a cutting tool, and I think I'd rather have a dremel around the house than an angle grinder. (Or maybe I'm wrong even on that assumption...?)
-R
both are tools you need around the house, but cutting this lid is NOT a job for the dremel. you are going to spend more on blades for it than a $20 harbor freight hand grinder and couple cut off wheels. but while you are harbor freight pick up the flapper disk as well for cleaning up the sharp edges.
-=Jason=-
-=Jason=-
RobbyBeers
Well-Known Member
- Joined
- Jan 16, 2009
- Messages
- 163
- Reaction score
- 4
Hmm...nuff said maybe. The angle grinder isn't really all that expensive, especially if it's that much better for the job.
Thanks for the input.
Thanks for the input.
OP
OP
I hate those tiny cutting disks with the dremel. I don't think I've ever used one that didn't shatter violently half way through the job. I do think, though, some on this forum have made some decent keggle cuts with a dremel. You could probably find them with the right search terms.
This is a job for an angle grinder. BTW, those disks can shatter and fly apart too if you push too hard. Don't push too hard. And, protective eyewear!
This is a job for an angle grinder. BTW, those disks can shatter and fly apart too if you push too hard. Don't push too hard. And, protective eyewear!
Similar threads
- Replies
- 5
- Views
- 1K
- Replies
- 4
- Views
- 2K
- Replies
- 0
- Views
- 558
