You are using an out of date browser. It may not display this or other websites correctly.
You should upgrade or use an alternative browser.
You should upgrade or use an alternative browser.
Show us your DIY wort chillers
- Thread starter BadgerBrewer
- Start date

Help Support Homebrew Talk - Beer, Wine, Mead, & Cider Brewing Discussion Forum:
This site may earn a commission from merchant affiliate
links, including eBay, Amazon, and others.


Nice job! That big 12mm tubing can be somewhat unwieldy, but you made those bends nice and even. I like the quick-disconnects, too.
Compacto
Active Member
- Joined
- Mar 17, 2015
- Messages
- 39
- Reaction score
- 27
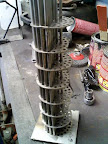
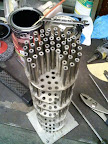
Here is mine. Taking my time with it. It is a tube/shell style heat exchanger made from 304 stainless. The wort will flow through the tubes and the chilling water will flow through the shell. The shell is not installed in photos below, and I still have a few tubes to install.
Original design was 57x12" long tubes of 3/16" OD in a 3" shell. The tubes are 11.875. I have 7 baffles to cause turbulence. On each end there will be a sanitary fitting and cap (with wort passage) fit with gasket and triclamp so I can remove the core for cleaning.
The design was simulated to cool 212F wort to 92 with 45F water (from my prechiller) first pass, and since I recirculate through the brew kettle to whirlpool, I should be able to get the wort down fast with this device.. <crosses fingers>
Impressive! What's your plan for the plenum for the wort? And sealing the tube etc.
ImperialStaudt
Active Member
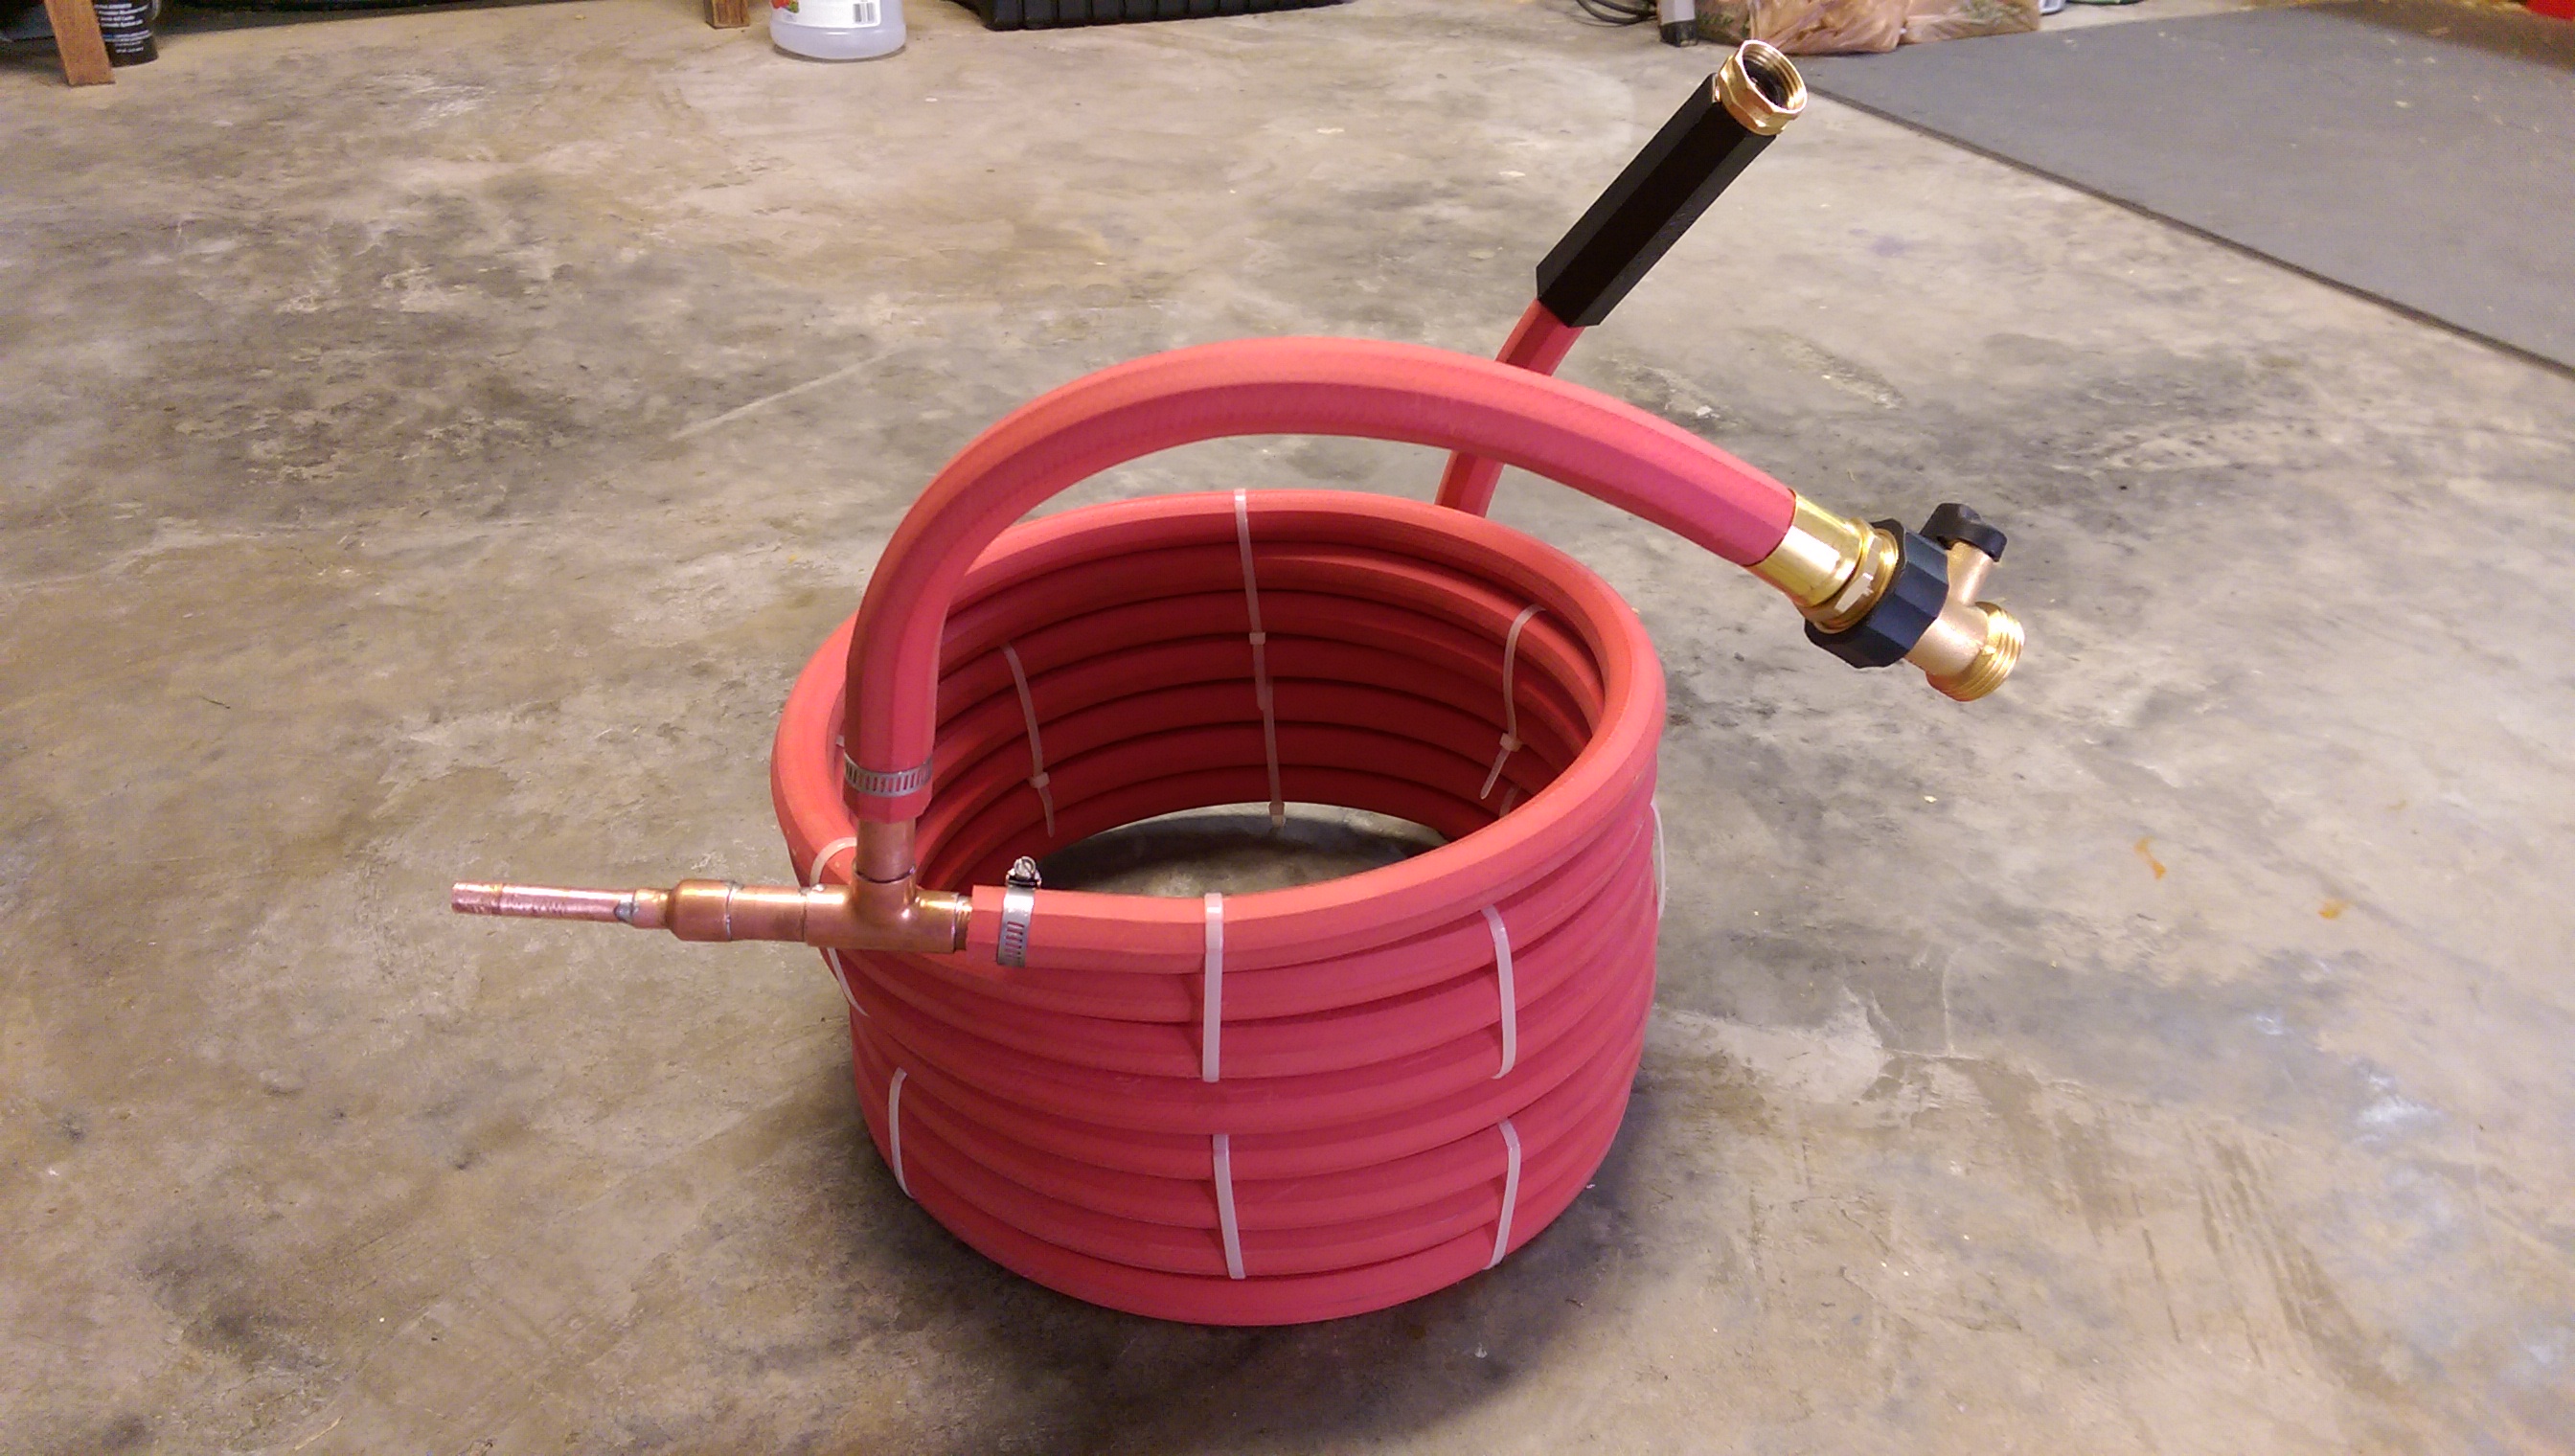
20' of 1/2" OD soft copper and 20' of 1"OD x 3/4"ID clear tubing. Trying it out this weekend.


UltraHighABV
Well-Known Member
- Joined
- May 30, 2015
- Messages
- 58
- Reaction score
- 3
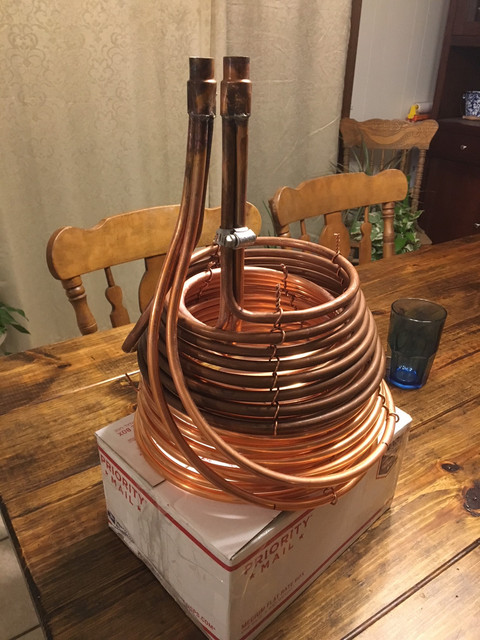
Heres mine: some before and after cleaning
View attachment ImageUploadedByHome Brew1435354254.938712.jpg
View attachment ImageUploadedByHome Brew1435354202.928778.jpg
View attachment ImageUploadedByHome Brew1435354236.566681.jpg
View attachment ImageUploadedByHome Brew1435354513.766362.jpg
View attachment ImageUploadedByHome Brew1435354603.508008.jpg
View attachment ImageUploadedByHome Brew1435354687.433704.jpg
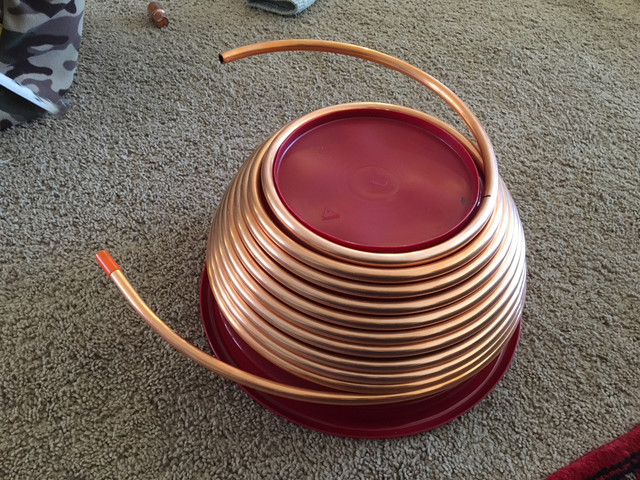
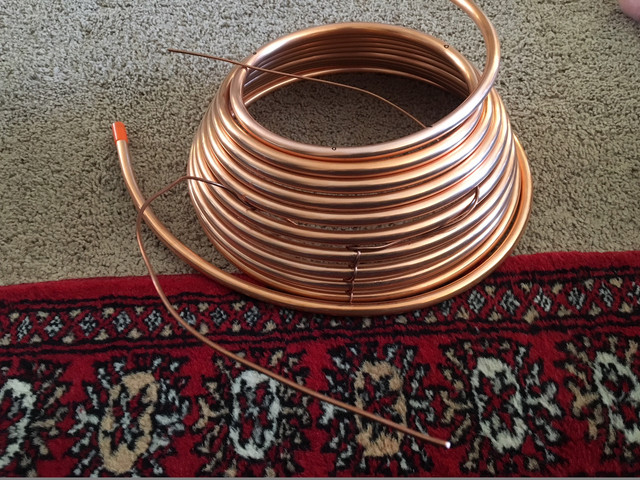
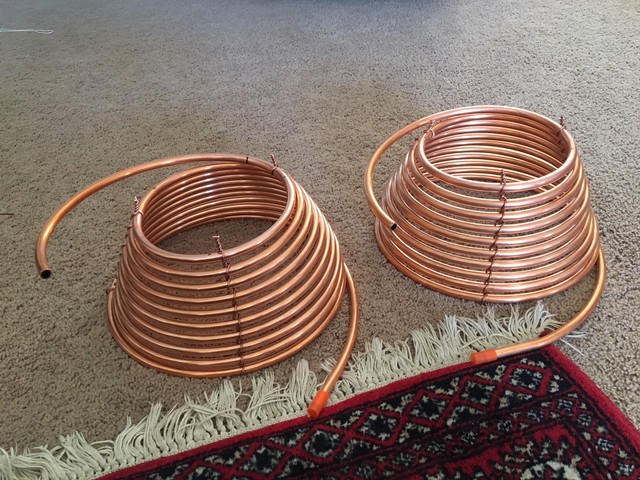
the two interlocked coils in the back are continuous, then a third is in front soldered to the other two
View attachment ImageUploadedByHome Brew1435354254.938712.jpg
View attachment ImageUploadedByHome Brew1435354202.928778.jpg
View attachment ImageUploadedByHome Brew1435354236.566681.jpg
View attachment ImageUploadedByHome Brew1435354513.766362.jpg
View attachment ImageUploadedByHome Brew1435354603.508008.jpg
View attachment ImageUploadedByHome Brew1435354687.433704.jpg
the two interlocked coils in the back are continuous, then a third is in front soldered to the other two
jmpreiks
Well-Known Member
Here's my counterflow chiller. Build pics and links to parts can be found here: https://www.homebrewtalk.com/showthread.php?t=537126
Edbeenbreto
Well-Known Member
- Joined
- Apr 25, 2015
- Messages
- 78
- Reaction score
- 7
So I am in the Army and I was cleaning out a old connex or storage and found this R2D2 looking cooling bot that was on top of a 10 gal water igloo. So of course I took the igloo and took apart the Top piece and found this! all copper with some aluminum fins! So my plan is to run the hot wert into one side and out the other to the fermenter, all while in a ice chest. Any thoughts? I did a test hit about a week ago with 150 degree hot water and it went from 150 to 80-84 at the end. If any one is using something like this please share. thoughts?


jmpreiks
Well-Known Member
So I am in the Army and I was cleaning out a old connex or storage and found this R2D2 looking cooling bot that was on top of a 10 gal water igloo. So of course I took the igloo and took apart the Top piece and found this! all copper with some aluminum fins! So my plan is to run the hot wert into one side and out the other to the fermenter, all while in a ice chest. Any thoughts? I did a test hit about a week ago with 150 degree hot water and it went from 150 to 80-84 at the end. If any one is using something like this please share. thoughts?
Looks like it has great potential, I don't see why it wouldn't work well. My main concern is what type of potentially hazardous chemical was that used for originally? You don't really have a good way to know if there are any deposits or sediments from whatever use to be in there, and you probably don't want them touching your beer. Unless of course you can disassemble everything and mechanically clean every bit of tubing.
The_Bishop
Well-Known Member
- Joined
- Dec 8, 2013
- Messages
- 2,100
- Reaction score
- 676
This is mine:

That being said, I'm installing a ZChiller counterflow chiller in my BIAB stand to minimize equipment/plumbing changes.
That being said, I'm installing a ZChiller counterflow chiller in my BIAB stand to minimize equipment/plumbing changes.
Two horrible pics of mine submerged in wort!!


Edbeenbreto
Well-Known Member
- Joined
- Apr 25, 2015
- Messages
- 78
- Reaction score
- 7
Looks like it has great potential, I don't see why it wouldn't work well. My main concern is what type of potentially hazardous chemical was that used for originally? You don't really have a good way to know if there are any deposits or sediments from whatever use to be in there, and you probably don't want them touching your beer. Unless of course you can disassemble everything and mechanically clean every bit of tubing.
Get this! Just water. there was a 12 volt water pump inside so it was like a portable swamp cooler. So I plan to run star san thru it for about 20 min and use it tonight for my stout.
jmpreiks
Well-Known Member
Get this! Just water. there was a 12 volt water pump inside so it was like a portable swamp cooler. So I plan to run star san thru it for about 20 min and use it tonight for my stout.
Nice, let us know how it turns out for you.
BeardedBrews
Well-Known Member
I bent a 50' 1/2" IC a couple months ago, and it was worlds better than the 20' 3/8" version I was borrowing from a friend.
Tonight I added on a "Jamil" style re-circulation arm and Good Lord! The difference is incredible.
Prior to recirculating I would get obvious cool spots. After 30-60 seconds of chill water the outlet side would start to run cold until I gave the IC a good swirl in the pot. The best I could do was 20 minutes to pitching temperatures if I gave the IC regular swirls.
Tonight I didn't even have time to turn on the camera before the temp started plummeting:
Started the timer at 211F just after I cut the propane on my burner and I opened the chilling water. My tap water was reading 66F this evening.
160F by 60 seconds
125F at 2 minutes
104F at 3 minutes
90F just after 4 minutes
82F at the 5 minute mark
74F at 7 minutes
68F at 10 minutes
[ame]https://www.youtube.com/watch?v=edfFVDmJvJ4&feature=youtu.be[/ame]
The video cuts off around 5 min when my battery quit. I remembered to get a shot of my whole setup around the 1:15 mark in the video.
Thanks guys for the inspiration to make an awesome chiller!
I moved here to Texas from Wisconsin. I brewed a couple weeks ago and I ran into an issue I didn't have in WI. The tap water is 80 in the summer.. Rut-roh... I used ice to chill it the rest of the way which I didn't like doing. My solution: I bought a 42 qt cooler. I took 50' of 3/8 soft copper and made it into dual coils and sat it inside the cooler. On the IN side, from the garden hose, it quick connects into a valve and goes into a 90 degree connection (drilled a hole in the top side) and goes through the coils which will be in an ice bath of course. On the OUT side, I drilled another hole in the top side, it goes to another 90 elbow and into a quick connect. I've got 10' of clear 3/8 ID with quick connects on both ends so it connects to the OUT from the cooler and the other end quick connects into my wort chiller. I will now have ice cold water going into my wort chiller and I would think it would be able to chill it to 70 in under 10 minutes. I don't recycle the hot water coming out of wort chiller. It flows down the driveway and into the gutter.
Does anyone know if I'm accurate in saying it should cool the wort in 10 minutes or so?
Does anyone know if I'm accurate in saying it should cool the wort in 10 minutes or so?
This may work but you may be better off cooling first using ground water the. The remaining 10 degrees using ice water. You may be putting so much water through the cool it will not cool down that much.
-BD
-BD
MrZuckerkorn
Member
- Joined
- Jul 28, 2015
- Messages
- 14
- Reaction score
- 2
First major DIY project, and first post! My first 5 batches were extract with steeping grains on the stove. 3 gallon boils (all the stove could handle), 2 frozen gallons of water to drop in for cooling. Worked like a charm, until our glass cooktop cracked through. Evidently you can't use a 30 quart pot on a ceramic cooktop, especially if the burner is on high for an extended period of time, wish I had known.
Anyway, after that expensive mistake, I ordered a Bayou burner and set to work on a wort chiller since I plan to do 5 gallon boils from now on. I initially tried (but failed) to be efficient with the cost of the project, and opted for a 50' coil of 3/8 OD copper on ebay for $42, free shipping. After tons of research on the forums, I was leaning toward a traditional design, but was worried that the water in the chiller would be heated through after the first 30 feet or so due to the small tubing diameter. So, I used the ribcage design but cut the tube into two 25 foot pieces, feeding each with a 1/2 ID rigid copper pipe. I kept the overall size small enough that I can stir the wort around the outer edge of the pot. I used hose fittings on either end since I plan to try to conserve the used water in some way, maybe for brewing clean-up. The compression fittings that helped me transition from the 3/8 OD soft copper to the half inch piping seem to allow the vertical tubing to rotate when I attach hoses, even when tightened securely, so I used some 14 gauge wire I had on hand to stabilize the coil.
Overall the project ended up costing quite a bit, probably over $100 for all of the fittings and solder kit, but it made for a great learning experience since I've never soldered before. The chiller works well, no leaks, although if I were to do it again I would use 1/2 inch OD tubing and possibly run the water intake tube down the inside of the overlapping coil for more stability. Looking forward to trying it out on my next brew!
jmpreiks
Well-Known Member
First major DIY project, and first post!
Nice work! Welcome to the forums!
BeardedBrews
Well-Known Member
Mr. Z, welcome to the forum and let me be the first to say that I LOVE your post. In my mind it perfectly exemplifies the the journey almost everyone takes with brewing, and with some selective quotes I think we can all see a bit of ourselves here. I added some labels for clarity.
"The Ramp-Up"
"The Research Project"
"The Realization"
"The Whole Point"
"The Next Paycheck"
"The Ramp-Up"
I ordered a Bayou burner and set to work on a wort chiller.
I initially tried (but failed) to be efficient with the cost of the project.
"The Research Project"
After tons of research on the forums
I was leaning toward a traditional design, BUT....
I used the {insert complicated thing here} so that I can {insert thing that probably helps} since I plan to {insert justification that you'll use with SWMBO}
"The Realization"
Overall the project ended up costing quite a bit
"The Whole Point"
but it made for a great learning experience
Looking forward to trying it out on my next brew!
"The Next Paycheck"
although if I were to do it again
jmpreiks
Well-Known Member
Mr. Z, welcome to the forum and let me be the first to say that I LOVE your post. In my mind it perfectly exemplifies the the journey almost everyone takes with brewing, and with some selective quotes I think we can all see a bit of ourselves here. I added some labels for clarity.
This is great. LOL
vindee
Well-Known Member
Double Coil Chiller.


vindee
Well-Known Member
More of the same


Awesome dual-coil IC, and you did a great job on the bending! I hope those spacing bars are not aluminum, you don't want to get galvanic reaction between it and the copper.
I posted about this in 2016, but just saw this thread now. I built a two stage counterflow chiller that lets me chill a 10 gallon batch in 15 minutes in one pass to pitching temps in the Georgia summer.
https://www.homebrewtalk.com/forum/threads/two-stage-counterflow-chiller.568689/
https://www.homebrewtalk.com/forum/threads/two-stage-counterflow-chiller.568689/
Loyd
Well-Known Member
My chiller 18' counter flow connected to a window ac glycol chiller.


bikedave99
Active Member
- Joined
- May 1, 2017
- Messages
- 26
- Reaction score
- 9
Here's my clone chiller made from 50' of clearance 3/8" tubing from Lowes and then 20' from my last inadequate immersion chiller:
bikedave99
Active Member
- Joined
- May 1, 2017
- Messages
- 26
- Reaction score
- 9
Alright, tested the above rig for the first time yesterday. All that copper sure took anger out of the boil when I first plopped it in. On to the good stuff. It took me about 9 minutes to take 12 gallons of boiling wort down to 70 degrees with my ~50 degree groundwater. I had it pulling off my clothes washer hose bib and dumped back into the washer for a warm load of laundry. It didn't take much more than a full washer to get down to temp. What a great improvement over the past operation, which was 30-40 minutes of bobbing the 25' - 3/8" chiller in it.
Congrats, looks like a winner! 
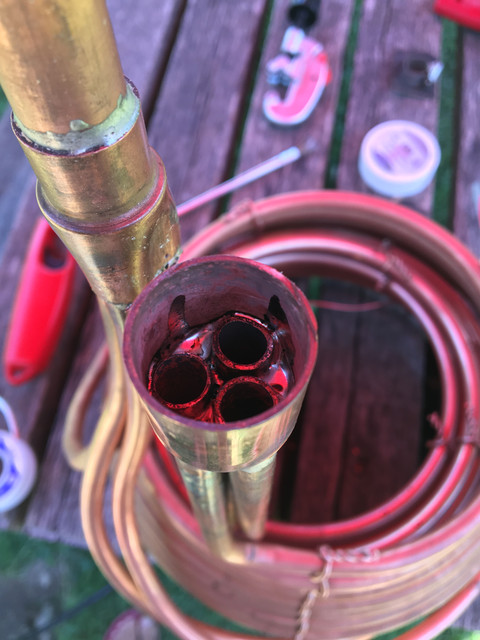
How were you able to fill the voids inside those 3-into-1 transitions?
Being an amateur plumber - with all that entails - I actually plumbed a utility sink where there wasn't one today - leak free, even - big gaps are a pita with solder...
Cheers!
How were you able to fill the voids inside those 3-into-1 transitions?
Being an amateur plumber - with all that entails - I actually plumbed a utility sink where there wasn't one today - leak free, even
- big gaps are a pita with solder...Cheers!
JONNYROTTEN
Well-Known Member
How is it cleaning the crud out of the inner and outer coil? seems like it might be a pain...nice job thoughHere's my clone chiller made from 50' of clearance 3/8" tubing from Lowes and then 20' from my last inadequate immersion chiller:
bikedave99
Active Member
- Joined
- May 1, 2017
- Messages
- 26
- Reaction score
- 9
Congrats, looks like a winner!
How were you able to fill the voids inside those 3-into-1 transitions?
Being an amateur plumber - with all that entails - I actually plumbed a utility sink where there wasn't one today - leak free, even
Cheers!
It is a pain! I started by forming the transition first. I stuck 3 steel dowels about the same size as the copper tubing into the fitting and then hammering it to fit tighter if that makes sense. Then I cleaned and fluxed the fire out of it, stuffed fluxed pieces of copper wire in the gaps I could and then ran in the solder. I had to do it upside down so the excess solder wouldnt drop into my coils. It was a tedious process and I had to go back a few times to fix pin hole leaks. I tested it with air pressure before moving on.
bikedave99
Active Member
- Joined
- May 1, 2017
- Messages
- 26
- Reaction score
- 9
How is it cleaning the crud out of the inner and outer coil? seems like it might be a pain...nice job though
Man it’s nothing... I’m constantly agitating the wort or the chiller as it is in use so nothing precipitates on the coils. All I had to do was dunk it in a bucket of water a few times and there wasn’t a spec of hop material left on it. There honestly really wasn’t any gunk on it coming out of the wort, I mostly rinsed it to get the sugary wort off of it. Turn it upside down to drain, hit it with some compressed air to speed the process and done.
North_of_60
Well-Known Member
Simple but only seasonally effective.


Nokt
Well-Known Member


bikedave99
Active Member
- Joined
- May 1, 2017
- Messages
- 26
- Reaction score
- 9
There are no words.
Did you make the manifolds? Out of what?
I have recently got access to a laser cutter, so this is a test to see what it can do. The manifolds är cut in stainless steel, the tubes is brazed to the manifold and the top and bottom of the manifolds is TIG welded. I have two project at the moment (beside working), I want to learn how to use the laser cutter and at the same time learn how to braze copper. This is a perfect object for both. The laser is the easy part.
Not quite as much copper as some of the other chillers here, but it'll be a whole lot better than leaving the pot in a bucket with the hose directing water around it.
Still waiting for the matching hose disconnects to arrive and need to ream out the stop in a compression fitting for the temperature probe.
bikedave99
Active Member
- Joined
- May 1, 2017
- Messages
- 26
- Reaction score
- 9
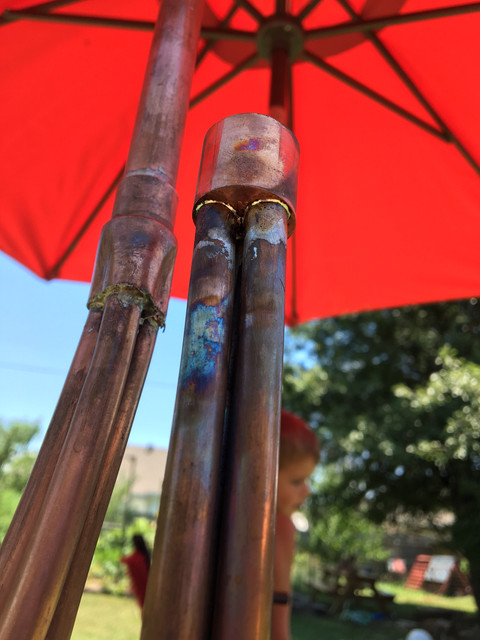
Well, i sprung a leak at my cobbled together 3-1 connector. I tried once to reflow the solder to get it to seal but it wasn't going to happen. So, I got a 3/4" copper pipe cap and drilled three holes just smaller than the tubing OD. I used a step bit and went really easy as I was getting close to the end. As soon as it began to catch I would run it in reverse to smooth out the grab. I final fit the holes to the tubing with a round file. There has been some concern expressed about the strength as you are just relying on the solder joint through a thin copper cap. How I did it, my holes were right up against the wall of the cap, so when I fluxed and soldered, the solder wicked up vertically between the cap and tubing. I believe this is quite strong. See below:
Last edited:
The first version was not dense. But the result was so good that I built a new one with twice the number of tubes.
It cools 25 liters (6.6 gallon) from 90 ° (195 ° F) to 25 ° (77 ° F) with 50 liters (13.2 gallon) of water that I then washed the equipment in. The flow was not more than 3 liters / minute so it took some time. Right now it's more important to save water than it's going fast. We have a heat wave in Sweden.
So I have to brew!
.jpg")
It cools 25 liters (6.6 gallon) from 90 ° (195 ° F) to 25 ° (77 ° F) with 50 liters (13.2 gallon) of water that I then washed the equipment in. The flow was not more than 3 liters / minute so it took some time. Right now it's more important to save water than it's going fast. We have a heat wave in Sweden.
So I have to brew!
WOW Some of these things are works of art. My issue was only brewing 2 Gallons, and my regular 10' homemede one was 50% out the wort. So I cut it up and modifed it to try get all 10' in the wort. Another mistake, 1/2" pipe. 3/8 would have been easier to work, but I could not find 3/8 fittings locally.
Attachments


Last edited:
rudylyon57
Well-Known Member
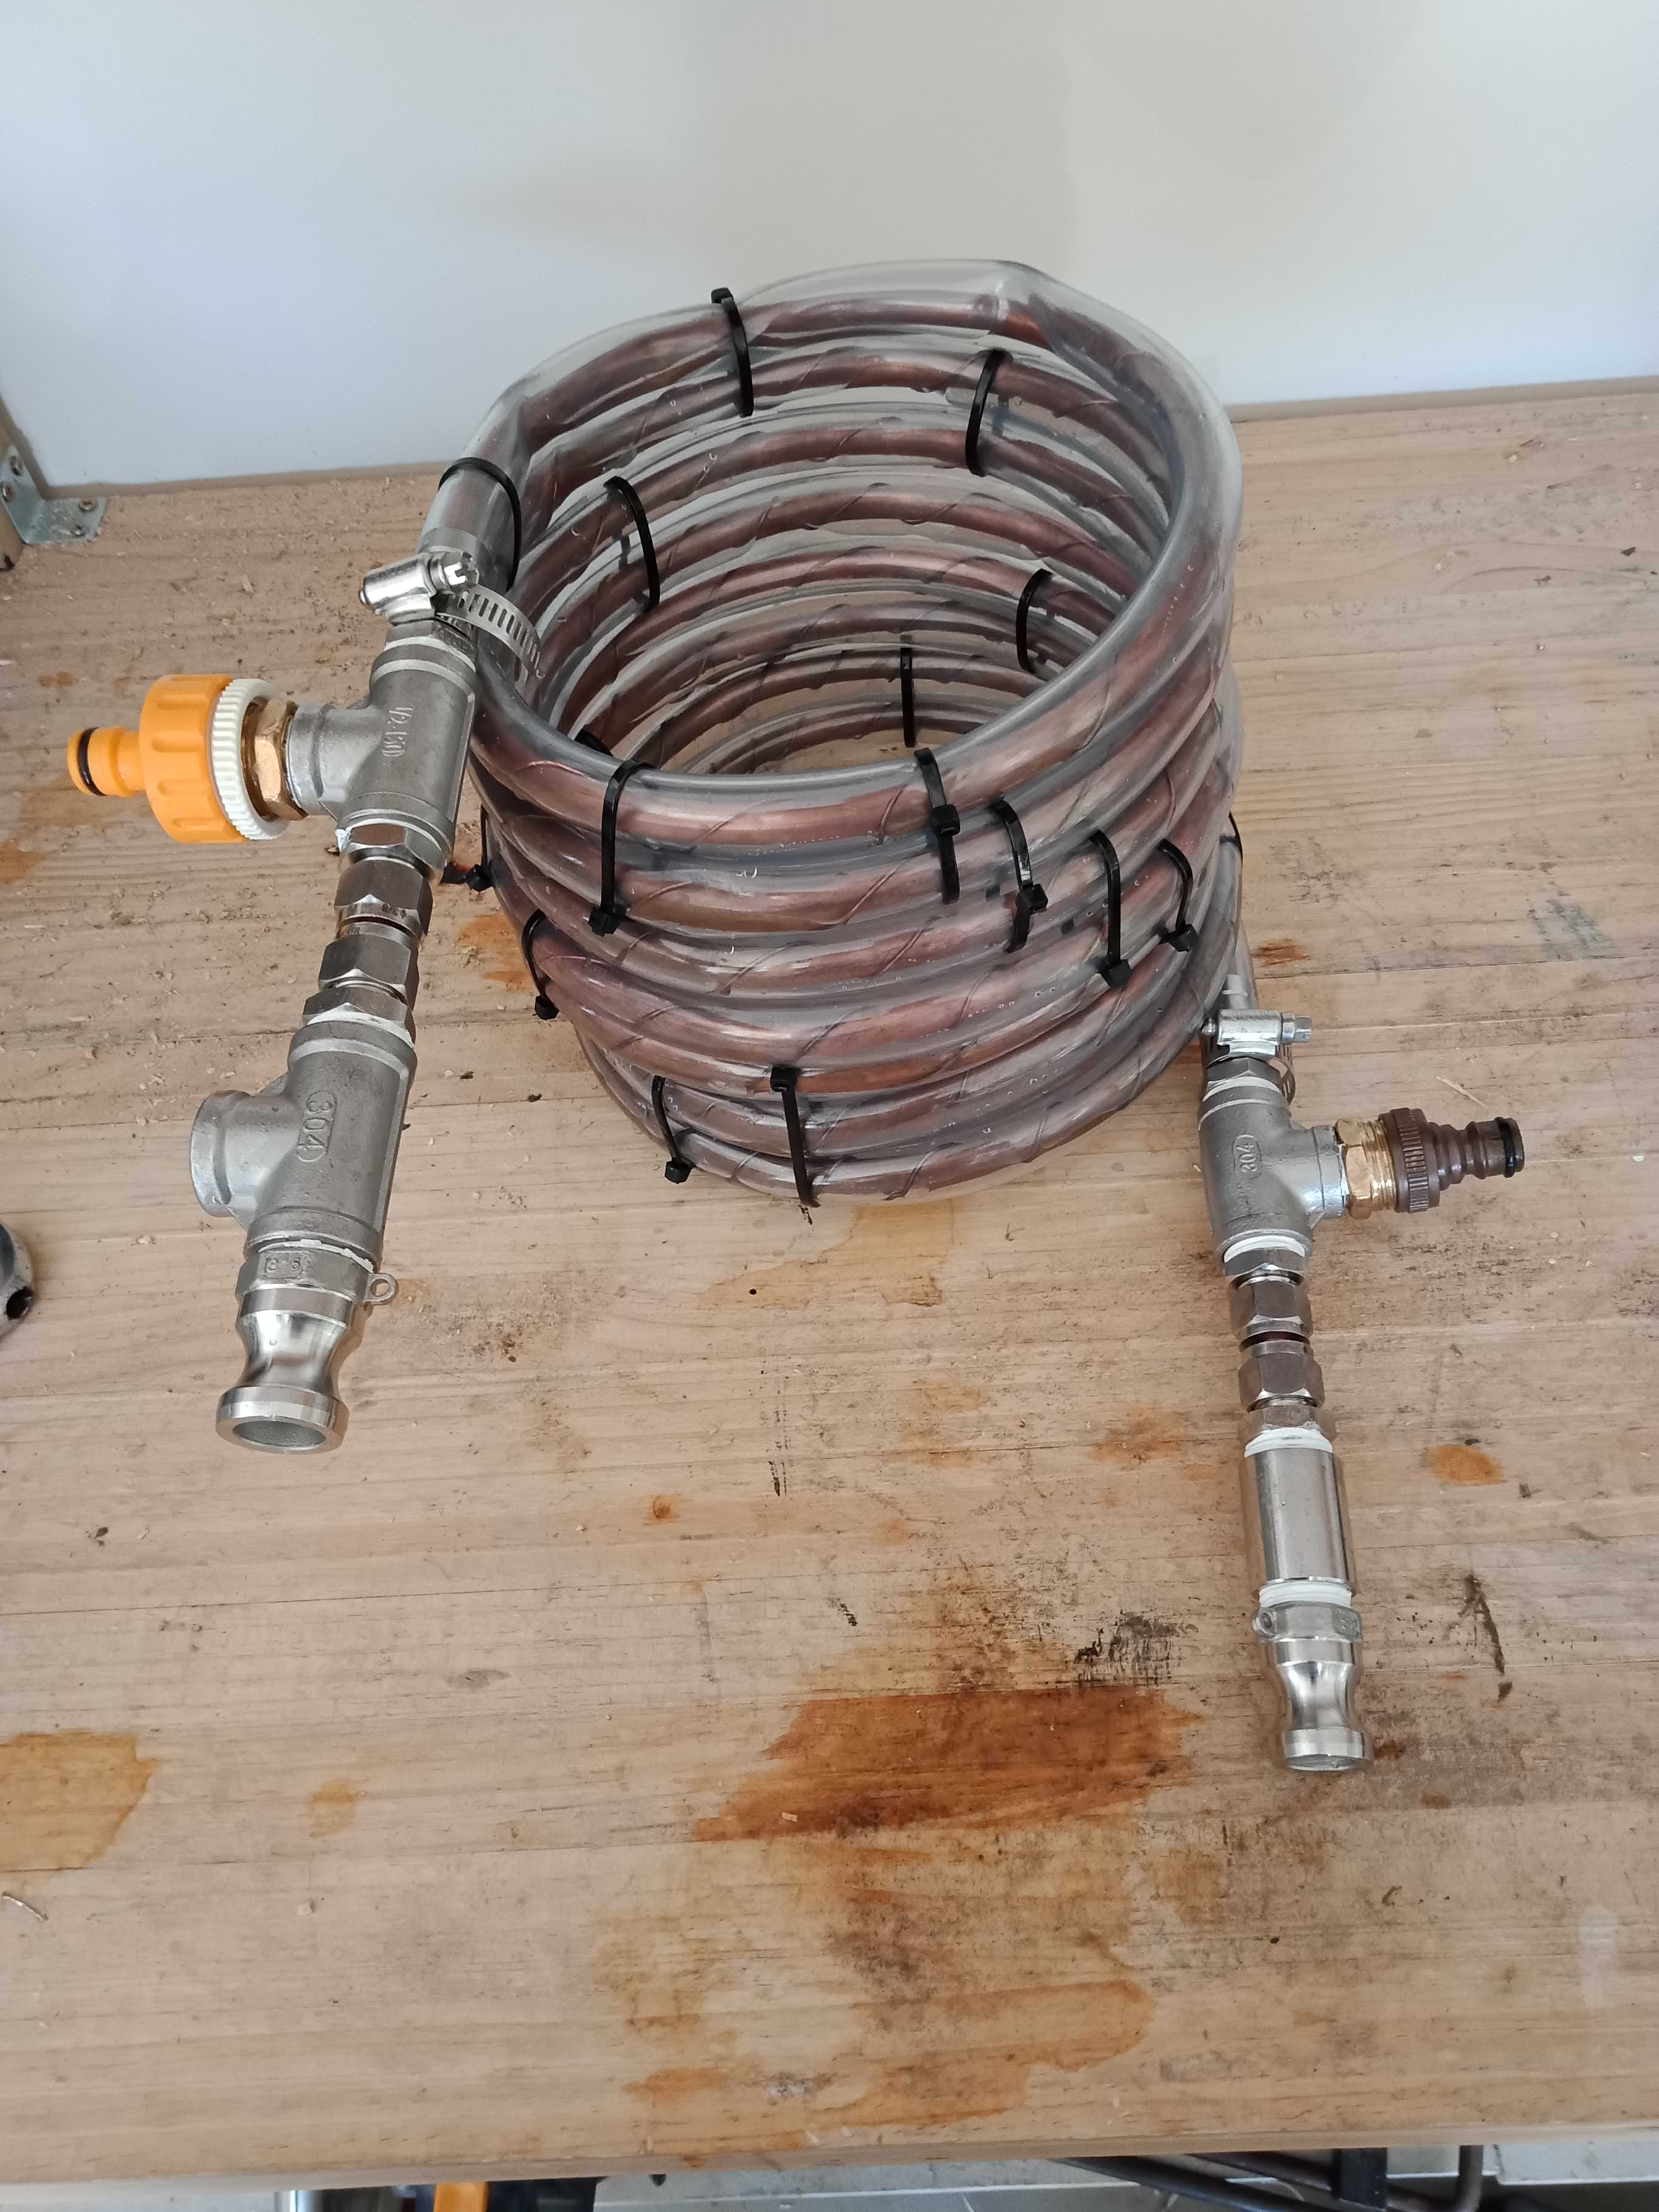
Built this a year ago after multiple clogs in a plate chiller. Uses 3/4" CPVC-PEX sheath and 20 feet of 1/2 X .030"W copper within. You can see the fixture used for winding and temporarily securing it. I keep it out of the way under brew stand. Does a good job chilling 6 gal from boil to 70F in 10-12 minutes while circulating BK. The large 7/16" bore in copper tube is impervious to clogs!


Similar threads
- Replies
- 4
- Views
- 584
- Replies
- 30
- Views
- 2K
- Replies
- 4
- Views
- 797
