You are using an out of date browser. It may not display this or other websites correctly.
You should upgrade or use an alternative browser.
You should upgrade or use an alternative browser.
Show Me Your Wood Brew Sculpture/Rig
- Thread starter twst1up
- Start date

Help Support Homebrew Talk - Beer, Wine, Mead, & Cider Brewing Discussion Forum:
This site may earn a commission from merchant affiliate
links, including eBay, Amazon, and others.

sloanfamilydsm
Well-Known Member
Getting lots of ideas while looking at you guys' wood.
Whoa
Latest Update prior to painting MLT and stand. 240V eHERMS system... Single pump for now. Gas BK.
Love that setup, looks very similar to what I am going for. How is it working out for you? Any more info about it? Thanks!
chisena
Well-Known Member
- Joined
- Jan 7, 2013
- Messages
- 1,170
- Reaction score
- 231
Love that setup, looks very similar to what I am going for. How is it working out for you? Any more info about it? Thanks!
It's working great for me! I prefer to slowly gravity drain wort from the MLT to the kettle so this is ideal. I am also ok with gas for boiling but love the eHERMS for easy and consistent mashing and sparging. The single pump means that I do have to move several hoses around but only after boil; when I am setting up to run the wort through my plate chiller. I'm ok with that. Some day I might add a second pump and implement electric boiling... but not anytime soon. This setup works great, is clean and consistent, and I have spent enough money on it over the past 2 years to make my wife cry.
ChocolateMaltyBalls
Well-Known Member
Nice rig chisena, I usually brew in color but I might have to try black and white sometime.
Nice rig chisena, I usually brew in color but I might have to try black and white sometime.
Just don't brew in sepia. Depressing.
I misread a recipe once and brewed in mosaic instead of adding it.
apeltes
Active Member
Ready for maiden voyage.
Inspired by a ladder, but this is much more stable and steps are custom-fit.
No pumps.
Gravity all the way from HLT to fermenter. (Is this four-tier?)
Two banjo burners with steel wind shields added.
Folds for storage.


Inspired by a ladder, but this is much more stable and steps are custom-fit.
No pumps.
Gravity all the way from HLT to fermenter. (Is this four-tier?)
Two banjo burners with steel wind shields added.
Folds for storage.
Sir_niveda
Well-Known Member
Went from this:
And just finished building this

Still needs some minor details, and if the weather holds, I'd like to stain it.
And just finished building this
Still needs some minor details, and if the weather holds, I'd like to stain it.


MX1
Texas Ale Works
I need to get onboard with the water filter....
val214
Well-Known Member
Nothing fancy here. 
Sent from my iPhone using Home Brew

Sent from my iPhone using Home Brew
steveoatley
someone has to fail, so the rest of you look good
Latest Update prior to painting MLT and stand. 240V eHERMS system... Single pump for now. Gas BK.
Chisena
Beautiful !!!
I am building a system almost exactly like yours !!

Can you share a pic of the inside of your HLT?
I'd love to see how you fit the Boil Coil with a HERMS coil
And where does that 3 way valve on your MT lead too ?
AND - how do you like your High Gravity Brewing control panel ?
I am looking to get one as well.
Steve
chisena
Well-Known Member
- Joined
- Jan 7, 2013
- Messages
- 1,170
- Reaction score
- 231
Chisena
Beautiful !!!
I am building a system almost exactly like yours !!
Can you share a pic of the inside of your HLT?
I'd love to see how you fit the Boil Coil with a HERMS coil
And where does that 3 way valve on your MT lead too ?
AND - how do you like your High Gravity Brewing control panel ?
I am looking to get one as well.
Steve
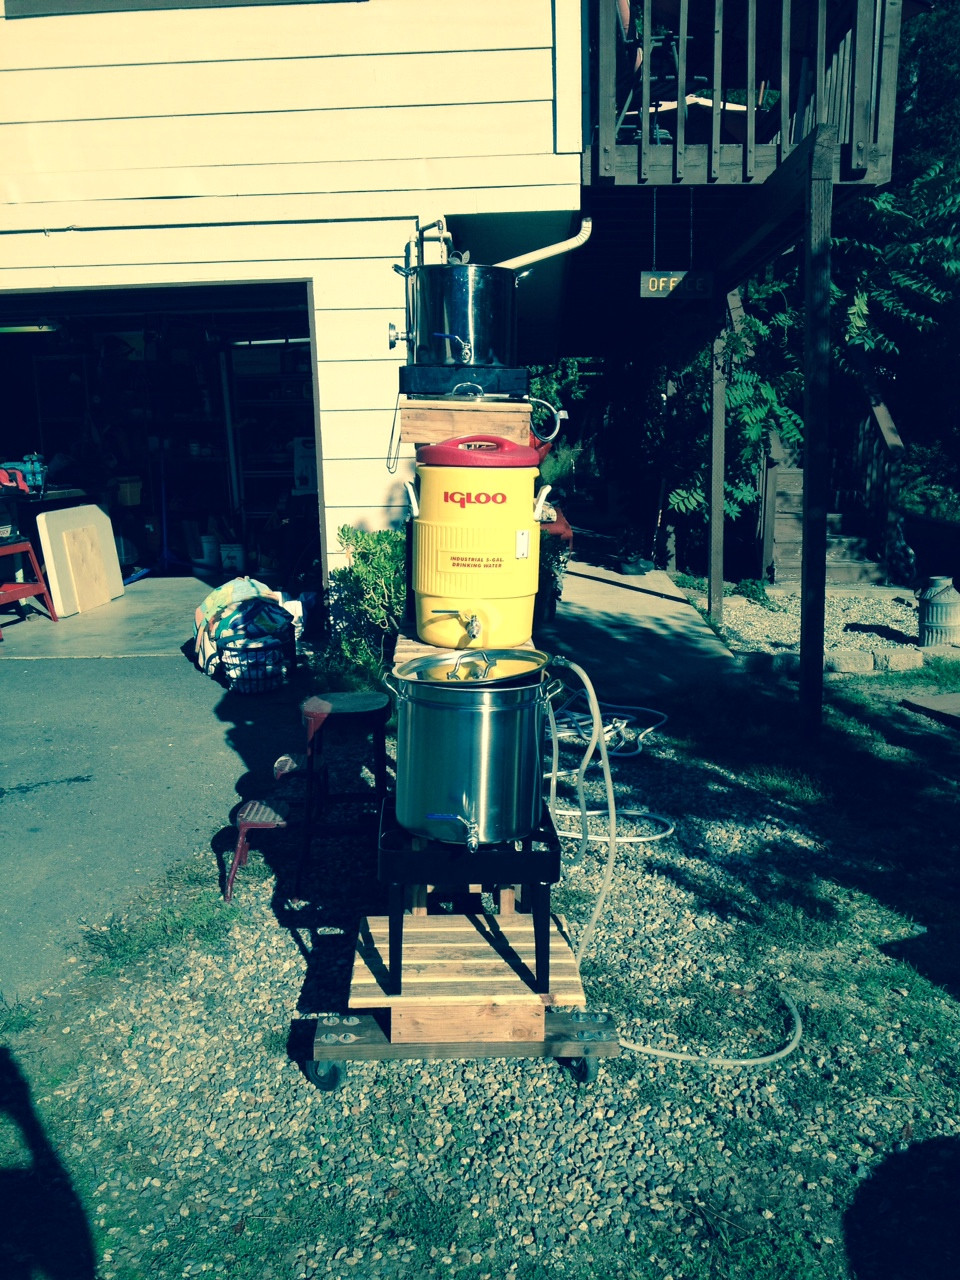
Hey Steve. Below is a photo of the inside of my hot liquor tank. It is definitely a tight fit. The hardware displaces about half a gallon of water. It's not a big deal to me but something to consider when designing an HLT. The 10G Bayou classic kettle that I started with had these wonderful volume markers on the inside which are now obsolete. I now use a piece of pipe with marks on it. The HERMS coil is from StainlessBrewing.com. It is 25 foot 1/2" OD coiled to a 10 inch diameter. I was really hoping it would fit inside of the BoilCoil however that did not work out. As you can see it is installed just above the coil which although not ideal, seems to be working okay even when not totally submerged. It does cause the water to get hotter than it otherwise would if the entire coil was submerged.
Regarding the 240V 10 gallon BoilCoil, it is awesome. It brings 5G of cold tapwater to 165° in about 20 minutes. Installation was a breeze and the high gravity controller works like a charm with the coil. I have only used of the controller once and am very happy with it. I ordered it with an extra pump control switch that I'm not currently using. I really wanted to order it with a second PID for future electric boiling, but just couldn't part with the money.
I use the three-way ball valve on the MLT to direct wort to the pump during recirculation or to the kettle during lauter. It's not really a necessary component but reduces the times I have to disconnect hoses.

Sent from my iPad using Home Brew
AgoraBrewCo
New Member
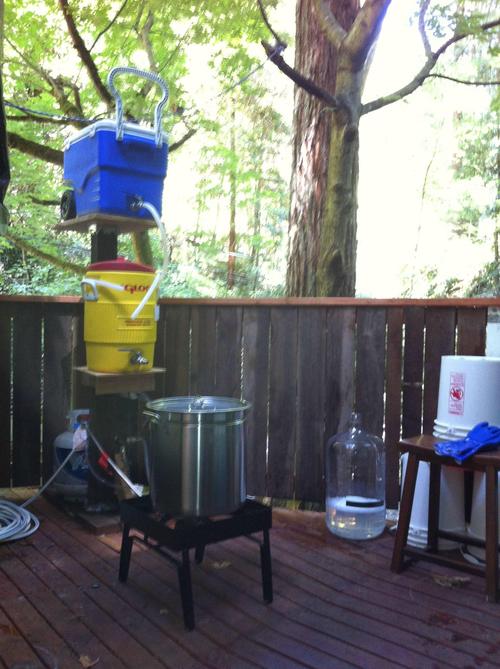
First of all, an enormous thank you to everyone that has contributed to this thread, and this forum. I've been stalking here for years. That said, here is my (mostly) completed wooden sculpture, based mostly off of ScubaSteve's design. I don't have many pictures of it yet, but I can get some if anyone wants a different angle. I might create a build thread if I get more comfortable with this forum posting stuff...
Nothing fancy here. View attachment 232480
You're humble...I see a fancy stir motor, a fancy mash paddle, a pump, kettle thermo....
The fact that it is portable just makes it a little less photogenic, but it is all there and nice!
FWIW, you likely don't need the lid under your HLT, even if the drain valve is slightly below your kettle rim, it will syphon over it.
steveoatley
someone has to fail, so the rest of you look good
Hey Steve. Below is a photo of the inside of my hot liquor tank. It is definitely a tight fit. The hardware displaces about half a gallon of water. It's not a big deal to me but something to consider when designing an HLT. The 10G Bayou classic kettle that I started with had these wonderful volume markers on the inside which are now obsolete. I now use a piece of pipe with marks on it. The HERMS coil is from StainlessBrewing.com. It is 25 foot 1/2" OD coiled to a 10 inch diameter. I was really hoping it would fit inside of the BoilCoil however that did not work out. As you can see it is installed just above the coil which although not ideal, seems to be working okay even when not totally submerged. It does cause the water to get hotter than it otherwise would if the entire coil was submerged.
Regarding the 240V 10 gallon BoilCoil, it is awesome. It brings 5G of cold tapwater to 165° in about 20 minutes. Installation was a breeze and the high gravity controller works like a charm with the coil. I have only used of the controller once and am very happy with it. I ordered it with an extra pump control switch that I'm not currently using. I really wanted to order it with a second PID for future electric boiling, but just couldn't part with the money.
I use the three-way ball valve on the MLT to direct wort to the pump during recirculation or to the kettle during lauter. It's not really a necessary component but reduces the times I have to disconnect hoses.
View attachment 232853
Chisena,
Thanks for the pic, it looks crowded in there
I have my HERMS coil & recirculation, and dip tube
AND its looking like I might not have room for the Boil Coil (TM)
Still working on Propane for now
Thanks
Steve
Carlscan26
Well-Known Member
You're humble...I see a fancy stir motor, a fancy mash paddle, a pump, kettle thermo....
The fact that it is portable just makes it a little less photogenic, but it is all there and nice!
FWIW, you likely don't need the lid under your HLT, even if the drain valve is slightly below your kettle rim, it will syphon over it.
Where is the stir motor?
Sent from my iPhone using Home Brew
Where is the stir motor?
OOPS!

I guess that's a shiny valve for fly sparging....my bad.
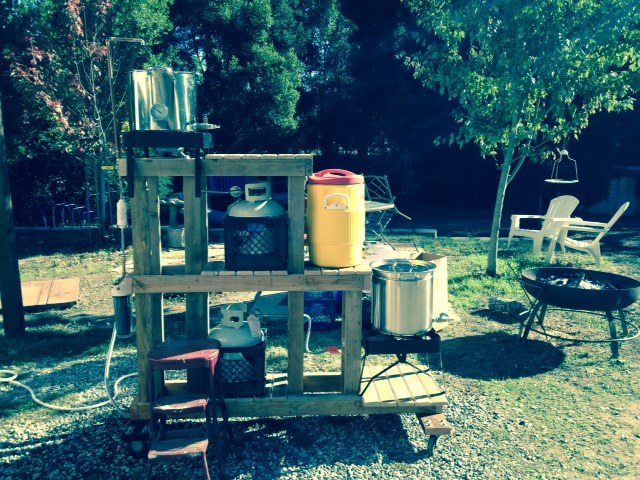
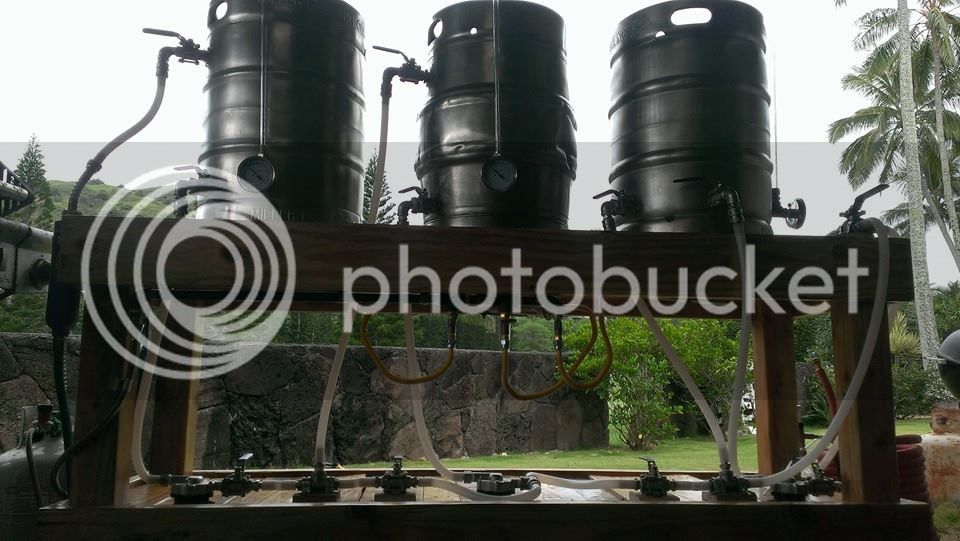
Yay! another chance to show off my rig! Here is mine, I call it the "Crooked Woody". With the kettle on the burner it is really a two-tier, one pump setup. Burner tier is covered in cement board. 2x4's for the base but the rest of the structure is 2x3's and it's solid. Bottom shelf for storage, and the extra wide right platform for setting down things like my notebook, hydrometer, beer etc. The pump is mounted to its own little box, which can be removed if needed.


chisena
Well-Known Member
- Joined
- Jan 7, 2013
- Messages
- 1,170
- Reaction score
- 231
Yay! another chance to show off my rig! Here is mine, I call it the "Crooked Woody". With the kettle on the burner it is really a two-tier, one pump setup. Burner tier is covered in cement board. 2x4's for the base but the rest of the structure is 2x3's and it's solid. Bottom shelf for storage, and the extra wide right platform for setting down things like my notebook, hydrometer, beer etc. The pump is mounted to its own little box, which can be removed if needed.
Crooked Woody... Classic. Very nice work! Congrats! You could tile over that cement board.
Crooked Woody... Classic. Very nice work! Congrats! You could tile over that cement board.
Haha, thanks! I do still have an inner 14 year old.
I have considered tiling over the cement board, and may do so eventually.
I have been staring at an old Workmate on my patio and wondering what to do with it for far too long.
Idea stolen!
NoahBeach
Well-Known Member
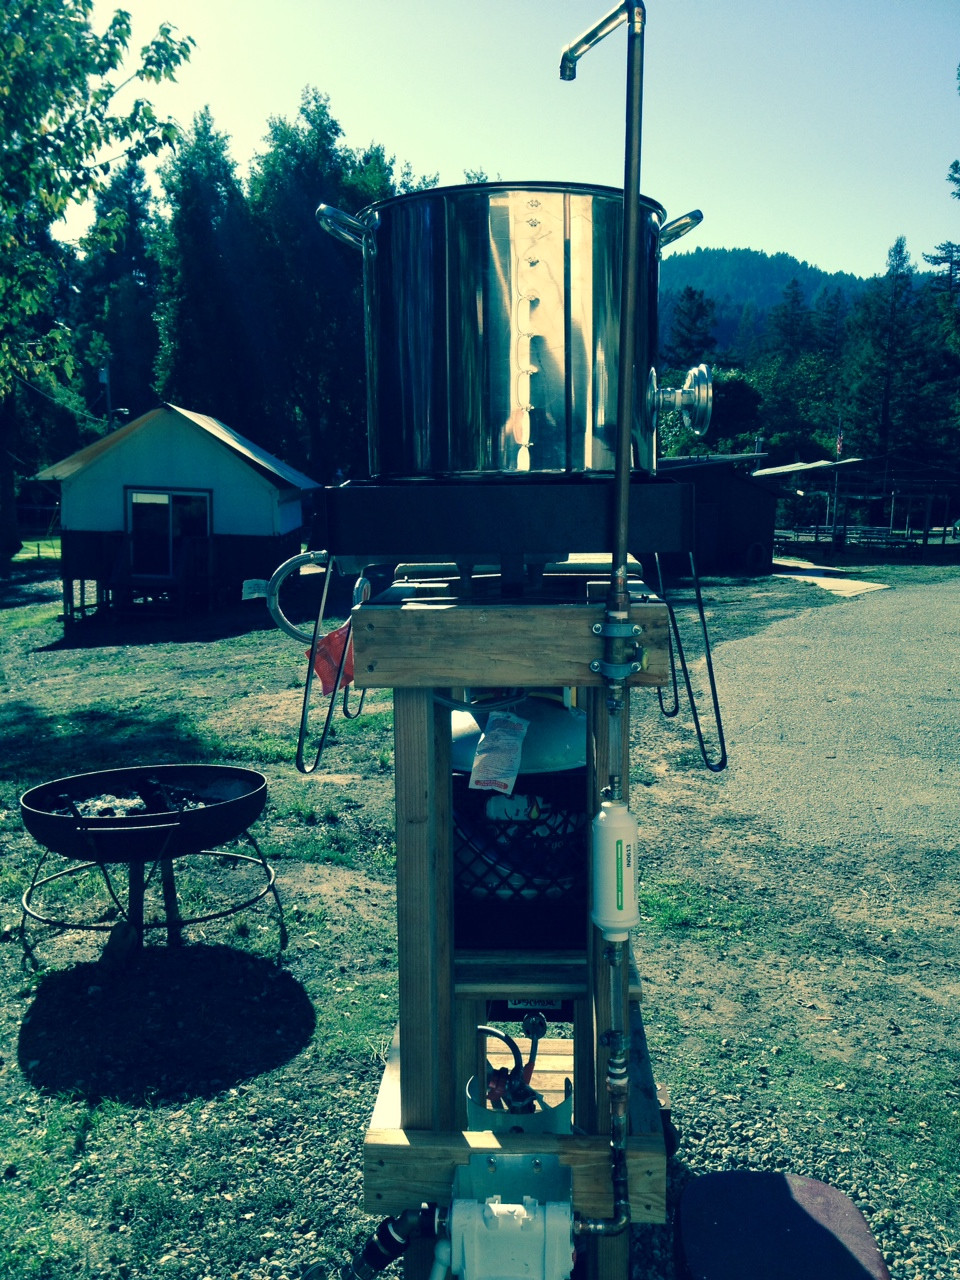
Brewed an APA last night so decided to snap a few pics of mine for this thread.
Highlights:
One of the few "build" pictures I have.

In action, yup thats right...baby monitor plugged into the brew stand!

Rear

Filter/CFC Connection Close UP

Filling the HLT (valve is on frame to the left),

Brew Kettle

Mashing In (the CFC/Ground Water probes are just measuring ambient air at this time)

Transfering first runnings to BK, sparge water heated.

Recirculating w/o cooling water to sanitize pump/CFC/lines (I really need to shorten those hoses haha).

After recirculating through CFC to get BK temp down to < 140F, now transfering to carboy, ground water is 65.1F, CFC out is 67.8F

Thanks for looking!
Highlights:
- Wooden Single Tier, Two Burner (BG-14), Three vessel (15G pots, 10G Cooler MLT). 100% inspired by this thread.
- Stainless 2"x2" pot support.
- Wind/heat shielding around burners.
- Concrete board around wooden frame.
- Gas manifold.
- Single pump, batch sparging.
- Thermowells in HLT and MLT for temperature probes.
- Inline temperature probes for wort leaving BK, wort leaving CFC, as well as ground water temperature.
- Hard plumbed inline filter w/ hose quick disconnect.
- Hard mounted CFC, plumbed.
- "Weather resistant" electrical junction box with (4) outlets, one switched outlet for pump.
- "Weather resistant" switch for pump.
- Camlock quick disconnects.
One of the few "build" pictures I have.
In action, yup thats right...baby monitor plugged into the brew stand!
Rear
Filter/CFC Connection Close UP
Filling the HLT (valve is on frame to the left),
Brew Kettle
Mashing In (the CFC/Ground Water probes are just measuring ambient air at this time)
Transfering first runnings to BK, sparge water heated.
Recirculating w/o cooling water to sanitize pump/CFC/lines (I really need to shorten those hoses haha).
After recirculating through CFC to get BK temp down to < 140F, now transfering to carboy, ground water is 65.1F, CFC out is 67.8F
Thanks for looking!
chisena
Well-Known Member
- Joined
- Jan 7, 2013
- Messages
- 1,170
- Reaction score
- 231
Thanks for looking
Very very nice. Of all the questions.... What brand/model water filter is that?
Agreed. That is a great setup. This is like what I want to build eventually. Nice work.
Sent from my iPhone using Home Brew
Sent from my iPhone using Home Brew
NoahBeach, very nice setup! I'm curious how you can do a single tier with only one pump. Do you batch sparge instead of fly sparge? I see the connection on the MLT lid, so it looks like you may fly sparge, but I just don't know how you can do that on a single tier with only 1 pump.
I also really like your digital thermometer setup. Can you provide more details on how you have them setup and wired and a closeup picture of all those little white boxes?
Thanks in advance!
I also really like your digital thermometer setup. Can you provide more details on how you have them setup and wired and a closeup picture of all those little white boxes?
Thanks in advance!
NoahBeach
Well-Known Member
NoahBeach, very nice setup! I'm curious how you can do a single tier with only one pump. Do you batch sparge instead of fly sparge? I see the connection on the MLT lid, so it looks like you may fly sparge, but I just don't know how you can do that on a single tier with only 1 pump.
I also really like your digital thermometer setup. Can you provide more details on how you have them setup and wired and a closeup picture of all those little white boxes?
Thanks in advance!
Sorry for the delay, had to take pics of the boxes!
I do batch sparge, though I use the camlock on the lid (which is connected to a "wort aerator" inside to disperse the flow) to recirculate (vorlauf) wort out and back in the MLT each time before I run off, gives my crystal clear wort in the BK as well as the ability to fly sparge if I ever buy a second pump.
As for the probes, I use the waterproof DS18B20 probes connected to a Raspberry Pi which is mounted to the brew stand. I use two different "models" of DS18B20's, both are waterproof, one is just "high temp" (the white cabled probes) where the cable jacket is PTFE (vs PVC) and rated up to ~250F.
The DS18B20's are 1-wire probes, and therefore work best when connected in a bus configuration. My first attempt using these probes with the RP was in a "star" configuration, and it was extremely unstable (probes drop, temps unreadable, etc), since I switched to a bus, no issues at all. I'm in IT and have tons of it so I chose to use standard Cat-5 cable/keystone jacks to run my bus. Rather than trying to splice and connect lots of tiny wires together, I decided to just try and use Cat-5 keystone jacks and punch down both wires (the probe and the Cat-5 cable) into the jack. This "spliced" both wires together, and gave me a jack to plug another Cat-5 cable into to extend the bus. The "white boxes" are simply surface mount keystone boxes ($1.50 at Home Depot), with one of the keystone ports blanked.
As always, pictures tell it all:
HLT "box"/probe going into HLT thermowell

Run between two boxes

Both cables, punched down into same keystone

Eventually runs back to this box, where the RP lives, yes wires are a bit of a mess there, tacking those down is on the "to-do" list

For the connections where I'm reading inline temps (BK out, CFC Wort out, CFC H2O in) I use these probe compression fittings from Brewhardware.com

For the HLT/MLT, I use these thermowell's from Brewhardware.com

For the actual interface, it is just a combination of Python scripts (which actually talk to the probes/store temps in database) and PHP/Javascript (using this library for the actual gauges) that I hacked together and access via a webserver running on the RP. The temps on the web interface are automatically refreshed about every second for each probe (depending on probe delay). It is still a work in progress, but usable.
Sorry for the delay, had to take pics of the boxes!
I do batch sparge, though I use the camlock on the lid (which is connected to a "wort aerator" inside to disperse the flow) to recirculate (vorlauf) wort out and back in the MLT each time before I run off, gives my crystal clear wort in the BK as well as the ability to fly sparge if I ever buy a second pump.
As for the probes, I use the waterproof DS18B20 probes connected to a Raspberry Pi which is mounted to the brew stand. I use two different "models" of DS18B20's, both are waterproof, one is just "high temp" (the white cabled probes) where the cable jacket is PTFE (vs PVC) and rated up to ~250F.
The DS18B20's are 1-wire probes, and therefore work best when connected in a bus configuration. My first attempt using these probes with the RP was in a "star" configuration, and it was extremely unstable (probes drop, temps unreadable, etc), since I switched to a bus, no issues at all. I'm in IT and have tons of it so I chose to use standard Cat-5 cable/keystone jacks to run my bus. Rather than trying to splice and connect lots of tiny wires together, I decided to just try and use Cat-5 keystone jacks and punch down both wires (the probe and the Cat-5 cable) into the jack. This "spliced" both wires together, and gave me a jack to plug another Cat-5 cable into to extend the bus. The "white boxes" are simply surface mount keystone boxes ($1.50 at Home Depot), with one of the keystone ports blanked.
As always, pictures tell it all:
HLT "box"/probe going into HLT thermowell
Run between two boxes
Both cables, punched down into same keystone
Eventually runs back to this box, where the RP lives, yes wires are a bit of a mess there, tacking those down is on the "to-do" list
For the connections where I'm reading inline temps (BK out, CFC Wort out, CFC H2O in) I use these probe compression fittings from Brewhardware.com
For the HLT/MLT, I use these thermowell's from Brewhardware.com
For the actual interface, it is just a combination of Python scripts (which actually talk to the probes/store temps in database) and PHP/Javascript (using this library for the actual gauges) that I hacked together and access via a webserver running on the RP. The temps on the web interface are automatically refreshed about every second for each probe (depending on probe delay). It is still a work in progress, but usable.
Awesome... Thank you so much for all the images and info! I think you have just completely changed the design of my upcoming brewstand... I batch sparge now and love it but have been toying with the idea of fly sparging now that I have a 2nd burner. I too only have 1 pump and someday (when the rugrats are older and I have more time to brew) will likely get another pump, so single tier is preferred for future expansion.
I have the same water filter as you, and have been planning on plumbing some PVC to fill my HLT as well.
I love the setup with all the thermocouples and the RPi as well. Definitely will be on my To Do list.
I've been looking all over for short runs of the yellow gas tubing, but can't find it anywhere? Where'd you get yours?
Thanks again for all the ideas!
NoahBeach
Well-Known Member
Awesome... Thank you so much for all the images and info! I think you have just completely changed the design of my upcoming brewstand... I batch sparge now and love it but have been toying with the idea of fly sparging now that I have a 2nd burner. I too only have 1 pump and someday (when the rugrats are older and I have more time to brew) will likely get another pump, so single tier is preferred for future expansion.
I have the same water filter as you, and have been planning on plumbing some PVC to fill my HLT as well.
I love the setup with all the thermocouples and the RPi as well. Definitely will be on my To Do list.
I've been looking all over for short runs of the yellow gas tubing, but can't find it anywhere? Where'd you get yours?
Thanks again for all the ideas!
No problem at all, glad to share info! I hear you about the rug rats, I only have one but he's 19 months old and gets into everything. Brewing is either done very early in the AM or starting around 8PM when he goes to bed, either way I'm tired.
As far as the gas tubing, these are the ones that I got. The picture makes them look like 6" long, but they are 18". They are advertised at 1/2" FIP to 1/2" MIP but they are adapted to that. The actual tube has 3/8" female flare on both sides which was perfect for me, left one side 1/2" MIP to screw on to my ball valve from manifold and the other side as 3/8" flare which connected to the oriface on the burner. They are 1/4" ID, which I was worried about at first, but so far I have had no problems on high pressure LP. I do have plans to eventually convert over to NG (everything else in my home is NG), but I'll cross that bridge when I get there.
Last edited by a moderator:
jmbingham3
Active Member
Should be finished this weekend! 2 blichman burners sit inside. Will have 2 chugger pumps and still trying to decide on a plate chiller or a counter flow.

Thanks again, Noah! I too pretty much brew when my little ones are sleeping. In my current setup everything is stored seperately and it takes time to even get setup. If my stand could just house everything I need and all I have to do is wheel it out of the garage if save doe good time. I'll definitely have something to post here someday soon! (Soon being a very relative term here... )
)Stealthcruiser
Well-Known Member
jmbingham3:
I like the truck bed toolbox idea!
Per chance, do your burners lift out, or are hinged, for stuff stowage underneath?
I like the truck bed toolbox idea!
Per chance, do your burners lift out, or are hinged, for stuff stowage underneath?
jmbingham3
Active Member
Thanks Stealthcruiser. They lift out. They are blichmann floor models and do lift out. Not a lot of room under them, but the cooler/mashtun will sit on a wood shelf leaving a small amount of room for storage. Hoping to have it finished an a week or 2
jmbingham3:
I like the truck bed toolbox idea!
?
Yes, brilliant idea! I previously saw it and like it, but until SC pointed it out I didn't realize exactly what you had done....like!!!
Wilserbrewer
Http://biabbags.webs.com/
jmbingham3
Active Member
Thanks guys. It has been an on going project. Had all the stuff then downsized to biab.
Now want to finally finish. Wife likes it because, I can put the pots in the shed and hide rest. Out of sight out of mind.
Now want to finally finish. Wife likes it because, I can put the pots in the shed and hide rest. Out of sight out of mind.
Yes yea....actually browsed craigslist a minute ago...you can by a fairly nice pre owned aluminum full size truck tool box for 50 bucks....perfect size for a brew table.
Genius idea....not sure I need a project. Thanks!
Wilserbrewer
Http://biabbags.webs.com/
Genius idea....not sure I need a project. Thanks!
Wilserbrewer
Http://biabbags.webs.com/
jmbingham3
Active Member
jmbingham3
Active Member
I will be rearranging the way the burners sit in the box. Need them to sit about 2-3 inches higher and make a shelf for the mash tun.
View attachment 1417405759608.jpg
View attachment 1417405759608.jpg
Similar threads
- Replies
- 7
- Views
- 595
- Replies
- 13
- Views
- 3K
