RIMS set up!

Homebrew Talk - Beer, Wine, Mead, & Cider Brewing Discussion Forum

Help Support Homebrew Talk - Beer, Wine, Mead, & Cider Brewing Discussion Forum:

This site may earn a commission from merchant affiliate links, including eBay, Amazon, and others.
Great information guys.

I just finished a test run of something similar. I'm not sure what you call the type of system I built but it goes like this.

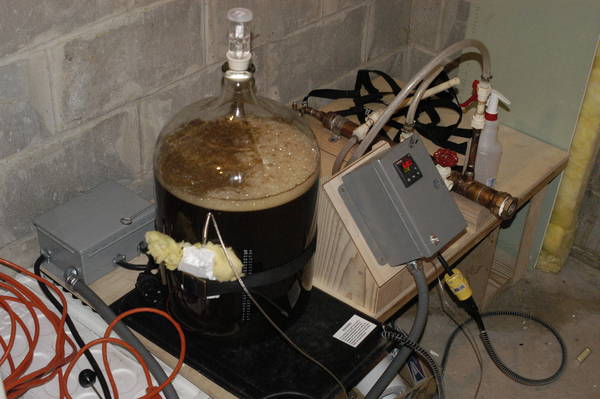
MLT drains through a manifold via gravity into a 1 gallon cooler. The 1 gallon cooler has a 1500W heating element in it. When the 1 gallon cooler is full, it overflows via gravity into my pump, the pump then runs back up to my sparge manifold. The 1 gallon cooler seals up easily and doesn't leak. I am assuming this is similar to your set-ups.

During my test today, I filled my 12 gallon mash tun as full as I could, closed the lid and fired everything up. I get a 1 degree per minute temp rise or maybe 1.5 minutes per degree. At first it didn't seem to be heating but after about 5 minutes I started to get consistent temp rises on the digital thermometer that is at the exit of the MLT.

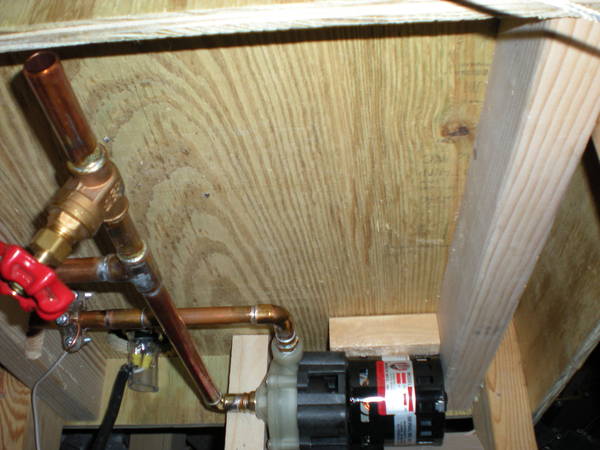
My test consisted of just plugging things into an extension cord, I am now in the process of building a control panel with switches and lights to see what is on. At some point I will wire in a Ranco for the heating elements.

I'm pretty excited about trying this thing with grain next week.
 
slnies said:
DSC_0005.JPG
DSC_0007.JPG
DSC_0004.JPG


So, these are pic's of the system in operation, One is the element connection and the protector that I made for it, so as I don't electrocute myself when I am not paying attention, and the last is of the grounding of the heating manifold. I will later change the wire out to green, but I wanted to test so, what ever was lying around. Other things that will happen are a twist lock male and female cap for fast element removal, another PID and SSR for an electric HLT, and maybe the new PID I order with ramp and soak control and I will switch it out with the one that is operating the MLT now and that one will operate the HLT. I don't know, we will see what the SWMBO lets me get away with.


Is it OK to have the wort in contact with the copper. For some reason I am remembering reading that it is bad but then we use copper for immersion chillers etc.

What size copper tubing did you use?

Linc
 
I dont think copper is an issue. Maybe you are thinking of brass. Brass is okay after it has been pickled.
 
missing link said:
Is it OK to have the wort in contact with the copper. For some reason I am remembering reading that it is bad but then we use copper for immersion chillers etc.

What size copper tubing did you use?

Linc

I used 1.5 inch copper tubing. Copper is good for yeast health.
 
Virtuous said:
I've been married for 5 years....
SeabeeJohn is still learning. He is still nearly a newly wed. Under five years. Of course I could be wrong, but if that is the case then I have known him for way longer than I thought.:tank:
 
slnies said:
SeabeeJohn is still learning. He is still nearly a newly wed. Under five years. Of course I could be wrong, but if that is the case then I have known him for way longer than I thought.:tank:

I've been married for 5+ years... hit 5 back in Jan. And just because your married, doesn't mean that a guy has to stop polishing his copper. Hell, there are days I polish it twice! (I like my copper shiny!)
 
Seabee John said:
I've been married for 5+ years... hit 5 back in Jan. And just because your married, doesn't mean that a guy has to stop polishing his copper. Hell, there are days I polish it twice! (I like my copper shiny!)
I think that is what Virtous is getting at. The longer you are married, the more you shine your..... .
 
So, The second batch of brew was done on the system today. I report smooth sailing and excellent performance. I hit all of my temperatures right on, and enjoyed the freedom of control in the process. I also dreamed up a idea that puts my PID to use controlling the fermentation temperatures. I do not have pictures yet but some will follow.
My idea goes like this. The line that controls my heating manifold has a cord cap outlet. This is plugged into a heating pad that was used for the dog. This pad sites under the carboy and the thermocouple from the PID is strapped to the side with a belt and some insulation. My basements ambient temperature is around 50F to 55F. Anyway this is my half ass idea. I will keep you all updated. S.
 
DSC_0015.JPG

DSC_00162.JPG

So here is the rig in action. The first Pic is the carboy set up and in operation. The second is the same except that I removed the towel so you can see the probe and insulation that are belted to the side. As you can see, the rig is holding temperature. I have the dead band set to 1 degree and it is the ferment right on temp. I did calibrate the probe with a calibrated thermometer for accuracy. It works great. I love this thing. S.
 
More news. The RIMS as we know it will be making another change. With the additions of a couple of new SS keggles I will be out fitting one as a mash tun and one as an electric boil kettle. The mash tun will use the same RIMS set up I currently have, but the stand will change for space conservation. The boil kettle on the other hand will be a whole new experiment. More to follow when the build gets under way. S
 
Got a question. I am looking to possibly build myself a rims system. I was wondering about caramelization. Does the wort caramelize going through the system? I brew a Belgian Tripel that is really light and would like it to stay that way.

Thanks

John
 
Got a question. I am looking to possibly build myself a rims system. I was wondering about caramelization. Does the wort caramelize going through the system? I brew a Belgian Tripel that is really light and would like it to stay that way.

Thanks

John
Well, let me answer that. No! There is no caramelization. My very first beers in this system were light beers. I have done a cream ale and an American Pils with great success. The trick is, to get a low density element. In the 50 watts an inch range. This is what I have and it works great. The hydrometer pics in this thread are of a light beers first running's. The other thing is to have the pump recirculate through out the whole mash. This keeps the wort constantly moving across the element preventing any wort caramelizing or scorching. I hope this helps. S.:rockin:
 
For the record, the brew on the temp control up above, is an english mild. It did not last long. Temp control rocks. S
 
I've been building my own ver. of the Slnies RiMS set up and I can't wait to give it a try. I'm 90% on the plumbing and still have to wire it up, but I should have pics up soon! I plan on brewing with Sean this weekend, so I'm sure he'll post his critiques!
 
I've been building my own ver. of the Slnies RiMS set up and I can't wait to give it a try. I'm 90% on the plumbing and still have to wire it up, but I should have pics up soon! I plan on brewing with Sean this weekend, so I'm sure he'll post his critiques!

I am excited to see the new set up. For all of you who don't know, I have personal investment in Seabee Johns success. His vessels where here only tuesday for welding. His assembly time is short, so this makes things exciting.
On another note though. I have started the build on the size upgrade of my system. An electric boil kettle is my first project. It will sport a 5500 watt element, a built in immersion chiller, whirlpool port, false bottom for whole hops, and drainage out the bottom. The fittings are in. Now the rest shall begin. Pics will soon follow. I am in no hurry, as of yet, to complete, because I am currently investing in a kegging set up. S.:tank:
 
Sorry for the long awaited update. Seabee Johns system is a success. On that note I have pictures of the updated MLT All testes were promising. Just larger. My controls transfered seamlessly and I had only one leak, an overheated o-ring in the gate valve.
DSCN0293.JPG

DSCN0294.JPG
 
Here is the plumbing under the stand. The idea is to get everything contained and compact. The next step will be to cover the stand in maple and finish it with a marine varnish. This by the way is just to make it look really nice. That way my SWMBO will feel like it belongs to the rest of the house. Cheers everyone. S.
DSCN0296.JPG
 
Wow, I love that design great job.

Just so I understand it a little better, you just have a mash tun and a boil kettle right? By using the heating element in the copper tube you eliminated the HLT?
 
Wow, I love that design great job.

Just so I understand it a little better, you just have a mash tun and a boil kettle right? By using the heating element in the copper tube you eliminated the HLT?

Not entirely, I still have a HLT, but it is mostly for ease. When I take it portable I do not use a HLT. The HLT is nice for the extra hot water, the sparge, and to premix entire batches of water with whatever for what ever recipe. But by no means is it a requirement. I used the first set up entirely with out a HLT, and it worked great. I am just getting lazy. :tank:
 
So when you use it standalone what method do you use? fly or batch sparge? I can see how you would heat the strike water but i'm not sure how the sparge water would be heated without a HLT.

sorry for all the questions, i'm still trying to wrap my brain around all this stuff.
 
So when you use it standalone what method do you use? fly or batch sparge? I can see how you would heat the strike water but i'm not sure how the sparge water would be heated without a HLT.

sorry for all the questions, i'm still trying to wrap my brain around all this stuff.

I batch sparge, and I heat the sparge water in the boil kettle. In my old system I would collect the wort in a seven gallon pale and then transfer it to the boil kettle after the last of the sparge water was added to the MLT. It works rather slick and the bucket is not required to be fermenter clean. I sanitize anyway, but really as long as it is clean and rinsed well, that is all that is required. S.
 
Awesome system, one question though. what is the tread size on the heating elements? i have been thinking about putting one together but didn't know what size the treads were. thanks for all the info!
 
Awesome system, one question though. what is the tread size on the heating elements? i have been thinking about putting one together but didn't know what size the treads were. thanks for all the info!

The threads on the element fit into a regular 1" pipe fitting. Nothing special. S
 
New pic of the system with the BCS-460 set up on brew day. Works great. The BCS operates the rig on the left.
DSC_0074.JPG

Also has some new features that are well worth it. I did a ramped a temperature increase over the span of seven days for a belgian blond that I brewed in this pic. The system was flawless. The control incredible. The beer is improved. After all the point is better beer. S.

who's that sexy man in the photo? :D
 
Rims set up strikes again. I brewed a American IPA last saturday. The RIMS performed flawlessly. I have only had to tweek the BCS slightly to put the temps right on. It was only out a degree to begin with, but what the heck. That is all to report now.
 

Latest posts

Back
Top