Recirculating eBIAB Build

Homebrew Talk - Beer, Wine, Mead, & Cider Brewing Discussion Forum

Help Support Homebrew Talk - Beer, Wine, Mead, & Cider Brewing Discussion Forum:

This site may earn a commission from merchant affiliate links, including eBay, Amazon, and others.

trav77

Well-Known Member
Joined
Nov 26, 2015
Messages
549
Reaction score
171
Location
Lethbridge
Well I am finally taking the plunge to eBIAB.

I've been brewing for about 15 years, most of that on some form of propane fired 3 vessel system (currently a converted keggle/cooler system). While it's been a great system for me, I would like to be able to brew in the basement (nasty climate in the winter here, plus I'm tired of running between the garage and the basement 100 times per brew day).

There are lots of build threads out there already but each one is a little different and I found them all useful when designing my plan... so one more couldn't hurt and I hope it helps someone else out.

So here goes. Custom kettle, hardware, bag, and controller components are all ordered. Just waiting for the brewhardware 15" false bottom to come back in stock and I'll be good to go!
 
Overall design and flow of the system. The 2 red hoses pictured are actually the same hose and will be moved from recirculating position to chilling/whirlpool positions.

biab flow.png
 
Panel design. I'm sure it will change slightly in the end, but this is the general design. Simple.

biab panel.png
 
Parts list. Some of it is in CAD so if you're in the US it will thankfully be cheaper!

parts list.png
 
Solid build plan. Keep in mind you don't want to unhook many hoses if they're full of wort and below the level of your kettle.

You could actually recirculate through the CFC for the entire brew if it made your plumbing easier. You could also look at something like this: http://www.ebay.com/itm/like/182048867607?lpid=82&chn=ps&ul_noapp=true so you don't have to unhook anything at all.

Finally, be careful with the bag and false bottom approach because you can still stick a mash that way. Recirculate slowly until you get a feel for your system with various grain bills. The guys who use baskets can pump back on top of their baskets as fast as they want since wort can also travel along the gap between the basket and the kettle. Your mash will sit against the kettle walls which means you're limited in the same way as a conventional mash tun.
 
Solid build plan. Keep in mind you don't want to unhook many hoses if they're full of wort and below the level of your kettle.

You could actually recirculate through the CFC for the entire brew if it made your plumbing easier. You could also look at something like this: http://www.ebay.com/itm/like/182048867607?lpid=82&chn=ps&ul_noapp=true so you don't have to unhook anything at all.

Yep good point. I already have the chugger pump which just has 1/2" MPT connections on the head. So it would be very easy to simply add a 1/2" tee and an extra ball valve to direct the flow to either recirc or chill/whirlpool.

Finally, be careful with the bag and false bottom approach because you can still stick a mash that way. Recirculate slowly until you get a feel for your system with various grain bills. The guys who use baskets can pump back on top of their baskets as fast as they want since wort can also travel along the gap between the basket and the kettle. Your mash will sit against the kettle walls which means you're limited in the same way as a conventional mash tun.

Yes this is really my only concern with the design. Trying to stay away from the basket (cost, one more part to clean, etc.). If the bag & false bottom doesn't work I can always pick up a basket I suppose.
 
Annnnndddd... My shipment including the mesh grain basket and all of my other TC clamps, valves, etc arrived yesterday.

Except it didn't.

This doesn't look like fittings and a grain basket.

View attachment ImageUploadedByHome Brew1483821727.797941.jpg

So unfortunately the hardware side is on hold while they sort out their shipping screwup.

Guess I'm working on the controller first.
 
Had to change the intended layout due to the location of a grounding bolt on the inside of the panel door.

View attachment ImageUploadedByHome Brew1483916827.018681.jpg

All cut out on the front. FWIW these panels are really easy to cut with a simple bimetal hole saw for the circular components and a bimetal blade on a jigsaw for the square ones. I'm sure a punch would be better but in my opinion the cost doesn't justify it for this project alone. The holes aren't perfectly clean but there's enough overhang on the buttons that there is some room for less than perfect holes.

View attachment ImageUploadedByHome Brew1483916995.198612.jpg
 
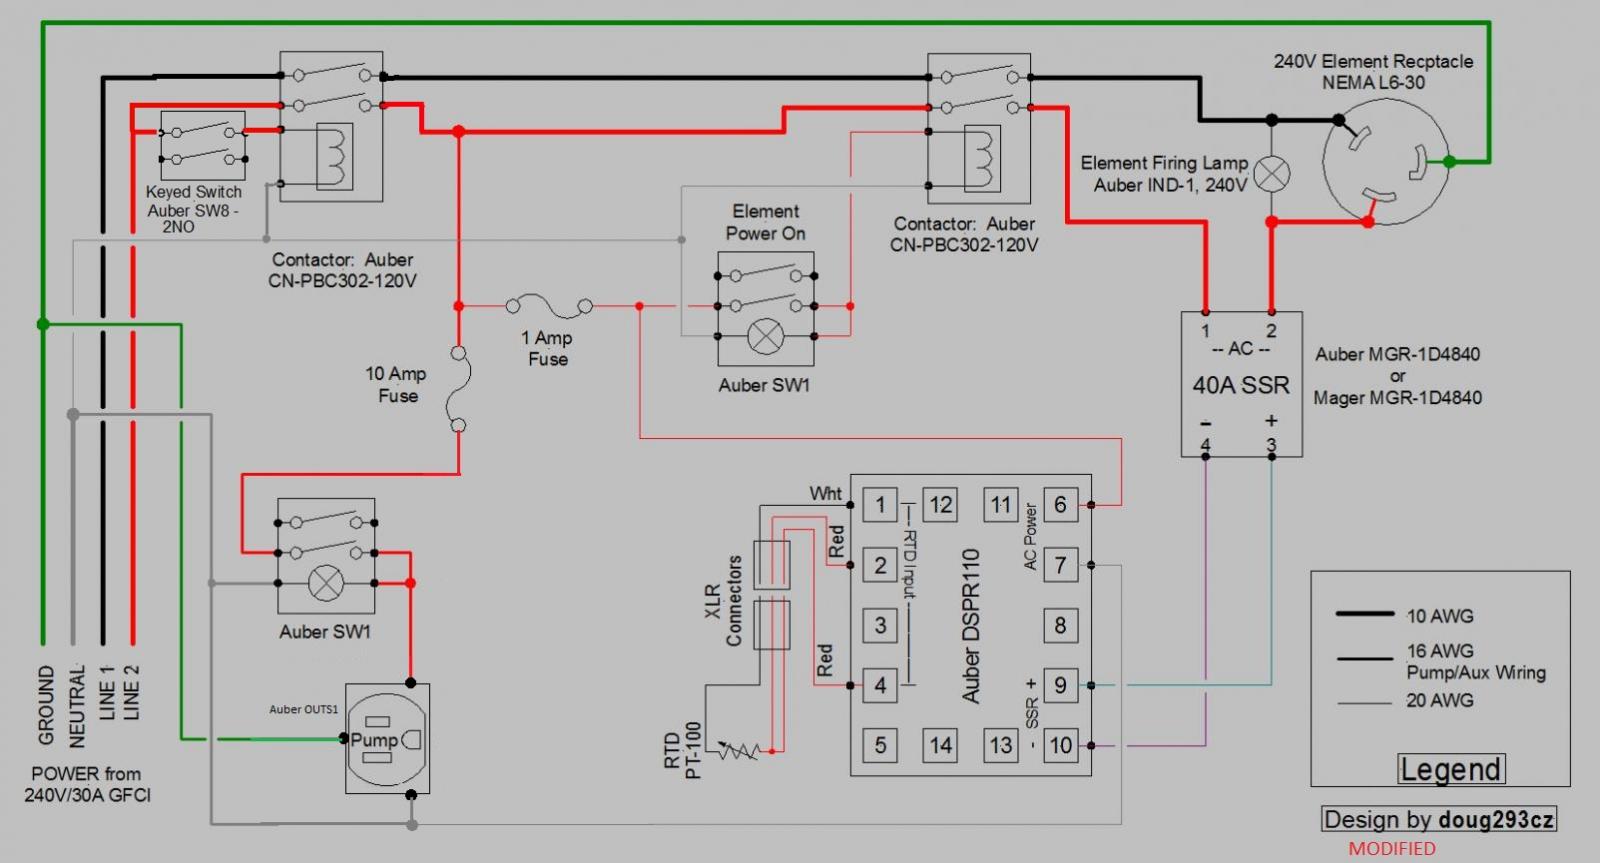
Wiring schematic. Modified slightly from one by @doug293cz to include a keyed switch.

So i am thinking of doing almost this same setup but instead of using fuses I was thinking of just using a 6 amp single pole breaker and 32 amp double pole breaker. Just need to figure out the wiring schematic for that.

Btw, awesome build. This is pretty much what I am planning on doing only different parts and trying to go more on the budget route.
 
Hot damn that's gonna look nice! Love those kettles... or any nice boil kettle really. I did my eBIAB setup on the cheap side and got a low cost kettle that doesn't look nearly that nice and fancy. You're going to love this!
 
So i am thinking of doing almost this same setup but instead of using fuses I was thinking of just using a 6 amp single pole breaker and 32 amp double pole breaker. Just need to figure out the wiring schematic for that.

Btw, awesome build. This is pretty much what I am planning on doing only different parts and trying to go more on the budget route.

@doug293cz can probably help you out, you'd just have to drop him a PM with your plan on how to integrate the breakers.

Capture.JPG
 
Lookin' good.. agree with you on the punches. . High $$ for one project.

Let us know how the maiden voyage goes..
 
Lookin' good.. agree with you on the punches. . High $$ for one project.

Yep. I could see it if you were going to use them for another project but for me to punch a handful of holes... ~ 50 bucks/hole is tough to swallow when the lip of the component is going to cover any imperfections anyways...

Let us know how the maiden voyage goes..

Will do. Still a ways out. I have to finish the recirc fitting in the lid, do all the controller wiring, build the exhaust fan/hood, do the plumbing, get the electrician in to wire an outlet, etc.

I checked out your build thread. You don't screw around. Very nice.

With your fan dripping... I have a similar fan ready to install. Going the 30 qt stainless bowl-as-hood route since I only have 1 vessel. How's that working for you? I was thinking of mounting it vertical right next to the exterior vent like you have it then ducting to the hood, rather than mounting it horizontal directly attached to the hood as many others have done. That way if it does drip, it drips behind the kettle instead of from directly above the kettle...
 
Yep. I could see it if you were going to use them for another project but for me to punch a handful of holes... ~ 50 bucks/hole is tough to swallow when the lip of the component is going to cover any imperfections anyways...


Will do. Still a ways out. I have to finish the recirc fitting in the lid, do all the controller wiring, build the exhaust fan/hood, do the plumbing, get the electrician in to wire an outlet, etc.

I checked out your build thread. You don't screw around. Very nice.

With your fan dripping... I have a similar fan ready to install. Going the 30 qt stainless bowl-as-hood route since I only have 1 vessel. How's that working for you? I was thinking of mounting it vertical right next to the exterior vent like you have it then ducting to the hood, rather than mounting it horizontal directly attached to the hood as many others have done. That way if it does drip, it drips behind the kettle instead of from directly above the kettle...

Mine works well. I did "slope" the ducting slightly towards the the fan itself. My fan has a screw in the housing right at a low point that I removed and when it does drip... Right into the sink..

I have been looking at some "high bay" lighting reflectors as a possible hood for a system. Something like this.
BBE_A15-U.jpg


They make them in many different materials and sizes.. I have seen some 20" in diameter... The one in the pic is 14.4 inches/aluminum and lists for $14!! Pretty good $$ and most have a bolt pattern on top that would make attaching duct work pretty clean and easy. I imagine if a person were up for a hunt you might fond some at a salvage lot. Quite a few power companies are swapping out those style light for LED replacements.

I really enjoy my system being in the basement, get up in the morning fill 'er up turn it on and then start the coffee. I would say about 20 minutes later, ready to mash in.

Thanks for the comments!
:mug:
 
Built the stand, installed the LocLine recirc fittings and arm, mounted the fuse holders (dinged the paint job oops!), installed an articulating TV mount that will attach the controller to the stand pole. Time for bed.

View attachment ImageUploadedByHome Brew1484373235.600870.jpg

View attachment ImageUploadedByHome Brew1484373245.917803.jpg

View attachment ImageUploadedByHome Brew1484373259.118541.jpg

View attachment ImageUploadedByHome Brew1484373301.871504.jpg

View attachment ImageUploadedByHome Brew1484373271.452378.jpg
 
Oh it will take a little bit of time to get it all together. I only get to work on it in short bursts when I'm not chasing the little gremlins around.

Kid-free it's a weekend project. I'm looking at another week or two to cap it off. Wired up the element today and started wiring the controller.
 
Where did you order your mesh basket from? Thinking of doing something similar...

I ordered mine from OBK in Ontario Canada. Arriving today after a shipping error so we'll see how it fits.

Likely you'll be able to source one a lot easier (and cheaper!) in the states.

Sorry I couldn't be of more help.
 
Nice! Perhaps I missed it but where did you get the TV mount? I need something like that for my controller!
 
Last edited by a moderator:
I'd recommend a splash guard for your pump.

Yep that's one of the final details! :mug:

Also wired in a GFCI outlet to replace the one behind the rig.

So close...

Also need to wait for my LHBS order to arrive. Minor detail...
 
might need to change the tape on your hood to aluminum tape or at least something higher temp duct tape does not like heat damn fine build
 
might need to change the tape on your hood to aluminum tape or at least something higher temp duct tape does not like heat damn fine build

Thanks. I didn't like the ghetto setup of having the hood duct taped so I already modified it. I cut the square duct so that it has sort of a flange and put it up through the cutout in the hood from the bottom. So now the hood just rests on that with no tape.
 
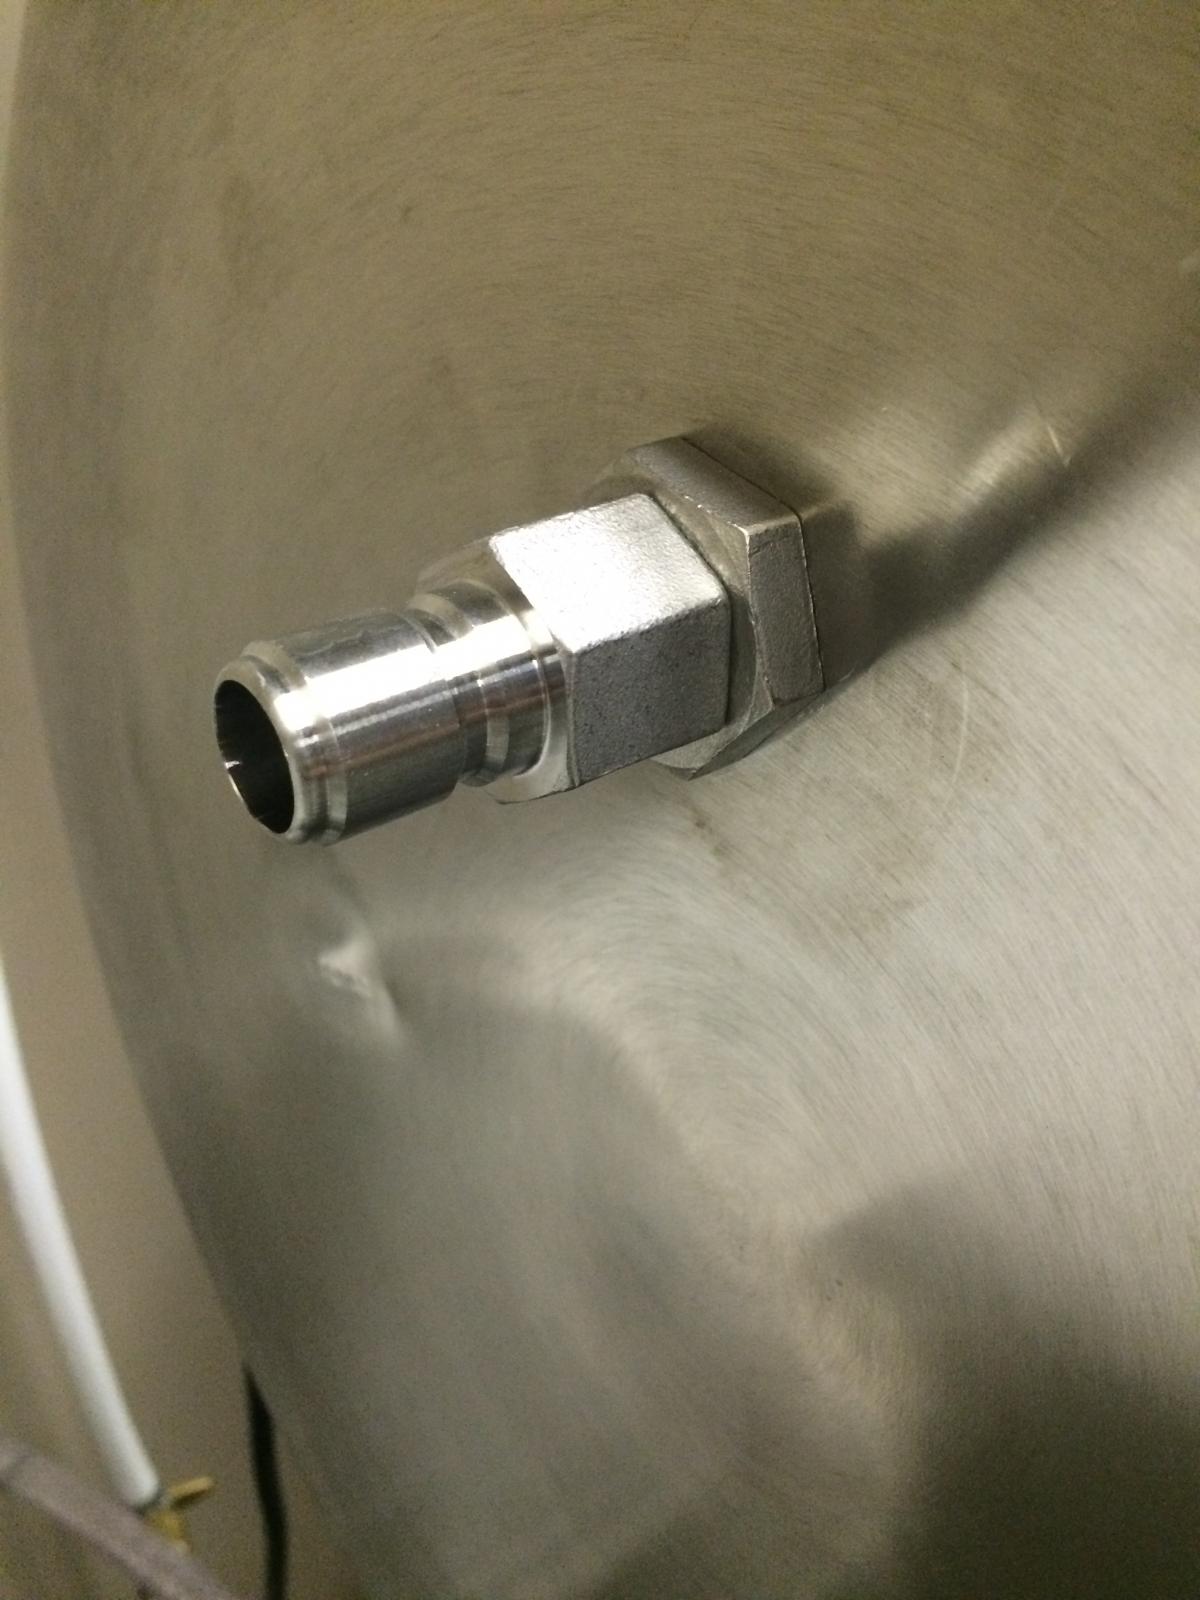
Swapped out the coupler inside the lid for a QD so now it's easy to pull the LocLine recirc arm off after mashing.

IMG_2634.jpg
 
Back
Top