Question about filling keg from primary

Homebrew Talk - Beer, Wine, Mead, & Cider Brewing Discussion Forum

Help Support Homebrew Talk - Beer, Wine, Mead, & Cider Brewing Discussion Forum:

This site may earn a commission from merchant affiliate links, including eBay, Amazon, and others.

Lazer Wolf Brewing

Well-Known Member
Joined
Aug 13, 2015
Messages
190
Reaction score
57
Location
Laguna Beach
Hey Guys,

I want to rack my IPA from my SS Brew Bucket Mini to my ball-lock keg. Can you please tell me if this process will work? Please keep in mind that this will be all gravity fed, not co2 powered. Also, I am leaving sanitation steps out for brevity:

1. Purge keg with co2 and disconnect.
2. Attach tubing to brew bucket mini spigot (Brew bucket will be on countertop)
3. Add a liquid ball lock QD to other end of tubing, and connect to OUT on keg (which is a few feet below brew bucket).
4. Unscrew pressure release valve.
5. Open spigot on brew bucket to begin transfer.
6. When transfer is done, reattach PRV and co2 to begin carbing.

The main thing I am not sure of is if the beer will flow through the ball lock disconnect and down the dip tube without doing something to the QD. Can beer flow freely both ways through a liquid QD?

As always, thanks guys. please poke holes in my process above, this is only my second batch kegging ever. If it's better to just run the hose from the brew bucket to the bottom of the open keg then I'll do that...just seems easier/more sanitary in the above way.

-Andrew
 
That will work, but so will simply taking the corny lid off and putting the tube from your fermenter down to the bottom of the keg. As long as you aren't splashing the beer as you drain the fermenter into the keg, there should not be any oxidation problem. That's all I do without even purging the keg with c02 in advance. I think some people are just overly paranoid about oxygen, so they take racking to a keg to an unnecessary and overcomplicated level.
 
T[...]I think some people are just overly paranoid about oxygen, so they take racking to a keg to an unnecessary and overcomplicated level.

Otoh, I'm betting "they" think the benefit is worth the effort, and also think there's a lot of oxygenated homebrew being consumed out there...

Cheers! ;)
 
That will work, but so will simply taking the corny lid off and putting the tube from your fermenter down to the bottom of the keg. As long as you aren't splashing the beer as you drain the fermenter into the keg, there should not be any oxidation problem. That's all I do without even purging the keg with c02 in advance. I think some people are just overly paranoid about oxygen, so they take racking to a keg to an unnecessary and overcomplicated level.

I did this for my first kegging last week. It was tough to do solo for a couple reasons...the main being that the tubing was stored curled up, so it was hard to keep the tubing at the bottom of the keg without it moving around, splashing, and me touching the outside of the tubing with my hands (contamination?).

I just felt that for a one man show, using a QD would be much easier, sanitary, and have less O2 risk.

Thanks for the help guys!
 
I have tried this with my SS bucket, and it did not work as well as I had hoped. Not sure if some hop gunk plugged up the disconnect or what. At any rate I went back to simply using tubing to bottom of the keg. It should work..... It just did not go well for me when I did it. A lot of people who go from carboys to kegs this way use some CO2 pressure in the carboy.

I will have to try again when I am doing something like a blonde ale that is a lot cleaner in the way of hops, etc.

**Straightening your tubing - I run hot water through mine and then basically just pull it/stretch/straighten it out. I hang it from a hook in my brew room instead of coiling it back up. it still likes to curl a bit, but straightens out fairly well.
 
As for contamination from you hands, I just keep a bucket 1/2 full of starsan around at all times + a spray bottle full of it. Before anything touches my wort/beer, including my hands, I just dip them in the bucket or spray them off. No infections yet.
 
That will work, but so will simply taking the corny lid off and putting the tube from your fermenter down to the bottom of the keg. As long as you aren't splashing the beer as you drain the fermenter into the keg, there should not be any oxidation problem. That's all I do without even purging the keg with c02 in advance. I think some people are just overly paranoid about oxygen, so they take racking to a keg to an unnecessary and overcomplicated level.

Nothing super complicated about attaching a liquid QD to the end of your racking hose...plus now you can actually purge your keg effectively if you ever decide to do that.
 
I would be curious to know if purging the keg with CO2 before racking really makes a difference when compared with simply racking to an empty and unpurged keg. Think I'll write a suggestion to the Brulosophers.
 
I think either means of transferring (through the dip tube or through the top) is going to give you comparable results. Once you have transferred your beer, make sure you purge the headspace a few times to clear that oxygen out. Then carb away! RDWHAHB!
 
I went ahead and tried it. Worked perfectly.

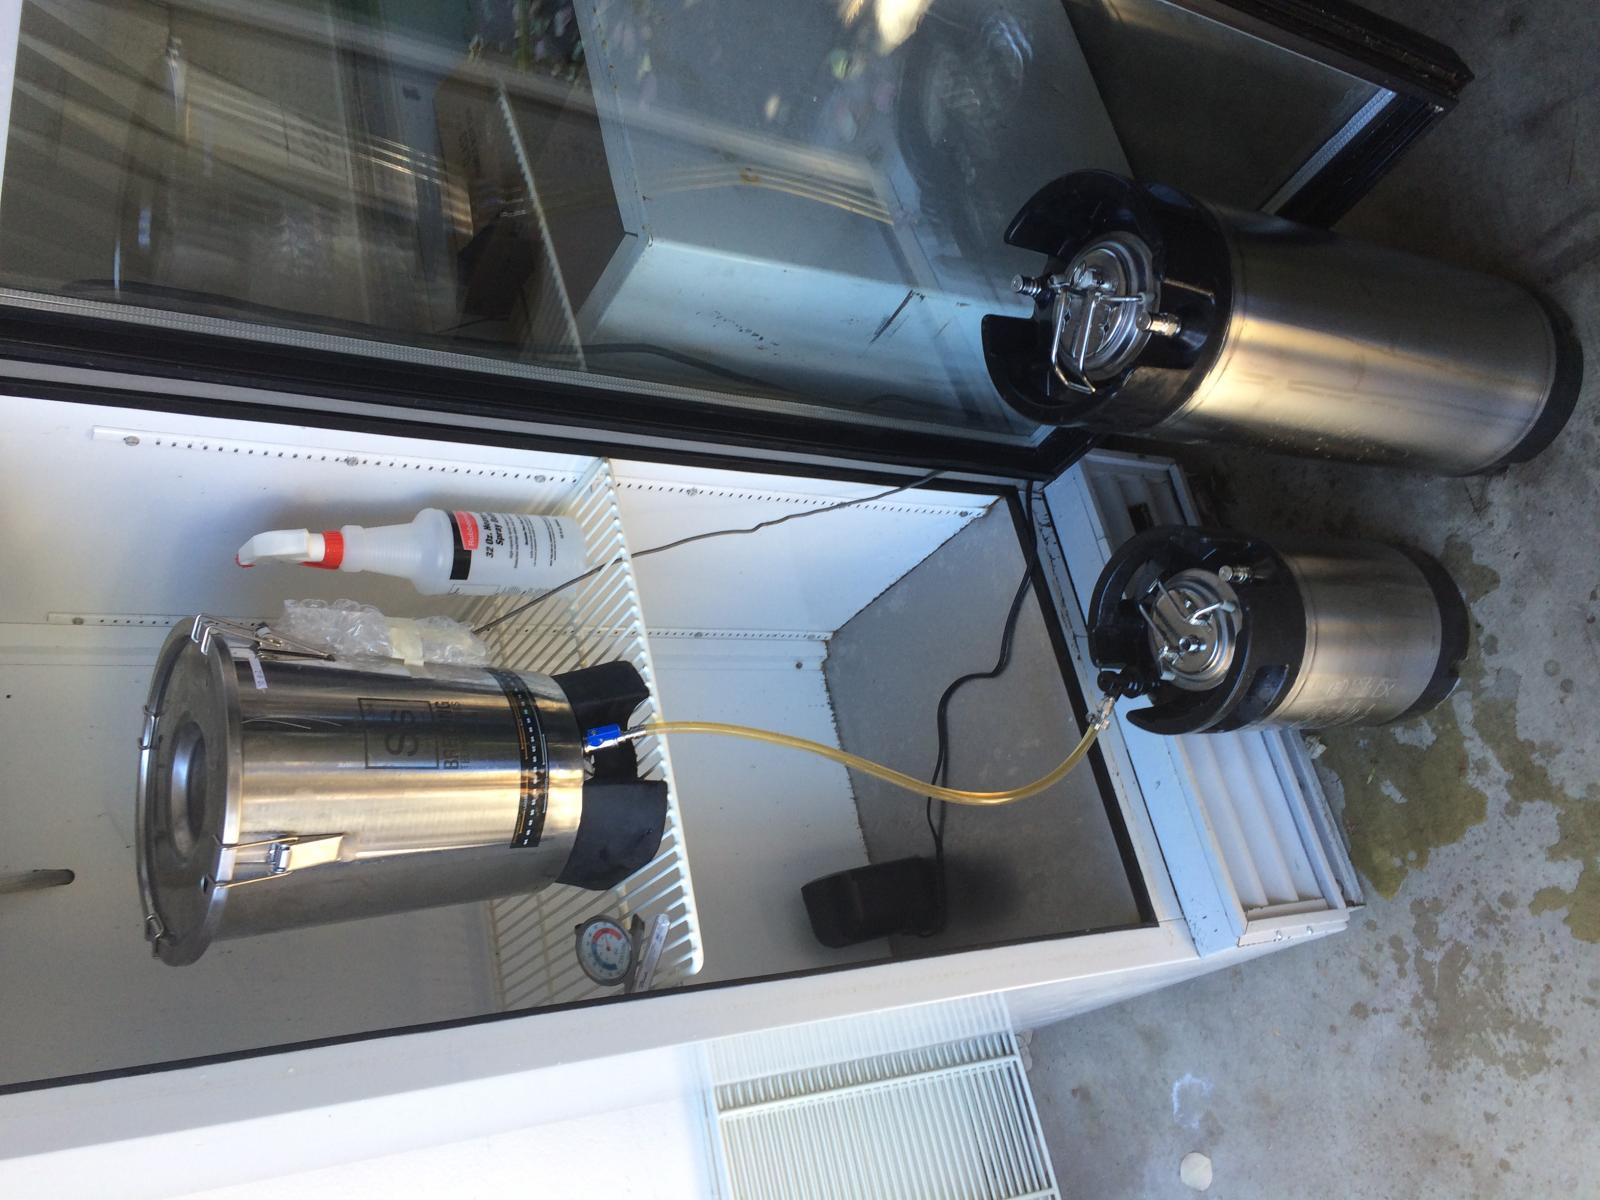
Purged the empty keg, sanitized the tubing and QD, stuck it on the spigot, attached the QD to the keg, opened the spigot. Without a hitch! Will definitely be doing it this way from now on. Thanks for the insight guys.

IMG_8996.jpg
 
I use hose lowered into keg. Everything sanitized. Using 1/2" makes quick work of this. I also hang hoses instead of coiling.
 
Did you unscrew the pressure release valve before transferring? If that is screwed in, the liquid won't flow. If could have been hops though. I use a Muslim bag for my dry hops and I didn't need to remove it before transferring which was nice.
 
Sometimes it just works best the way it works best for you.

I may try this next time I fill a keg. I'd probably fit a spare QD on the gas post to help it purge air(CO2), or keep the lid on, but not tight.
 
I too purge the keg with CO2, vent, remove lid, tubing to bottom of keg, and open the fermenter valve. I use silicone tubing for the task specifically because vinyl coils up. Works like a charm, though I have considered the QD method and will likely some day try it.

@aghenender - what ID tubing are you using on the spigot? Myself and others have mentioned the 3/8" spigot is not truly 3/8" and 3/8" tubing doesn't hold on by itself, it creeps off. I emailed Ss Brew Tech and they told me their valve has "less aggressive barbs to make it easier on wearing the tubing". I am now looking at buying 1/4" silicone tubing to try as I think 5/16" (as they recommended) might still be a little loose fitting. Right now I have to literally pinch-hold the tubing on the spigot while filling the keg.


Rev.
 
I went ahead and tried it. Worked perfectly.

Purged the empty keg, sanitized the tubing and QD, stuck it on the spigot, attached the QD to the keg, opened the spigot. Without a hitch! Will definitely be doing it this way from now on. Thanks for the insight guys.

How did you purge that keg? Filling all the way with Starsan, then pushing it all out with CO2?
 
Some others have mentioned the O2 exposure... your biggest exposure is the empty space in your keg. The good news is that this is EASY to fix.

Replace your step 1 with:

1a. Fill keg completely to top with water. You could use star san if you're extremely worried, but you're talking about chlorinated tap water here and it's going to receive fermented beer.
1b. Install lid, close PRV.
1c. Attach CO2.
1d. Push out all water through your tap (assume you have a cobra tab here). I'd start it off around 10-15 psi then lower it to 5 psi towards the end so you don't waste too much CO2, but enough enough so you're not wasting too much time.
1e. You now have a keg that only has CO2.
1f. You can store your keg indefinitely like this (what i do until i need it)
1g. Immediately prior to use, release PRV
1h. Attach to racking cane, fermenter etc, Rack through liquid QD.

I suspected oxidation issues with my beers for years when i just did the "purge the head space 3 times" trick. Since i started to to this my oxidation flavor is gone.

^^^^^ THIS IS WHAT EVERYONE WHO KEGS SHOULD BE DOING ^^^^^^^^^^^^
 
@aghenender - what ID tubing are you using on the spigot? Myself and others have mentioned the 3/8" spigot is not truly 3/8" and 3/8" tubing doesn't hold on by itself, it creeps off. I emailed Ss Brew Tech and they told me their valve has "less aggressive barbs to make it easier on wearing the tubing". I am now looking at buying 1/4" silicone tubing to try as I think 5/16" (as they recommended) might still be a little loose fitting. Right now I have to literally pinch-hold the tubing on the spigot while filling the keg.
Rev.

Rev, there are no markings on the tubing but it appears to be 5/16''. 3/16'' is way too small (tried it) and 1/4'' silicone was way too big (tried it). 5/16'' takes a little elbow grease getting on the spigot. If you look at my last picture, youll see some wort on the ground...I hadn't pushed the tubing far enough onto the spigot and it popped off for a second. Those barbs don't do much. Once I pushed it on pretty far, I let it go with no worries.

And to all, yes I filled with StarSan solution and poured out back into my home depot bucket to use for next time. Thanks for the tips everyone!
 
Only issue I have with the QD method is I can't see if I am overfilling the keg. Sometimes when I use a lot of hops or other adjuncts like coconut I use more wort volume to ensure that I get 5 gallons after absorption loss. Sometimes there's a little extra and I don't want to fill it so high as to reach the CO2 diptube. At least with going through the lid opening I can see the weld line, and if it's still foggy from the CO2 I use a small flashlight.


Rev.
 
Rev, there are no markings on the tubing but it appears to be 5/16''. 3/16'' is way too small (tried it) and 1/4'' silicone was way too big (tried it). 5/16'' takes a little elbow grease getting on the spigot.

How could 1/4" be too big if it's technically 4/16", which is smaller than 5/16" which you said takes a little work getting on the spigot?


Rev.
 
Some others have mentioned the O2 exposure... your biggest exposure is the empty space in your keg. The good news is that this is EASY to fix.

Replace your step 1 with:

1a. Fill keg completely to top with water. You could use star san if you're extremely worried, but you're talking about chlorinated tap water here and it's going to receive fermented beer.
1b. Install lid, close PRV.
1c. Attach CO2.
1d. Push out all water through your tap (assume you have a cobra tab here). I'd start it off around 10-15 psi then lower it to 5 psi towards the end so you don't waste too much CO2, but enough enough so you're not wasting too much time.
1e. You now have a keg that only has CO2.
1f. You can store your keg indefinitely like this (what i do until i need it)
1g. Immediately prior to use, release PRV
1h. Attach to racking cane, fermenter etc, Rack through liquid QD.

I suspected oxidation issues with my beers for years when i just did the "purge the head space 3 times" trick. Since i started to to this my oxidation flavor is gone.

^^^^^ THIS IS WHAT EVERYONE WHO KEGS SHOULD BE DOING ^^^^^^^^^^^^

"1e. You now have a keg that only has CO2."

Not quite. If you fill your keg till it overflows the PRV, you still have ~3 fl oz of air in the lid headspace. Turns out that small amount of air can give you greater than 1 ppm residual O2 (but it is way better than just 3 purge cycles.) I did the full analysis here: https://www.homebrewtalk.com/showpost.php?p=7330461&postcount=22. If you don't fill with water/StarSan thru the beer out post until it overflows the PRV (for example just filling thru the open lid) you will have even more air in the headspace when you start the liquid purge process.

Brew on :mug:

I stand corrected. I need to modify my water purge process.
 
Oops I meant 1/2inch sorry. I'll have to measure when I get home, must either be 5/16 or 1/4inch

I'm just confusing myself now.

I just ordered 10' of silicone 1/4" tubing so I'm hoping to be all set. Silicone is more flexible and stretchable so I think it will work fine. Vinyl is tougher to get on when the size isn't a perfect match.


Rev.
 
I went ahead and tried it. Worked perfectly.

Purged the empty keg, sanitized the tubing and QD, stuck it on the spigot, attached the QD to the keg, opened the spigot. Without a hitch! Will definitely be doing it this way from now on. Thanks for the insight guys.

That's pretty sweet having a dedicated glass-fronted fermentation chamber to show off your shiny fermenter. :mug:
 
That's pretty sweet having a dedicated glass-fronted fermentation chamber to show off your shiny fermenter. :mug:

Hehe, if you got it show it off right? Took me about a month and a half on Craigslist every day to find it. $150 but it smelled like it was used to store dead bodies when I got it.
 
Back
Top