My homebrew stirplate

Homebrew Talk - Beer, Wine, Mead, & Cider Brewing Discussion Forum

Help Support Homebrew Talk - Beer, Wine, Mead, & Cider Brewing Discussion Forum:

This site may earn a commission from merchant affiliate links, including eBay, Amazon, and others.
beergears said:
Odd, I concede... but why not get rid of the fan blades altogether..??

That is they are still pushing air, taking up precious power. Lopping them out should be done carefully, so the unit remains balanced.

I spent a year in engineering school, so I may be wrong, but from what I remember of physics and centripetal force those fan blades will help to balance out your non-centered, out of balance magnet because they are on a greater radius than that of the magnet.

Then there is the KISS principle. I'd leave them on there.
 
Gammon N Beer said:
OK...

I am testing my stirplate and this is what I get.

My stir bar will rotate, but I am not getting the speed I need to create the vortex. Is it that the motor rotates too fast for the bar to keep up?


I just got mine up and running yesterday. I used a total of 4 magnets. Two stacked on top of one another and then epoxied to the fan hub.

You need to rotate the fan slowly at first and let the stir bar "hook up" to the magnets and then ramp up the speed. Although if you go too fast, it will throw the stir bar.

To get mine started, I jog the fan with the on/off switch untill I see the bar "hook up".

I've been using a DC transformer that has adjustable voltages. 7.5 has been the best speed for me with a high of 9volts. 12 volts is just too fast and throws the bar.

I need to get a flask and see how that works with a bottom that's not concave.
 
Cookiebaggs said:
I just got mine up and running yesterday. I used a total of 4 magnets. Two stacked on top of one another and then epoxied to the fan hub.

You need to rotate the fan slowly at first and let the stir bar "hook up" to the magnets and then ramp up the speed. Although if you go too fast, it will throw the stir bar.

To get mine started, I jog the fan with the on/off switch untill I see the bar "hook up".

I've been using a DC transformer that has adjustable voltages. 7.5 has been the best speed for me with a high of 9volts. 12 volts is just too fast and throws the bar.

I need to get a flask and see how that works with a bottom that's not concave.


My bar hooks up to the magnets well. I am not getting the revolutions per minute out of the bar to create the vortex. Yet, the fan is fast enough.

Do I have to slow that fan down?
 
Well my setup is as follows. I have the (Harddrive-salvaged) magnet about a 1/2 inch below the beaker and I am using a 120mm fan. I had to trim the magnets down a bit as they were so strong that it causes the fan to slow down as the magnet is also pulling on the fan motor.

With this setup I can spin a 1 inch stir bar at enough of a speed to draw a vortex violent enough to dislodge the stir bar.

What you describe with it not spinning fast enough is that magnet is to strong and is working against the fan motor, I would guess. Trim the magnet down a bit so that it's not so strong on the motor. I woudl say try to run the motor with out the magnet and see how fast it spins. Then try it with the magnet and see how much difference you get. Then trim the magnet to allow for something in the middle. I think ideally you would like to put something between the magnet and the fan to isolate the fields. But I have not figured that out yet. So, I went the route I outlined above.

Good luck and let us know how it works out.
 
SCORE!

I was scrounging for discrete components at the electronics shop and found a dusty old velleman 317-based variable power supply for $9.95 transformer, power cord, and all. I bought it.
 
waterkc said:
Well my setup is as follows. I have the (Harddrive-salvaged) magnet about a 1/2 inch below the beaker and I am using a 120mm fan. I had to trim the magnets down a bit as they were so strong that it causes the fan to slow down as the magnet is also pulling on the fan motor.

With this setup I can spin a 1 inch stir bar at enough of a speed to draw a vortex violent enough to dislodge the stir bar.

What you describe with it not spinning fast enough is that magnet is to strong and is working against the fan motor, I would guess. Trim the magnet down a bit so that it's not so strong on the motor. I woudl say try to run the motor with out the magnet and see how fast it spins. Then try it with the magnet and see how much difference you get. Then trim the magnet to allow for something in the middle. I think ideally you would like to put something between the magnet and the fan to isolate the fields. But I have not figured that out yet. So, I went the route I outlined above.

Good luck and let us know how it works out.

Currently, I have four magnets stacked on top of each other with the top magnet close to the top of my plastic case. The fan motor runs fine.

I will again test it by removing a magnet and restarting it, removing the next one etc.
 
So while working on this project I became busy with other things in my life, so my first disclaimer is that I was not focusing on it as much as I could have.

THAT being said...

I almost pulled my hair out over this one. I have very minimal understanding of electronics, but it sounded so easy I couldn't pass it up. So I had a lot of problems, mostly user caused (that means me) but it's finally done. Here's two pics.

P3310081.JPG


and

P3310082.JPG


I had a problem first with the magnets, they were stopping the fan. So then I was worried that I wouldn't be able to slow it down enough. I took off the magnets and started messing with the thing. I added a second pot. thinking this would help, but I still couldn't get it to spin at anything but blinding speed. Duh. There was nothing slowing the fan down. So I added the two 1/4" pieces of pine I cut out with a hole saw to the top of the fan hub, attached the magnets to the top of them, epoxied the whole thing together, and everything was okay. I don't have much control with my 6V power supply, full speed seems about right, so I guess I wasted the time and money to put in those pot.'s...maybe I'll replace one of them with a power switch!
 
Well, I got some parts together and assembled a couple of stir plates. I salvaged the magnets, case fans, and on/off switches from the giant pile of old PC's that were at the city recycling yard.

I bought one project box and then found a sale on wooden cigar boxes for $2. Every time you open the cover, it smells like patchuli.


Used a rheostat and an LED.


They both work well!

 
MrSaLTy said:
I chose to go with a simple LM317 voltage regulator circuit. Schematic here.

3040-lm317.jpg


This circuit can vary the voltage from about 1.3V to just under 12v I recommend this if you have a little electonics knowledge and know how to solder. Here is an EXCELLENT tutorial on how to build this circuit with component placement and everything. I have a list of parts etc at the end of this post.

http://casemods.pointofnoreturn.org/vregtut/tutorial-full.html

Hi, I'm new to this forum. I know absolutely nothing about electronics and was hoping that this link would show me how to put the board together, but the link is dead. does anyone have another site i can look at for this. I tried searching myself (both here and on the web), but I'm not sure what I'm looking for so I can't search very effectively. Thanks.

Billy

ps. I love this forum. I've read a lot of good stuff here already.
 
I've been getting the parts together to build a simpler stir plate (a lot like the ghetto one in the $Free.99 thread). Anyway, there's no science supply store that I knowof around me to get a stir bar, and I had a hard time finding a place online that I could get one for pretty cheap. Just wanted to share that I found one at here
for $3.35, and you can use the code MCSCIEDGE to get free shipping (The shipping was always what killed it. I found places that had stir bars for $3.50-5, but always at least $5 in shipping).

Also, I found a similar site where you can get a 1000 mL pyrex Erlenmeyer flask for $7.95 here . It is a different site, but you can use the same MCSCIEDGE code for free shipping too.

I didn't know where to post these because I'm pretty new here, so if there is a better place, let me know.
 
Initially, my stirbar was spinning on the wrong axis, sort of rolling sideways quickly.
I tried many configurations and flung many different adhesives all over my shop.
The old stirbar was 1 3/4 , I believe and not hooking up as someone described it.
Ordered a 1" from Eslay and stacked three HD magnets(4th broke)
and wamo, spins right up and refuses to disengage. Maybe with this much stronger field, my motor bearings won't last long, who knows. Try and get some pics up this weekend.
 
I have a proof-of-concept setup with:
wall wart, small fan, single magnet (no glue!), screwheads+washerS, plastic top plate... and a coffee pot plus $3.50 stir bar.

All loose parts.. and it works!


I just wonder how big of a vortex is needed, in actual starter conditions?
 
I bought the Flexi-PSU (1.5A Version with Flexi-PSU PCB and LM317T) from Ecros Technology: http://www.ecrostech.com/General/MiniPsu/LM317.htm Cost: $8.95. I connected it up to a 12V DC wall wort I had around and purchased a full sized POT to replace the included trimmer pot. It went together easy and worked as expected. I received my order within two days. All around I'm happy with the purchase.

The one negative thing I would say is that it did not come with step by step instructions. I was able to look at the schematic and determine what went where but there are some options on the PC Board and it took some consulting of the schematic to determine which parts went where and what components were left out as optional or for other models.
 
OK, I'm about at the end of the ol' rope with this stirplate circuit. I got everything from Jameco per Yuri's post (thanks Yuri!) and I've gone through 2 power supplies and 1 LED. I guess getting an A in Physics II in college (which was pretty much all electronics) hasn't done much good for me. I'm not an electronic idiot, but since this circuit is kicking my ass, it goes to prove that a little knowledge in electronics does not go a long way. I've got everything hooked up right (at least what I think is right, which is probably wrong) and it still doesn't work. I've tested all the points with a multimeter and everything seems to be connected, BUT IT"S JUST NOT WORKING! (Although the led lights up, which is more annoying than helpful.)

I guess a good place to start would be if someone could provide (or point me to on the web... I've searched and can't find) a detailed description of how everything gets connected in regards to the schematic. I have the following parts in the circuit:

-power connector
-power switch
-LED
-R1 (1K)
-R2 (Potentiometer- 10K)
-C1 (.1uF)
-C2 (1uF)
-LM317 (I'm sure I have the In/Out/Adjust right)
-Fan
-Power Supply

Can anybody help me out... PLEASE!

Did you toast your regulator?
 
Did you toast your regulator?

Good question. I hadn't thought of that. I don't think so, BUT... how can I check for sure with a multimeter? I have another unused one to compare readings if necessary. If course, this one is intended for stirplate number 2.
 
Good question. I hadn't thought of that. I don't think so, BUT... how can I check for sure with a multimeter? I have another unused one to compare readings if necessary. If course, this one is intended for stirplate number 2.

Since the regulators are essentially transistors using a meter on an inactive device will not work. I would connect the circuit using the new device and check it out. These regulators are probably available at your local radio shack, for a buck or two each. What is your input voltage, output voltage, and load current? If you are regulating down to far say 12 down to 5 and your current draw on your load is high enough it could be overheating. I do not remember if that regulator has a thermal shut down built in, but that could also be something to check.
 
I just had this whole thing typed about how I tried the new voltage regulator and it still not working when I paused to take a close look at all of my soldering points. One soldering point looked like it connected everything OK, but looked like it was remotely possible that the 2 points weren't quite connecting in the solder. So, I fired up the gun and re-soldered that point. IT WORKS!

bru-er, I really appreciate your help!:mug:

Sounds like you fixed it. Let me know how it works. I am getting ready to begin a stirplate.
 
Finally got around to building one of these. I've been using mostly dry yeast for quite a while now so I haven't needed it. I've started getting into lagers though so I decided it would be worthwhile to have for building up big starters. Can't wait until my stir bar and flask arrive so I can start using it.
 
I've found an even cheaper way to regulate the speed of the fan somewhat without the need to solder or add additional parts. It won't be as sexy as the plates with the knobs, switches, and LEDs, but if all you want is a stirplate, it's hard to get much cheaper (or easier) than this. I'm including price for new parts in case you can't scrounge, since half of the parts you need come from old/dead computers.

You need:

1. 4 inch computer fan, 12V DC (Price new: aprox 5-7 dollars)
2. At least 1 magnet from a dead hard drive (Price: ??? Ask Geek Squad or your local friendly computer repair store for a dead HD)
3. Coby CA-969 Universal AC/DC Adapter (Price: 7 bucks from Fry's, I've found them for as cheap as 4 bucks each)
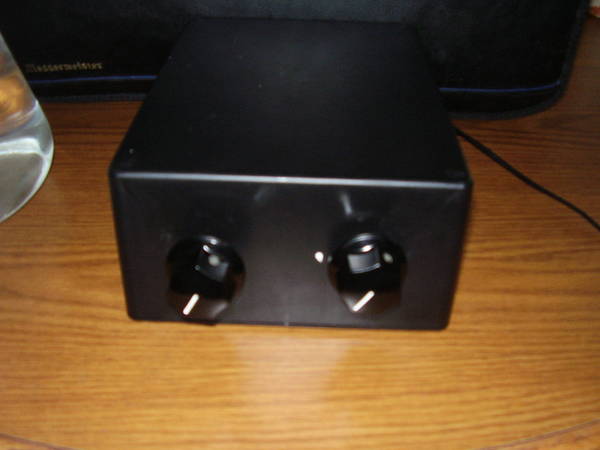
4. Project box (Price: around 10-15 bucks)
5. Electrical tape (Price: 3 bucks tops)
6. Epoxy (Price: less than 5 bucks)

Optional:
7. Power switch (Price: Maybe 3-5 dollars depending on how fancy you get)

Assemble much like any other stirplate, installing the switch if you *really* want to get fancy. The CA-969 adapter has a switch on the wall wort that varies from 1.5-12 volts, so you have about 8 "speed" settings, the highest few (8-12) I'm imagining are too fast. So you have 4 or 5 valid speed settings in one wall wort. Cut off the head of the adapter at the end of the cable, and strip the wires. The wire with the white stripe is positive. Strip all your cables, assemble everything (Use bolts or at least spacers to get your fan up near the top of the box, this might cost you an extra dollar or two in parts).

No soldering needed unless you want to add a switch.

Total cost if you have zero tools and the electrical skills of Paris Hilton? Maybe 30 bucks. Most of us have access to at least half of these parts, so for instance the price for me ran around 10 bucks.

Oh, and if you want a fan suggestion, Antec offers a "tricool" 12 volt fan that offers 3 speed settings via a switch at 12 volts, the lowest being 1500 RPMs, and the other two being 2000 and 2600 RPMs. That combined with stepping down the voltage should give you plenty of control with minimum fuss.
 
OK, I'm about at the end of the ol' rope with this stirplate circuit. I got everything from Jameco per Yuri's post (thanks Yuri!) and I've gone through 2 power supplies and 1 LED. I guess getting an A in Physics II in college (which was pretty much all electronics) hasn't done much good for me. I'm not an electronic idiot, but since this circuit is kicking my ass, it goes to prove that a little knowledge in electronics does not go a long way. I've got everything hooked up right (at least what I think is right, which is probably wrong) and it still doesn't work. I've tested all the points with a multimeter and everything seems to be connected, BUT IT"S JUST NOT WORKING! (Although the led lights up, which is more annoying than helpful.)

I guess a good place to start would be if someone could provide (or point me to on the web... I've searched and can't find) a detailed description of how everything gets connected in regards to the schematic. I have the following parts in the circuit:

-power connector
-power switch
-LED
-R1 (1K)
-R2 (Potentiometer- 10K)
-C1 (.1uF)
-C2 (1uF)
-LM317 (I'm sure I have the In/Out/Adjust right)
-Fan
-Power Supply

Can anybody help me out... PLEASE!

I just built one of these and it works.
Thing is, i got it wrong - both of my capacitors are 1uf, instead of one being .1.
Only noticed it when I read the above post.
What can I expect as a consequence?
(One thing i noticed is that once it stalls, I have to flick it with a finger to get it rolling again, but i just thought this was the particular fan/magnet combo I'm using.)

I'm obviously no electronics genius, so I'm not sure, but I wouldn't leave it like that. You should be able to the capacitor you need at your local Radio Shack.

Update: I just got my new power supplies in yesterday and my stirplate works great. Now I just have to build another one:cross:.
 
Help!
The only way I can couple the stir bar to the magnet on the computer fan is by spinning up from zero.
If the fan is already spinning, I can rarely get the stir bar to sit - keeps bucking it. Takes a 1/2 hour of friggin with it !!
Problem is, the fan won't start from zero without physically being nudged by my finger. Of course, I have to take the lid off to do that, so i have to decouple the bar. Catch 22.

I'm using the 317L circuit published near the start of this thread - or whatever the correct letters are.

Does yours start from zero?
What can I do?

Cheers,
Yorg.

On mine, I generall have to start slow, then slowly speed up. To keep it spinning without throwing it, it's only spinning at about 6 volts. Any faster and it throws it. But that's fast enough to get a little whirlpool going. Like others have said in this thread, you've got to get the magnets as close as possible to the top of the underside of the box. The magnets should almost be rubbing the lid. If that still doesn't work (make sure you're using 2 magnets- one flipped over- on each side of the fan), then you'll need to get more powerful magnets or double-up the ones you have. If you're using harddrive magnets, different harddrives use different magnets... some are bigger/stronger than others.
 
Sometimes the fan has a problem starting from a dead stop if the magnet isn't centered on the hub.

Although one fan I had needed to be "nudged" as well even with the magnet right on center. I ended up swapping it out for another fan.
 
Getting closer.
Tossed the fan and got another. It now starts from zero.
However, it throws all but my smallest bar quite low speed.
I have one magnet on the hub, so will try another on top and see.
Thanks for your suggestions.
 
inspired by this thread, I made two with just a pentometer, fan and old blackberry power supply for each and som glad tupperware type containers.

I originally was using harddrive magnets, but switched to some ceramic ones from lowes that were 7/8 x 1 7/8 x 3/8 (may be different it's been about a month since I bought them).

I purchased a 2" stir bar that kept getting thrown with the harddrive magnet. I bought the magnets from lowes that come in a 2 pk. I put two together end to end and taped them together, then taped them to the center of the fan to have a larger magnetic field.

I am only using the pentometer to control the speed, but they work when you pulg them in at full speed, unplug them, then put the starter with stirbar on centered as best as you can. Eventually the speed slows enough for the bar to stop rattling around and center it's self. When it centers I have to plug it in quickly and then slow the speed with the pentometer.

I've done 3 starters so far and they have worked great

thanks for the inspiration.
 
I wish someone would draw this circuit out for those of us that are not electronic engineers.

I have problems following the schematic. If it were drawn out in terms of connect this wire here to this wires it would be easier.

I am not good at reading schematics that were meant for an electronic Engineer.

This is definatly not worded for the weekend warrior.
 
I wish someone would draw this circuit out for those of us that are not electronic engineers.

I have problems following the schematic. If it were drawn out in terms of connect this wire here to this wires it would be easier.

Wow, it's your lucky day! Check out this thread by hexmonkey, from earlier today. Seems to be exactly what you're asking for.

Detailed step-by-step stirplate speed control
 
All I used for mine was:

Project Box
12v Fan
switch
Rheostat (25 ohm)
2 rare earth magnets from ebay
12v transformer


I'm ok with electronics, but I don't understand the need for capacitors and all that other stuff when this works perfectly...
 
All I used for mine was:

Project Box
12v Fan
switch
Rheostat (25 ohm)
2 rare earth magnets from ebay
12v transformer

I'm ok with electronics, but I don't understand the need for capacitors and all that other stuff when this works perfectly...

The site I linked in the other thread explains a bit about why the "advanced" circuit uses the components it does (and it sounds like the capacitors may be somewhat unnecessary). Basically, the problem is that some fans spin pull more current than others, so a random fan with the same 25 ohm rheostat gives predictably random results. Using a circuit that you know will put out a specific voltage range from a given starting voltage allows you to use whatever fan you want.

In your example, 25 ohms is not a very high value, so the difference from full-off to full-on is not particularly high. In my circuit I used a 120mm fan rated for 12V at 20 mA

voltage drop = amps x ohms = 0.20 x 25 = 5v
12v max - 5v = 7v
So full range of circuit for the 25 ohm rheostat is: 7v to 12v

This means the 25 ohm rheostat only dropped the voltage to 7V when turned all the way down. I had to flick the on/off switch to get the fan moving slowly enough not to throw the stirbar, because even turned all the way down, it was moving too fast to start. Not what I would call "working perfectly" in this setup.

In comparison, the "advanced" circuit is specifically designed to give a range of ~1.2V to 12V, which is well enough to start really slowly and get it up to speed without throwing the stirbar. Now I can just set the flask down, turn it on and adjust the speed, and it just works with no fiddling.
 
I just noticed a good point for those of you looking to make this without the advanced circuit: use Ben25's parts list, but switch to a 6v power supply.

On this site:

Wort-O-Matic: Articles

Erik uses the same parts list as Ben25, including a 12v fan, but he lists a 6v power supply instead of a 12v power supply.

In my previous post, I noted the voltage drop for the fan and rheostat:

voltage drop = amps x ohms = 0.20 x 25 = 5v

This is independent of voltage, so it's a 5v drop for 12v or 6v supplied. Using a 6v power supply means the range is much better (1v - 6v). The fan will never spin at full speed, but for most fans this won't be a problem at all.
 
Back
Top