Microscope images - help identifying

Homebrew Talk - Beer, Wine, Mead, & Cider Brewing Discussion Forum

Help Support Homebrew Talk - Beer, Wine, Mead, & Cider Brewing Discussion Forum:

This site may earn a commission from merchant affiliate links, including eBay, Amazon, and others.

hlmbrwng

Well-Known Member
Joined
Nov 25, 2015
Messages
247
Reaction score
41
Location
Somerville, MA-->Los Angeles, CA
I was motivated to purchase a relatively inexpensive microscope having x1000 magnification so I can start looking at microbes after my brews, to look at microbes of commercial beers, and to perform cell counts.

The last couple of batches have given off a strange plasticy smell. Actually, the last batch really did, and I think the fermentation chamber just still smells like it. Not sure that the new batch is infected.

I transfered the beer to secondary so that I could do a second dry hopping of this beer. It is a hefeweizen using Wyeast 3068. I was waiting to receive immersion oil in the mail, so the mostly empty carboy sat for a day with its opening covered with plastic wrap (a couple of hours went by before I thought to cover it).

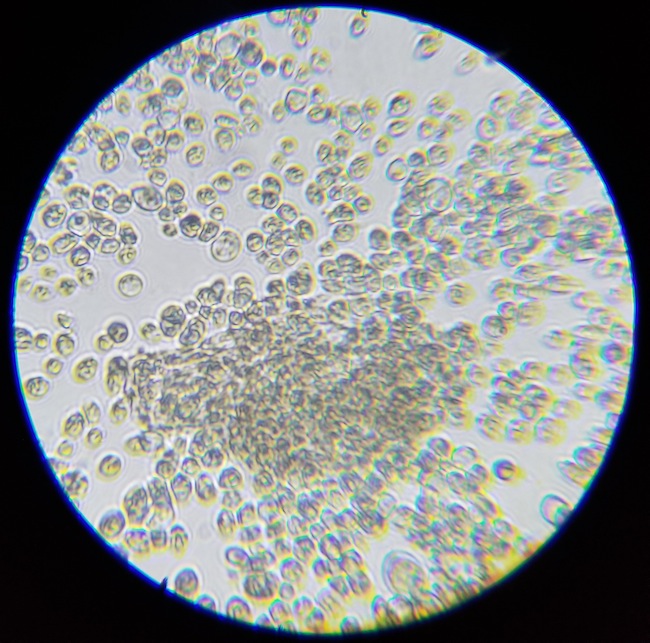
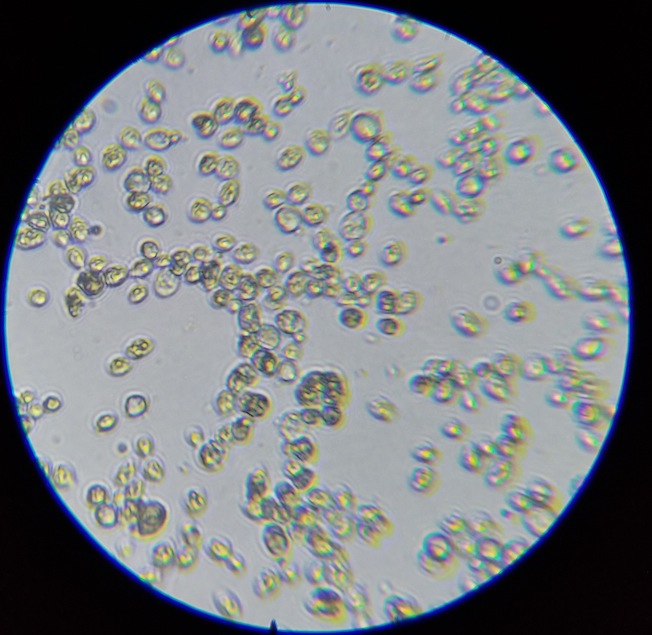
The mesh bag containing the first round of dry-hop pellets was still in the carboy, so there was A LOT of hop material. I added some water, swished it all around, dump a bunch in a glass and let it sit for an hour. I pulled some beer from the top and placed it on a slide to view. I did not diluate the liquid to any specific degree. Here are some images. Thoughts on what we are seeing would be appreciated. I'm having a hard time knowing how to tell sacc from some brett strains, since they can look similar. Also, are we seeing hop material? Autolysis?

1) This is pretty much what most of the slide looked like
2) Same
3) Mostly the same
4) Some different looking "cells"? Autolysis? Hop material or oil?
5) What is in the center, hop material?
20170815_193509.jpg


20170815_194342.jpg


20170815_194220.jpg


20170815_194741.jpg


20170815_194559.jpg
 
It just looks like you have yeast to me which isn't a bad thing. No bacterial contamination. Without staining the cells it's difficult to assess the viability (autolysis) of the yeast. You would need to do some sort of metabolic test to discern sacch from brett. The plastic smell most likely comes from phenols produced by the yeast during fermentation. The hefeweizen strain you used produces more phenols than your average strain so if you let the fermentation temp get to high or underpitched/aerated you could get a plastic off flavor.

Don't know if you've seen this yet but it's worth a read:

https://www.homebrewtalk.com/using-microscope-homebrewing-primer.html
 
#4 looks to have rod shapes which are not yeast. Without staining you don't know for sure what they are but could be lactobacillus. I only say this because it is the most found contaminate in brewing that is rod shaped.
 
first off, congrats poster on your acquisition of a microscope. hottpeper is right that rods would definitely be the most common bacterial infection to find but I think a lot of what is being looked at is debris. bacteria are often significantly smaller than yeast. there are tiny specs that are hard to discern between more debris or bacteria.

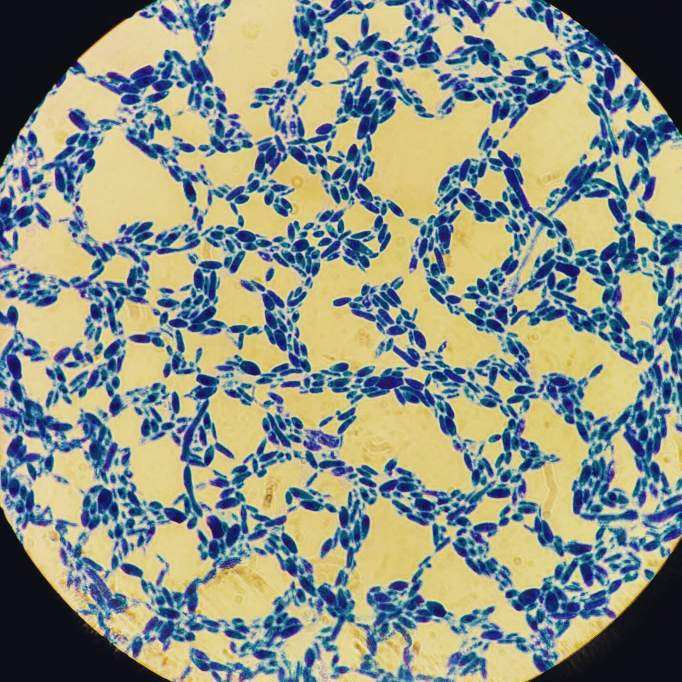
below is an image of a stained brett one will typically find. they remind me of little lemons. there are some elongated cells in your images but none with points like brett. that could be from death (methyl blue stain is going to be an important purchase to determine which yeast are dead). if they are alive, many wild yeast look round but slightly elongated and those could be a contaminant.

was the wort oxygenated or agitated? what condition was the yeast in before pitch? autolysis is unlikely a scenario unless these were yeast with very little life in them at the start. glycogen is the energy battery they store for the packaging. but without some food and oxygen they begin to die off. new wort is a hostile environment so they need to be in prime condition.

328.jpg
 
was the wort oxygenated or agitated? what condition was the yeast in before pitch? autolysis is unlikely a scenario unless these were yeast with very little life in them at the start. glycogen is the energy battery they store for the packaging. but without some food and oxygen they begin to die off. new wort is a hostile environment so they need to be in prime condition.

This was yeast collected from the bottom of the secondary carboy. This explains why there is a lot of other material beside the microbes. Sometimes you can see huge chunks of hop material.

I do have methyl blue, but have not used it yet. What I might do is make a starter from the beer, and then use that yeast for analysis.

I really don't think it is lacto, simply because I aimed for 70 IBUs.
 
Definitely not lactobacillus, which is a rod-shaped bacteria and are smaller. These are yeast.
 
"This was yeast collected from the bottom of the secondary carboy. This explains why there is a lot of other material beside the microbes. Sometimes you can see huge chunks of hop material."

Got it, but before the brew what health condition were the yeast in? That's what I was asking for because that will be a great determinant in off-flavor development without a doubt. Yeast that warmed in transit a couple times wakes and metabolizes some glycogen faster. Some yeast die, others become sick and cause genetic drift when they reproduce in the right conditions (in your beer). You will see some of them on plates if you start making media as tiny colonies compared to the rest.

If your yeast was fresh and you made a starter (with yeast nutrient) then this is not the situation and may well be a contamination. I change out star san and iodine every couple batches to keep the contaminants on their toes a bit.

If you make a starter that will only tell you what goes fastest. It also would put potential autolized cells in the background compared to the rapid growth of your main yeast. You should try it and experiment, I am often wrong about things, but my flawed intuition tells me you won't learn what you are looking for here by doing that. Methyl blue will easily show dead cells of the same sample and that would at least narrow the possibilities down.

Autolysis in a carboy in great numbers would be unlikely if the yeast were healthy going into the fermenter.
 
Thanks xico for the in depth comment.

The yeast was from a smack pack that I then built a starter from. The yeast took off quickly. I did not pitch at maximum activity, but within 24 hours after the peak. Another reason I don't believe it is the condition of the yeast is that this is the second time this happened in a row, and I am using two different yeasts. One was a hefe and the other Burlington ale yeast. Same off flavor.

I have thought about switching back and forth between sanitizers and will likely start to do that.

I keep thinking about the wine fridge I use for the fermentation chamber. When the fridge is warm I can definitely smell the distinct odor that first appeared with the first infected batch. It was less potent for the second batch. I feel that the first batch caused issues. The Burlington yeast was harvested from a previous batch and was a second generation. It was my first attempt at harvesting yeast. I don't think I have anymore of it, but if I can find a mason jar with it in the back of my fridge, I will see if I can grow some of it and test it.
 
I wipe down my chambers every so often with lysol to get that funk out. If dampness becomes an issue small dehydrators go for cheap, depending on your location. I got a 20 dollar u.s. unit and it pulls about a liter out of the chamber during active fermentation and that's moisture not supporting microbes on the walls of the freezer. I've cut my cleaning frequency by a fraction. It's not a necessity but a quality of life feature I appreciate.

Unless I don't have a yeast variety save for the bottom of a carboy, I generally save yeast on the starter end and it might be worth the consideration. It's much less time-consuming, not to mention less stressful to make a larger starter than you need. 500mLs of starter slurry can be chilled, decanted (~50mL), and transferred onto distilled water.

If you let the starter go past krausen, (full 24-30 hours from last step-up, depending on yeast and vigor) the yeast will have built up their stores of glycogen and will be able to handle storage in the fridge longer. Last note while on the subject of maintaining yeast health from saved batches, yeast nutrient will usually provide nitrogen but doesn't necessarily contain vitamins and important elements like zinc. It's not unheard of for old world brewers to throw a scoop of krausen from a fermenter and toss it in the kettle in the last 5-10 minutes of the boil. This provides much of the nutrition for your organisms. I like to add this into my starter media as well so the yeast are in top shape before going into a stressful environment like an anaerobic and syrupy 1.060 wort.

Some products sold as energizers will have these vitamins and zinc (often just yeast hulls).
 
I think you are right in that I should just keep some of the original starter. It seems like it is not only more effort to wash yeast, but washing yeast also seems to come with a greater likelihood of infection. Of course, this is very dependent on the brewer and how well he or she can maintain a clean workspace. I was probably not careful enough in the process.

My only thought regarding saving some of the starter for a second batch is that if I take 500mL from a 2L starter, perhaps I won't have the ideal number of cells for the current batch of beer, depending, of course, on what I am brewing. I know 1500mL is still a lot more than what you get from a pack or vial of yeast.
 
A solution to this dilemma will be to pull off 500 mL of a starter and add more wort for another step up of the remaining slurry.

Pack of yeast into 1L, after a day draw off half into your decanting flask to save yeast (I bake my glassware before use (250-270F) with aluminium foil loosely covering the top). add another 1L to your remaining 500mL and run for another 12-24 hours on your stir plate.

It would mean needing to start your yeast a day earlier but your save work for yourself on the tail end of the process, for apt reasons you mentioned.
 
I'm sure it's mostly the microscope and me not knowing how to properly use it, but I think the images I am getting are not all that great. At least compared to other images I have seen. What is typically the limiting factor in the quality?

I want to get a 60x objective to go with the 25x eye piece, so I'll have 1500x magnification. (or the 100x objective if it isn't over kill). But would this even help? Would it just be a bigger image of the same quality resolution?
 
I just ordered a 100x objective for my microscope to get better images. I was using 25x (eye piece) times 40x (objective). Now I'll be using 10x times 100x for better resolution.
 
I ended up getting a new microscope. The objective would not fit the microscope and so I was unable to increase the objective power. Now I have a 100x objective with either a 10x or 25x eyepiece. It is quite amazing what I am able to see now with the greater resolving power. I'll post some images soon. I was looking at microbes from some bottle dregs, and it's like a jungle of different looking microbes...so fascinating.
 
Can I be so bold as to suggest you buy some tsa plates and do a simple spread plate from a serial solution.

Or buy a gram stain kit. And a spore stain.
 
What scope did you get?

I got the Amscope B120.


Can I be so bold as to suggest you buy some tsa plates and do a simple spread plate from a serial solution.

Or buy a gram stain kit. And a spore stain.

I got petri dishes and agar to attempt to make my own plates. I didn't realize that I need a pressure cooker or something of the sort. I'll end up getting one, but I'm trying to find one that I am positive goes up to 15 psi. In the meantime, I might just buy a stack of 10.

I'm really enjoying whatever it is in my IPAs. I don't ever want my beers to be accidentally inoculated, however, I would like to plate this one so I can retain the strain if I ever want to use it again.
 
I didn't realize that I need a pressure cooker or something of the sort. I'll end up getting one, but I'm trying to find one that I am positive goes up to 15 psi.

This is something I am interested in too. I will tell you what I found so far.

Pressure canners are pressure cookers and they include a gauge so you can verify the pressure. They are also huge which means you can make jars of wort for starters, etc.

I have this one:
T-Fal canner

Here's something similar. (I decided to buy the one above because it came with the canning shelf and cost a little less.)
Presto canner

If you're buying this thing mainly for lab gear, you may want the biggest one you can fit on your stove. Never know when you'll want to sterilize a big flask or something, right? This brand makes them HUGE and is also supposed to be top quality, but with a price to match...
All-American Canners (various sizes)

I like my T-fal well enough BUT it only gets to about 13 - 13.5 PSI according to its gauge. However, if you check a PSI/temp chart, that means it is still exceeding 240F which is what is needed to kill botulism, the primary concern in food preservation.

For true autoclaving, I know you want 15 PSI but I don't know if you can get that on a stovetop canner. I could not find evidence of that when I was shopping for a canner.

But for sterilizing yeast apparatus, a pressure canner may still be good enough. Check out this article abstract, which indicates that tests using a home pressure cooker as an autoclave worked pretty well.

https://www.ncbi.nlm.nih.gov/pubmed/12267939

When we pasteurize food at lower temperatures, it is possible to increase the amount of bugs we kill by running for longer times. I assume the same principle applies at at the high temperatures in a canner/autoclave. For example, if 15 PSI at 15 minutes is sterile, what about 13.5 PSI for an hour? 2 hours? So far I cannot find any charts or studies exploring that, though.

Lastly, here's a cool gadget, a max-reading thermometer that goes inside your autoclave/PC. Next time I have $50 burning a hole in my pocket...

Good luck with your shopping!
 
Last edited by a moderator:
Thank you so much for the detailed write-up. I did not know about the pressure canners, so that is very helpful. It's interested that for most pressure cookers, devices that are based on a build up of pressure, the expected pressure inside the vessel is not listed. I have found this information for some pressure cookers in the electronic manuals. The last one I looked at was 9-11 psi...but I forget which model.

Keep us posted on the use/effectiveness of your equipment!
 
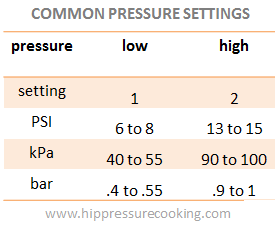
By tradition pressure cookers have "high" and "low" settings which are supposed to be standardized. In practice they vary by a couple PSI.

common_pressure_settings.PNG


Electric PCs High setting are usually 1-2 PSI lower than shown here, too. So yeah... It's kind of a mess.
 
But for sterilizing yeast apparatus, a pressure canner may still be good enough. Check out this article abstract, which indicates that tests using a home pressure cooker as an autoclave worked pretty well.

When I worked in a lab that had a "proper" medical-grade autoclave, we routinely used a $20 super-basic domestic pressure cooker for quick-and-dirty sterilisations of small amounts. I'm probably glad that surgeons don't use them when operating on me but they're good enough - they certainly colour up autoclave tape which needs 15-20 minutes at 121C. Don't forget the main purpose of the pressure is just to allow higher temperatures without water boiling off, so the difference between 13psi and 15psi is effectively the difference between 117C and 121C or something like that.

Just as a reminder - never, ever, ever tighten the caps of bottles in a pressure cooker - they make big dents when they explode.... So I've heard..... Loosen them a half turn, and then tighten them back up once cool

Do use a timer - it makes a mess when they boil dry....

Do put enough water in the bottom, for the same reason.

Do wait for the pressure to drop before opening.

Use foil as lids for anything "open" - keeps condensation from dripping back in during the "cook", and keeps things sterile afterwards.

Sterilise other things alongside your starter, like a solution of priming sugar.
 
You can maybe work with 11 psi but 6 qt is really small. That is a gallon and a half of volume, and you lose some because all the items need to be on a shelf instead of sitting on the bottom of the pot. You could do things like slides and plates but you couldn't pressure-can a quart jar of starter wort. I have an 8 qt pressure cooker and I can't fit a single upright quart jar in it.
 
Back
Top