Melted Heating Element

Homebrew Talk - Beer, Wine, Mead, & Cider Brewing Discussion Forum

Help Support Homebrew Talk - Beer, Wine, Mead, & Cider Brewing Discussion Forum:

This site may earn a commission from merchant affiliate links, including eBay, Amazon, and others.

EdK

Well-Known Member
Joined
May 7, 2009
Messages
87
Reaction score
2
Location
Gibbstown, NJ
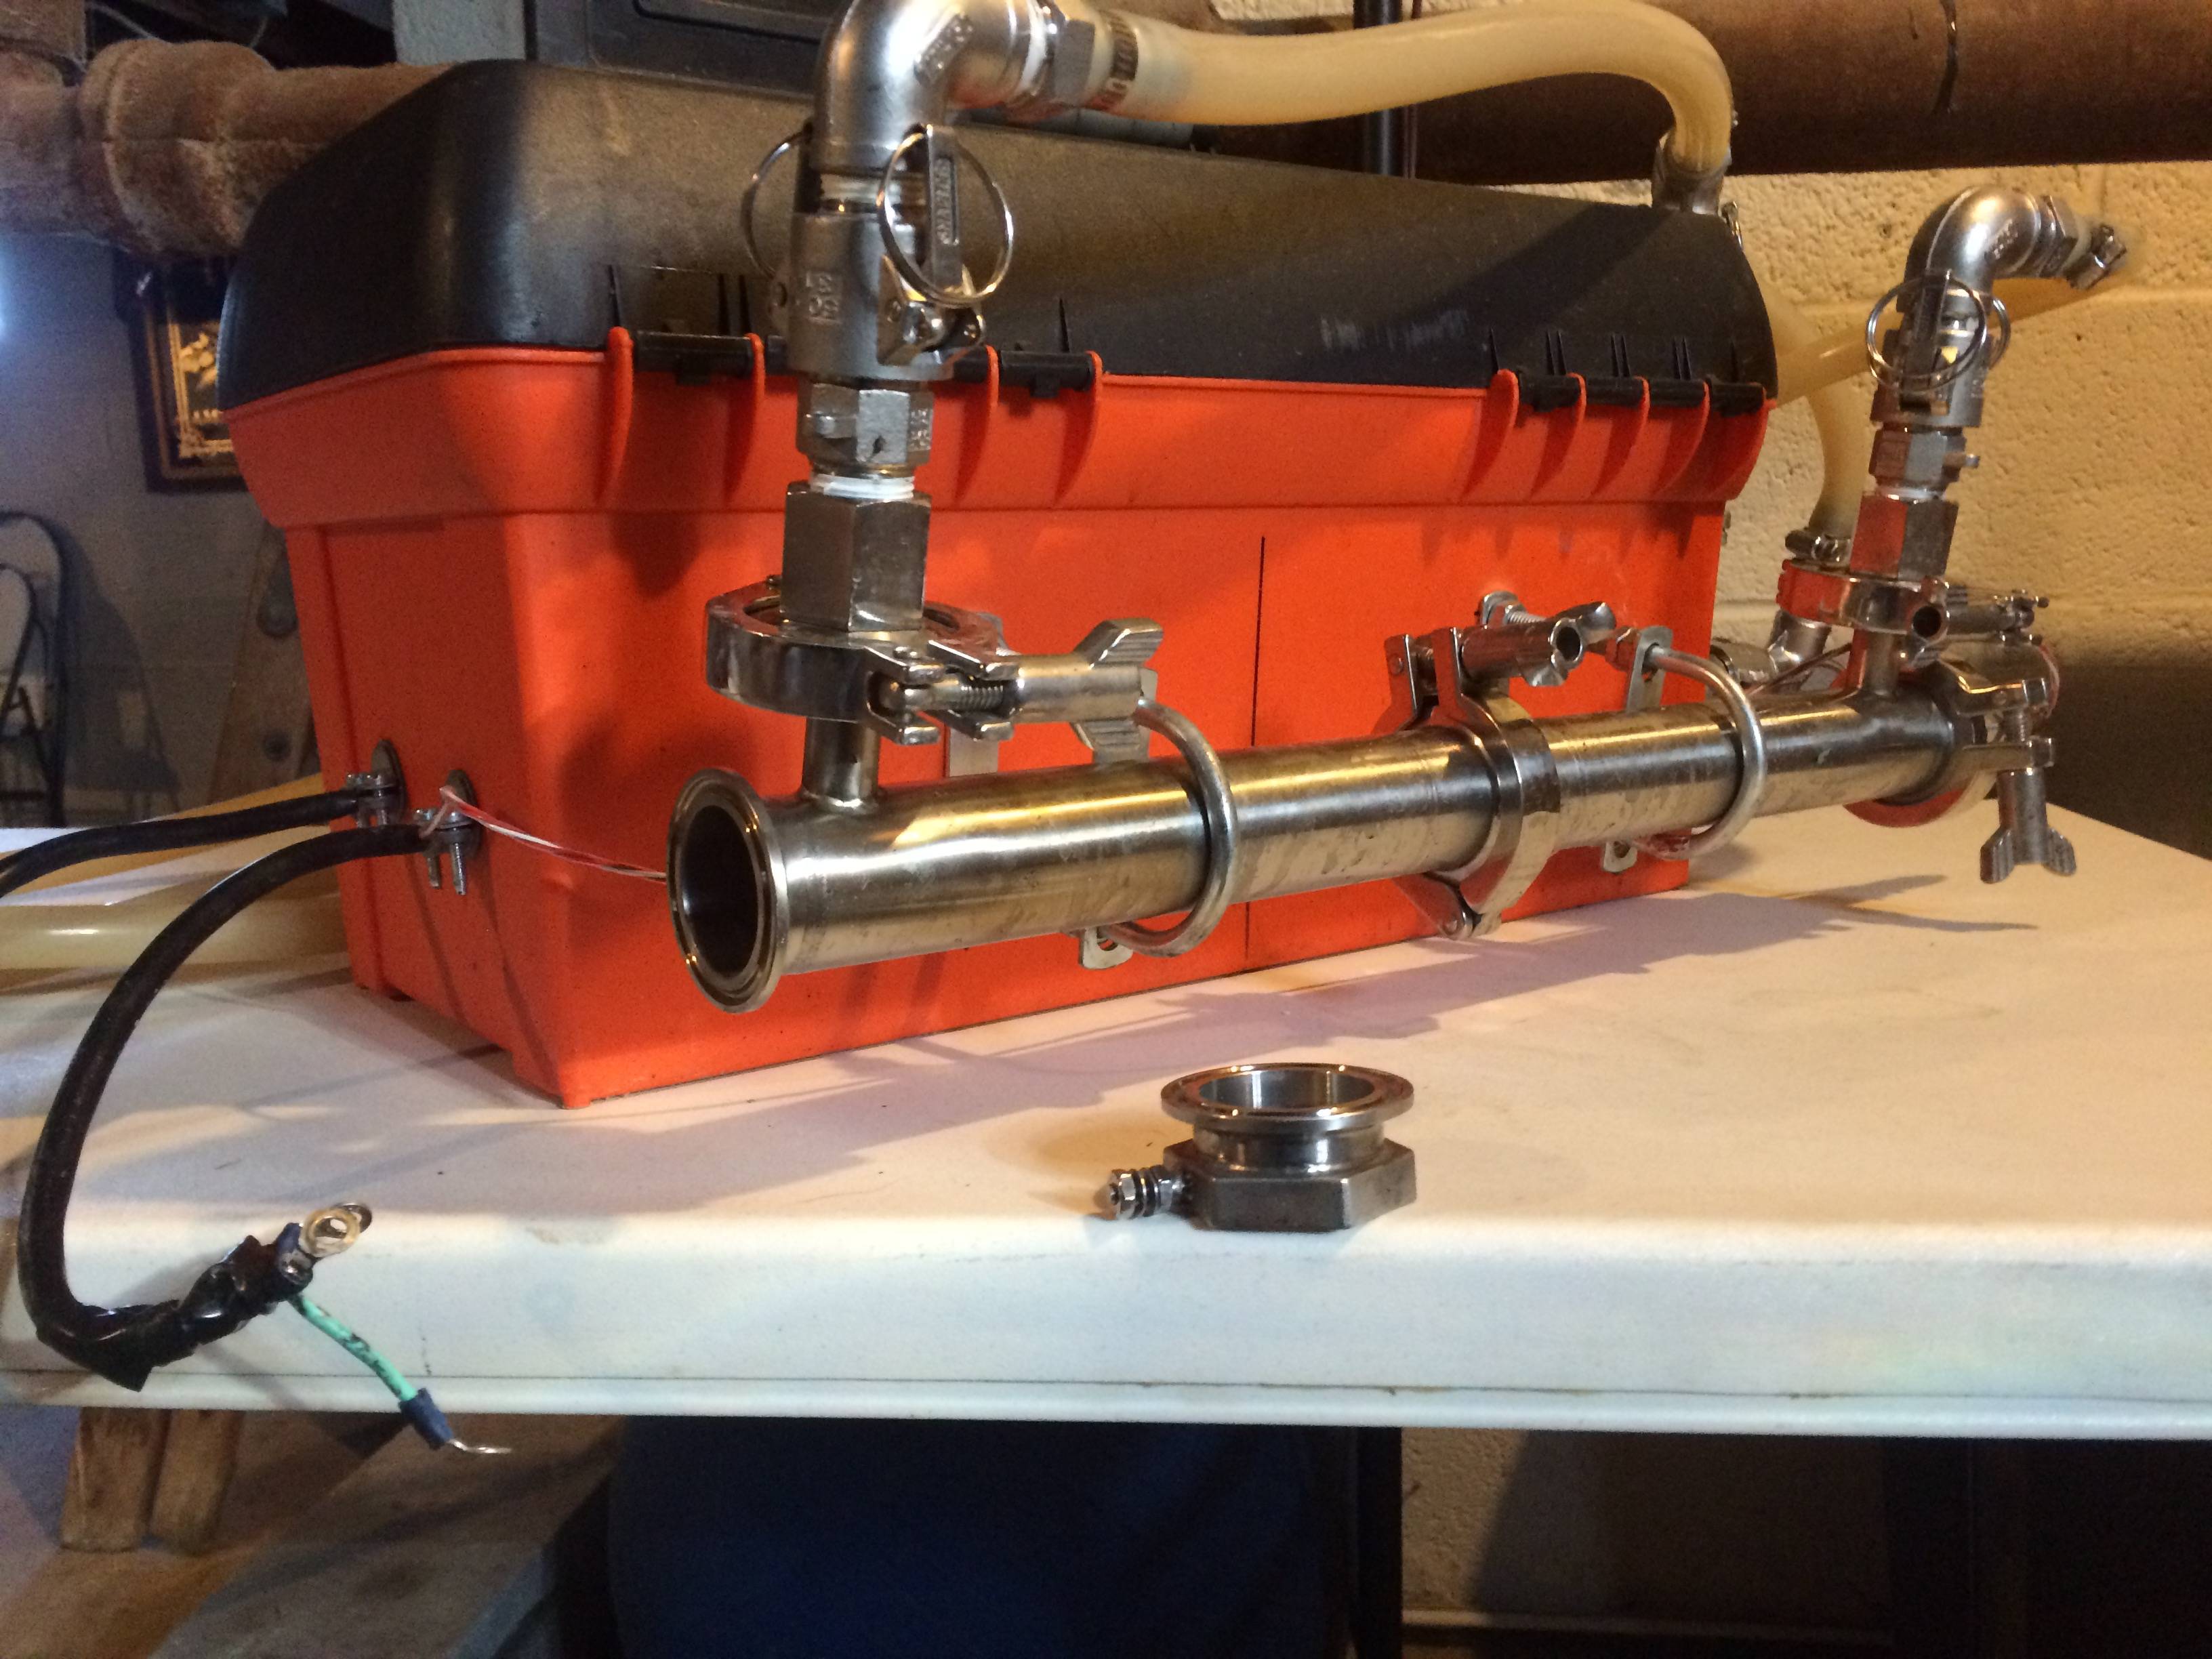
So brew day comes and my RIMS heating element fails. I turn to direct fire my MT instead but continue to use the pump and monitor temp via the probe of the RIMS tube (as well as for a whirlpool after the boil). That was a couple weeks ago and today I set out to open up the tube and and replace if needed.

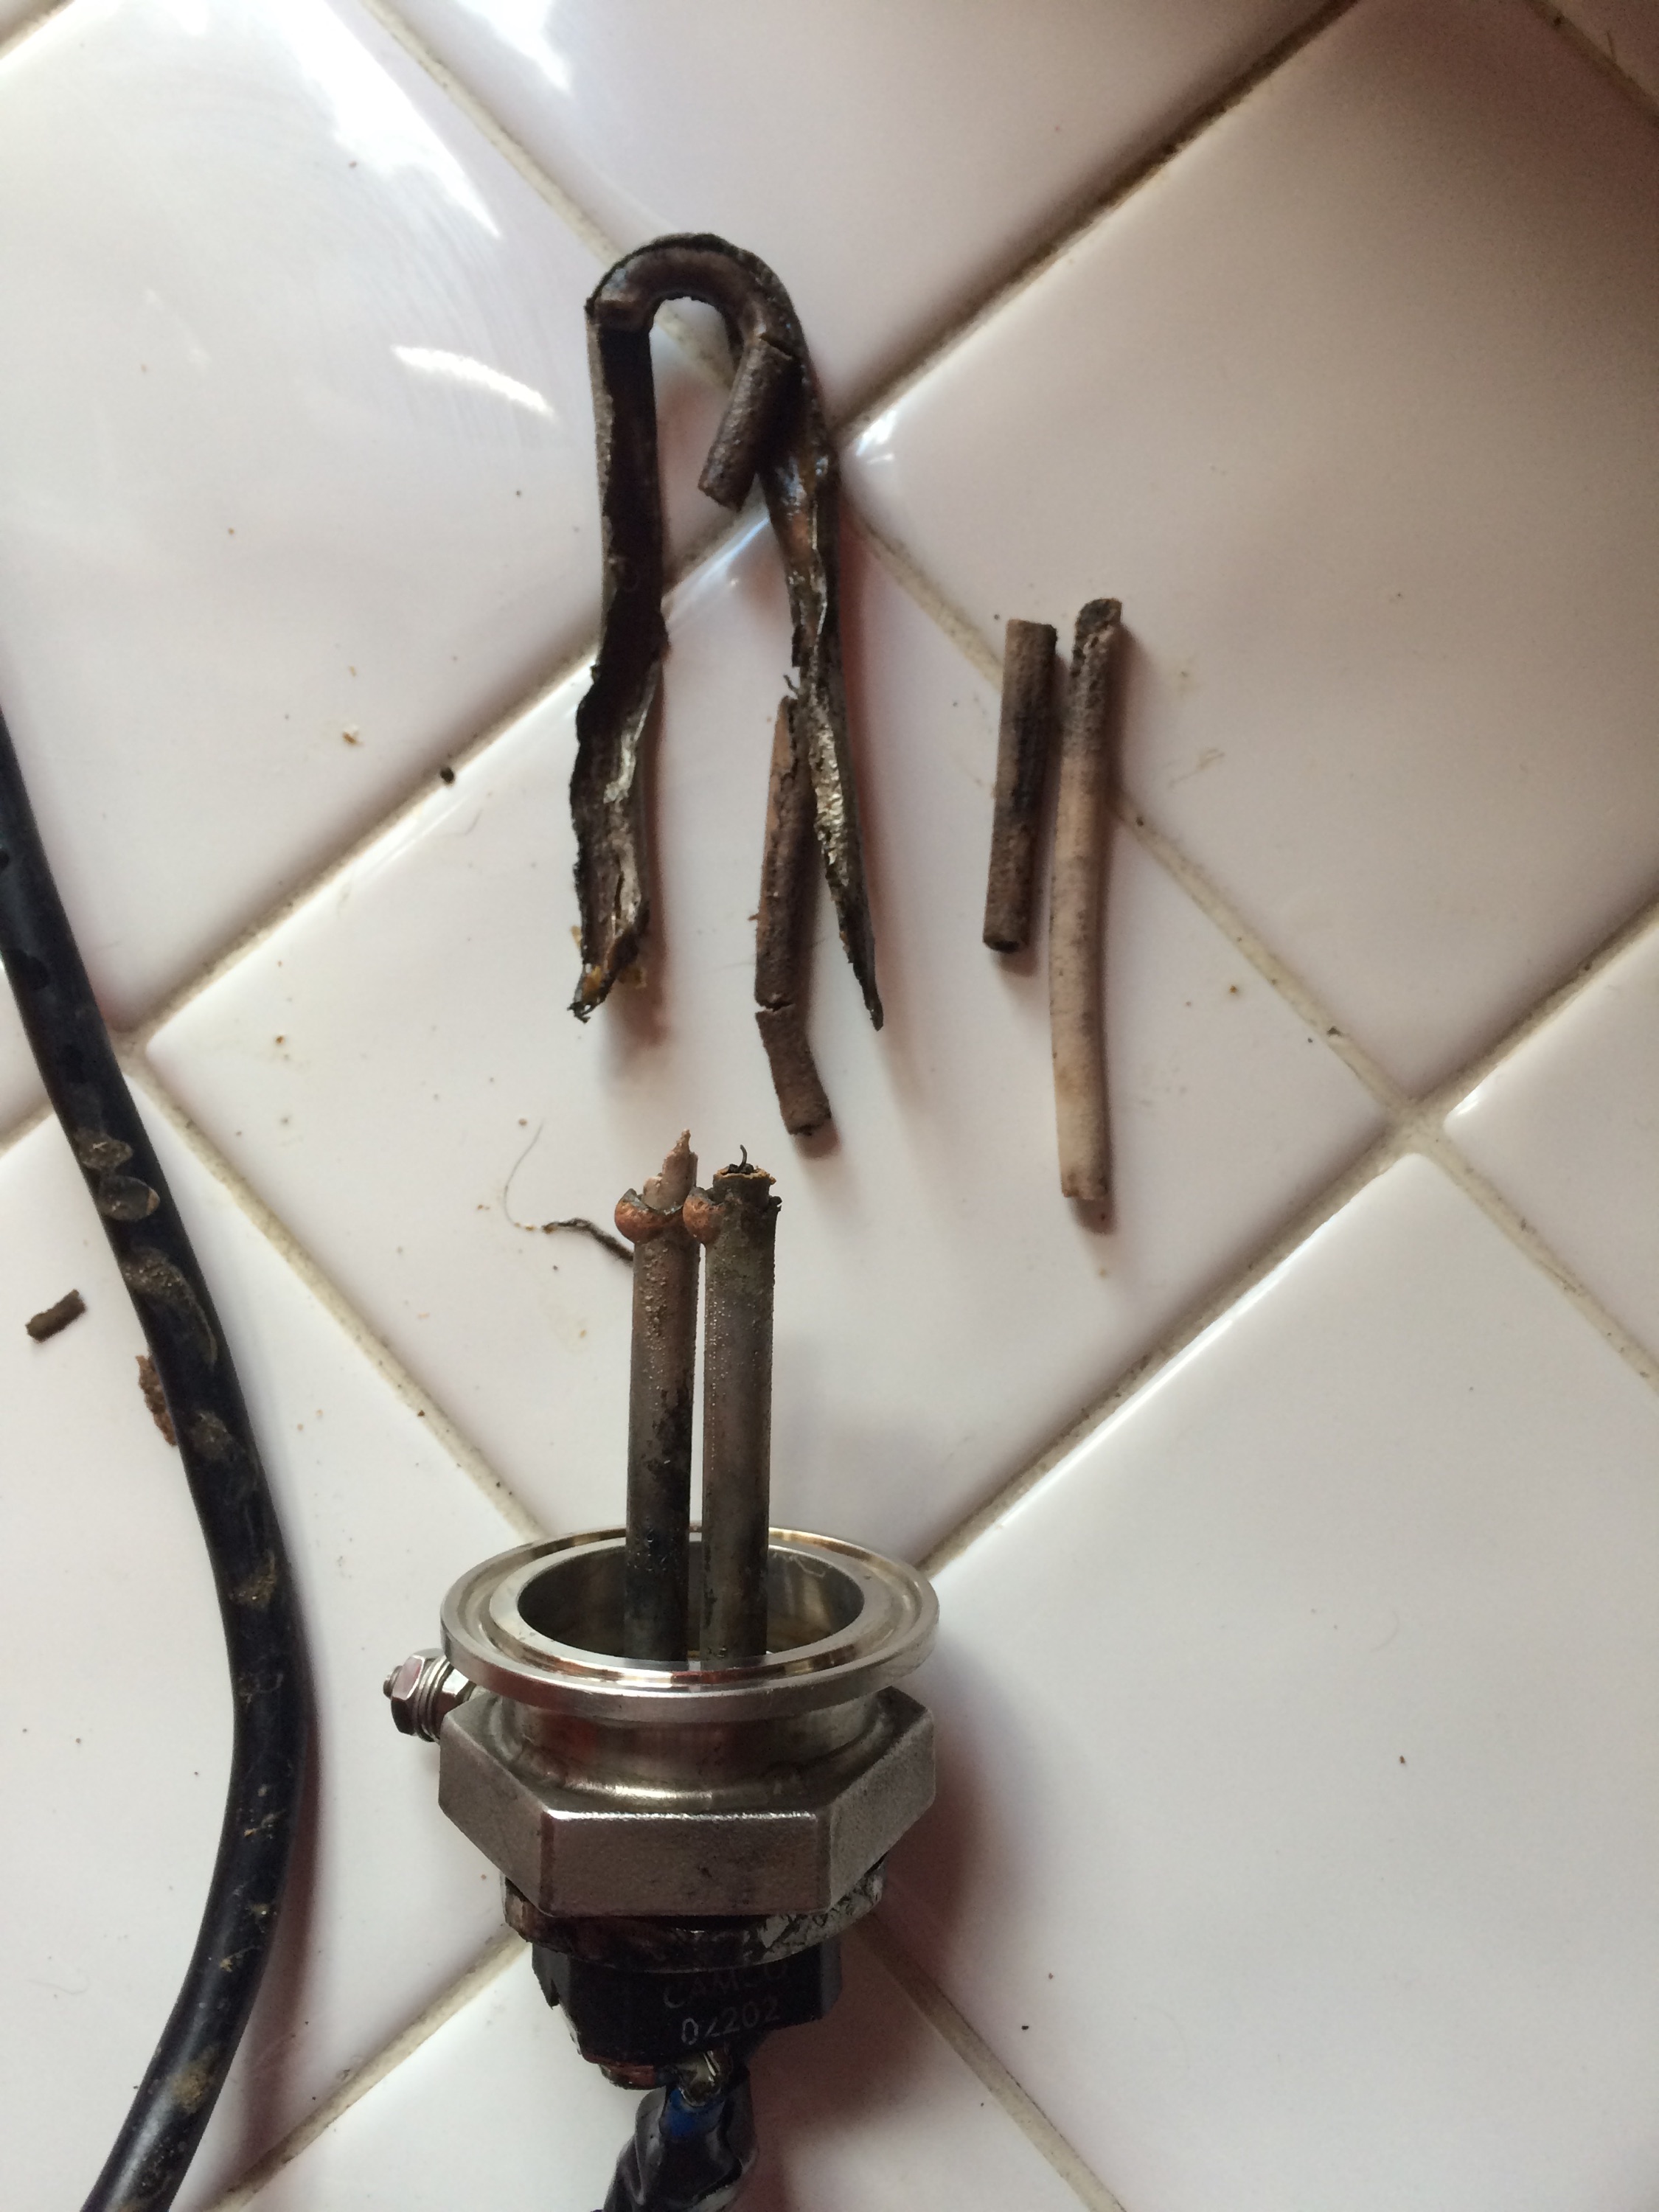
What I find has me quite concerned. I pull the element out and it has basically melted and it snapped into pieces easily (see image). I do recall that the switch was flipped before any recirculating was even happening - I'm not sure how long it ran dry but as soon as I saw, I flipped it off. This is likely when it happened.

My first thought is if it is possible that this thing could have leached any toxic metals into the brew. Has anyone had this happen? I thought I read they are made of copper and covered in magnesium oxide and nickle or some such.

IhbFwuW.jpg
 
Shouldn't a breaker have flipped somewhere along the melting process?
 
Shouldn't a breaker have flipped somewhere along the melting process?

Probably not. The resistance of the element would likely have gone up as it heated up and burnt out, so the current draw would have dropped. Breakers only respond to overcurrent situations.
 
I wonder where it fell apart. Did cold liquid hit it after it was heated?

I suppose? Not cold water but mash temp when I finally started the recirc of the mash and of course the rest of the brew day, including whirlpooling after boil and finally a decent amount of time recirculating with hot water/PBW. Then it's been in the unheated shed for 2 weeks where temps dropped below freezing so whatever was exposed and may have still been wet had that stress put on it as well.

What's inside these elements anyway? It's very brittle and breaks apart easily.

Full disclosure, though I've used the RIMS box for many a brew day it was always my brew partner that was the techy equipment guy. So I know how to run the box (and the flipped switch was very much an accident to run it dry), but I didn't do the wiring myself nor did I procure the element. Unfortunately, he isn't available to brew so much anymore so I need to get more versed in this stuff - not a bad thing at all though.

Now that I'm looking at it, it's a 120v, 2000 Watt element and it's U-shaped so high density, right? After reading through the RIMS for dummies thread, it sounds like a low or ultra low density element would be a safer route.
 
What was the watt density?

When it comes to terrible things that could happen during brew day that's not too bad, I'm sure your GFI would have saved you from current leak. At least your RIMS didn't turn into a pipe bomb.
 
What was the watt density?

When it comes to terrible things that could happen during brew day that's not too bad, I'm sure your GFI would have saved you from current leak. At least your RIMS didn't turn into a pipe bomb.

Yes, indeed. See above for explanation (I edited while you were posting), I believe the it was HD wattage.

Thank god for no pipe bomb.

So to move away from HD, I could go with one of these lower wattage elements and it should still be able to perform okay, right?

120-1500-LD
120-1500-ELD

I wouldn't have to do anything different as far as wiring goes inside the box?
Don't go with either of those elements - they aren't all stainless (bases will likely rust), and they aren't really LWD (I have the second one, from before the all stainless ones became available, and I really need to take my RIMS tube apart to replace it). You're better off going with an all stainless 5500W 240V element run at 120V (for 1375W at ULWD) if it will fit in your tube, or a LWD 1500W 120V all stainless element if it won't fit.

Brew Hardware ULWD 5500W 240V element for 18" RIMS tube (might just fit in a 12" RIMS tube with your Triclover adapter in the photo - I thinks it's 12.75" long)
Brew Hardware Short 1500W LWD for 12" RIMS tube.

Thank you! Yes, stainless would make more sense.

I don't have the unit (its of the RIMS in a toolbox variety) in front of me, but I do have a ruler and I'm thinking it's probably the 18 inch tube. That said, is the idea of using the 240v element because it's longer and will have more contact with the wort in the tube?
 
Also, the wiring to the element never seemed to be enclosed in a safe manner in my opinion. My friend simply wrapped the wiring in a lot of electrical tape (which in the image had already been removed). I think I would like to grab a plastic junction box to make a better cover.

Is there any special way the two should be mated - can I simply cut a hole, place the tri clover adapter on the outside and thread the element from the inside of the box?
 
Thank you! Yes, stainless would make more sense.

I don't have the unit (its of the RIMS in a toolbox variety) in front of me, but I do have a ruler and I'm thinking it's probably the 18 inch tube. That said, is the idea of using the 240v element because it's longer and will have more contact with the wort in the tube?

Sort of - running the long 240V element on 120V means it has 1/4 of the power it would have at 240V, so you've got the power spread out over a large area. More contact with the wort probably also means that the element runs cooler and closer in temperature to the wort. The power density is low enough that you can even accidentally run the 240V elements on 120V dry and they won't burn out (reportedly you can also do this carefully with the 240V 5500W ripple elements on 240V to burn off scorched wort).

Also, the wiring to the element never seemed to be enclosed in a safe manner in my opinion. My friend simply wrapped the wiring in a lot of electrical tape (which in the image had already been removed). I think I would like to grab a plastic junction box to make a better cover.

Is there any special way the two should be mated - can I simply cut a hole, place the tri clover adapter on the outside and thread the element from the inside of the box?

A plastic or metal junction box is one option (have a look at The Electric Brewery for one way to do that - you'll replace the kettle and locknut with the Triclover adapter.

Another is a pre-made element adapter - either the Brew Hardware Hot Pod or one of the other ones that are out there. I have one of these on my RIMS tube.

A third that I've seen is using a CPVC reducer JB-welded over the element connections. This seems a bit dodgy as it doesn't give an easy option to connect a ground to the element.
 
Shouldn't a breaker have flipped somewhere along the melting process?

Probably not. The resistance of the element would likely have gone up as it heated up and burnt out, so the current draw would have dropped. Breakers only respond to overcurrent situations.

The compromised element's "heating" wires, carrying 240V, were exposed to wort or water. That should have kicked in the GFCI! That's what those are for.

Maybe the OP isn't using one?
 
The compromised element's "heating" wires, carrying 240V, were exposed to wort or water. That should have kicked in the GFCI! That's what those are for.

Maybe the OP isn't using one?

120V heating element in this case. If I remember correctly, I had it plugged into a CFCI in my kitchen but after I realized it wasn't working, tried another non-CFCI outlet in the next room. I can't say how long it was firing dry until I noticed the switch was in the ON position but it sounds like a cheap HD wattage element can burn out quite fast under those conditions.

I just wish I had enough smarts to turn everything off, unplug, and check the element. Had I seen it was totally crapped out, I had two options I suppose. Run to Home Depot and replace or simply leave it out and cap off the RIMS tube and direct fire like I wound up doing anyway. Of course I just left it in there and ran my damn wort through it all day.

I had already doughed in and a bit of panic struck when I started recirculating and the temperature kept falling. I never assumed it burnt out like this, just that something else was malfunctioning so it took entirely too long just to diagnose and decide to direct fire.
 
The element failed because it ran dry. Low density design or stainless sheath would not have prevented this. Basically the element sheath melts, any moisture that is introduced to the magnesium oxide powder within the element will cause an electrical short to the sheath and will also expand splitting the sheath as shown. GFCI protection would have tripped the circuit but would not have prevented element failure.
 
This is one area where RIMS is inferior to HERMs (though I personally think it's superior otherwise). You need to build in a safety to make sure the element is not run dry. On my BCS controlled rig, using ladder logic, the element cannot be powered unless there is positive flow through the tube. Not just liquid but flow. It uses a flowmeter but there are inexpensive flow switches that anyone can incorporate.
 
The element failed because it ran dry. Low density design or stainless sheath would not have prevented this. Basically the element sheath melts, any moisture that is introduced to the magnesium oxide powder within the element will cause an electrical short to the sheath and will also expand splitting the sheath as shown. GFCI protection would have tripped the circuit but would not have prevented element failure.

Totally makes sense when you look at it. Seems like there are two copper-looking "drops" at the main braking point. Maybe I was able to shut it off before more melting happened but the magnesium oxide was already exposed in some way.

Looked into the inside, didn't seem like any of it actually dripped onto the tube itself. Potentially adding some magnesium to the beer doesn't sound so bad.
 
The lower the watt density the more time you have before melt down, some folks will dry fire their ripple elements to clean them. I've dry fired mine a few times when I forgot to turn off the HLT during sparge. It's still working fine
 
The compromised element's "heating" wires, carrying 240V, were exposed to wort or water. That should have kicked in the GFCI! That's what those are for.


120V heating element in this case. If I remember correctly, I had it plugged into a CFCI in my kitchen but after I realized it wasn't working, tried another non-CFCI outlet in the next room. I can't say how long it was firing dry until I noticed the switch was in the ON position but it sounds like a cheap HD wattage element can burn out quite fast under those conditions.


I would think even if it wasn't GFCI, the breaker on the box would still trip from pulling too much current to the equipment?!

Either the circuit must have still been able to complete or something wasn't grounded properly?

I'm not calling anyone out, just seems curious how this went down. And scary/dangerous for that matter...
 
That hot pod is a nice affordable option. So basically I would use my tri clover adapter in place of the lock nut as seen in this install - https://youtu.be/5QjkXWE1QI8?t=5m19s

And I'd be grounding inside the pod and no longer on the nut itself.

If you use the basic pot, https://www.brewhardware.com/product_p/hotpod-ewl.htm then you need to ground your existing TC Flange nut and the metal pod cover. If you don't do that, then the rest of the rims tube and control box won't be protected from short circuit.

It would be more clean to use the integrated TC version https://www.brewhardware.com/product_p/etc.htm so you just attach the ground to the all in one deal.
 
I would think even if it wasn't GFCI, the breaker on the box would still trip from pulling too much current to the equipment?!

Either the circuit must have still been able to complete or something wasn't grounded properly?

I'm not calling anyone out, just seems curious how this went down. And scary/dangerous for that matter...

Something other than the element to the adaptor nut? It has a nut where the ground wire was attached. Hard to see in the pic, but it was still attached. Could there be an issue with the outlet?

If you use the basic pot, https://www.brewhardware.com/product_p/hotpod-ewl.htm then you need to ground your existing TC Flange nut and the metal pod cover. If you don't do that, then the rest of the rims tube and control box won't be protected from short circuit.

It would be more clean to use the integrated TC version https://www.brewhardware.com/product_p/etc.htm so you just attach the ground to the all in one deal.

Yeah, I saw that other TC one. Not sure when it would be in stock again. If I did use the basic pot, how would this ground be accomplished?

Here is what I'm working with:
U8eJLKo.jpg
 
I would think even if it wasn't GFCI, the breaker on the box would still trip from pulling too much current to the equipment?!

I think that it's pretty unlikely. A heating element burning up in air like this one did is likely to fail open, not short (short would require that the two ends of the element, which are separated by at least half an inch at the base, came into low resistance contact), which means no excessive current and no breaker trip.

Wort or water isn't a very good conductor, and the contact to the wort/water is through a thin wire, so later adding wort after the element has burnt out also doesn't mean that enough current will be shorted to trip the breaker. It also looks like this element burnt out a little distance up the element, so there's also some resistance in the wires to that point.

Either the circuit must have still been able to complete or something wasn't grounded properly?
My bet is that the circuit wasn't complete enough to pass enough current to ground to trip the GFCI (if indeed it didn't trip the GFCI at all after the burn out and with wort in the tube - I'm not so sure from the OP's posts about moving from a GFCI to non-GFCI circuit). <WAG*> The open ends of the wires could possibly be so oxidized by overheating in air </WAG> that there's too much resistance from wire to wort to ground to pass the 5mA to ground that the GFCI needs to trip. You'd need about 40 kOhms or more from hot to ground through the wort for that to be the case.

*WAG = Wild Ass Guess
 
Remember that these elements were not made for this purpose. They were meant to me submerged in a large volume of water full time where the convective fluid currents alone would keep their temperatures limited. They were not meant to be trapped in a small tube and possibly dry fired. A dry fired element will eventually burn up and open circuit - not short out nor ground fault. If by some miracle the heating were stopped at the right time to expose a conductor, then water/wort were added, it should fault to ground, but that conduction exposure is highly unlikely.
 
Something other than the element to the adaptor nut? It has a nut where the ground wire was attached. Hard to see in the pic, but it was still attached. Could there be an issue with the outlet?

Yeah, I saw that other TC one. Not sure when it would be in stock again. If I did use the basic pot, how would this ground be accomplished?

Here is what I'm working with:

Regarding the ground wire. I believe the BH element pod can have the "grounding lug" reversed so that the ground wire attaches on the outside of pod. If that is the case, then simply run a jumper between the pod lug and the element flange/nut lug. The TC will connect the element flange to the RIMS tube.


Important testing:
Once you wire this up, get a multi-meter and check the resistance between the ground pin on the cord you plug into the wall, and every other piece of metal that you can see/touch in your RIMS box.

You want to make sure that the ground from that wire coming into the box is securely connected to any switches that have grounding screws, any SSRs that should be grounded on their bases, connected to the ground wire for the element cord coming back out of the box, and for good measure you can connect it to any of the screws inside the box that hold things together :D


Like BrunDog said, it would take an unlikely set of circumstances for the element to have burned out and then short across to the RIMS tube. The worst case would have meant that the outside of your RIMS tube was electrically "hot". No matter what, keep the RIMS kit on a GFCI outlet all the time. That way there is something to automatically cut the power for you if you accidentally take 120v to the fingers.

-B

U8eJLKo.jpg
 
You want to make sure that the ground from that wire coming into the box is securely connected to any switches that have grounding screws, any SSRs that should be grounded on their bases, connected to the ground wire for the element cord coming back out of the box, and for good measure you can connect it to any of the screws inside the box that hold things together :D

Thank you! I did snap a pic when I took the other.

I see the ground wire is coming in from the power supply (right lower hole), running through the ON/OFF power switch, and back out to the element (right upper hole).

The wiring is a bit everywhere so I'll take a closer look. Do you know a schematic that would match this layout?

B3PomnE.jpg
 
Thank you! I did snap a pic when I took the other.

I see the ground wire is coming in from the power supply (right lower hole), running through the ON/OFF power switch, and back out to the element (right upper hole).

The wiring is a bit everywhere so I'll take a closer look. Do you know a schematic that would match this layout?
You are pretty close to this:
http://www.pjmuth.org/beerstuff/images/Auberin-wiring1-a4-2000w-BIAB-120V-A.jpg

You may not have some of the switches (Element Power, E-Stop, PID Power) but you can get the general idea just by following the wires.


Everything inside there looks very clean, and it will be easy to test your ground connections since they are all on that nice bus bar. Just check each one to the ground on the wall plug, and if those are working, you should be good to go.
 
It would be more clean to use the integrated TC version https://www.brewhardware.com/product_p/etc.htm so you just attach the ground to the all in one deal.

Looks like they are back in and you are right, the cleaner connections are worth an extra $15, I'd say. I went ahead and ordered that and this element - https://www.brewhardware.com/product_p/element1500_long.htm

I have an 18 in. tube, so there should be no issue with this, right?

If I'm getting all this right, with a 1500 Watt element and chugger pump running I'm looking at like 14.4 amps (12.5 from the element + 1.9 from the pump). How does the extension cord factor into this? I run this from my kitchen outlet to the shed not far from my back door.

I'm curious about this though, my GFCI outlet is probably just a 15 amp, right? Wouldn't the old HD element at 2000 Watts/120 volts/16.6 amps trip that just from running normal because it's over the amp allowance? Or is that not exactly how GFCI works? I recall it tripping one at my buddy's house (but there was also a freezer plugged into it). Or maybe the outlet is 20 amp?
 
The GFCI will just protect you from connecting the power directly to a ground like your hand or something (Ground Fault Circuit Interrupter), it doesn't care about the amps. The circuit breaker at the panel is what determines how many amps can go through the line to your outlet. If you have a bigger breaker you will also need bigger wires to carry the power to the outlet. (And an outlet rated to handle the additional power, and a plug that can handle it)

The wire thickness for an extension cord depends on how long the cord is. You can do 15 amps at 50 feet on 14 gauge wire without losing too much voltage.
 
I recall it tripping one at my buddy's house (but there was also a freezer plugged into it). Or maybe the outlet is 20 amp?


GCFIs do not like fridge/freezer compressors or large pumps.

Find the breaker that supplies your chosen outlet, if it's 20amp then you're fine. Good idea to turn it off and see what else is on that circuit.
 
This is one area where RIMS is inferior to HERMs (though I personally think it's superior otherwise). You need to build in a safety to make sure the element is not run dry. On my BCS controlled rig, using ladder logic, the element cannot be powered unless there is positive flow through the tube. Not just liquid but flow. It uses a flowmeter but there are inexpensive flow switches that anyone can incorporate.

I wouldn't build a RIMS without one! Simple, CHEAP and effective. just a simple float switch for $15 would do it.

Hope the batch turns out man! Whatcha' gonna call it if it does?

Cheers
Jay
 
I'm curious about this though, my GFCI outlet is probably just a 15 amp, right? Wouldn't the old HD element at 2000 Watts/120 volts/16.6 amps trip that just from running normal because it's over the amp allowance? Or is that not exactly how GFCI works? I recall it tripping one at my buddy's house (but there was also a freezer plugged into it). Or maybe the outlet is 20 amp?

The GFCI outlet only trips if there is a ground fault (short to ground, detected as missing current between the hot and neutral). It has no overcurrent fault detection. That's provided by the breaker in the panel. If this GFCI outlet is in the kitchen, it's plausible that it's on a 20A circuit and breaker, shared with other outlets.

Even if it isn't, it takes time for breakers to trip from small overcurrents, and the actual current will depend on the exact line voltage anyway - 16.67A at 120V may not trip the breaker very quickly, and if the line voltage is actually closer to 110V, the actual current will be lower - 15.2A at 110V - which might not trip at all.
 
Thank you all for the insight.

Hope the batch turns out man! Whatcha' gonna call it if it does?

It's a BSDA and at this point is only about 2.5 weeks old, so very very young. I've tasted a recent sample and all seems well to me - nothing that gives me the idea of burnt wort or metallic off flavors that I can perceive, so there's a plus. Went down from 1088 to 1014, not too dry which was a concern as the hooplah with the RIMS tube had me wind up mashing a bit lower than target. Going to throw it in kegs this weekend and age for another 4+ months.

My wife, who now brews with me (but is really more of the official stirrer and disappears when it's time to clean), found a recipe that was supposed to be a sort of St. Bernardus inspired brew. I did a bit of tweaking, mostly just dropped a random Marris Otter addition for a small quantity of Aromatic and adjusted sugar to malt ratios. We were originally going to brew it on Valentine's Day and the name that came to mind as a whole play on St. Bernardus was to call it St. Valentine which of course the wife loved.

But after this debacle, something with meltdown sounds more fitting. Malt Meltdown
 
I wouldn't build a RIMS without one! Simple, CHEAP and effective. just a simple float switch for $15 would do it.

So basically all I need is the meter, third down on this page - http://www.futurlec.com/Flow_Sensor.shtml - and there is an easy way to wire it into my current box to cut off the element power? Could some sort of red light be installed to indicate when the meter has tripped? I'm likely to be watching the flow like a hawk now, but it still seems like a cheap yet most useful fail safe.

Or this thing - http://www.amazon.com/dp/B00NWF8L6U/?tag=skimlinks_replacement-20

Not sure the float would work with the box setup.
 
Last edited by a moderator:
So basically all I need is the meter, third down on this page - http://www.futurlec.com/Flow_Sensor.shtml - and there is an easy way to wire it into my current box to cut off the element power? Could some sort of red light be installed to indicate when the meter has tripped? I'm likely to be watching the flow like a hawk now, but it still seems like a cheap yet most useful fail safe.

EDIT: Oh, you mean a float in the mash tun?

No I mean in the RIMS tube itself If you could get one to fit. I Don't see any reason why the flow sensor you linked wont work. It is all low voltage so it looks like you would need a Voltage regulator and then it is digital output so you just need to build accordingly. I think I would be using a simple tank style float switch at the top of my RIMS (if I used one) and disrupt the element relay. But my system is simple electrical relay driven. I use all full voltage everything accept my PID's of course..

Cheers
Jay

Thanks, yeah, I think I came across one of the floats you are referring to in the mean time and edited but you had already posted at the same time.
 
Thanks, yeah, I think I came across one of the floats you are referring to in the mean time and edited but you had already posted at the same time.

Yeah something like that for sure. That one looks like they rated it for DC voltage/current but I think your on the right path for sure. I use a bunch of them in my brewery.

Cheers
Jay
 
You are pretty close to this:
http://www.pjmuth.org/beerstuff/images/Auberin-wiring1-a4-2000w-BIAB-120V-A.jpg

You may not have some of the switches (Element Power, E-Stop, PID Power) but you can get the general idea just by following the wires.


Everything inside there looks very clean, and it will be easy to test your ground connections since they are all on that nice bus bar. Just check each one to the ground on the wall plug, and if those are working, you should be good to go.

Okay, so the hot pod and element came in today and as I suspected, the wire coming out of the box is not long enough, especially if you want to be able to unclamp the whole unit and remove the long element from the tube.

Should I just cut out and rewire an outlet into the side of the box? This way I can get another short length of cord with a plug attached to the element and the whole thing becomes much more modular.

Should this outlet be CFGI or can it just be a standard 15 amp in this case (considering the whole box will be plugged into one in my kitchen).

I am a little worried about that ridge of the box and if a plate will fit over it (see below). Is there any other options using what's already there?

bmPYpZt.jpg
 
Back
Top