Johnnycakes Brewing DIY Projects

Homebrew Talk - Beer, Wine, Mead, & Cider Brewing Discussion Forum

Help Support Homebrew Talk - Beer, Wine, Mead, & Cider Brewing Discussion Forum:

This site may earn a commission from merchant affiliate links, including eBay, Amazon, and others.

jleiii

Well-Known Member
Joined
Sep 9, 2013
Messages
582
Reaction score
114
Location
Rock Hall
I keep teasing people with brief posts about my DIY projects with comments in other threads, and its time to break loose with the details, starting with an introduction. (I had 'brief introduction' initially, but had to remove brief!)

I've been brewing just about 2 years now, and did extract for the first 18 mo or so. I started on the stove, then bought a fully stainless turkey fryer setup to do full volume boils. Well that lead to BIAB(ag), and now BIAB(asket).
Along the way I've made a variety of DIY projects, starting with a ST1000 controlled RediWhip cooler for lagering, then a heated 4 chamber fermentation cabinet, various small volume carbonation bottles/keg, and most recently moving toward electric brewing. And a bunch of things in between.

My biggest challenge is space. I have a comfortably small house with a full basement (but only for the height challenged), and no garage. So, many of my projects have been designed to maximize the available space in the basement, starting there with a extra deep sink (with below grade pump) a counter and storage. Having a small family manufacturing business helps immensely as I have lots of tools at my disposal. A shear, finger/box break, welding, brazing, and soldering equip, plus a milling machine and metal lathe all come in handy. Oh, and being a DIY'r for most of my 54 yrs helps too. I don't hire contractors for my house as I do it all myself (except the roof and sewer line I will admit), and I can rebuild engines and old wooden boats, and I can melt bronze into new shapes - but I digress.

One thing I need to admit to is that I'm 'online challenged'. Put me in a corporate datacenter and make be design and implement backups, replication and disaster recovery and I'm at home. Make me manage and post pictures online and I start coming up short. Social media, sorry, can't do that either. So bear with me while I try to post my project stuff. My computer experience goes all the way back to the early 80's (non-stop) but I'm not keeping up with the times very well. And don't be surprised if I'm MIA for days at a time here. I do far too much with far too little time (re-read last paragraph!)

I'm going to jump ahead to the project that kind of pushed me to start this post, my Mash Basket, hence the BIABasket thing above. I tried numerous ways to be able to rinse my grains in the BIABag and just was not happy with any of them. I could have gone with a typical cooler as a mash tun, but what would the fun be in that? Plus that pesky low clearance in the basement. While I'm sure plenty of people make really great beer with BIAB and no rinse/sparge methods, I wanted to step it up a little. I'll leave the pics to the end as that the only way I know how to post them right now. Gotta learn about those new fangled online picture sites for inline picture posts. Any suggestions?

Getting on to the first project - the Mash Basket.

The Mash Basket is a stainless steel sheet rolled into a cylinder and edge soldered. The bottom is a 300 mesh SS screen also soldered in place. With a 12" ID pot a 36" sheet makes a very good fit. I get most of my non-brewing supplies through Mcmaster Carr. You can sometimes find a better price elsewhere but no-one has the selection and delivery they do. I'm close to a warehouse and get most things same day at discounted shipping rates.

I bought a sheet of 304 SS .030 x 36 x 36 for the shell. I cut a 16" piece off of it, then pondered how to roll it into a cylinder. I ended up clamping 1 end to a 5 gallon paint thinner can then set it on a large table (big projects happen in my business shop), and tried to roll the sheet around the can. That went poorly. At .030 thick this stuff is not easy to roll. Eventually I got a little curve going, then found that if I laid on top of it I could push myself back and forth rolling the can and sheet. No witnesses to this, but I'm sure it was a sight to behold. This gave the sheet enough curve to work with. I then clamped a 2x4 across the edge of the table and used it to work the ends of the sheet into the same curve until they sufficiently met. Once I had the basic curve set I cut a circle in a piece of plywood to match the OD I wanted, and slid the cylinder into and clamped the ends at the overlap and started soldering. I used the same solder and flux most everyone here uses.

Once that was done it was onto the screen. Again McMaster supplied this. It's a 300 mesh SS filter quality screen (finer wire than std screen). I cut a 12" or so diameter piece and used the plywood pieces I cut for the cylinder to form a lip around the edge. I put that in 1 end of the cylinder and used the inner circle plywood piece inside to keep it flat in place. May be hard to picture, but I have the pics somewhere..... With the screen inside the cylinder I used a piece of 3/32 SS welding rod formed into as circle on the inside lip of the screen lip to help keep the lip against the cylinder. With much effort, and a few restarts I was able to clamp the rod, screen and cylinder together and spot soldered the way around to the start. Once I was close to the end I had to trim the rod so the ends would not overlap. Once it was spot soldered I went around the whole thing filling in the solder to form a 'grain proof' seal.

Now the only thing left was to make handles for it. One thing I learned from the basket that came with my turkey fryer is that any protrusions will get in the way of something. I ended up using a sheet metal punch and angle grinder to make large notches at the top, then soldered a curved SS rod across the top of the notch. I can use this in any number of ways - hoisting, hanging and my most recent idea - supporting a sparge arm (yet to be made).

Some other projects not mentioned above:
Bottle washer (not quite finished)
Hop Basket
Hop Growing
Glycol Chiller (getting started)
Motorized Mash Stirrer (obsolete now)
RIMS & Pump, usable but only temporary setup

Here is what the Mash Basket looks like:

Basket1.jpg


Basket2.jpg
 
Is your basket going to be resting on the bottom of your pot? If so, how is the wort going to get out to the pot? Will you be recirculating your wort? Do you plan on rinsing the grains? 300 seems to be a very fine mesh. Are you afraid of it taking a long time to drain the wort?
 
Is your basket going to be resting on the bottom of your pot? If so, how is the wort going to get out to the pot? Will you be recirculating your wort? Do you plan on rinsing the grains? 300 seems to be a very fine mesh. Are you afraid of it taking a long time to drain the wort?

Yes, the next topic to cover. But to answer one question, the basket sits on the valve spud nut in my smaller pot.

Originally I made this as an alternative to BIABag but was not happy with how it performed. On National Homebrew Day (Big Brew Day) I made a Dunkelweizen which had been milled like BIAB, fine. I rinsed with the rest of the batch water and it was slow, very slow, but that day was about all fun beer things, so no big deal. The next day I did another brew to use with the 100% pale malt wort our day sponsor (Iron Hill) mashed for the occasion, again BIAB fine mill. That was a total disaster. The infamous stuck sparge but in my case the stuck drain. I ended up dumping the wet grain into my bag and continuing.

So I took some time to ponder my options, read lots of posts here and decided to move into the electric brewing arena. I started this with a Chugger Pump and RIMs tube as I thought that was the logical next step with the basket. As of last weekend I had the RIMS setup operational and did a practice run with PBW to clean all the parts and to tune the controller and get a basic feel for the system. I then brewed up a lager and screwed up the grain bill, but that's in another post.

I heated up 7 gallons of water in my boil kettle to strike temp and pumped 5 gal into the mash basket & pot. Fired up the RIMS and doughed in. Initially I had the pump running wide open, but once I had the all the grain in, the level in the narrow gap between the basket and pot quickly dropped and started to suck air. Over the next 15 min or so I stirred the mash and adjusted the flow until I reached a steady state. I have no idea what the flow rate was, but will check next time. I am very pleased with how this went on the first go round. I will be re-doing the screwed up Lager in the next week or so, and will continue to tune my process.

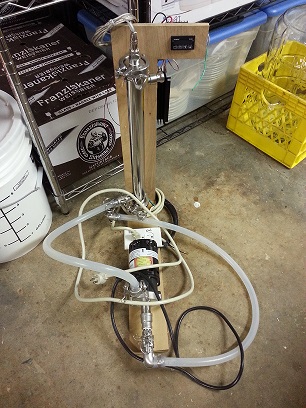
My next step is to get the setup better organized. This last brew was done with the brew pot on the floor burner, the Pump, RIMS tube and controller on the floor connected with a hastily built wood 'L' bracket. Pump flat, RIMS tube vertical and Controller above the RIMS tube. The pic of this is below. The Mash pot/basket was sitting on my roll around grain mill table. Oh, another project I forgot about.... In this configuration I pump up from the 'HLT pot' to the mash pot, and drain down to the 'boil kettle' at the end. My plan is to build a 2 level sculpture to get it all together, and then move to electric boils.

Regarding the mesh size, I may be mistaken on this, it might be 400 mesh. Depending on how things go with the next brew I may go to a courser mesh. I milled my grain more in line with typical mash tuns on this batch and I think that helped drastically over the clogged mess on the earlier run. This is something I'll be watching closely.

John

RIMS.jpg
 
This part here. I've always mashed in differently.

I heated up 7 gallons of water in my boil kettle to strike temp and pumped 5 gal into the mash basket & pot. Fired up the RIMS and doughed in. Initially I had the pump running wide open, but once I had the all the grain in, the level in the narrow gap between the basket and pot quickly dropped and started to suck air. Over the next 15 min or so I stirred the mash and adjusted the flow until I reached a steady state.

My mash tun false bottom uses the punched SS with 3/32 holes on 5/32 centers, so the holes are much larger than what you use. Still, when I mash in I add enough strike water so the false bottom is covered then a couple of gallons more. Add about 1/4 of the milled grain, stir, more water and grain, stir, then final amount of water and the balance of the grain. Stir it all up to remove dough balls and let it sit for 10 minutes. All of this without the pump running. If I let the pump run I would end up with a good amount of grain in my RIMS tube.

I suspect that with the SS mesh you used that you did not end up with grain bits in your RIMS tube. It doesn't bother me that some grain slips past the false bottom, but by letting the mash settle I don't have anywhere near the issues with grain getting past the false bottom as I did when I started pumping first.

I know you won't have that problem with the mesh you're using. I'm just thinking out loud about letting the pump run from the very beginning of the mash process. In my setup it would cause the mash to suck down very tight and not let a lot of wort pass. By letting it settle first, it stays more loose and I get a much better flow rate.
 
stlbeer, Thanks for the comments.

I redid the oops Lager over the weekend and did the mashin without the pump running. Once it was stirred well and settled I fired up the pump and adjusted the flow for max without sucking in any air. It took about 10 min to dial it in to a steady state flow rate, which seemed like a pretty substantial amount. It then ran fine through the whole mash period.
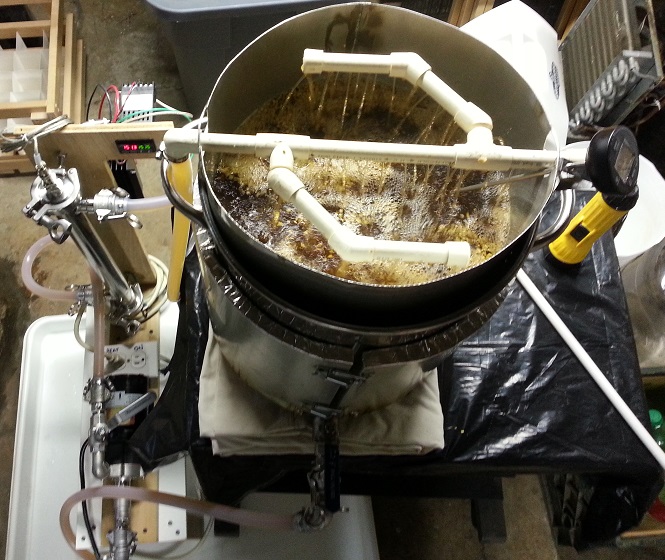
I then drained about 3 gallons and pumped the remaining water (sparge water I suppose) as slowly as I could maintaining the slowest flow that I could as still have good distribution with my latest DIY item, pictured below. Still not getting great efficiency but I'll get there.

Mashing.jpg
 
I have a huge stash of 1x3 maple wood that's been waiting to become something for 20+ years. - Beer Crates!
There are 2 sizes here, std 12oz and 500ml. My brother keeps me supplied with Franziskaner bottles - 500ml and 20 to a case. Each size should stack securely but if they are not perfectly aligned when I drill the screw holes they don't quite nest right. A few seconds with a sander on the feet will fix that, but then I loose the lacquer finish that's already on the wood. An adjustment to the fixtures I made is needed to solve this.

WoodCases.jpg


And for compact storage of empties:

EconomyCases.jpg


These were made with corrugated plastic sheets from Lowes. $7.89 (each sheet) and maybe an hour of time for both. Having an industrial stapler was very helpful too as you can't glue this plastic. The sheets are 30x36 which is almost perfect, minus the lid. I may use the corner cutouts as a basic cover as I really only need to keep dust out.

For $12 - $14 I can buy a case of new bottles at the LHBS with the box, but I need 10 of these and I don't need 10 more cases of bottles. Plus they will eventually need to be replaced as well. Cardboard cases don't hold up well after a year or 2. I'm not sure about using them with full bottles yet. I'll see how that goes.

I had a continuing supply of Yuengling boxes, but a baby put a damper on beer consumption a year ago, and now they have a 2nd one. An occasional 12 pack is the norm there now. The bottle dividers last a long time, so no need to make them for the 12's but the Franz do not have them. Those I did make, but the chipboard cardboard is hard to find, except by the pallet. These are basic posterboard.


John
 
Love the corrugated plastic boxes..im totally making some of those because i have quite a lot of it from making RC Airplanes.

FWIW Gorilla glue does work on the Coroplast.

What thickness did you go with and do you think its rigid enough or too rigid?

Theres a shop nearby where i got my sheets before that sells all thicknesses of this stuff, i may go get a 4x8 foot sheet and make a ton of boxes for all my bottles.

According to the Lowes website its Plaskolite. I researched this and if I recall correctly it's not made by them, but someone else, and I don't recall who. I could not find it on their website, and contacted them and they directed me elsewhere. It's polyethylene and pretty much no glue will stick to it very well. There are some modern glues made for it, but super expensive. I used it on my bottle washer too, and melted the holes in to bond 2 layers 90 degrees to each other for greater strength.

The spec says .157 thick, and that's more than adequate for empties, and I just loaded 1 with full bottles, and it looks like that works well too. I'd be hesitant to trust the staples though. It sagged maybe 1/4" in the bottom center and the sides stayed straight. I'll have to try gorilla glue and see how that works. Maybe that and staples will give a stronger bond.
 
Yea its the same stuff i used, maybe made by a different company but they are all just polyethylene.

This company about 30 mins from me ive bought a lot from before
http://www.multicraftplastics.com/sign_graphics/content/corrugated_polypro.html

I think ill go take a look at what they have and see if the 4mm(same as what you got) is thick enough or if i should go with the 6mm.

Gorilla glue will work, trust me..ive crashed RC planes going 50mph into metal poles(not on purpose :tank: ) and everything breaks and the plastic tears before the glue bonds break :)
Just make sure to apply it properly as the instructions state, get the surfaces damp before applying :)
 
Yea its the same stuff i used, maybe made by a different company but they are all just polyethylene.

This company about 30 mins from me ive bought a lot from before
http://www.multicraftplastics.com/sign_graphics/content/corrugated_polypro.html

I think ill go take a look at what they have and see if the 4mm(same as what you got) is thick enough or if i should go with the 6mm.

Gorilla glue will work, trust me..ive crashed RC planes going 50mph into metal poles(not on purpose :tank: ) and everything breaks and the plastic tears before the glue bonds break :)
Just make sure to apply it properly as the instructions state, get the surfaces damp before applying :)


It is labeled Plaskolite, and gorilla glue is marginally effective. I cut out 5 more crates yesterday, did a test glue job, and it holds, but not very well. The 2 pcs pulled apart with a little effort, and you can rub off the residue with a little more effort. I'm going to try sanding the surfaces a little and see it it helps. But with the staples it may still be much stronger than the staples alone.

No new project updates yet, but working on several in the background - Brewing Tree and glycol cooler.

I've got 1 lager ready to move to lagering temps, and another coming up on Sunday and have to get the cooler operational. I've had the parts for way too long. It's a dehumidifier, cooler, pond pump and radiator mounted to a 4" muffin fan. The proof of concept last night was a success, now I need to put it together in a more permanent way. The dehumidifier is a great device for this, but they left ZERO slack in the refrigerant tubing. I've got it 90% re-positioned where I want it, but that last 10% is a killer. I'm trying to keep it all within the original cover, and that will be..... interesting.

The Brewing Tree will be a major upgrade from what I've been doing. It's a large angle iron base, 3" steel tube and will have 3 levels, with my control, RIMS and chugger mounted. I can't wait to get it usable!
 
I spent the weekend getting my glycol cooler done. Here are a few pics, and the highlights. I posted this in another thread last night due to interest in it there, and figured I should add it here too.

The glycol reservoir is made from 1/8" fiberglass panel, ell and channel (McMaster Carr). I used a 24x24 sheet and made it as big as possible from that. It ends up holding about 3 gallons. It's 10.5" wide x 12" high by 6" deep, where the width was determined by the evaporator width. The cost was about $90 for this material and a qt of resin from Home Depot. The channel was a perfect fit to slide the evaporator down to keep it in place.

213975d1406512960-glycol-chiller-build-help-wiring-chiller1.jpg


The cooler is an old, very very old, dehumidifier I've had for 25 yrs, and used only occasionally during that time. As may be typical the evaporator and condenser were back to back above the compressor and water tank. I carefully finagled the evaporator 90 degrees down to where the water tank was, and managed to do so without causing a freon leak. Due to the design there was VERY little slack in the tubing, and this was quite a challenge.

I used 3/8 tubing bullhead barbs, elbows, and straight barbs for the pump outlets with tubing going down to the fountain pumps, and bulkheads couplings and straight barbs for the returns which pass over the evaporator to the far side. The fittings were about $25 (McMaster) and pumps are about $19 each (Home Depot). I only have 2 pump so far. I will be looking at bigger ones as the one I have running so far had issues getting the air pushed out, and 2 chambers are 24" higher. Update from last nights post- I found 291 gal/hr pumps with a lift of 6.25 feet on Amazon for $19.99.

It took about 20 min to get the glycol down to about -4C then it basically stopped. Seems the evaporator froze up, even though I was using 1 pump to circulate with a loopback tube. Once I shut off the compressor it settled down, and is happy at -5C right now. I will probably add a pump just for circulation and a distribution tube to keep the whole return side of the evaporator moving. Update - Overnight all went quietly. No good gauge of how long, or how often yet. But now I need to figure out how to control condensate on the tube ends where the insulation ends.

The fermentation chamber has a 4" muffin fan and the mini radiators to circulate the cold air. I have a lager, at room temp for a d-rest, that's been chomping at the bit to get to lagering. I'm going to drop it 5C per day till I get to 35F. The fans are std 4" muffin fans ($9 Surplus Center), and the coolers are cpu coolers ($25 from ???). They look like mini car radiators. The fans mount directly to them.

213974d1406512960-glycol-chiller-build-help-wiring-cooler.jpg


I still have to get the wiring on the fans/pumps finalized. You can see a bare metal box in the last pic which will be for 2 duplex receptacles, 1 for each chamber. The pumps will plug into these. The looped tube in that pic is to keep the glycol moving all the time, for now. As I noted I will probably add a pump just for this, and wire it with the compressor.


Cheers!

213976d1406512960-glycol-chiller-build-help-wiring-chiller.jpg

213977d1406512960-glycol-chiller-build-help-wiring-chiller2.jpg

213978d1406512960-glycol-chiller-build-help-wiring-chiller3.jpg

213979d1406512960-glycol-chiller-build-help-wiring-chiller4.jpg
 
Last edited by a moderator:
Another project I finally got to the 95% mark, just waiting on cam locks now.

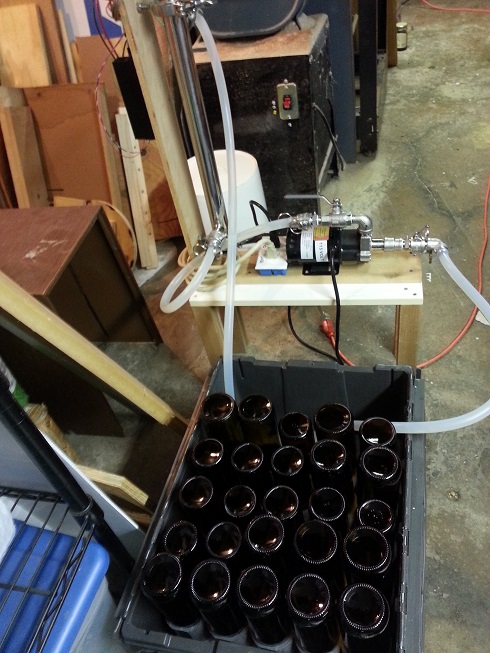
My RIMS washing bottles. With the 4500w element on 120 it can only get to about 150F. When I get my electric panel going the 240 will make quick work of higher temps, but the plastic tote was rather soft at 150. I'm adding cam locks to it as well so I can use my existing hoses easily. I will figure out some sort of hood for it and add a sprayer head to shower the outsides as well. I'll even experiment with delabling too, but will have to filter the water to keep the labels out of the pump and rims.

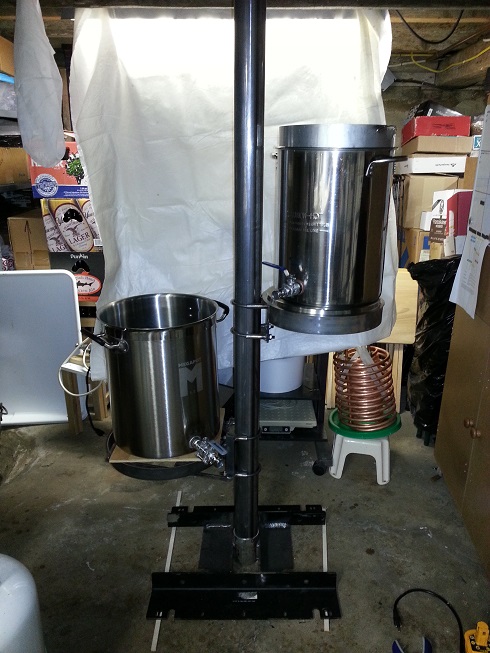
The pump and RIMS will be mounted to the Brewing Tree I'm working on, so I'll bring the tote to them in the future. Here's a preview of the Brewing Tree, too.

RIMSBottleWasher.jpg


BrewingTree.jpg
 
I spent more quality time with my Glycol Chiller over the weekend. The results with the radiator were less than what I'd hoped for. I could chill to 55 for lager fermenting, but at about 46 the radiator froze up from condensate. I raised the glycol temp to 32, but it was still hard pressed to go lower. So, time for plan B.
I picked up a roll of Reflectix and roof flashing aluminum. I then taped 3/8" tubing to the aluminum, cut 2 layers of reflectix to fit in between the coils, and wrapped 2 layers of reflectix around the outside. 2 stretchy velcro straps secures it around the carboy. Viola, glycol jackets. Total cost of the jacket was about $35, plus I have enough Reflextix and flashing to make a second one.

glycoljacket1.jpg


glycoljacket2.jpg


This seems to be working well so far. It's down to about 37F in 1.5 days. I'm going to add a collar around the top to keep the cold contained. I had installed this in the upper chamber initially, but in spite of a pump with 5ft lift @ 70gal/hr it was unable to move the glycol. I suspect the weight of the glycol was too much resistance. I tried to purge all the air, but that failed too. Since it worked fine sitting on the floor next to the chiller, it would have to work in the lower chamber, so more glycol draining, hose moving, bulkhead fitting installs completed, and low and behold, it works in the lower chamber. I will add a second one soon in the other lower chamber, as I have another lager almost ready for lagering. The only downside is that I can't keep the GLASS carboy in my milk crate anymore. There just is not enough room in the crate for the jacket too. I have a planter tray under it in case any condensate forms.
Plastic carboys are a terrible shape for these jackets, but the glass ones are nearly smooth, only slight ridges, vs 1/2" valleys in the plastic ones. With the aluminum against the carboy (aluminum is to help transfer the cool over the entire surface).
Since the jackets are 'hard hosed' in the chamber, these 2 chambers will be less flexible than the other 2 since the jacket will be there all the time. If needed I can use them for fermenting ales although they'll be overkill, but that's what the STC take care of!

Here is the radiator, hanging during testing. It's now mounted to the screws from above. The hoses are also attached with a bulkhead fittings rather than just pushed through the holes. This will give me plenty of cooling for summer brews at any fermenting temp I need. No issues with flow here in the upper chamber, thank goodness.

radiator.jpg


In the process of getting the pumps wired up in a double duplex outlet box, I managed to get the neutral and hot wires crossed on 1 pump, and as soon as the second STC latched the cool relay a snap and flash ensued, and the smoke was let out of I assume the relay contacts. 2 STC's down.:mad:

When everything was wired directly, there was no issue, but as soon as I installed the duplex outlet box, all 4 STC's now had 1 cool relay contact connected together - neutral. Well, all but 1. 120 volts across 2 sets of relays, and that was it. Thank goodness for 2 more in the other chambers that are not being used at the moment.

I need to run the fan for heat and cool, so fried relays are no big deal in end. I found an 8 relay opto-isolated relay board on ebay for $12. I'll remove the STC relays, and wire them to this board with a few extra parts so the fan relay will energize for heat and cool. Although the glycol jackets won't need the fan, and will not even be wired this way, as the fan may be detrimental to keeping them cool.

It's been more than a year since I started this chiller plan, and finally it's nearly done, and working!

One word on hose clamps - Gap-Free Pinch Hose and Tube Clamps, Tongue and Groove style
I got them from McMaster and use them on all my brewery hoses. You need the $22 pliers to install them (and remove), but they are vastly better than standard hose clamps as long as you don't intent to remove them very often. They come in very narrow ranges, so you have to be sure of exactly which one you need. The overlap between sizes is very limited. Even though they are 'permanent' they take less time than a screw clamp to install or remove. They cost about $0.40 each, so even if you have to remove them several times as you fix your mistakes or make changes it's still worth it.
 
Definitely digging your glycol build. I'm planning on doing one myself in a few months. So far in mine I have been using a minifrige with a cold water tank pumped through jackets. Jackets work great, my particular fridge isn't cutting the mustard. I know you have already built out your jackets, but take a look at these: http://www.gotta-brew.com/categories/cooling-jacket.html. They may be a bit pricier than what you made, but they work amazing, not bulky, and easily removable. I am using them with the expansion link on sanke fermenters and they are a delight. You can make your own heating panels pretty cheaply by getting flex watt in bulk and cutting them up yourself. I actually went with 7" instead of 11" to fit inside the ridges of the keg to make better contact. No issues heating that much mass a few degrees. I use the heat and cool to keep my ales steady (usually anywhere from 62*-68* for different yeasts), then ramp up to 72* after about 3 days. Results should be filed under "how do I make beer faster (without drinking popcorn!)." I am really enjoying bringing the same temp precision I have with my eherms to my fermentation. Excited to see your fermentation control progress!
 
Definitely digging your glycol build. I'm planning on doing one myself in a few months. So far in mine I have been using a minifrige with a cold water tank pumped through jackets. Jackets work great, my particular fridge isn't cutting the mustard. I know you have already built out your jackets, but take a look at these: http://www.gotta-brew.com/categories/cooling-jacket.html. They may be a bit pricier than what you made, but they work amazing, not bulky, and easily removable. I am using them with the expansion link on sanke fermenters and they are a delight. You can make your own heating panels pretty cheaply by getting flex watt in bulk and cutting them up yourself. I actually went with 7" instead of 11" to fit inside the ridges of the keg to make better contact. No issues heating that much mass a few degrees. I use the heat and cool to keep my ales steady (usually anywhere from 62*-68* for different yeasts), then ramp up to 72* after about 3 days. Results should be filed under "how do I make beer faster (without drinking popcorn!)." I am really enjoying bringing the same temp precision I have with my eherms to my fermentation. Excited to see your fermentation control progress!

I checked out the jackets, and they do look very nice. I don't see any reference to how efficient they are, when doing lagers. If they are thin, then it might be tough to get down to 35F.

Mine has about 9 feet of tubing in contact with the aluminum flashing, and I'd love to find a soft/squishy thermally conductive material to line the inside of the aluminum (if it's cheap!) for better contact with the carboy. I researched thermally conductive adhesives for use with the tubing to get more surface contact, and there are few options, but they are very expensive. Since mine seems to be working as needed maybe I should leave well enough alone. I will finish the edges and add a top cover once this lager is done. I may try adding self adhesive velcro to keep it closed too.

I do need to make a second one ASAP for my dopplebock that's in drest right now. I have 20ft of poly tubing that I got for something else, but was not suitable, so I'm going to try using that. I'll heat the bend areas and see if I can get more turns in the same area. The rubber tubing was barely able to make a 6" bend without kinking which limited me to 5 passes. I might even try putting some serious weight on it as it lays flat, and running hot water through it to get it to flatten out some once it's formed into the loops. I may look for something else to use as insulation between the tubing to save the reflectrix for the outside. I used exactly half, I think, on the first one, and could have 3 outer layers if I find something else for the inside.

Quick disconnects would be a bonus too, but gotta cap my costs. Assuming the poly tubing works, the second one is already paid for. The brewery budget got cut to zero last week due to a 20% pay cut in lean times. Better than out of work!!

The only issue I have with the chiller so far is the tank is getting condensate buildup in the 1/8" gap between the FRP panels and the styrofoam. The FRP angle on the corners keep it from full contact. I need to find a 1/8" something to slip in, or redo the styrofoam to fit tightly. It's dripping an oz or 2 of water per day. I still need to finish the top cover and insulate it, but it's not getting condensate on it. The cover over the whole unit comes off with 6 screws, so I can fully access it to work on the foam. Bonus is that it can continue to cycle as well.
I wish the FRP panels had been a little bigger (24x24 sheet) as the space for the pumps is barely enough. The next bigger size is 48x48 and 4 times the cost. There was enough space to fit 4 of the tiny pond pumps in a row at the bottom, but only 2 bigger ones. I'm hoping the small ones are powerful enough to supply the radiators in the top chambers, since I have 2 already. They can sit on top of the bigger ones, no problem. The small size also makes it tough to retrofit the pumps. I had to remove several tubing fittings to get my hand in, as well as the bigger pumps. The bonus is that the pumps will happily drain the glycol out so I'm not putting my hand into ~30F liquid!

My original chiller design was going to use a transmission cooler and fans in my big cooler (at 0F), but after pondering that plan for a while, and deciding the unused dehumidifier needed to go (as I took over more of the basment), I had my Oh! moment and the dehumidifier got a second life. The air over the transmission cooler would probably not have been good enough, no reservoir for pumps, and so on. I thought about just a reservoir in the big cooler, but did not think it would be efficient enough either, plus glycol slushes up below about 15F making it unpumpable with mini pumps. I think the dehumidifier is about as efficient as it gets for DIY. Similar results can be had with an AC unit in the same fashion I'm sure.
 
I have an old dehumidifier too, but live in a 100yr old house with an unfinished not that tightly sealed basement, so it gets plenty of use as what its intended for. I would think they would be about the same when you chop them up for our purposes. As for the jackets, Steve the owner is very helpful with tips and suggestions what will work and won't with his products. Lagering shouldn't be a problem if you can keep the supply liquid cool, which is why I'm leaning towards making a chiller myself. With enough btu's cold crashing shouldn't be a problem either. The jackets themselves are made of vinyl similar to a heavy duty pool floaty (the expensive ones, not the cheap flimsy ones), and it has channels that the liquid flows through to keep everything moving well. Steve had suggested for my purposes I find a way to insulate the fermenters, which I did with refletix. I know he does have his own insulated carboy covers as well. The price of those could start to add up with multiple carboys as well, but I'm thinking they would work quite well. In my build I have my fermentation in my basement, which stays anywhere from 55-70 depending on the season. I have them out in the open with insulation around them. That seems to work quite well in my setting, but if you were to have them in a garage or other area with larger temp swings, I would guess having them in a chamber would still be the way to go. One final note, Steve also has quick connects that work quite well and are very reasonably priced. He has 1/2" and 1/4" sizes on his website, but I think he also has 3/8" if you email him. They are a twist lock with orings and work very well. The connects are included with the jackets.
 
Almost forgot, what are you using for glycol? I haven't done a ton of research yet, but its my understanding there are several different types. Also are you mixing with water? And if so how much?
 
Almost forgot, what are you using for glycol? I haven't done a ton of research yet, but its my understanding there are several different types. Also are you mixing with water? And if so how much?

Marine/RV antifreeze straight from the bottle, no dilution. The Evil Empire (warlmart) has them for under $4 a gallon, if I recall correctly.
 
I have an old dehumidifier too, but live in a 100yr old house with an unfinished not that tightly sealed basement, so it gets plenty of use as what its intended for.

Similar situation for me. Mine ranges from 50-70 through the year. I have a 4 compartment insulated chamber to isolate from the variation.
 
I got the second carboy wrap/glycol jacket done over the last couple days. This one was made with the leftover poly tubing I had, and a form made from plywood to set the shape with hot water. The forming was a pain in the beer. I intentionally used 3/8 plywood to partially flatten the tubing for better contact with the flashing, and had to use like 100 drywall screws to make it work. In the end it came out pretty good. Here are the forms.
tubing1.jpg

tubing2.jpg


I did not cut the reflectix to fit between the tubes this time. That was too much of a pain in the beer the last time. I did tape 3 layers together at the ends then added a 4th that overlaps the front. All in all it's pretty good, but damn tight in the chamber.

I added quick connects on this one so I can easily remove it from the chamber as needed. I found fittings that bulkhead mount, and that worked out very nicely. I will upgrade the other one with them in a few weeks when that lager is ready.

Lagers.jpg


I also updated my control with 2 of the STC1000+ units flashed by wilconrad with the code alphaomega created. I won't be using the step feature yet, but will for the next lager, ferment, drest and lagering.

The 71F is where this one started. Down to low 40's over night, and hopefully at 35 when I get home. I believe a slower ramp is appropriate, but this lager is so far behind schedule I can't take days to get there.

STC1000+.jpg
 
Really nice work! Do you happen to have a link to the bulkhead mounted quick connect fittings? I currently have a water reservoir and pump in my kegerator feeding a Cool Zone cooling jacket, and it would be nice to bulkhead mount the hoses through the refrigerator wall instead of just routing them through a hole. Thanks!
 
Really nice work! Do you happen to have a link to the bulkhead mounted quick connect fittings? I currently have a water reservoir and pump in my kegerator feeding a Cool Zone cooling jacket, and it would be nice to bulkhead mount the hoses through the refrigerator wall instead of just routing them through a hole. Thanks!

I get most of my generic stuff from McMaster Carr, and I'm sure there are lots of other places that have this stuff, and maybe cheaper. I'm in the same day delivery zone, so I order by noon and have it before 5, and typically for under $5 in shipping for small items.

They have crazy URLs, which don't link correctly, so go to mcmaster.com and search for item 5012K98. That will take you to "Plugs, Barbed Through-Wall", and see whatever else on that page strikes your fancy. They have other styles as well, another search for "Quick-Disconnect Tube Fittings" will get you 3 styles, click on the one with that name, and that will bring up a bunch. The ones I got are "Moisture-Resistant Acetal Quick-Disconnect Tube Couplings". Damn I hate their unlinkableness!!

They also have straight barb bulkhead fitting that you will see in my pics of the glycol tank a page back in this post. At 1/10 the cost of the quick connects, I used them on the tank. Quick connects all around would be really nice, but would have more than doubled the whole project cost.

Edit: I used ones with internal shutoff valves on the bulkhead so when you disconnect them the glycol can't come out if the pump were to be energized. Male for bulkhead, female on hoses.
 
I think I found the exact same parts at US Plastics for about 1/3 less:

64616, Female for 3/8 ID tube, no shutoff, $3.90
64657, Male bulkhead for 3/8 ID tube, with shutoff, $8.80

FYI, these are good to -40F, others are not.
 
The pump and RIMS will be mounted to the Brewing Tree I'm working on, so I'll bring the tote to them in the future. Here's a preview of the Brewing Tree, too.

Did you make the base to your brewing tree or buy it? I have a basement floor house jack that would work perfectly for this and could be shrunk to half height for storage. Also, I get how you mounted the shelves but what did you use for shelves. Thanks.

-- Eric
 
Did you make the base to your brewing tree or buy it? I have a basement floor house jack that would work perfectly for this and could be shrunk to half height for storage. Also, I get how you mounted the shelves but what did you use for shelves. Thanks.

-- Eric

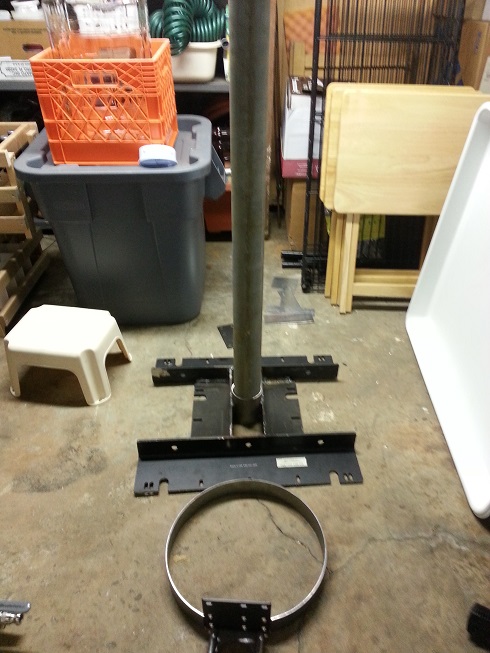
It's made from 3 pcs of angle iron I salvaged from equipment racks. They were the anti-tip brackets. I had a neighbor do the welding as my mig was too small. 1 was cut in half and positioned back to back with a 4" ID steel tube between, and all welded up. It's basically an H pattern with the center line being the back to back pcs and tube centered. Since then I had a second tube added all the way to 1 side to off center it to the 'back'. The base weighs about 40lbs.

The vertical tube is 4" OD tubing that was a tight slip fit into the tube in the base. I was able to get it in about 3" by holding the whole thing balanced in 1 hand, and pounding on the bottom of the base with a framing hammer. I could have gone further, but the dog came unglued due to the banging. He's got a heart condition, and can't over stress him. He can't handle any sort of sharp noise, like hammering, stapling, thunder and fireworks. Makes DIY stuff a pain in the butt.

The 'shelves' are all welded steel, with standard ubolts attached that fit the vertical tube. I formed 1 1/2 x 1/8 x 48 strip into a ring about 14" in dia, trimmed the ends to meet, and flatted the ends. I cut 2 1x1 angle about 4" long, and drilled holes at each end for the ubolts and mounted this on a pc of tubing to square it up. Each ubolt has a screw in each angle making it square like. I then welded the ubolt bases to the angle, then welded the ring to it near 1 end. I added 2 supports from the other end to the far side of the rings, and then added 3 rails across the rings for the pot support. I can put my full weight (~170lbs) on the outer edge and there is no flex, and the whole thing is quite stable.

In the pic here it only has the original centered tube, and a test shelf. This was the first attempt, a ring welded to a plate, which was welded to the ubolts, but the anlge style is better. I'll be using this one as well. I have a second plate that I used for the chugger pump shelf, along with ubolts.
The extra tube was added alongside this one, against the 'back' rail. I also added adjustable feet since my floor is not adjusted.

I will add more details, probably next week as I'm tied up with other DIY stuff for a while. A 4 day dock rebuild at my fathers place in MD, and melting bronze at Chesapeake Bay Maritime Musuem on friday! Can't wait. My first chance to melt with them since I built the foundry for them last winter. Thumb screws for a 1888 Lawley racing Cutter, and custom pump mounts for my boat engines are the parts I'm casting.

BrewingTree2.jpg
 
Thats perfect, thanks! I'm going to have to find a local welder to help me out with this I think. Right now I'm using tables and chairs stacked at different levels.
 
I would love to hear a followup on your mash basket. I had (what I thought was) a brilliant idea to hybrid BIAB with a standard mash tun, but I wanted to see if anyone had done it first.

I'm planning an all electric build using Sanke kegs and I was thinking of doing something similar to what you had. The only difference I was planning was to lift the basket out of the mash water, then pump in the sparge water and let it drain directly into what is then the BK.

Did it end up working well or did you abandon the idea?
 
I did several brews with it starting just before National Home brew Day last year. Initially I was doing it as BIAB then changed to RIMS. I never got great efficiency, had a couple stuck drains, but it worked. A coarser mesh might have been better. The thing I had to watch closely was that the liquid level between the basket and pot wall would drop and the RIMS would suck air. I usually had it set in 10-15 min.
Just upgraded to a 10 gal mash cooler with false bottom, and only 2 brews so far. Again the RIMS flow is the thing to watch.
 
Yeah, I was thinking that the mesh you used seemed small. I was thinking of using the standard 3/32" or 1/4" perforated stainless that is typically used for false bottoms.

No idea if this harebrained scheme would work. I may have to be the guinea pig. I'm going to have more volume than you outside the mash which should help the pumping situation, but may make mashing difficult. I'm not sure.

I would love to be able to do a 1/2bbl keggle + 1/4 BBL HLT system. It would be so compact and simple. :drunk:

The mesh I started with was for a Hop screen basket, so I wanted a fine mesh. Then I made the mash basket, and tried this same mesh, since I had plenty. As I noted at some point in the past a slightly coarser mesh would have been better, but it worked once I uderstood the nuances of it.

Having a greater gap around the basket won't help. It's all about how well the liquid can exit the mesh as compared to the pump flow. With the basket you depend on gravity to keep the level high enough to prevent air being sucked in. In a closed system, a mash cooler with false bottom for example, you can create a negative pressure and suck the liquid through without risk of air getting sucked in.

If you can seal, or nearly seal the bottom of the basket over the outlet, then you might have much less concern for sucking out the liquid from the gap around.
 
Back
Top