Inkbird 106vh

Homebrew Talk - Beer, Wine, Mead, & Cider Brewing Discussion Forum

Help Support Homebrew Talk - Beer, Wine, Mead, & Cider Brewing Discussion Forum:

This site may earn a commission from merchant affiliate links, including eBay, Amazon, and others.

Action

Well-Known Member
Joined
Jan 24, 2008
Messages
68
Reaction score
5
Location
Valley Springs, Ca
I am building an HLT with a 2000w 120v element. Thought I was going to use an Inkbird ITC 308 I have...wrong only rated to 1000w. So I have an Inkbird ITC 106vh and a ssr-40da. I am wanting some help wiring this thing. I only want an on/off switch and and a plug for cord to element. Pretty simple I know. This is just not my strong point. I did search and read 100's of pages but didn't really find what I was wanting.
Thanks for any help.
Jack
 
Thanks.....That is pretty much what I want......My PID wires a little different but I think I got it now. Just need a boxto see if it works.
Thanks
Jack
 
Thanks......Still looking for a box to put it in.
Jack
the 12x12x8 plastic electrical enclosures at the home depot or lowes work very well.Ive used them many times... under $40 too and easy to cut holes into. the enclosure in the thread linked above is the 6 or 8" version of the one im talking about. that ones like $16
 
I just built a 240v 5500watt system with that PID controller and just brewed my first beer with it.
Seems to work pretty good but had to buy a separate thermocouple to fit into the thermowell that came with my BruGear kettle.
Seems to work great, used a 12v Lamp for the fire light and with help from my brother-in-law found out that I needed to send power through the alarm switch to the alarm light/speaker. Worked great, except I had adjusted the thermocouple settings for mashing temperatures and now need to crank it up to 218 to keep it in a rolling boiling state. It doesn't leave the element on all the time which I like. The instructions suck but I am sure that there are others here that use this controller and can help out getting it setup.
The thermocouple should be adjusted to never read higher than 212 so its reading temps correctly all the time unless somethings wrong with it. (its tough to tell if it is now by your statement if this is the case)
If your pid has the manual /pwm mode thats the mode you use for the boil not pid mode..(the 106vh does have this mode I believe) The only way you'll get a steady boil in pid mode is if you set it to like 213 degrees or so and then the boil will be too powerful for most people with too much boiloff for 5 or 10 gallon brews.=since it will be at full 5500w power all the time.

I actually have one of these pids that inkbird sent me a while back but I havent had any projects since to use it in. I'll look through the directions and see if I can figure out how to toggle between pwm and pid mode... most of my pid experience has been "mypin" based.
 
Last edited:
@augiedoggy were you able to translate the Chinese into English and figure out how to just turn it on to boil? The reason I had to use 218 degrees was the thermocouple was set for the 153 degree range and seems to then vary 6 degrees as I reached boil temp. I checked the temp with my digital thermometer and it was reading 211.8 range with the controller set up at 218. I probably need to get a better thermocouple. I am looking at one on Auber Instruments that comes with the 1.5" TC connection.
I actually kind of like it firing on and off to keep it at that temp though. Then it doesn't seem like it would scorch the wort as easily. The object is to cook the hops and other add ins but also boil off some of the water to get your initial specific gravity up. Maybe not a good idea for the SSR to use it like that though.
The instructions have some nice features that I haven't a clue on how to program it to do it. Maybe somewhere there is a thread that explains this controller better. Maybe we can have a separate thread for all the different controllers that we use and PIN them to the top for us to help each other know how to use our respective controller better.
 
pwm mode at say 75% will give you a great even steady boil and since the element would only be on for 75% of every second the surface wouldnt be as hot and it would be less likely to scorch vs being on solid
I havent even had a chance to pull out the direction yet.

a sticky for the different controllers is a good idea but there are many of them.

if its a tc based pt100 rtd (better than thermocouple) this may be a good option, im ordering some for my 3 bbl brewery.
https://www.ebay.com/itm/Tri-Clamp-...hash=item3af1863d57:m:mTTq-5qwPOpefFX7RqAmjMg
 
if its a tc based pt100 rtd (better than thermocouple) this may be a good option, im ordering some for my 3 bbl brewery.
https://www.ebay.com/itm/Tri-Clamp-...hash=item3af1863d57:m:mTTq-5qwPOpefFX7RqAmjMg

Thanks, I just order one as well. That is half the price I saw it elsewhere. I will also check out the PWM mode and set it for 75% or just select that mode. I think if each person that has a different controller start a thread on that controller then we all can pitch in and add info.
 
Why would the rating of the PID matter for your element? You don't want 1000w going directly to the PID. The load goes through the SSR that the PID uses to control. As long as you're using the proper fuses in your circuitry, this would protect the PID from damage. I have seen people use this inkbird PID to control their lead pot temp for making bullets!

edit: oh, sounds like the element is the problem. But for an HLT a 1000w element should be just fine.
 
Last edited:
Why would the rating of the PID matter for your element? You don't want 1000w going directly to the PID. The load goes through the SSR that the PID uses to control. As long as you're using the proper fuses in your circuitry, this would protect the PID from damage. I have seen people use this inkbird PID to control their lead pot temp for making bullets!

edit: oh, sounds like the element is the problem. But for an HLT a 1000w element should be just fine.
the inkbird temp controller hes talking about in the first post is a prewired hysteresis temp controller wired up to control regular 120v 15amp plugs and only supports like 10-12amp I believe (meant for a fridge not fast switching)... Its not a pid at all and doesnt even use an ssr... They use mechanical relays so those that use them for something like this (120v rims) just use them until the mechanical contacts burn up and toss them I guess.. It also has no pwm mode for an even boil if it were to be use for boils.

1000w is small for a hlt it will take much much longer vs 2000w element. and they are not exactly easy to pick up for this type of use since most are 1200w and higher.
 
Last edited:
I too have not been able to figure out manual mode for output %. if anyone has the correct info on how, I would appreciate it.
 
the inkbird temp controller hes talking about in the first post is a prewired hysteresis temp controller wired up to control regular 120v 15amp plugs and only supports like 10-12amp I believe (meant for a fridge not fast switching)... Its not a pid at all and doesnt even use an ssr... They use mechanical relays so those that use them for something like this (120v rims) just use them until the mechanical contacts burn up and toss them I guess.. It also has no pwm mode for an even boil if it were to be use for boils.

Edit: I see where the confusion is now. He was referring to the 308 rating, not the 106VH.
 
Seems to work pretty good but had to buy a separate thermocouple to fit into the thermowell that came with my BruGear kettle.

Ya know there are cheap bushings you can get (such as 1/2" to 1/4") so that you can install a thermocouple into a coupling of a larger diameter.
 
Ya know there are cheap bushings you can get (such as 1/2" to 1/4") so that you can install a thermocouple into a coupling of a larger diameter.
The thermocouple was metric and thermowell was 1/2" NPT. Couldn't find it an adapter like that at Lowes and didn't trust buying it online. So I bought a plastic 1/2" to hose barb, cut off the hose barb and drilled and tapped it for 8mm. Boom, custom water proof adapter. :)
 
did you fill the space between the thermoprobe and thermocouple with thermal paste? if you have plastic insulating it now its going to have a large delay in reading temps and be very slow to respond.

I threw away my thermocouple and bought cheap pt100 RTD's when I started those too had metric (M8 threads) so I just drilled a smaller hole to match and mounted the probe right in the kettle wall with an oring.

most 1/2 npt probes that people use are designed (and work more effectively) to be mounted directly in a hole in the kettle wall they already have the thermocouple built in.
Yes, three tubes of it. I wanted to use the thermowell that came with the Bru-Gear kettle. I have another one coming that has the 1.5" Tri Clover adapter built in.
 
Digging this thread back up—

I have one of these for my HLT and can’t get the thing configured correctly if my life depended on it [emoji13]

What are the key configs I have to watch for when pairing this with a PT100 RTD Probe?
 
Just to make sure I’m not missing the other side of this equation, here’s a couple photos of the wiring:

IMG_7855.JPG


IMG_7854.JPG
 
Still quiet?

Ok, here are the settings I have the PID configured to now:

1P:
- Sn: Pt
- SC: 0.0
- dL: 0.

oP:
- Ctrl: PId
- H - C: Heat
- run: Auto

ALP:
- Mode: 0
... All alarm settings at default ranges since I don't use this
- dF: 0.3
- dISP: on

PId:
- CtL: 1
- P: 50.
- I: 30
- d: 8

unIt: F

And the manual I've been using for reference:
- http://pmod79883.pic31.websiteonline.cn/upload/0bk4.pdf

I'm sure there's something super obvious I'm missing here..! Any help is very much appreciated!
Let me turn mine on and go through the settings. Are you not getting a good temperature showing up? If not then might be a different probe type.
 
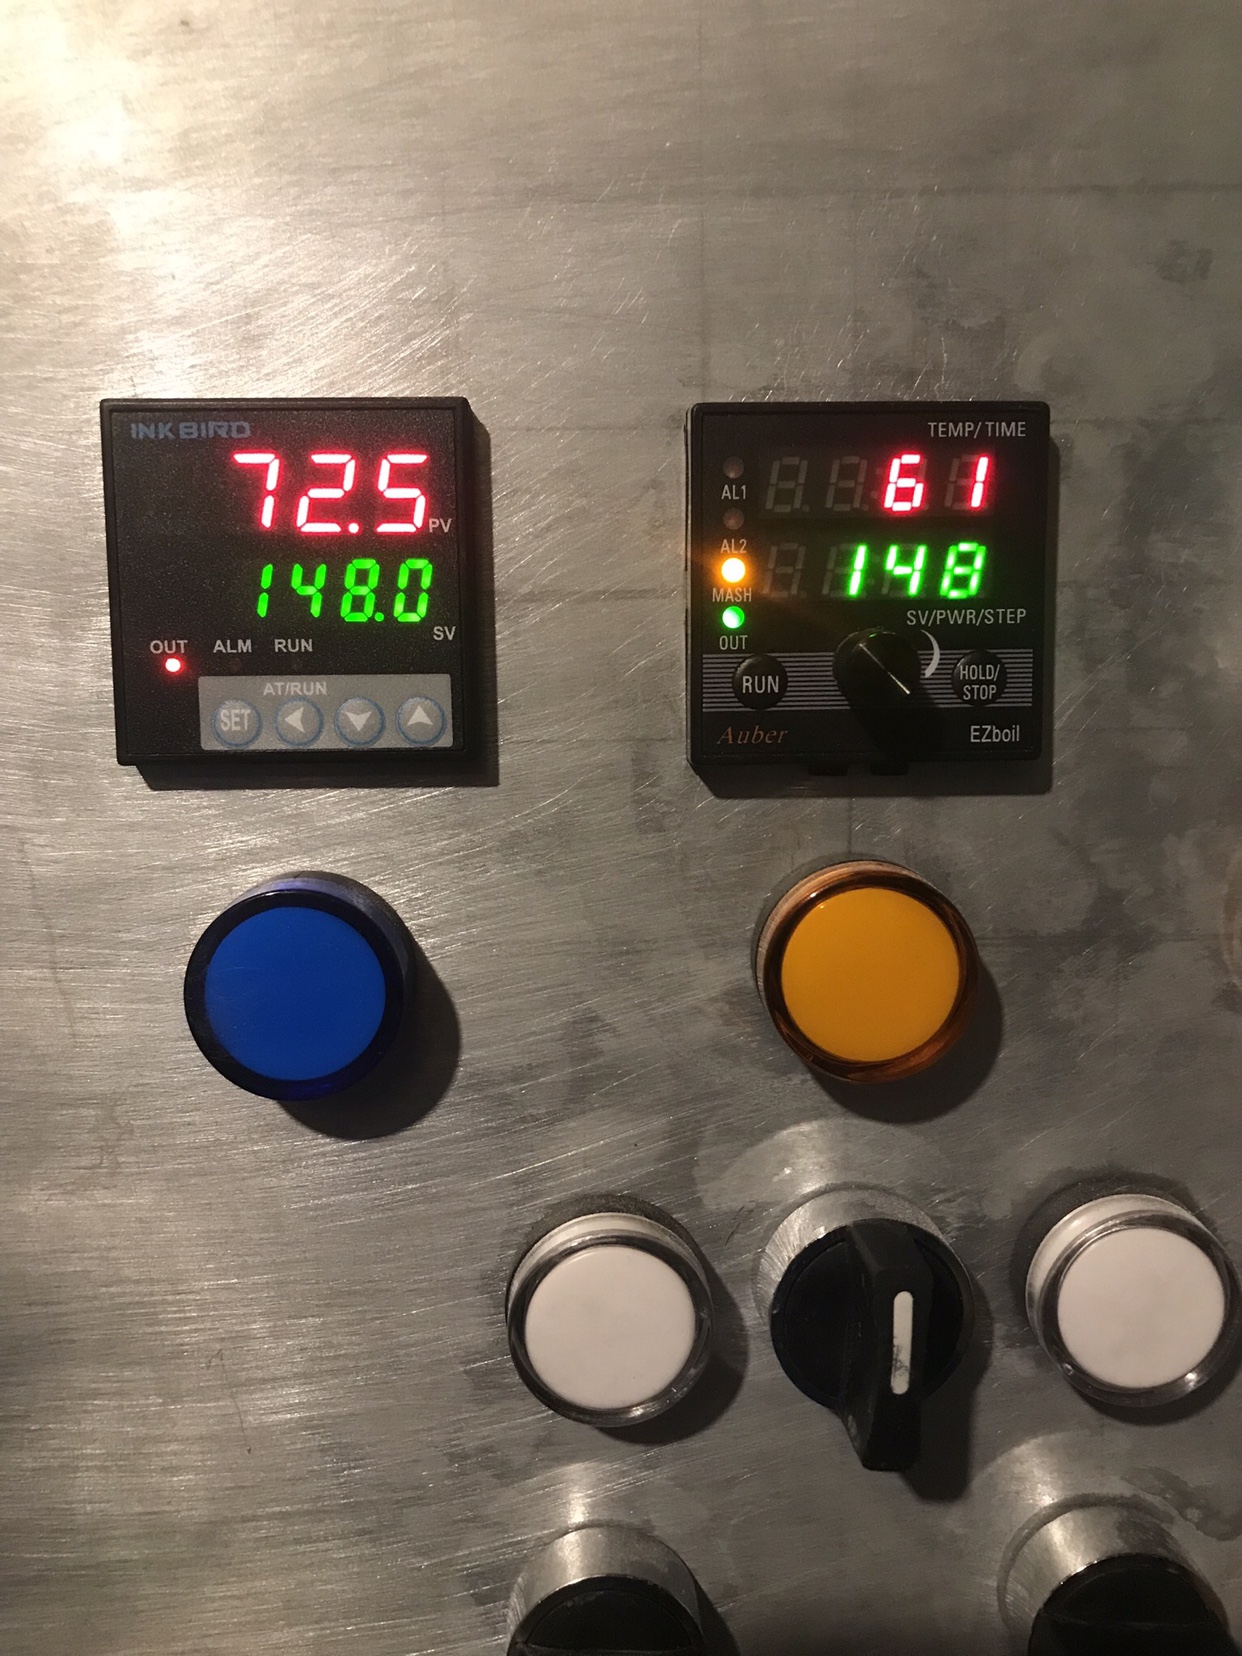
So the readings appear to be consistently inaccurate and it gets even worse as I try to get towards strike temps...

Here’s a quick side by side example next to the EZBoil used for mashing (FYI - my basement is unfinished and cold, 61F is definitely a more reasonable ambient temp):

IMG_7861.JPG
 
Last edited:
So the readings appear to be consistently inaccurate and it gets even worse as I try to get towards strike temps...

Here’s a quick side by side example next to the EZBoil used for mashing (FYI - my basement is unfinished and cold, 61F is definitely a more reasonable ambient temp):

View attachment 615814
1p
Sn=Pt
SC=-6.5
Dl=0

Op
Crtl=Pid
H-C=Heat
Run=auto

ALP
Mode=1
HiAl =154
LoAl=-1999
DHAL=9999
DLAL=9999
dF=0.3
dISP=oF

PID
CtL=2
P=50
I=30
D=8

Unit
F
 
I think this is the setting to adjust it so it reads the correct value. SC=-6.5 Mine is a minus 6.5 degrees, you would need to adjust yours to minus 11. I would use a good handheld digital thermometer and adjust both PIDs.
 
I think this is the setting to adjust it so it reads the correct value. SC=-6.5 Mine is a minus 6.5 degrees, you would need to adjust yours to minus 11. I would use a good handheld digital thermometer and adjust both PIDs.

This is correct

IMG_2640.jpg


SC is Sensor Correction or Sensor Calibration
You need to put a calibrated thermometer and the sensor in a reference temp. I use an ice water bath because it should be 0 c/32 f once it's been stirred and the liquid is homogeneous

If you put that RTD in a glass of ice water and it reads 45 and your calibrated thermometer confirms 32, you need to set SC to -13
 
Back
Top