I was trying to get that gliphy thing working but ....
Last edited:


I've tried to upgrade my BPI and used doUpdate.shAnnouncing: BrewPi Bug Squashing Realease 0.5.4.1

I've tried to upgrade my BPI and used doUpdate.sh
The scripts was execute well but I did not reprogram the arduino at the end because I'm using the brewpi-arduino-uno-i2c-0.2.12.hex version.
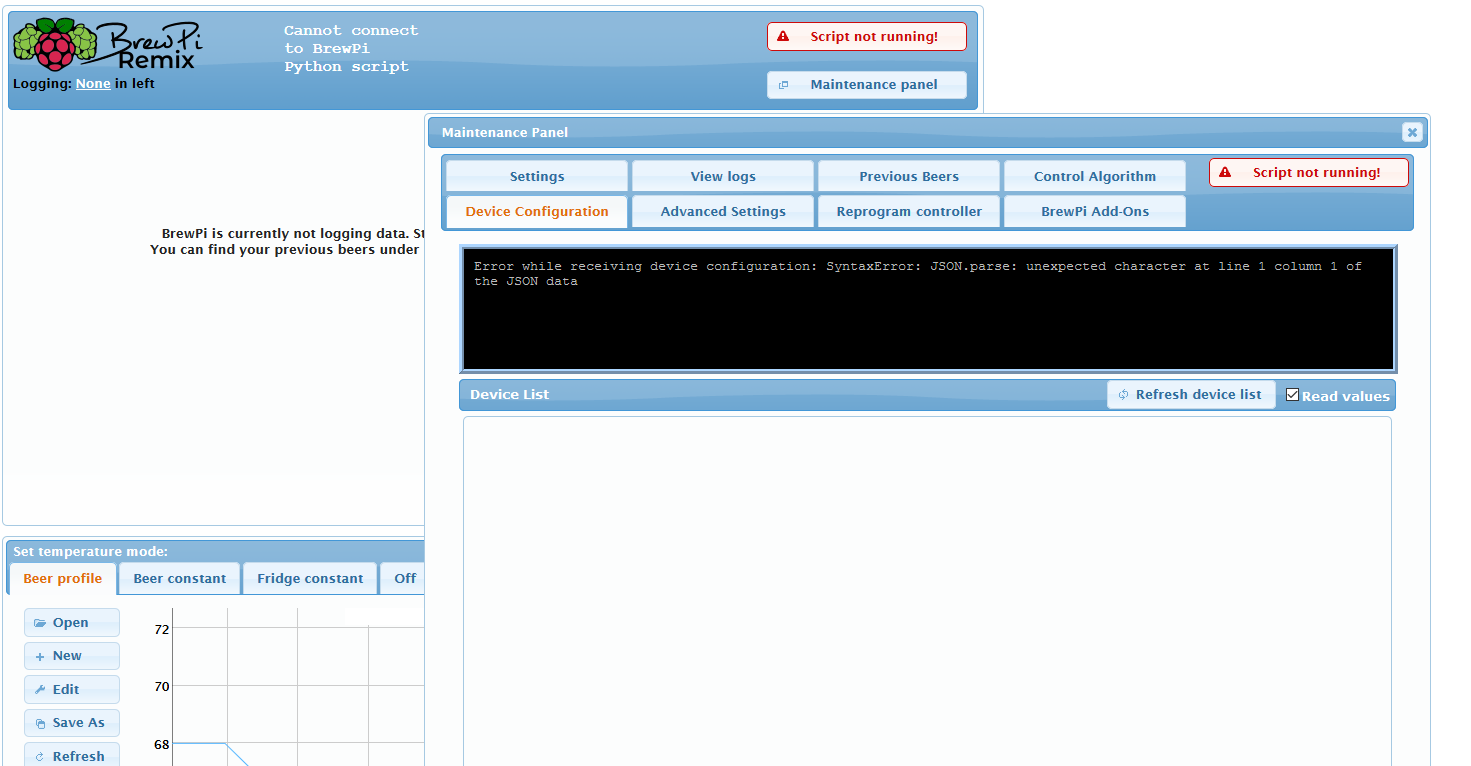
But now I'm unable to get the script running (see screenshot)
View attachment 660367
I tried to reprogram the arduino with XLoader but it still doesn't work.
Also notice that it upgraded to version 0.5.4.0 not 0.5.4.1
Did I do something wrong?
sudo /home/brewpi/utils/doPerms.sh$ sudo /home/brewpi/utils/doPerms.sh
***Script doPerms.sh starting.***
Fixing file permissions for /var/www/html/chamber1.
Fixing file permissions for /home/brewpi/chamber1.
Allowing BrewPi python access to Bluetooth interfaces.
Checking user accounts.
***Script doPerms.sh complete.***sudo systemctl restart brewpisudo reboot nowcat /home/brewpi/logs/stdout.txt | nc termbin.com 9999
cat /home/brewpi/logs/stderr.txt | nc termbin.com 9999
journalctl -u chamber1.service -b --no-pager | nc termbin.com 9999https://termbin.com/h38z0.5.4.1 is scripts only so it will only show in the logs right now. The version given in the web page is currently only the WWW version.
To be sure, I'd have to see the logs, but you need to clear some space either way.
If you want to know the airlock is bubbling, you have seen Brew Bubbles, right? It's going to be a lot easier on your card space.
Once you get your space issue taken care of, here's sort of a catch-all method of remediating random "script will not start" issues:
From the Raspberry Pi command line:
The output should look like:Code:sudo /home/brewpi/utils/doPerms.sh
Then do:Code:$ sudo /home/brewpi/utils/doPerms.sh ***Script doPerms.sh starting.*** Fixing file permissions for /var/www/html/chamber1. Fixing file permissions for /home/brewpi/chamber1. Allowing BrewPi python access to Bluetooth interfaces. Checking user accounts. ***Script doPerms.sh complete.***
There should be no output here. If there is, let me know. Then:Code:sudo systemctl restart brewpi
This will reboot your Pi. When it reboots, refresh your web page and if the button in the top-right still says Script not running!, click the button (once) and it should start within 30 seconds.Code:sudo reboot now
This takes care of a lot of potential issues. If at the end of all this the script will not start, I need to see the logs. You can issue these commands and each will give you a link. Run these and send me those links:
You will get back a link from each that looks like this; share it here:Code:cat /home/brewpi/logs/stdout.txt | nc termbin.com 9999 cat /home/brewpi/logs/stderr.txt | nc termbin.com 9999 journalctl -u chamber1.service -b --no-pager | nc termbin.com 9999
Code:https://termbin.com/h38z
0.5.4.1 is scripts only so it will only show in the logs right now. The version given in the web page is currently only the WWW version.
To be sure, I'd have to see the logs, but you need to clear some space either way.
If you want to know the airlock is bubbling, you have seen Brew Bubbles, right? It's going to be a lot easier on your card space.
Once you get your space issue taken care of, here's sort of a catch-all method of remediating random "script will not start" issues:
From the Raspberry Pi command line:
The output should look like:Code:sudo /home/brewpi/utils/doPerms.sh
Then do:Code:$ sudo /home/brewpi/utils/doPerms.sh ***Script doPerms.sh starting.*** Fixing file permissions for /var/www/html/chamber1. Fixing file permissions for /home/brewpi/chamber1. Allowing BrewPi python access to Bluetooth interfaces. Checking user accounts. ***Script doPerms.sh complete.***
There should be no output here. If there is, let me know. Then:Code:sudo systemctl restart brewpi
This will reboot your Pi. When it reboots, refresh your web page and if the button in the top-right still says Script not running!, click the button (once) and it should start within 30 seconds.Code:sudo reboot now
This takes care of a lot of potential issues. If at the end of all this the script will not start, I need to see the logs. You can issue these commands and each will give you a link. Run these and send me those links:
You will get back a link from each that looks like this; share it here:Code:cat /home/brewpi/logs/stdout.txt | nc termbin.com 9999 cat /home/brewpi/logs/stderr.txt | nc termbin.com 9999 journalctl -u chamber1.service -b --no-pager | nc termbin.com 9999
Code:https://termbin.com/h38z
Lee, many thanks for your help! You are SUPER!!!!Lee I've send the links in a private conversation.
@day_trippr Thanks for the info. By default it is turned off so I probably set it on for testing and forgot to turn it back off.fwiw, I have a bunch of RPi's doing surveillance duty and if you go into the /etc/motion/motion.conf you can turn off all recording of images and video. You'll still need to find the (likely default) storage location (it's in the conf file) to delete the accumulated images/videos...
Cheers!
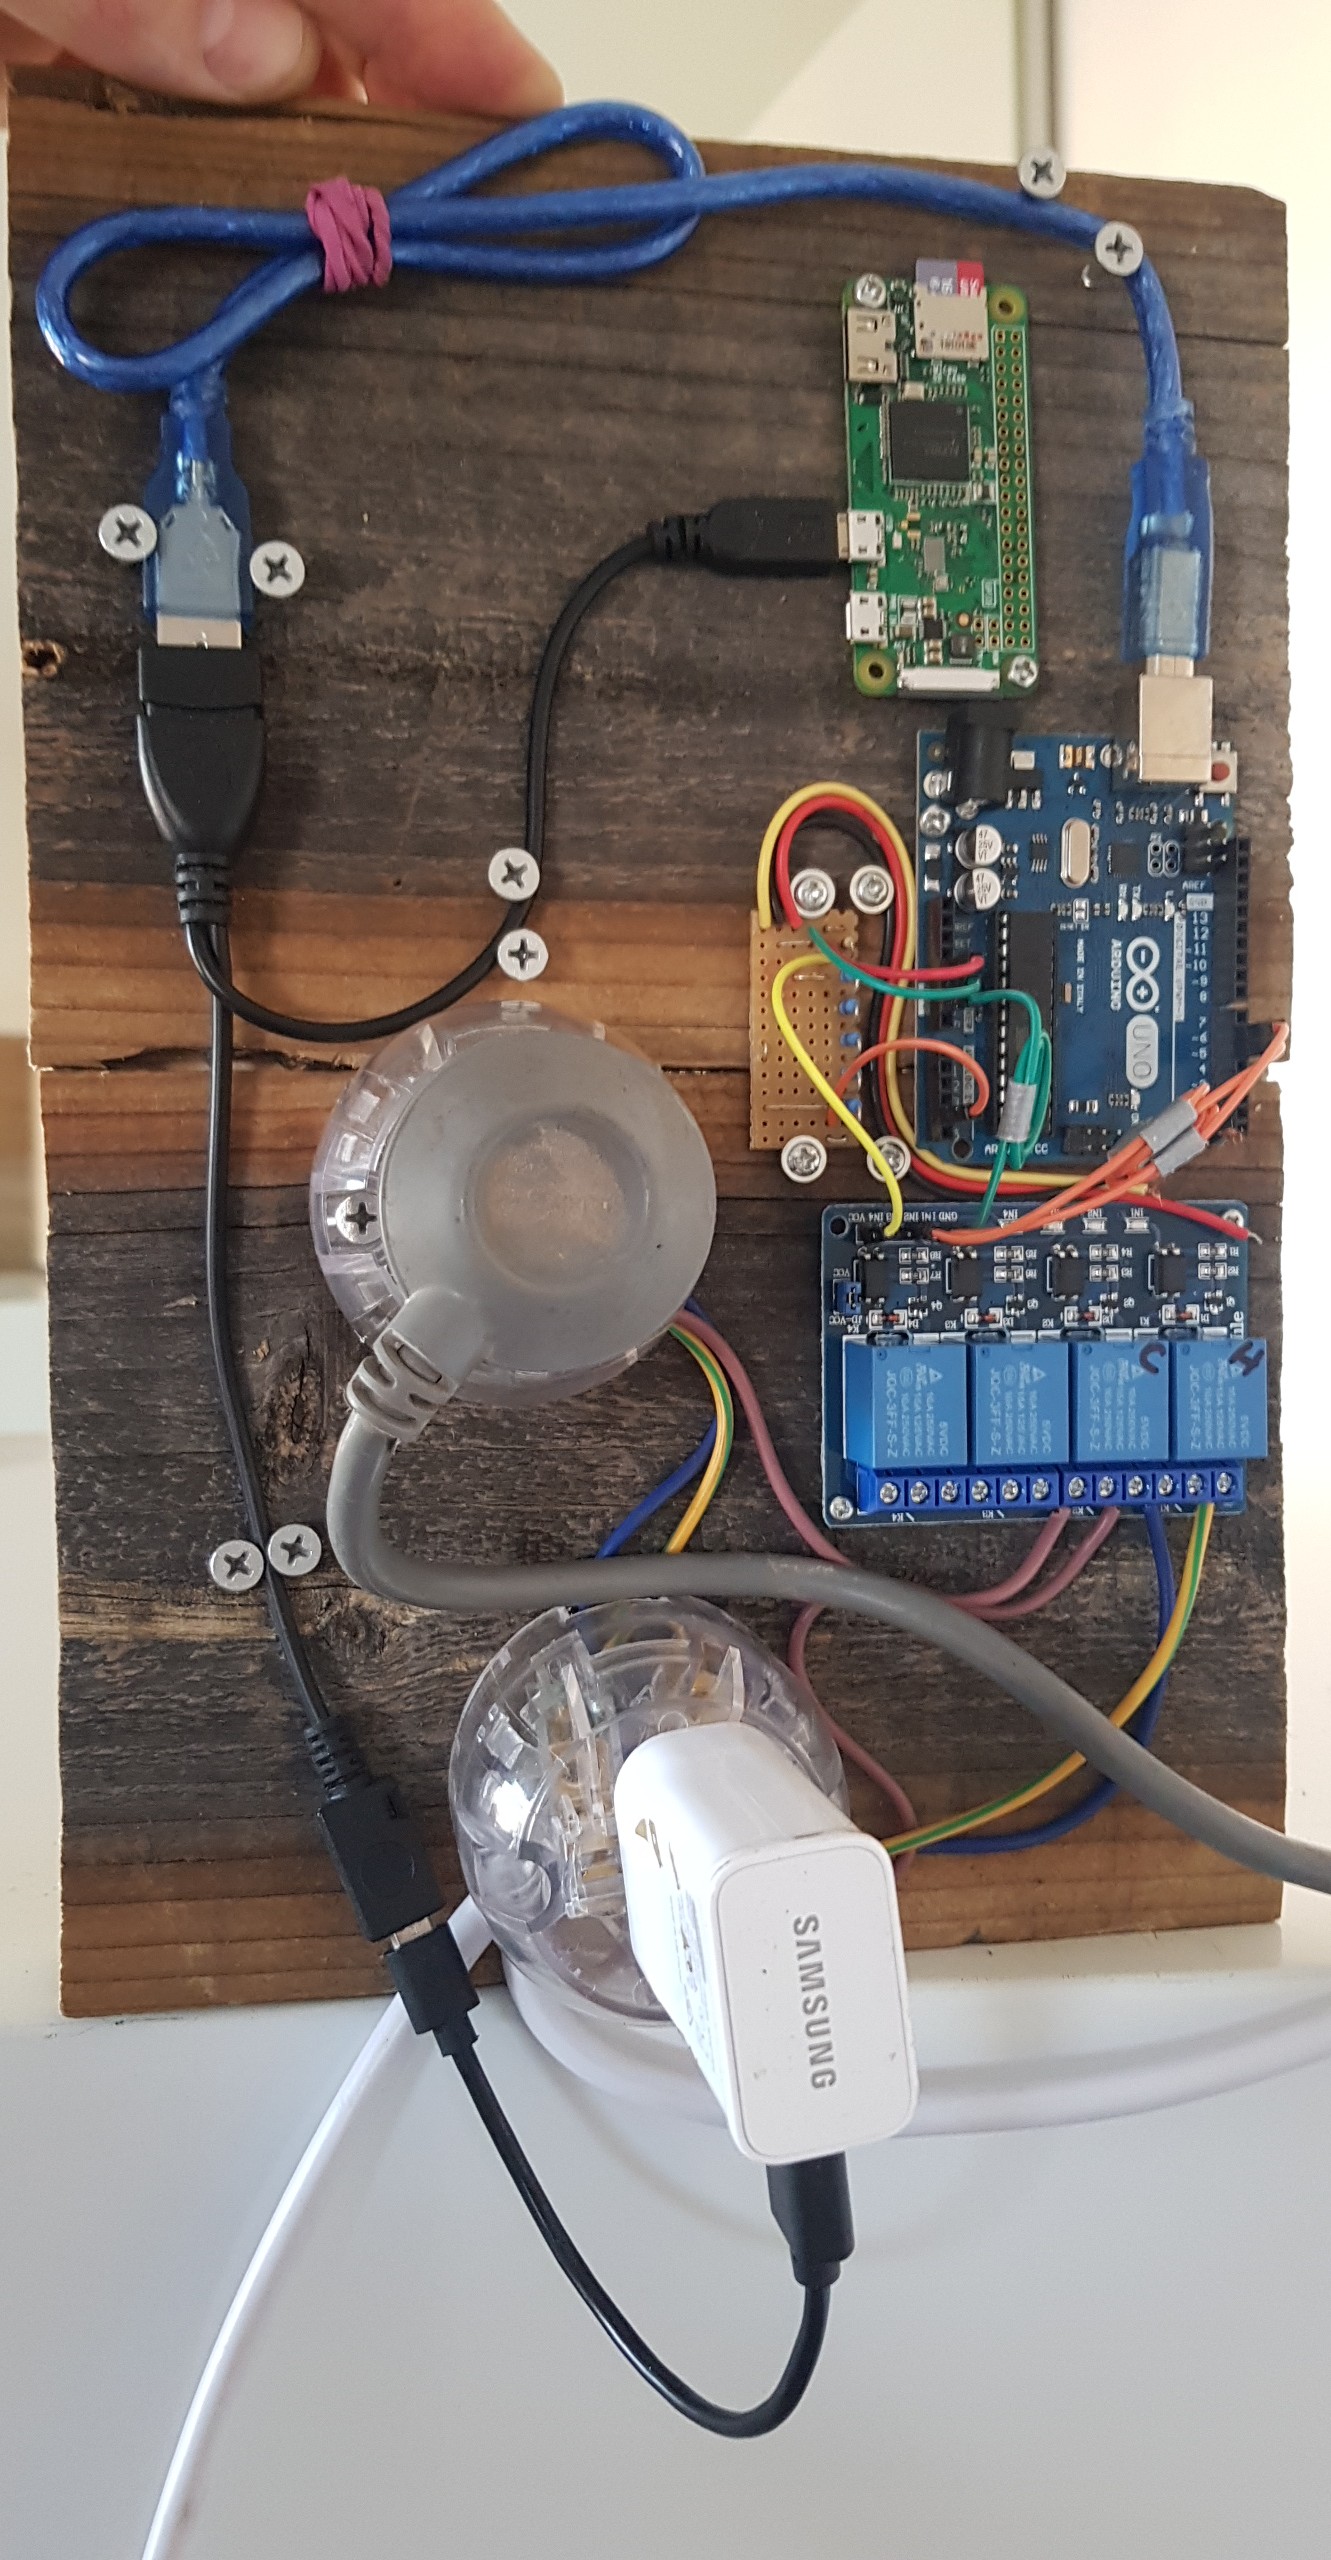
curl -L install.brewpiremix.com | sudo bashavrdude -F -e -pATmega328P -cArduino -b115200 -P/dev/ttyACM0 -U flash:w:"/usr/share/arduino/hardware/tools/avr/brewpi-arduino-uno-revc-0.2.12.hex" -C /usr/share/arduino/hardware/tools/avrdude.confI would check the 5V on the Uno clone. How are you powering it? Via its power socket or via USB?
When a ds18b20 comes out of reset it'll read 85°C/185°F - the reason some folks see spikes in their plots at that temperature is most often due to less than great power to the Uno and thus the sensors which will go through reset if the voltage sags enough...
Cheers!
Has he checked for ds18b20 running in parasitic mode?I will never say never, but software seems unlikely. There have not been any changes to that portion of the code since the original work, and it’s quite well baked. There are a lot of users out there without the problem.
That said, I have occasionally chased such a gremlin. To get to the basics, use the one wire connected directly to the Arduino and see if the problem goes away. It’s always possible that the breadboard you are using is bad in someway, the wires are not making a good connection, or some other strange issue.
Burning out a resistor seems a little far-fetched, but it’s worth changing a two cent piece.
#!File: /usr/lib/cgi-bin/test_sensors.py
#!Version: 20mar2014
#!Discover and test any DS18B20 temperature sensors
#!Run from user space (/home/pi)
#!/usr/bin/env python

import os
import time
import glob
import RPi.GPIO as GPIO

GPIO.setmode(GPIO.BCM)
comp_pin=25
GPIO.setup(comp_pin, GPIO.IN, pull_up_down=GPIO.PUD_DOWN)


#-------------------------------------------------------------------------------------------------------
# global variables
speriod=(15*60)-1

comp_high=55
comp_low=45

#-------------------------------------------------------------------------------------------------------
# get temperature
# returns None on error, or the temperature as a float
def get_temp(devicefile,devicenumber):

    try:
        fileobj = open(devicefile,'r')
        lines = fileobj.readlines()
        fileobj.close()
    except:
        return None

    # get the status from the end of line 1
    status = lines[0][-4:-1]


    equals_pos = lines[1].find('t=')
    if equals_pos != -1:
        tempstr = lines[1][equals_pos+2:]
        print "Read Sensor",
        print devicenumber
        print "Raw Data = ",
        print tempstr,
        tempvalue_c=float(tempstr)/1000.0
        print tempvalue_c, "Degrees C"
        tempvalue_f = tempvalue_c * 9.0 / 5.0 + 32.0
        print tempvalue_f, "Degrees F"
        tempvalue = round(tempvalue_f,1)
        print tempvalue, "Rounded"
        return tempvalue

    else:
        print "There was an error."
        return None


#-------------------------------------------------------------------------------------------------------
# main function
# This is where the program starts
def main():

    # enable kernel modules
    os.system('sudo modprobe w1-gpio')
    os.system('sudo modprobe w1-therm')

    print "Looking for W1_Slave Temperature Sensor Devices..."
    # search for a device file that starts with 28
    devicelist = glob.glob('/sys/bus/w1/devices/28*')
    print " "
    devicecount = len(devicelist)
    print "Number of W1_Slave Devices found:",
    print devicecount
    print " "
    for deviceindex in xrange(0,devicecount):
        print "Sensor " +str(deviceindex)+ " ID: " +devicelist[deviceindex]
    print " "
    if devicelist=='':
        return None

#    while True:

    # get the temperatures from the device files

    for deviceindex in xrange(0,devicecount):
        w1devicefile = devicelist[deviceindex] +'/w1_slave'
        temperature = get_temp(w1devicefile,deviceindex)
        if temperature != None:
            print "Sensor " +str(deviceindex) +" Temperature = " +str(temperature) +" F"
            print " "
        else:
            # Sometimes reads fail on the first attempt
            # so we need to retry
            temperature = get_temp(w1devicefile[deviceindex],deviceindex)
            if temperature != None:
                print "Sensor " +str(deviceindex) +" Temperature = " +str(temperature) +" F"
                print " "
            else:
                print "Error Reading Sensor " +str(deviceindex)


#        time.sleep(speriod)


if __name__=="__main__":
    main()

comp_state = GPIO.input(comp_pin)
print comp_state

if comp_state == 1:
    print "Compressor On"
    comp = comp_high
else:
    print "Compressor Off"
    comp = comp_low

print comp

GPIO.cleanup()I've never had a PAR probe, would he be able to see any PAR probe via the Device configuration panel?
I suggest hooking the probes up to the RPi, using 3.3V with the same 4.7K pull-up resistor to 3.3V.
ie:
Sensor red wire(s) to +3.3V (GPIO header pin 1 or 17)
Sensor black wire(s) to GND (GPIO header pin 6,9,14,20 or 25)
Sensor yellow (or white) wire(s) to GPIO4 (GPIO header pin 7)
Add a 4.7K ohm 1/8w resistor across GPIO header pins 1 and 7 (ie: between red and yellow/white wires).
Then run this python script and see what is reported:
Code:#!File: /usr/lib/cgi-bin/test_sensors.py #!Version: 20mar2014 #!Discover and test any DS18B20 temperature sensors #!Run from user space (/home/pi) #!/usr/bin/env python import os import time import glob import RPi.GPIO as GPIO GPIO.setmode(GPIO.BCM) comp_pin=25 GPIO.setup(comp_pin, GPIO.IN, pull_up_down=GPIO.PUD_DOWN) #------------------------------------------------------------------------------------------------------- # global variables speriod=(15*60)-1 comp_high=55 comp_low=45 #------------------------------------------------------------------------------------------------------- # get temperature # returns None on error, or the temperature as a float def get_temp(devicefile,devicenumber): try: fileobj = open(devicefile,'r') lines = fileobj.readlines() fileobj.close() except: return None # get the status from the end of line 1 status = lines[0][-4:-1] equals_pos = lines[1].find('t=') if equals_pos != -1: tempstr = lines[1][equals_pos+2:] print "Read Sensor", print devicenumber print "Raw Data = ", print tempstr, tempvalue_c=float(tempstr)/1000.0 print tempvalue_c, "Degrees C" tempvalue_f = tempvalue_c * 9.0 / 5.0 + 32.0 print tempvalue_f, "Degrees F" tempvalue = round(tempvalue_f,1) print tempvalue, "Rounded" return tempvalue else: print "There was an error." return None #------------------------------------------------------------------------------------------------------- # main function # This is where the program starts def main(): # enable kernel modules os.system('sudo modprobe w1-gpio') os.system('sudo modprobe w1-therm') print "Looking for W1_Slave Temperature Sensor Devices..." # search for a device file that starts with 28 devicelist = glob.glob('/sys/bus/w1/devices/28*') print " " devicecount = len(devicelist) print "Number of W1_Slave Devices found:", print devicecount print " " for deviceindex in xrange(0,devicecount): print "Sensor " +str(deviceindex)+ " ID: " +devicelist[deviceindex] print " " if devicelist=='': return None # while True: # get the temperatures from the device files for deviceindex in xrange(0,devicecount): w1devicefile = devicelist[deviceindex] +'/w1_slave' temperature = get_temp(w1devicefile,deviceindex) if temperature != None: print "Sensor " +str(deviceindex) +" Temperature = " +str(temperature) +" F" print " " else: # Sometimes reads fail on the first attempt # so we need to retry temperature = get_temp(w1devicefile[deviceindex],deviceindex) if temperature != None: print "Sensor " +str(deviceindex) +" Temperature = " +str(temperature) +" F" print " " else: print "Error Reading Sensor " +str(deviceindex) # time.sleep(speriod) if __name__=="__main__": main() comp_state = GPIO.input(comp_pin) print comp_state if comp_state == 1: print "Compressor On" comp = comp_high else: print "Compressor Off" comp = comp_low print comp GPIO.cleanup()
This code will not work with PAR probes afaik...
Cheers!
pi@raspi5:~ $ python test_sensors.py
Looking for W1_Slave Temperature Sensor Devices...

Number of W1_Slave Devices found: 5

Sensor 0 ID: /sys/bus/w1/devices/28-0118331d0eff
Sensor 1 ID: /sys/bus/w1/devices/28-0118333937ff
Sensor 2 ID: /sys/bus/w1/devices/28-01183319b4ff
Sensor 3 ID: /sys/bus/w1/devices/28-011833349cff
Sensor 4 ID: /sys/bus/w1/devices/28-0118331c11ff

Read Sensor 0
Raw Data =  21625
21.625 Degrees C
70.925 Degrees F
70.9 Rounded
Sensor 0 Temperature = 70.9 F

Read Sensor 1
Raw Data =  21562
21.562 Degrees C
70.8116 Degrees F
70.8 Rounded
Sensor 1 Temperature = 70.8 F

Read Sensor 2
Raw Data =  21562
21.562 Degrees C
70.8116 Degrees F
70.8 Rounded
Sensor 2 Temperature = 70.8 F

Read Sensor 3
Raw Data =  21687
21.687 Degrees C
71.0366 Degrees F
71.0 Rounded
Sensor 3 Temperature = 71.0 F

Read Sensor 4
Raw Data =  21625
21.625 Degrees C
70.925 Degrees F
70.9 Rounded
Sensor 4 Temperature = 70.9 F

pi@raspi5:~ $Detected 2 devices
Device 0 is a DS18B20
Device 1 is a DS18B20
Sensor 0 26.44
Sensor 1 26.56
Parasite power is: ON
Glad you got this far!
What errors are you getting flashing with avrdude?
You're right - the documentation is lagging. Since I basically forked the project and the original docs were limited, I often find myself neglecting some because it's not "all."I just got a BrewPI Remix installation running in January. I am looking for a brief description on how to get the Tilt Sensor integrated into BrewPi Remix since the release of version 5.4.1. I opted to include the Tilt Integration during the installation of BrewPI on my Raspberry PI V3 B+. But it does not appear to be tracking and I don't see a way to configure it under the Device Configuration. I have tried looking for this information, but all the information appears to be prior to the newest release of Remix. I assume that I need to connect the PI to the Tilt, but I don't have a clue where to start.
# wwwPath = /var/www/html
# port = /dev/ttyACM0
# altport = /dev/ttyACM1
# boardType = arduino
# startupDelay = 1.0
# debug = true
# tiltColor = Purple
# logJson = True
# scriptPath = /home/brewpi/sudo cp config.cfg.example config.cfgThe GUI has always been iffy. I'll get back to that one of these days. If avrdude is not working, certainly the script will not. Seeing the output would help.With the BPR GUI, when I attempt to upload the .hex file it just hangs. No output occurs in the bottom window. With avrdude over command line, it gives a stk500 and communication error. Sometimes it says it times out. I will get you a proper output a bit later. The only way I was able to get the .hex file on was with HEXtoArduino.
The GUI has always been iffy. I'll get back to that one of these days. If avrdude is not working, certainly the script will not. Seeing the output would help.
pi@raspberrypi:~ $ sudo avrdude -F -e -p atmega328p -c arduino -b 115200 -P /dev/ttyACM0 -U flash:w:"brewpi-arduino-uno-revc-0.2.12.hex"

avrdude: AVR device initialized and ready to accept instructions

Reading | ################################################## | 100% 0.00s

avrdude: Device signature = 0x1e950f (probably m328p)
avrdude: erasing chip
avrdude: reading input file "brewpi-arduino-uno-revc-0.2.12.hex"
avrdude: can't determine file format for brewpi-arduino-uno-revc-0.2.12.hex, specify explicitly
avrdude: read from file 'brewpi-arduino-uno-revc-0.2.12.hex' failed

avrdude: safemode: Fuses OK (E:00, H:00, L:00)

avrdude done. Thank you.Do you get the same results when running updateFirmware.py?Here is the output I get when I try to run the avrdude command.
sudo avrdude -F -e -p atmega328p -c arduino -b 115200 -P /dev/ttyACM0 -U flash:w:brewpi-arduino-uno-revc-0.2.12.hex:ipi@raspberrypi:~ $ sudo avrdude -F -e -p atmega328p -c arduino -b 115200 -P /dev/ttyACM0 -U flash:w:brewpi-arduino-uno-revc-0.2.12.hex:i
avrdude: stk500_getsync() attempt 1 of 10: not in sync: resp=0x54
avrdude: stk500_getsync() attempt 2 of 10: not in sync: resp=0x3a
avrdude: stk500_getsync() attempt 3 of 10: not in sync: resp=0x7b
avrdude: stk500_getsync() attempt 4 of 10: not in sync: resp=0x22
avrdude: stk500_getsync() attempt 5 of 10: not in sync: resp=0x42
avrdude: stk500_getsync() attempt 6 of 10: not in sync: resp=0x65
avrdude: stk500_getsync() attempt 7 of 10: not in sync: resp=0x65
avrdude: stk500_getsync() attempt 8 of 10: not in sync: resp=0x72
avrdude: stk500_getsync() attempt 9 of 10: not in sync: resp=0x54
avrdude: stk500_getsync() attempt 10 of 10: not in sync: resp=0x65
avrdude done. Thank you.That suggests the BrewPi script was still running.here is the new output adding the :i
Excellent! That means when I fix the UI method, it will work.Running updateFirmware.py seems to have run without an issue.
Enter your email address to join: