HOWTO - Make a BrewPi Fermentation Controller For Cheap

Homebrew Talk - Beer, Wine, Mead, & Cider Brewing Discussion Forum

Help Support Homebrew Talk - Beer, Wine, Mead, & Cider Brewing Discussion Forum:

This site may earn a commission from merchant affiliate links, including eBay, Amazon, and others.
Status
Not open for further replies.
hi guys,

I have been lurking for a while and have completed my controller build. Before I fire it up could someone confirm my resistor for the sensor probes will work as shown please.

I have limited experience with electronics!

http://flic.kr/p/qS6UVT

I look forward to your guys response and feedback. I'm still waiting for my probes to arrive any day now and I will be all but ready to get a brew in the fermenter.

Cheers
 
Last edited:
Looks like a 4.7K resistor from A4 to 5V, so that much looks just fine.
And I see the data connection to A4, the two actuators on IO5 & 6, and a least a GND connection.

Can't quite make out where your 5V connection to the probe(s) is due to the camera position, so check that and you should be good to go...

Cheers!
 
Awesome mate thanks for the reply!

I was hoping my logical thought on the resistor location was right. I haven't done many electronic projects - but it sure is fun.
 
My 2 Sensors are BEERTEMP slot-0 pin A4, and CHAMBERTEMP slot-1 pin A4. BrewPi is showing 3 termperatures - BEER, FRIDGE and "ROOM Temp"
Where is the Pi getting the data for the room temp. with NO third sensor ? :confused:
Thanks
 
Go into the Maintenance Panel - Device Configuration.
Click the little Read Values check box.
Then click the Refresh device list button.

In the Installed devices section (top half) find the ghost probe that's assigned as Chamber device - Room Temp.
It should be the one that has a null Value, but in any case, change the Function from Room Temp to None and click Apply.

Repeat the Refresh device list and see if it's gone...

Cheers!
 
Pleople, I done the implementation as shown on attached, but after some hours, the raspberry freeze and stop to collect data and does not implement the programmed beer temperature as set. My doubt is what can doing this: the temperature of inclousure and bad power sourse. I am not sure that the power sourse to RPi is good, but the previous weird characters on lcd, apparently, is solved.

View attachment 1421831351122.jpg
 
Questions, questions!

Will this LCD work if I order it from ebay:

NEW 2004 204 20X4 Character LCD Display Module Blue Blacklight for Arduino New

http://www.ebay.ca/itm/NEW-2004-204...5518pt=LH_DefaultDomain_0&hash=item20f33d9e4d

Should I purchase any other wires to make wiring this easier? I'll likely order some male connectors for the Arduino/breadboard connections.

If I need to run two Arduinos from a single Pi should I get power supplies for the Arduinos or will the Pi be able to handle that?

Also curious how everyone mounts these components in project boxes. I picked up a project box large enough to house two controllers but I'm not sure how to go about placing everything in the box. Glue? Screws? Ties?
 
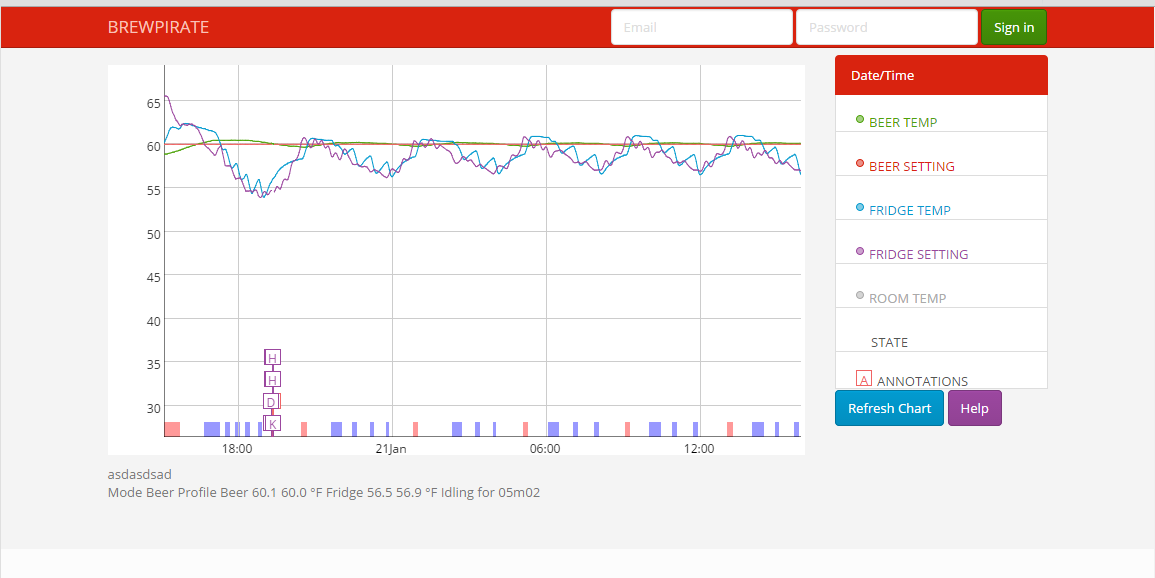
Thanks for the build out instructions, I am currently rewriting the brewpi interface to use the bootstrap framework and look good on any device. Also adding user level support for and some other more advanced functions, here is a screenshot of the work on my laptop and desktop.


Bootstrap - Desktop
First go at converting BrewPi to bootstrap, will have custom color scheme selector and user login for administration.

XmsEBcw.png


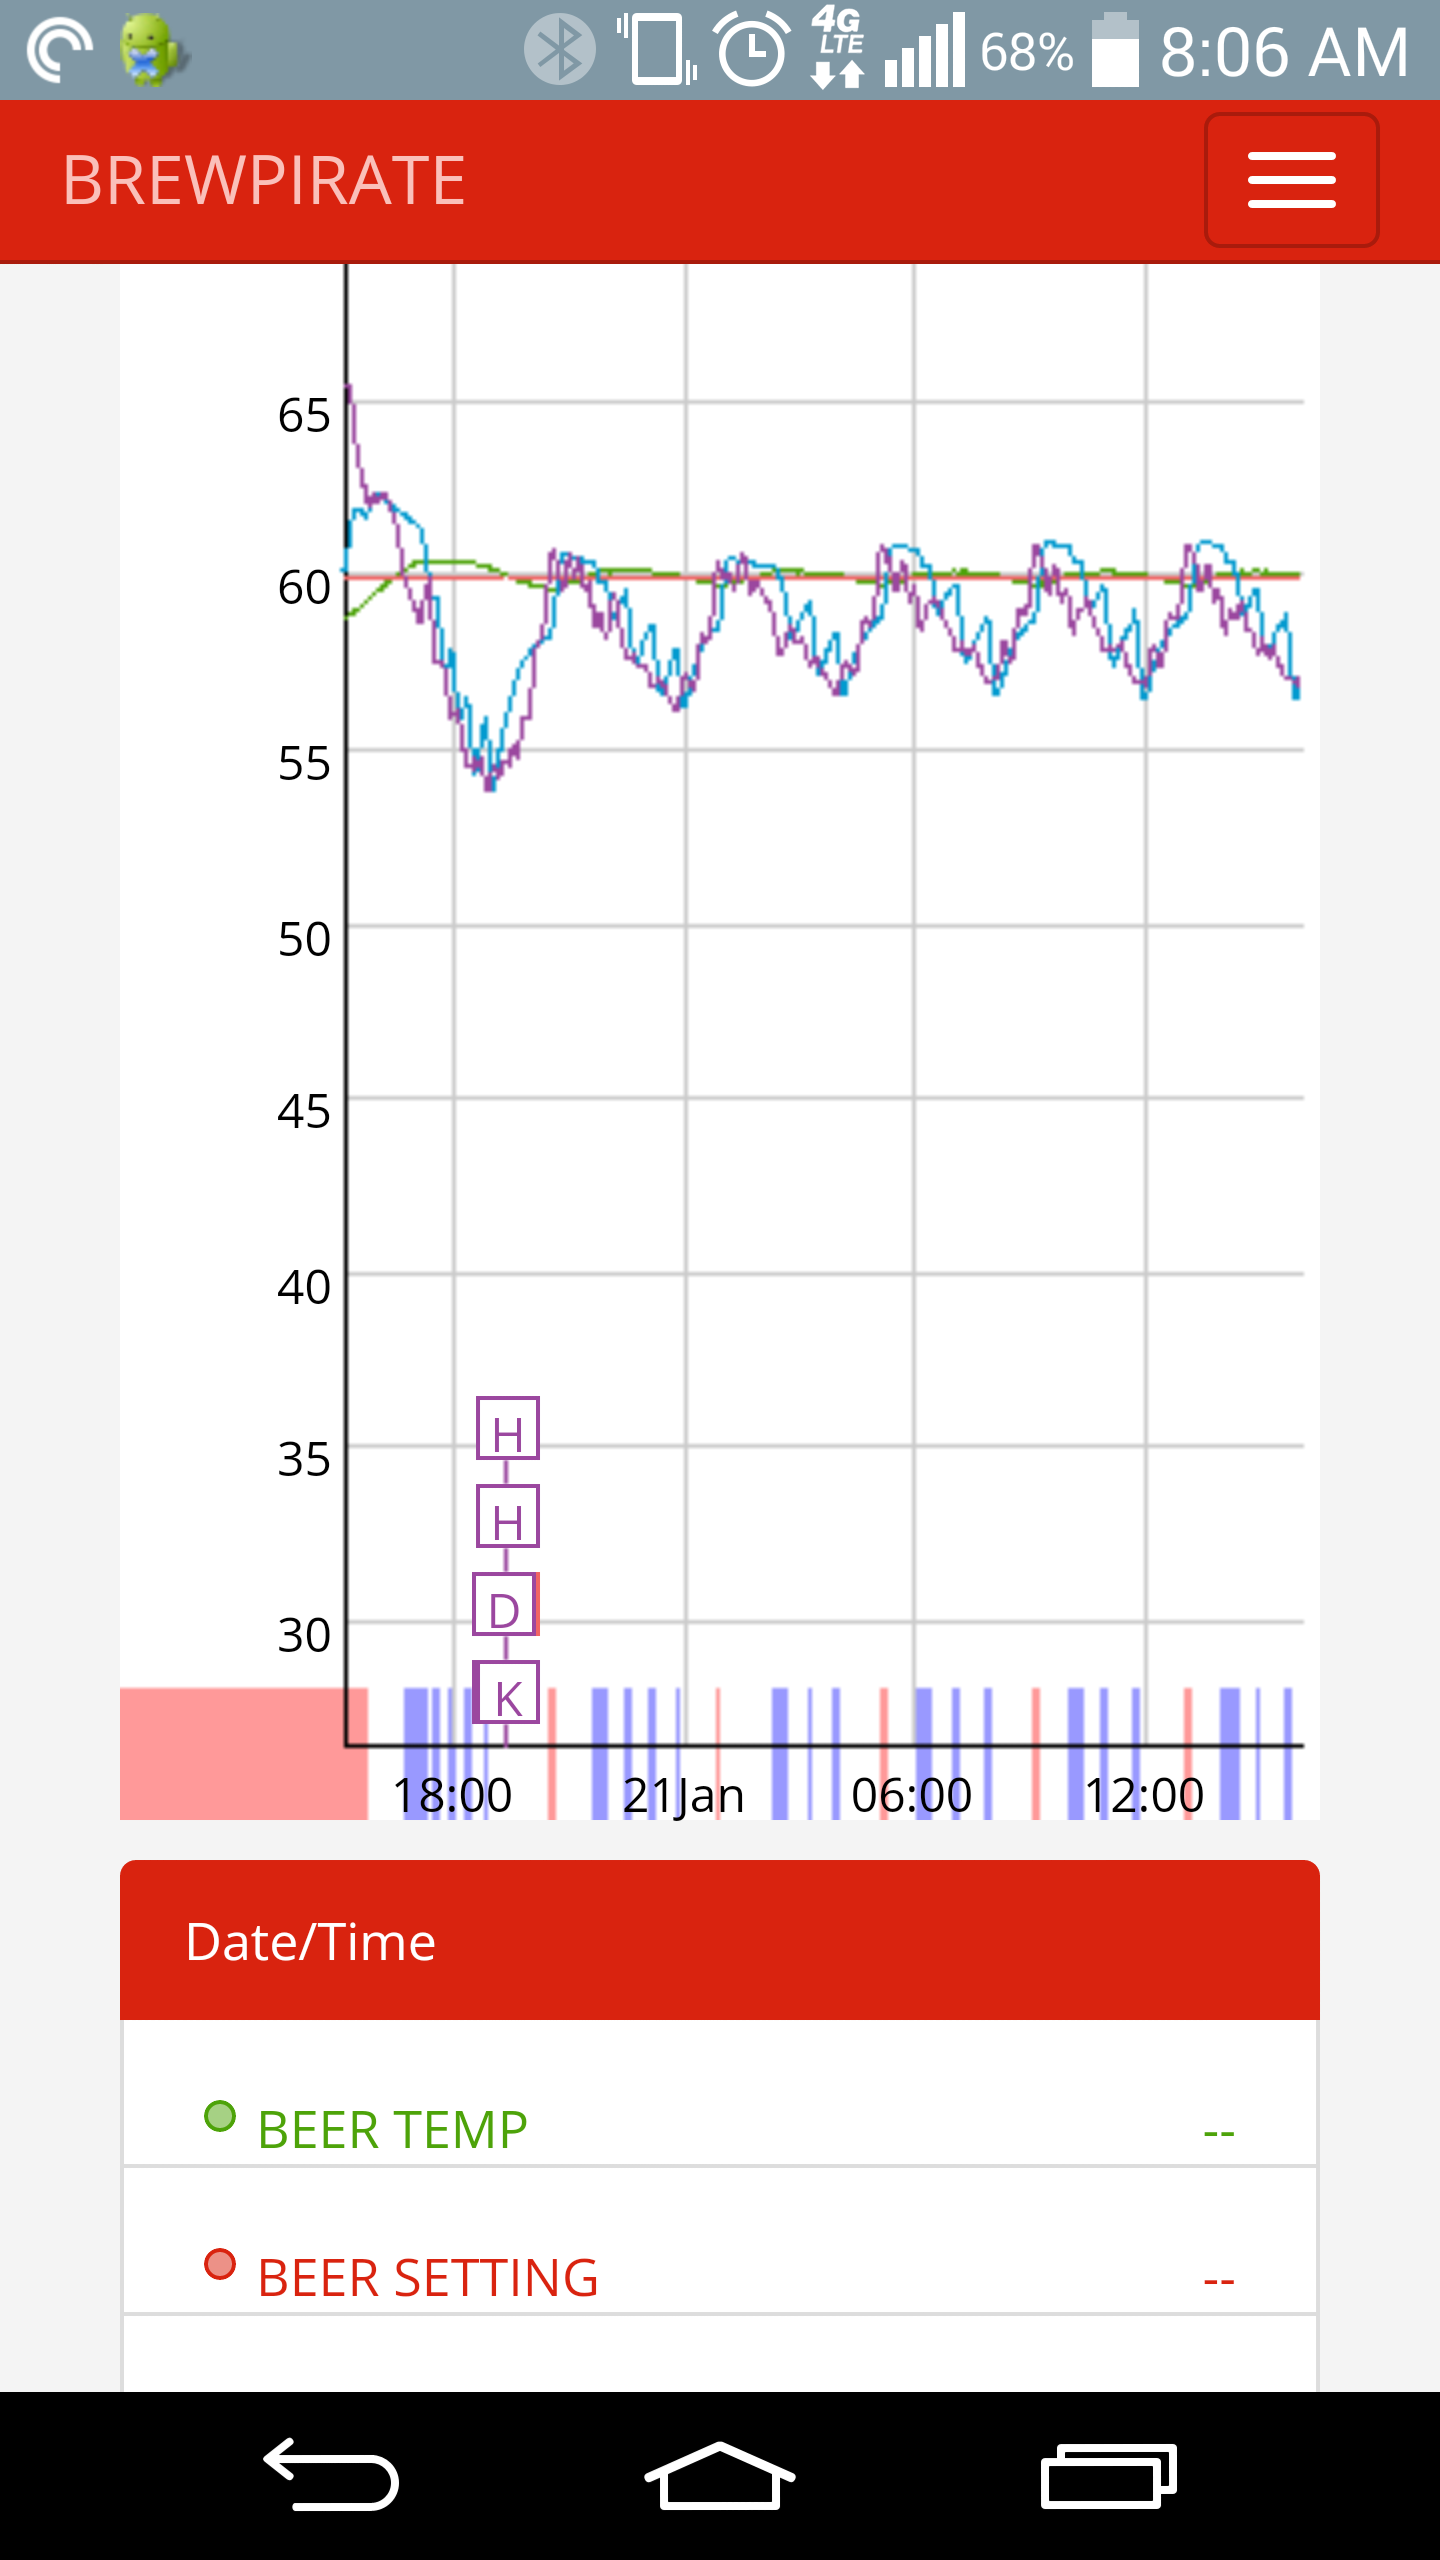
Bootstrap - Mobile
Brewpi on the phone, not perfect but its a start.

xnhTEAv.png
 
Questions, questions!

Will this LCD work if I order it from ebay:

NEW 2004 204 20X4 Character LCD Display Module Blue Blacklight for Arduino New

http://www.ebay.ca/itm/NEW-2004-204...5518pt=LH_DefaultDomain_0&hash=item20f33d9e4d

Your link didn't work, but this one has the identical wording in the title, and it's exactly the same description as the units I've been using.

Should I purchase any other wires to make wiring this easier? I'll likely order some male connectors for the Arduino/breadboard connections.

Dupont jumpers, for certain. Get a bag with all three gender combos.
Also the shift register IC, a variety of resistors and capacitors are needed to get the LCD working.

If I need to run two Arduinos from a single Pi should I get power supplies for the Arduinos or will the Pi be able to handle that?

Powering even one Uno via the RPi USB ports can be problematic. It's not something I'd recommend. There are ways to share power, but that's not a reliable one. The easiest reliable alternative is to get each Uno it's own 9VDC mini wall wart.

Also curious how everyone mounts these components in project boxes. I picked up a project box large enough to house two controllers but I'm not sure how to go about placing everything in the box. Glue? Screws? Ties?

The boards have holes suitable for mounting on small (4-40) stand-offs. A handful of the stand-offs with matching nuts and screws will do the trick (you can use nylon hardware of course).

The rest is a matter of floor-planning. Pretend you're building a kitchen ;)
There are lots of builds in this thread...

Cheers!
 
Pleople, I done the implementation as shown on attached, but after some hours, the raspberry freeze and stop to collect data and does not implement the programmed beer temperature as set. My doubt is what can doing this: the temperature of inclousure and bad power sourse. I am not sure that the power sourse to RPi is good, but the previous weird characters on lcd, apparently, is solved.

Happy to see your LCD is still solid.

If the RPi is definitely dead (the green activity led never blinks) the first thing I'd be checking would be power. The next would be to start pawing through /var/log/syslog to see if there's a hint therein.

Cheers!
 
I've been "away" from brewing and my brewpi for a while now. Just started up a new brew and now I cannot get the graph data to load anymore. I know some of you mentioned similar problems before. What was the fix. I am seeing permissions errors for config.cfg but after running the fixPeemissions.sh I still get nothing. Any ideas.
 
Your link didn't work, but this one has the identical wording in the title, and it's exactly the same description as the units I've been using.


Dupont jumpers, for certain. Get a bag with all three gender combos.
Also the shift register IC, a variety of resistors and capacitors are needed to get the LCD working.


Powering even one Uno via the RPi USB ports can be problematic. It's not something I'd recommend. There are ways to share power, but that's not a reliable one. The easiest reliable alternative is to get each Uno it's own 9VDC mini wall wart.


The boards have holes suitable for mounting on small (4-40) stand-offs. A handful of the stand-offs with matching nuts and screws will do the trick (you can use nylon hardware of course).

The rest is a matter of floor-planning. Pretend you're building a kitchen ;)
There are lots of builds in this thread...

Cheers!

Thank you! This is exactly what I was looking for.

I've never really played with electronics like this so the terminology is new to me. That being said there's one other thing I'd like to do with my setup to keep it neat and clean as possible. I'm looking to install inputs on the enclosure box, is this possible?

Like plug the sensors in, 9VDC plugs possibly the RPi power if I don't mount it on the outside.

I'm not really sure what I should be looking for to get this done - could someone point me in the right direction?
 
those look good.

ive been using my brewpi again. ive decided that im going to finish what i started. but im simplifying it up a bit. no more ds-2413s. ill save them for future brewpi builds. im just going to build the arduinos right into the fridge and use dupont connectors for everthing.
 
I bought these for the connectors for my temp probes and they're perfect for the one wire probes

http://www.aliexpress.com/item/20pa...791.html?tracelog=ae-app-ios-sharefor-shkmail

They work really well and are the same kind you get with the proper Brewpi.

I have one running into the top of my fridge splitting into two and then connecting to two probes in the chamber.

I'm not exactly sure what you mean by one wire probes.

I'm currently using DS18B20 Sensors which have 3 wires - can I solder it to these pins to make a pluggable interface?
 
Dupont jumpers, for certain. Get a bag with all three gender combos.
Also the shift register IC, a variety of resistors and capacitors are needed to get the LCD working.

Ordered a bag of Dupont jumpers and a couple shift registers but I'm not sure what I need for resistors and capacitors. The only thing I have is 4.7k Resistors from the original build without a LCD.

I searched through the thread somewhat and BrewPi's site but couldn't find anything.
 
Sorry yes they're called one wire as well as the DS18B20 (I'm guessing as many sensors can communicate through the one data wire)

Yes each wire is soldered to a numbered pin on a connector, it doesn't matter which wire goes to which number so long as the split wire is soldered to the same number I.e if you soldered red to pin 1 you'd need to solder the other half to the wire to pin 1 as well
 
Subbed.

I will be building one of these to control my mini fridge kegerator/fermentation chamber.

I am building one, too. I just started brewing again after a long dry spell (40 years, OMG), so many new things here. I am in the process of converting a fridge into a fermentation chamber and am planning to eventually use the BrewPi setup described by FuzzeWuzze in an earlier thread. I plan on using an STC1000 to control the temperature until the BrewPi system is up and running. This will tell me if the new fridge is able to maintain the set temperature. Just got the Raspberry Pi board today and hooked it up and installed everything successfully. Now I'm just waiting on the temperature probes and need to wire up the Arduino board. I am a retired programmer and I was surprised that I could still remember some of this stuff (I'm an old Unix/C guy from way back). A lot of things happened that weren't covered but I was able to resolve them and finished successfully. My other half tells me I'm a geek and I guess maybe I am to some degree, but now the geek has beer!
 
After 2 weeks of building my first RPi and bench testing in many profile ways, I thought I had it to the point that I could take it to my Brewery and go LIVE...
I got the WiFi working with 3 outa 4 bars, the Script is running and here are my settings - After 9 hours of Idleing - Beer Temp = 64.5, Beer Set Point 67.2!!
My Pin settings - Beer Temp. Device 0 Pin A4/ Room Temp. Device 1 Pin A4// Chamber Heater Device 2 Pin 5/ and Chamber Cooler Device 3 Pin 6.
I do NOT have a fridge set up, only Conical Fermenters with Flex Watt Heat Strips wrapped around them n insulated. So, I really do not need Chamber cooling.
All seemed to "work" fine, with multiple new Beer Profiles set up and ran....
WHY is my PI now sitting there forever in IDLE mode???:confused:
I will have to go back to my Ink Bird "STC-1000" that I built, and works well. My poor Yorkshire Square Nut Brown Ale is now 64.5 and slowly falling......NO HEAT relay kicking in!

UPDATE! - After researching all over the web, I found this -http://ask.brewpi.com/question/283/brewpi-never-leaves-idle/

I did reprogram Arduino and then reset and stored my devices. I then changed ROOM TEMP. to CHANBER TEMP......and the heater kicked on!
Not sure what I did that actually fixed this....I did bench test with only Beer Temp and Room Temp. as my temperature sensors, and it did work the actuators for heating! Maybe it was just a dream....
 
Last edited:
After 2 weeks of building my first RPi and bench testing in many profile ways, I thought I had it to the point that I could take it to my Brewery and go LIVE...

I got the WiFi working with 3 outa 4 bars, the Script is running and here are my settings - After 9 hours of Idleing - Beer Temp = 64.5, Beer Set Point 67.2!!

My Pin settings - Beer Temp. Device 0 Pin A4/ Room Temp. Device 1 Pin A4// Chamber Heater Device 2 Pin 5/ and Chamber Cooler Device 3 Pin 6.

I do NOT have a fridge set up, only Conical Fermenters with Flex Watt Heat Strips wrapped around them n insulated. So, I really do not need Chamber cooling.

All seemed to "work" fine, with multiple new Beer Profiles set up and ran....

WHY is my PI now sitting there forever in IDLE mode???:confused:

I will have to go back to my Ink Bird "STC-1000" that I built, and works well. My poor Yorkshire Square Nut Brown Ale is now 64.5 and slowly falling......NO HEAT relay kicking in!


UPDATE! - After researching all over the web, I found this -http://ask.brewpi.com/question/283/brewpi-never-leaves-idle/


I did reprogram Arduino and then reset and stored my devices. I then changed ROOM TEMP. to CHANBER TEMP......and the heater kicked on!

Not sure what I did that actually fixed this....I did bench test with only Beer Temp and Room Temp. as my temperature sensors, and it did work the actuators for heating! Maybe it was just a dream....


You fixed it by changing room temp to chamber temp. Room temp is just for logging and doesn't affect the PID at all. You can basically forget about room temp all together if you want.
 
Ordered a bag of Dupont jumpers and a couple shift registers but I'm not sure what I need for resistors and capacitors. The only thing I have is 4.7k Resistors from the original build without a LCD.

I searched through the thread somewhat and BrewPi's site but couldn't find anything.

I have a thread that covers adding an LCD to an Uno running the BrewPi code. The only thing missing is the p-fet for turning off the LCD backlight - I've been waiting for the rotary encoder switches to show up...

Cheers!
 
I had it all working before I built my enclosure. I wanted to make a quick connect for the temp probes from a stereo plug/jack. This was my first time soldering so hopefully I did it right. But now the temp probes aren't detected at all. Did I wire them wrong?View attachment ImageUploadedByHome Brew1422192329.644041.jpg
Sleeve = Ground
Ring = Data
Tip = 5V

For reference, here's my breadboard with one probe attached.
View attachment ImageUploadedByHome Brew1422192443.866351.jpg

Is it possible that the wires are not touching the lead from the stereo jack and the solder holding them together isn't conductive enough?
 
Thanks wbarber69. Yes, I see that if you set your second sensor to Room Temp, this will NOT be used in the Algorithm, but only just for logging data!
I forgot this fact of the BrePi.

I do not use a "Chamber". My Conical Fermenter is wrapped with Flex-Watt Heat Tape and insulated. This works great for Ales in my basement here in cold Pittsburgh Winters and most of the Summer.

I will be posting soon, how I used a window A/C unit to act as a Chiller for a submersible Chiller Coil, for making Lagers and in the Summer, when my basement may get too warm for my beer profile to work. Waiting for the weather to warm up and document putting it all back together.
 
Last edited:
Have you got a Resitor between data and 5v?


I have the resistor in place and I tried resoldering the connections in hopes more of the wire was in contact with the pin. I'm going to try a spare probe directly into the breadboard and see if that works.
 
I do miss seeing this.

What are you Fermenting in this screen shot? Looks like programing-language-beer! Yum Yum!

I do LOVE just sitting in front of the Pi screen, with a beer of course, and just watch it do its thing! So much more fun then hust having a dumb Johnson Control. Never thought I would see the day that my Brews are now within one-tenth of a degree from my set point and running profile ! :D
 
Thanks wbarber69. Yes, I see that if you set your second sensor to Room Temp, this will NOT be used in the Algorithm, but only just for logging data!

I forgot this fact of the BrePi.


I do not use a "Chamber". My Conical Fermenter is wrapped with Flex-Watt Heat Tape and insulated. This works great for Ales in my basement here in cold Pittsburgh Winters and most of the Summer.


I will be posting soon, how I used a window A/C unit to act as a Chiller for a submersible Chiller Coil, for making Lagers and in the Summer, when my basement may get too warm for my beer profile to work. Waiting for the weather to warm up and document putting it all back together.


You must use the chamber temp controller to get any results from brewpi. I use fermwraps in my setup and I place the chamber temp probe under the heat tape against the wall of the fermenter. It's worked flawlessly so far.
 
What are you Fermenting in this screen shot? Looks like programing-language-beer! Yum Yum!


I do LOVE just sitting in front of the Pi screen, with a beer of course, and just watch it do its thing! So much more fun then hust having a dumb Johnson Control. Never thought I would see the day that my Brews are now within one-tenth of a degree from my set point and running profile ! :D


It's a white American pale ale. It uses 3lbs of raw honey in the fermenter. Which does a great job of keeping itself warm. All I have to do is watch for the moment when the software has to start heating more to maintain temps. Then I toss in the dry hops and let them sit for about 4 days. Back up to 72 for 2 days then a cold crash before kegging.
 
View attachment 251537
These are my detected devices. I tried plugging a spare probe directly onto the breadboard and nothing was detected. Could my breadboard be defective?

Unlikely, there's hardly anything there to break, yes?

So, what is wired to what right now? Just the spare probe to A4 with a pull-up, plus power and ground?

Cheers!
 
View attachment ImageUploadedByHome Brew1422234946.955191.jpg
These are the installed devices which I believe are the relay switches.

As it's wired here, I have a soldered temp probe plugged in, but i got the same result plugging the wires of a spare probe into the breadboard.
View attachment ImageUploadedByHome Brew1422235167.611090.jpg
View attachment ImageUploadedByHome Brew1422235239.942742.jpg

I'll keep messing with it. I'm sure it's something simple that I'm overlooking, especially since it worked previously.
 
When you plugged in the spare did you disconnect the "soldered" probe connections?

Strip it back to what you had working...

Cheers!
 
Start by reducing your wires down to just what is needed. Turn the resistor so you can access all 5 ports on the single bus attached to a4, reducing the wires by 1.
 
When you plugged in the spare did you disconnect the "soldered" probe connections?

Strip it back to what you had working...

Cheers!


Ok, I stripped it back to how it worked before with the 'spare' probe and some connectors to hook it up to the board. I forgot to use the connectors last time I tried the spare and it probably didn't make a good enough connection, because now it works. View attachment ImageUploadedByHome Brew1422238325.035577.jpg

I'm starting to think I have some dud temp probes.
 
I'm thinking your soldered connectors are at the root of your current problems.

I'd remove the connectors and re-test each probe.

Then verify that you actually bought stereo plugs and receptacles and not mono headphone receptacles...

Cheers!
 
Status
Not open for further replies.

Latest posts

Back
Top