The thing about the SSR is they only allow like 2A so assuming your heater is > 240 watts, that's likely too much. So, back to the relays. They should work fine.
Yes, that LCD will work as well.
Yes, that LCD will work as well.

Ok, I have a pi a bit out of date it's a 3b... But I'm happy to get a new one if it not enough... I'll purchase the other items and start the build unless otherwise advised.If you can find one, stick with the RPi3B or 3B+. The 4 is pyrotechnic, frankly not worth the effort to keep it from frying itself for something as mundane as BrewPi management...
Cheers!
The clear advantage of the 3 vs the 2 is having onboard WiFi and Bluetooth so no dongles. The 3B+ has an advantage over the 3B since it supports 802.11ac vs the B (and the Zero W) which only supports 802.11n (and will slow down your home wireless.)fwiw, even a 3B is overkill for multi-instance BrewPi plus a tap list manager like RaspberryPints.
I run four BrewPi minions over Bluetooth plus the tap list manager and a few other cold-side brewery functions on a 2B just fine...

Yep, replaced the Arduino, relays, and outlet. It's really strange because it was running fine and then half way through a fermentation it just started acting up. I was controlling the Arduini through a PC and even switched to a raspberrypi with the same results.When you say you've replaced all parts, did you replace the Arduino? Other than suspecting you are making too many changes at once, I don't have too many tips for you. Erase EEPROM, re-flash the Arduino, and add one device at a time. Assuming you are using a relay, set it to "non-inverted" and observe that the relay turns on. Set it back to "inverted" for normal operation. If the relay does not turn on in that manner then you more than likely have a wiring issue.
I’m traveling through tomorrow. If I can’t get to it remotely (dev box at home) it will be Wed.Lbussy, you mentioned that you recommend a custom image for my setup with using Glycol chilling as the time restraints may be an issue. Can you provide me a link to download? I will be receiving my hardware today.
What version of the firmware? What power supply?Yep, replaced the Arduino, relays, and outlet. It's really strange because it was running fine and then half way through a fermentation it just started acting up. I was controlling the Arduini through a PC and even switched to a raspberrypi with the same results.
Those are not errors, it’s telling you it’s never been flashed (true) and asking you what version you want. You asked about the I2C previously so I assume that’s the one you want. You can play with that till I get you the version which will be more compatible with glycol.
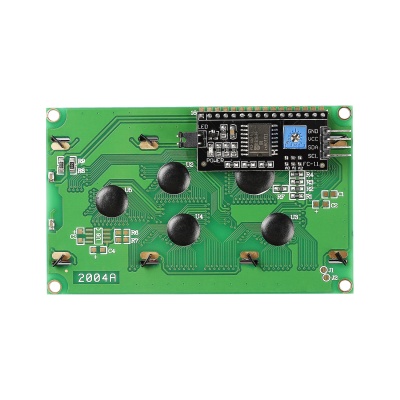
Turn the blue pot on the back of the lcd. I had to turn mine 20 revs to get the data to display
We were forced to go to PHP7 (from 5) which might have but that would only happen when you are actually viewing the web page. If you are leaving a display up constantly then yes, that could add additional load.Disregard this, I placed a fan in the box and no problems since. It's crazy I've fermented around 100 or so batches with this prior to uploading the new program and never a single problem. Within 8 hours of running the new program it overheats, I guess the new program has more requirements.
I don't understand why that was necessary. The logs you posted are as I would have expected - you only needed to select which type (I2C or RevC) to flash.Ok, I have had some success with flashing my uno. I had to do it via windows using Arduino Sketch Uploader for Windows
If you flashed the I2C hex, you need to use A0 for the temp sensor instead of A4 since A4/5 are for the LCD.However, now my LCD does not display anything. I belive this is due to a pin conflict or not having the correct LCD driver included in the "Hex" file? Is there a way to include the LCD driver that I need?
Ok, I have made progress. I now have my temp sensors reading ( at least in the maintenance panel -> device refresh with read values. I also have my LCD ( i2c ) working once I found the proper 12c hex file and flashed my arduino manually via windows as I can not get the flashing to work from the gui.
However, in the maintenance panel, I can seem to get the device settings to apply. If I change my Device 0 or 1 which are detected as my OneWire temp sensors to a proper device slot, and function and click apply the log windows says:
Device config command sent, U:{"i":"3","c":"1","b":"0","f":"3","h":"1","p":"5","x":"1"}
But if I click refresh the devices are always back to unassigned.
Please help if you can while I work my google fu...
Also, although my LCD is now working it turns off after a bit and never returns unless I reset the arduino, I have read people talking about the "roatary"? what is this?
Thank you all again for your great support to my endeavors.
You need to pull pin 7 down I believe (jump to gnd) to disable dimming. The rotary encoder which you don’t have I guess is how you get it to turn back on. Think of it as a screensaver.
You need to pull pin 7 down I believe (jump to gnd) to disable dimming. The rotary encoder which you don’t have I guess is how you get it to turn back on. Think of it as a screensaver.
I can confirm this I had the same problem and connecting pin 7 to the ground keeps the I2c display on.
Just another question is BrewPi Remix supporting iSpindle? I just received my kit today and I would like to test it with my next brew.
Ok, thank you I just would like to clarify as I am not very good with these components... pin 7 of which component?
I have attempted jumpering pin 7 of the LCD board to ground and the LCD still turns off at 1 minute.
Not quite. I have the bones in there but I need to finish the endpoint for it. That’s the same work I have to do for my new project (how’s that for a subtle hint?) so it should be pretty soon.Just another question is BrewPi Remix supporting iSpindle? I just received my kit today and I would like to test it with my next brew.
Your probably right I never tried it that way since I already had it off... I'll try that tomorrow. Thanks.Same here, with the jumper installed the four wire interface is all that's needed...
Cheers!
Enter your email address to join: